TIPS & HOW TO
WINDOW WISE: A guide to planning, framing and installing a new window

Allan Britnell

With only basic tools it’s possible to add a window to your home with relative ease.
At its easiest, this is a job any DIYer can handle. On the other hand, if things aren’t stacked in your favour, though you don’t yet know it, here are some tips on how to decide if this project is something you should take on.
Here’s a word to add to your vocabulary: fenestration. It’s a term used to describe the windows, doors, and other openings in a building. And if you’re comfortable using a hammer, saw, and drill, you’re likely capable of getting into the home fenestration business. Specifically, adding a new window to your house. If the thought of poking holes in your home’s building envelope seems a little too intimidating, the same steps could be used to add natural light to a garage, shed or a Bunkie at the cottage.
The fine print
Before you start ripping open walls you should contact your local building department. For one, you’ll likely need a building permit to add a window. Some municipalities also limit the size and number of openings you’re allowed in a home. If you’ve decided you want add a large picture window in your dining room to capture the morning light, you may be required to close up an existing window elsewhere in the house to do so. If you are working on an existing wall, you’ll need to carefully remove the vapour barrier and insulation, and reinstall it once you’re done. And, of course, along with building the window frame, you’ll need to know how to install the window properly, and finish off the job inside and out once it’s in place (more on that later).
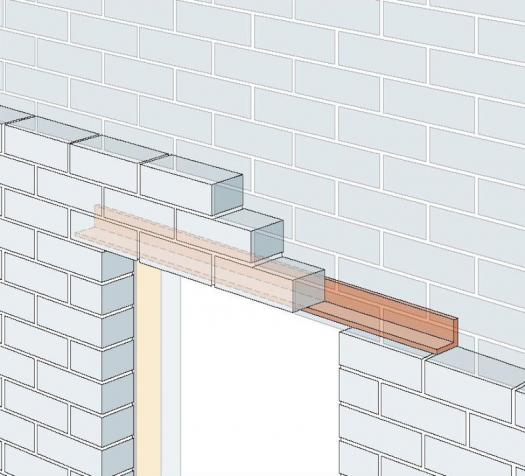
Perhaps the biggest caveat of all: beware the brick house. The framing on the inside is essentially the same regardless of the exterior cladding. But if you’re removing bricks, you’ll need to support the load above them, usually by installing a steel lintel across the top of the new opening. This can be finicky – and structurally significant – work that’s probably best left to a mason.
Demo Derby
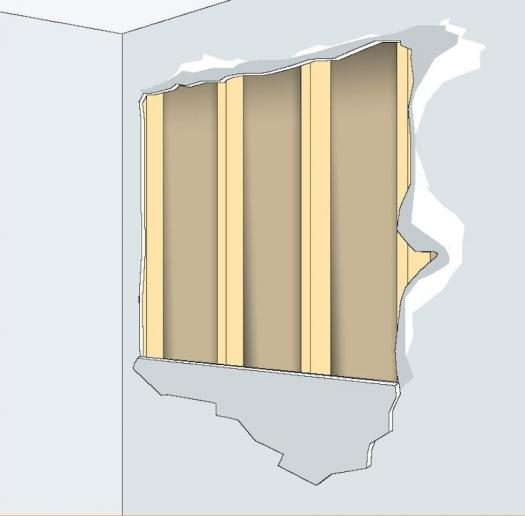
If this is a retrofit project, before you pick up the tools you need to do a bit of planning to figure out where your new window will go. While the ideal spot to catch morning light or the sun as it sets might be on one particular wall, the project gets exponentially more complicated if there’s plumbing, wiring, or duct work running where you’d like your future window to be.
If your basement (or crawlspace) is unfinished, you might be able to see where all the mechanicals run to help narrow down the location list. If you don’t have a sophisticated sensor that can detect plumbing and wiring behind walls, you’ll have to open up the drywall (or other wall finish) to make sure you have a clear path to the great outdoors before you begin. Ultimately, you’ll need to remove enough of the existing interior wall to give you room to install all the new framing members. It may not be the end of the world if you have to hire a plumber or electrician to re-route one line, but re-running ductwork can be a messy, complicated project.
From the Ground Up
In most Canadian jurisdictions, you don’t need a building permit to construct a building such as a shed or a cottage bunkie if it has a footprint of 108-sq.ft (10 sq. metres) or less. Building new means you also avoid a lot of the retrofitting hurdles such as re-routing existing wiring, ensuring the insulation and vapour barrier remain continuous, and matching the interior and exterior finishes to products that may no longer be available.
New construction also gives you the advantage of being able to place your window in the ideal location to capture the light. To do so, you’ll want to stand on the site at different times of day to see how the sunlight will hit the structure to determine the best positions for window placement to catch the rising and setting sun, or avoid the direct daylight if keeping the space cool is a priority.
If the window you’re installing is a casement window (one with hinges on the side, see “A Word About Windows”), you’ll also want to consider the direction of the prevailing wind, and have the hinged side of the window positioned so that it catches the breeze when opened.
Get to Work
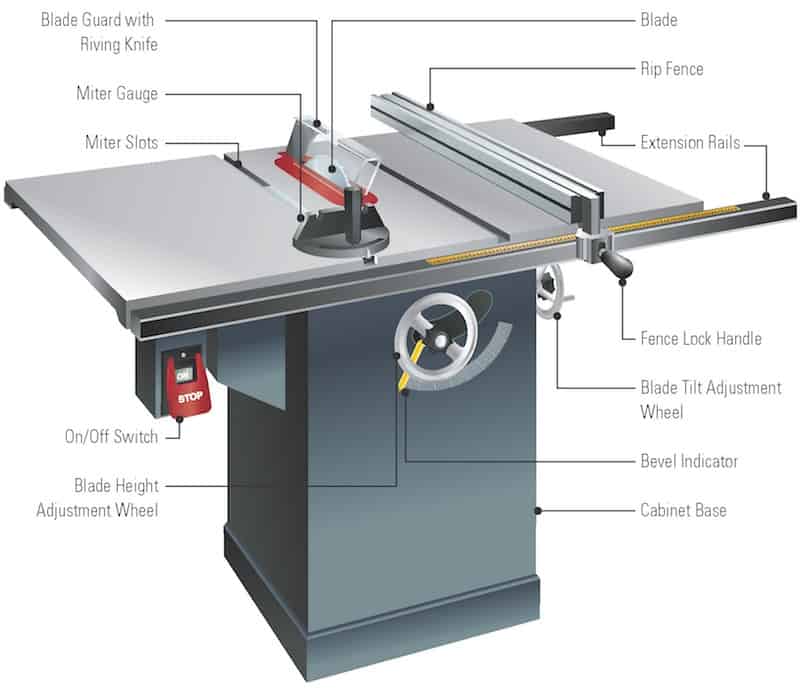
Now that you’re ready to pick up the tools, this next part is relatively straightforward. The tools in question are fairly basic: a tape measure, level, something to cut lumber, and something else to drive the nails. For the latter two, you can use either power tools or, if you’re feeling particularly old-school, hand tools.
First, let’s go over a bit more terminology. You don’t necessarily need to memorize these terms, but they’ll help you keep the components and steps in order.
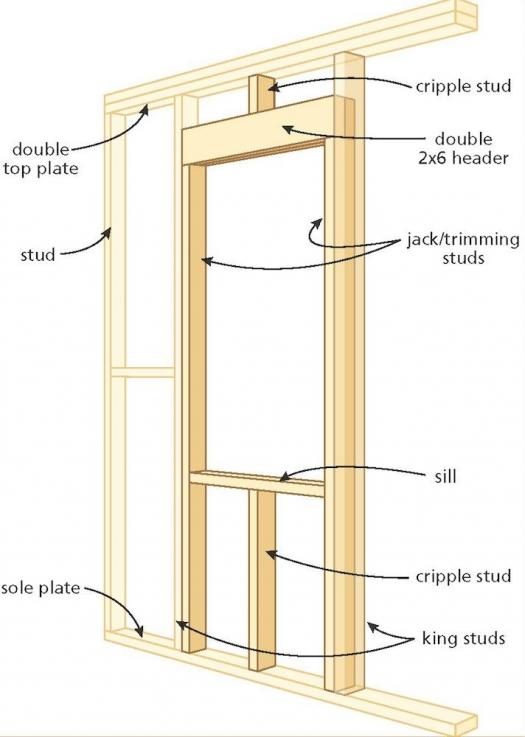
Starting at ground level, you’ve got your bottom (or sole) plate, a single two- or three-by piece of lumber laid horizontally, flush with the outer edge of the floor. King studs are toe-nailed (driven in at a roughly 50°) into the top of the bottom plate, and run vertically, supporting the top plate, a doubled up horizontal lumber sandwich that spans the width of the wall.
You’ll be installing jack studs (also known as trimmer studs) on the inside of the king studs. On top of the jack studs rests the header, typically a doubled-up 2×6 that sits with the wide side upright. Depending on the width of the window, you’ll also need one or more cripple studs, short length of lumber that support the sill and connect the header to the top plate.
In retrofit situations, ideally, you’ll be able to incorporate one or both of the original king studs. If the positioning doesn’t work, you’ll have to use additional cripple studs to support the sill.
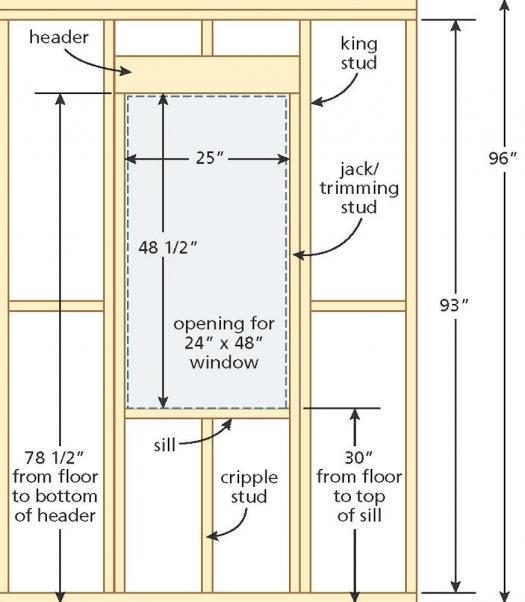
As an example, we’ll use a 24″ wide by 48″ high window, set into an 8′ high wall, with a windowsill that’s 30″ above the floor to calculate your cutting list and to show where everything should go. Adjust the measurements accordingly to suit the window you’re installing.
While the window will sit on the sill, you’ll want about a 1/2″ gap on either side of the window and between the top of the window and the header to give you clearance to get it into the opening, then level it with shims as needed. You’ll fill the gap with spray foam insulation after the window is secured to the frame.
The order of installation is as follows:
- Nail your jack studs to the king studs.
- Install the header on top of the jack studs.
- Level and install the sill.
- Install top and bottom cripple studs.
Check that your opening is square by measuring diagonally across it from both sides. The two measurements should be within 1/8″. If it’s off, adjust, or use shims to level the window before screwing it to the frame.
If the window is new, follow the instructions that came with it. If your window is second-hand, set it in the opening and get it leveled horizontally. Use 3″ screws and drive them through the window frame into the jack and king studs. Use two or three screws to affix both sides of the framing.
Finishing Touches
Once the window is installed, you’ll need to apply casing trim that matches the other windows in the house and possibly do some touch-up painting. On the exterior, use foam insulation or caulking to seal the gaps between the window and frame. You’ll also need to match the existing siding or other cladding. That’s the easy part. The hard part? Trying to casually work the word “fenestration” into a conversation.
A Word About Windows
Windows come in all shapes, sizes, and styles. Here’s a quick rundown of the basic types so you can talk the talk.
•Awning: Windows that are hinged at the top.
•Bay/Bow: Multi-paneled windows that sit on a frame that projects out from the building.
•Casement: Windows that are hinged on the left or right side.
•Fixed/picture: Non-opening windows.
•Hopper: Windows that are hinged at the bottom.
•Horizontal slider: The name says it all.
•Single-hung/double-hung: Windows that slide vertically. Singlehung means one is operational and one is fixed.
•Tilt-and-turn (or “Euro-style”): Windows with two sets of hinges; one on the side like a casement, and another set on the bottom, allowing the top to swing in.
Photos credit: Lead Photo by Dreamstime
Brick is Tricky
When the exterior of your home is brick you might be best to call a professional mason. Brick needs to be supported directly above where any cuts are made so they don’t crumble, crack or fall off your home.
Inside View
Once you have selected your window location you need to make sure no plumbing or wiring will impede your progress. If you don’t have expensive sensors, simply removing the drywall is the best approach. It’s possible to re-route plumbing or wiring, but it is a bigger job.
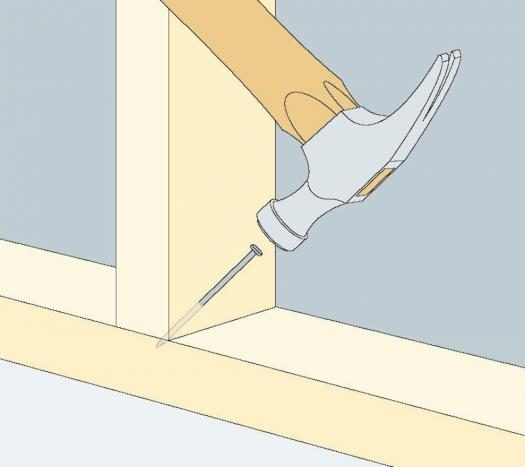
Toe-Nailing
To secure the king studs, a technique called toenailing needs to be used to drive nails, at an angle, into the upper surface of the bottom plate. The king studs will travel upwards to the top plate, and provide much of the support needed to create a strong wall.