TIPS & HOW TO
The Well-Dressed Board

Vic Tesolin

How you prepare your stock will have an impact on the quality of work that you do.
One of the biggest frustrations faced by novice woodworkers is the acquisition and preparation of lumber for their projects. Where you purchase your stock will determine how much work you will need to do before your material is ready to use.
Buy Lumber Dressed or Rough
Woodworkers typically purchase lumber rough or dressed. Dressed boards have been surfaced on two sides (S2S) and sometimes four sides (S4S). They are typically available in ¾” thicknesses and in limited widths and lengths. This can be a good solution if you lack a jointer and thickness planer to dress rough stock. Unfortunately, this also means that you will need to work with the material as you purchased it.
Wood is hydroscopic, which means that the ambient environmental conditions will cause it to move with changes in temperature and humidity. Even though dressed lumber will have left the mill kiln dried, straight and flat, it will still have plenty of opportunities to do the twist before it finally becomes part of your project. It’s not unusual to have lumber cup, bow, crook or twist within a few days of entering your shop. Once the lumber has adjusted to the relative humidity in your shop it will need further milling to make it straight and flat again, further reducing its initial dimensions. A moisture meter will help you determine when your wood is ready to work.
Rough lumber is typically available in thicknesses from 1″ (referred to as 4/4) to 4″ (referred to as 16/4). This wide range of thicknesses gives you considerably more control over the final appearance of the wood you will use. As with dressed lumber, rough boards will have been kiln dried, and will likely undergo some movement by the time they are acclimatized in your shop.
The large nationwide building supply outlets typically carry dressed softwood lumber with an emphasis on construction grade stock. You’ll find little in the way of hardwood, and what is available is usually highly priced. Local or regional building supply outlets often seem to carry a wider range of lumber, though in fairly limited grades, species and sizes.
Purchasing your lumber from a lumber dealer gives you access to a much wider range of species, grades and stock sizes. Typically prices will be much lower. Even if there are no lumber dealers in your vicinity, many dealers will ship the lumber to you. The cost of shipping lumber is not as high as you might think, in many cases adding no more than a dollar per board foot to your bill.
You can, of course, purchase lumber from a local sawmill, or mill your own lumber to custom sizes. This will provide you with ultimate control over your stock, giving your work a look that sets it apart. In either case, you will need to stack and air dry the lumber until it dries – usually about one year per inch of thickness. You’ll also want to purchase a metal detector and check the lumber for imbedded metal objects.
Ensure Your Machines Are Accurately Aligned
Precise joinery is directly dependant on your initial stock preparation. Following a specific order of operations is critical if you want to end up with stock that is square, flat and the correct thickness. Before you begin preparing stock for a new project take the time to check your machines to be sure they are set up properly. This will include your jointer, thickness planer and table saw. Here is a quick checklist that we run through in our shop before beginning each project. Note that this doesn’t replace a regular schedule of cleaning and aligning shop machinery.
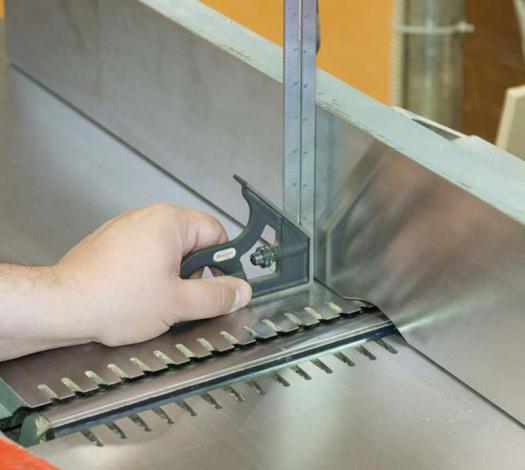
• Use a try square to check that the fence on the jointer is square to the table.
• Use a straightedge to check that the outfeed table is even with the top of the cutterhead knives.
• Use a straightedge to ensure that the infeed and outfeed tables on the thickness planer are flush to the bed.
• Use a try square to check that the table saw blade is aligned square to the top.
• Visually inspect the blades on the jointer, planer and table saw to determine whether they need to be honed or re-sharpened.
The following sequence of steps takes you through the milling process in a logical manner.
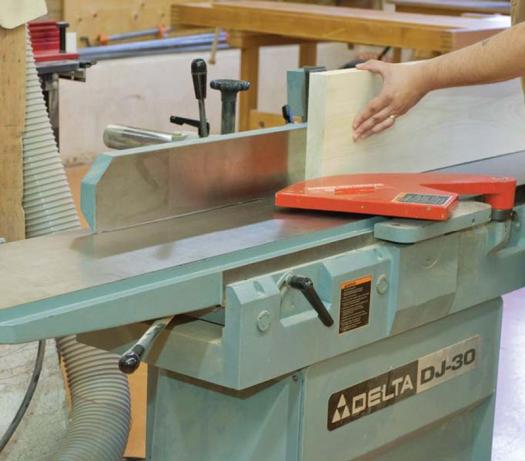
Step 1 Flatten one face on the jointer.
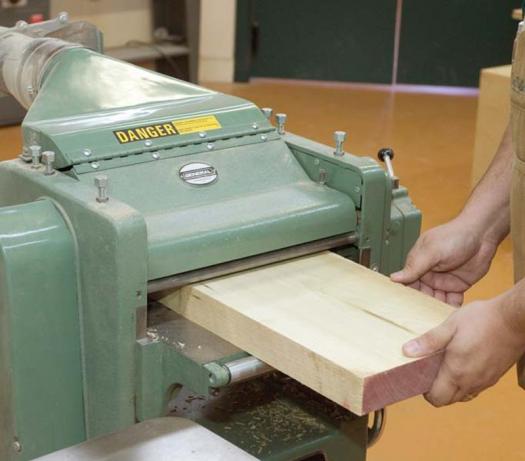
Step 2 Flatten the other face in the thickness planer.
Step 3 Square one edge on the jointer.
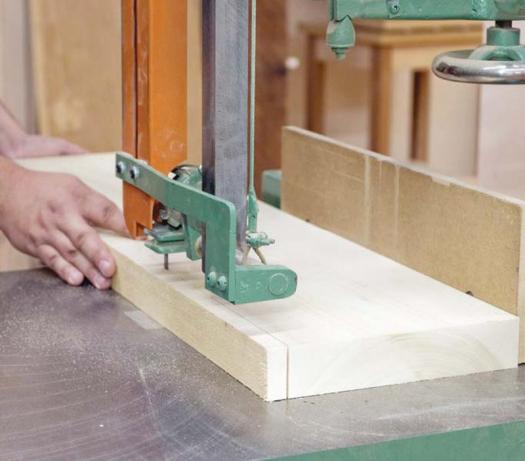
Step 4 Rip the other edge square on the table saw.
Step 5 Cut the ends square on the table saw.
Flatten One Face
To select the correct face to flatten on the jointer, take a look at the board from one end. In almost every case it will exhibit a curve from one edge to the other.
This is commonly referred to as cupping. To keep the board stable on the jointer and to minimize waste, joint the concave side first. As with all woodworking, grain direction also plays an important part when jointing a board. Wood fibres are best cut when they are under tension so place the board on the jointer so that the grain leaves the edge of the board in the same direction as the knives are cutting. A board whose fibres are being cut under tension will have a smooth purring sound when feeding the board; milling against the grain direction will result in a harsh sound as if the knives were being hammered into the wood. On some boards it may be difficult to determine the grain orientation, particularly with heavily figured lumber. In such cases run the boards in alternate directions to determine the best direction of cut.
While it does take a little longer, we prefer to make several light passes on the jointer, taking off no more than 1/16″, rather than a few heavy ones. It takes a little longer but it provides you with feedback as you progress. If there is a fair bit of tear out, reverse the board for subsequent passes. Continue jointing the face of the board until all rough sections have been planed smooth. For the final pass reduce the depth of cut to 1/32″. If you are jointing boards longer than about 4′, particularly on a bench top jointer or a stationary jointer with a short outfeed table, it is good practice to use an outfeed roller stand.
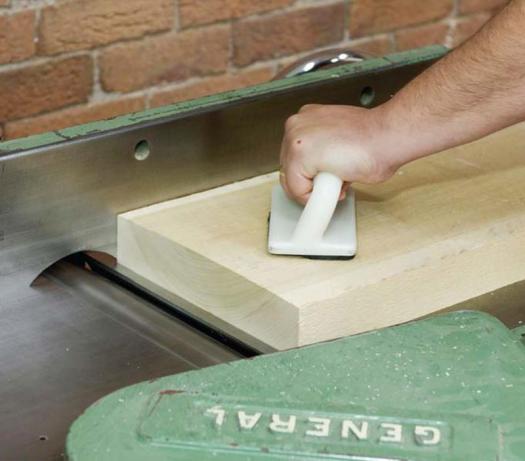
Flatten the Other Face
The second step is to flatten the other face by running the board through the thickness planer. Many woodworkers often think that a thickness planer can serve both as a jointer and as a thickness planer; this is a mistake that can lead to much frustration later when cutting joinery. To flatten a board, the jointer uses an infeed table that is offset in height from the knives and outfeed table; a thickness planer has a fixed table underneath a set of knives in a cutterhead assembly that is raised and lowered. This assembly exerts enough downward force on the stock so that it will flatten out any bowed or cupped board and dress the one side.
After the board comes out of the planer, the downward pressure from the cutter head is removed and the board springs back into its previous shape, albeit with one smooth side. Always flatten one face of your material on the jointer first before heading to the thickness planer. Run the stock through the planer until you have arrived at your desired thickness. If the board is narrow enough you can feed it into the planer at an angle. This helps reduce tear-out on highly figured lumber.
Square One Edge
At this stage you will have a board that is flat and has a consistent thickness from one end to the other. The next step is to head back to the jointer to dress one edge of the board. Determine which direction the grain is running and then run the board over the jointer with one of the finished faces up against the jointer fence. If you have set your fence correctly, when you have milled away the rough edge you should be left with a smooth edge that is exactly 90º to the first two faces.
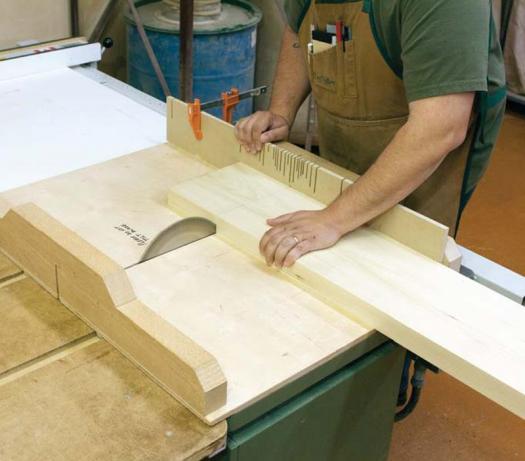
Square the Other Edge
Now head over to the band saw or table saw and rip the boards to width. Check the settings on your saw and be sure that your blade is set to 90º and is parallel to the fence to prevent burning or kickback. Use a good quality blade and rip the pieces to width. You can rip the pieces about 1/16″ wider than their final dimensions, and then run these pieces through the thickness planer standing on edge to remove any saw marks. This will also ensure that every piece is exactly the same width as the next. For stock that is less than 1/2″ wide run several pieces through the planer side-by-side.
Square the Ends
The last step is to trim the ends square and the boards to length. For this you can either use the mitre gauge or crosscut fence on the table saw, a cross cut sled, or the mitre saw. Depending on what you will be using the wood for, this may be sufficient preparation.
There are, of course, some variations and enhancements to this process. Some woodworkers rough cut lumber to within ¼” of finished dimension on the band saw before milling the lumber. This reduces the amount of stock that needs to be jointed and thickness planed, and hence reduces the volume of sawdust generated, and lessens the wear on knives.
When milling rough lumber it is good practice to joint and thickness your stock to within 1/8″ or so of finished dimension, sticker it, and then let it acclimatize to the relative humidity level in your shop. This usually takes at least a week. Once the lumber is stable you can then mill it to final dimensions.
Straight, square and flat stock is the foundation that the rest of your project is built on so time spent dressing your stock properly will pay off later during construction and assembly.
In the Good Old Days
Almost every piece of machinery in a woodworking shop is designed to work with lumber that is straight, flat and square. Before power tools became commonplace in home shops, lumber was dressed with a succession of specialized hand planes. Almost every woodworker these days will opt to dress his or her lumber with a powered jointer and thickness planer. Try dressing 50 board feet of 4/4 cherry for a project using hand tools alone, and the reason will become clear in short order. However, once lumber is dressed you will still need to remove the milling marks – those tiny ridges left by the jointer and planer. Here, of course, is where hand planes shine, and the enjoyment of hand planing truly begins.
Photos credit: Carl Duguay
Check that jointer fence is square
1. Flatten one face on jointer
2. Flatten other face on planer
3. Square one edge on jointer
4. Rip other edge square on band saw
5. Cut ends square on table saw