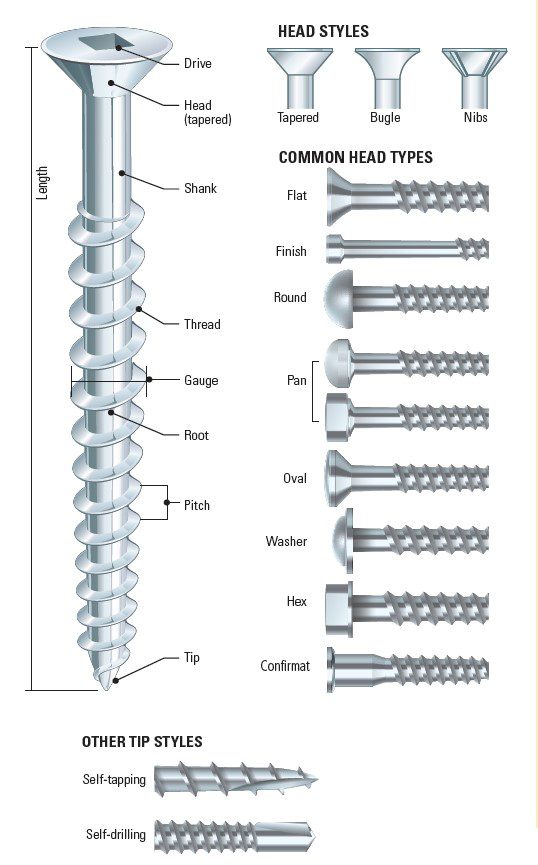
TIPS & HOW TO
Stains

Carl Duguay

A stain is a liquid substance that, when applied to wood penetrates the surface, imparting a rich colour.
The two most common types of stains are pigments (which cover the wood), and dyes (which penetrate the wood). Today, many manufacturers combine both pigments and dyes into a single blended stain.
Pigments
Pigments are fine insoluble particles of inert chemical compounds, which can be natural (like iron oxides) or synthetic. A carrier (mineral spirits, lacquer thinner, or water) serves to spread the pigment over the wood, and a binder (such as varnish or lacquer) acts as an adhesive to glue the pigment to the surface of the wood. Because pigment particles are heavier than the binder, they settle to the bottom of a can – which is why you have to stir these stains before using them. That big glob at the bottom of the can is a sure indicator that the can contains a pigment stain.
Pigment particles lodge in the pores and scratches on a wood surface, exaggerating grain differences. A pigment stain on oak tends to colour the early wood pores more darkly than the denser latewood. However, on maple, the stain would be much less pronounced because the pores are so small.
Dyes
While pigments cover the surface of wood, much like paint, dyes are absorbed into the fibrous structure of wood. Dyes can also be natural or synthetic. Like pigments they require a carrier, but they don’t use a binder. This is because dye particles, which are about 1/1000th the size of pigment particles, are dissolved in the carrier, while pigment particles are suspended in the carrier. Because dye particles are dispersed uniformly throughout the stain they don’t have to be stirred. Like pigments, dyes can be dissolved in water, alcohol, petroleum distillates like naphtha, and in glycol ethers for non-grain raising (NGR) dyes.
While natural dyes are prone to fading, modern synthetic dyes are quite fade resistant (when used indoors). The nice thing about dyes is that you can apply one colour directly on top another colour You can purchase dyes as powders or pre-mixed in a solvent.
Chemical Stains
Sometimes you’ll read about people using various chemicals to colour wood. These include potassium dichromate, ammonium hydroxide and sodium hydroxide. Most of these chemicals are both poisonous and caustic, so we recommend that you avoid them. There are so many pigment and dye stain colours available today that you’ll certainly find the right one for your project.
Minwax Stains
I’ve been using Minwax stains for several years with great success. They come in several formats (water based, oil based, gel, and blended with a polyurethane finish. One of the things I particularly like is that they are available in a wide range of colours, and I find that the same colours are consistent from can to can.
While the Minwax Water Based Wood Stain is easy to use, I find that it dries too fast for anything but the smallest projects. It also raises the grain on many woods because the water penetrates the wood and raises the tiny fibers. I dampen the wood and then lightly sand it before applying the stain. One of the main benefits of this stain is that it is compatible under any finish.
Minwax’s Wood Stain is an oil based pigment stain. This is the one I use most regularly on flat, horizontal surfaces. It dries more slowly than water based stain, giving me more time to apply it, particularly on large surfaces like table tops. I find that it adds more depth to the wood.
Neither of the two stains already mentioned work well on vertical work, or for work with a lot of detail. For this I use Minwax Gel Stain. This is a great product that doesn’t run, and seems to dry a bit slower than the Wood Stain. It’s especially good for use on carvings and turnings. And, it’s very easy to use – basically you rag it on, and rag it off.
Minwax PolyShades is a unique product, a pigment stain pre-mixed with polyurethane. The benefit of this product is that you do the staining and finishing together – an ideal proposition where time is of the essence. Of course you could still lay a couple of coats of polyurethane on top of this stain/finish for added durability.
Staining Tips
Staining wood is not difficult, just a bit messy sometimes.
You can apply most stains with a brush or rag. It’s important to note that different woods take stain differently. In fact, even one species of wood will take a stain differently depending on such factors as how the board was cut, the wood grain, and the relative density of the wood. Woods like pine, poplar, alder, and birch are notorious for blotching.
For blotch prone wood I apply a thinned coat of shellac before I apply the stain. I also apply shellac on the end grain, which has a tendency to absorb stain like a sponge and darken much more than the surface. It’s a good idea to do a trial run on scrap pieces before you begin staining your project. You can experiment by diluting the stain with its solvent (typically mineral spirits) or laying on two or three coats of stain (allowing each coat to dry in between, of course).
You really want to stir the contents of the can thoroughly before applying the stain. It’s important that all the pigment is dispersed in the liquid as opposed to sitting on the bottom of the can. Generally, if a wood is very hard and dense, you should sand to a coarser grit than if the wood is soft and porous. If you sand maple to 220 grit it will absorb very little stain; better to sand the maple to 150 grit. However with oak I tend to sand to a higher grit, often 320.
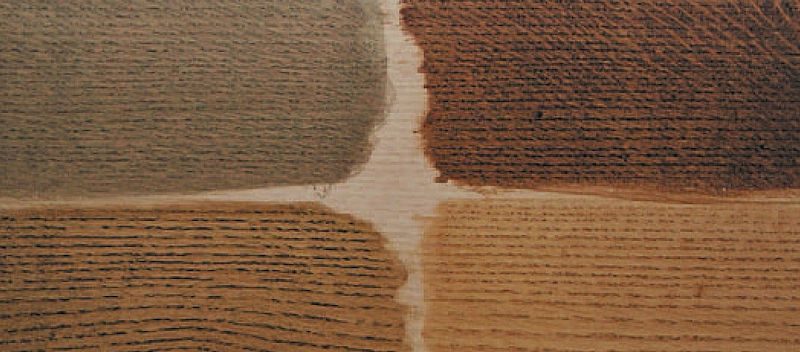
Top photo: one coat, bottom photo: two coats
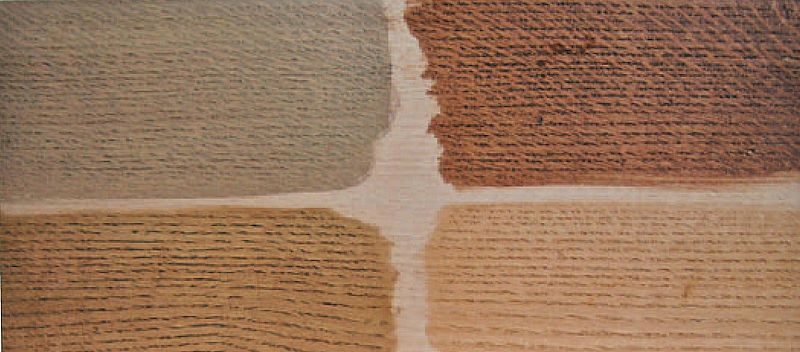
Clockwise from top left: Minwax Water Based “American Walnut”; Minwax Wood Stain “English Chestnut”; Minwax Gel Stain “Aged Oak”; Minwax PolyShades “Antique Walnut”