TIPS & HOW TO
Pierced carving

JASON KLAGER

Add texture and visual interest to your next project with these techniques.
I believe, if done sensibly, playing with such things as prismatics, colour, proportions or asymmetry can add visual interest to a piece of furniture. The introduction of texture takes this one step further, turning something that is visual into something tangible as well. One way to add texture is with pierced carvings. They can be used in a number of ways on a piece such as a door, lid, panel, table leg, etc. Using a panel from a recent vanity I built as an example, I will show the steps involved and share a few tips along the way to ensure your efforts become successful.
When designing this vanity, I decided to place a panel between the two drawers in the table to add visual interest and provide a way of accessing the secret box hidden behind. I wanted the image on the panel to be a simple continuation of another pierced carving of a tree silhouette located in the chest above, which balanced nicely with the leaf marquetry of the chest. After completing the drawing, I considered possible wood choices and decided to use East Indian Rosewood. I knew the rosewood’s density and fine grain would provide the strength I needed when working on the finer details of the carving, and its colour would blend harmoniously with the wenge table. Rosewood, like wax, is friendly to carve, gives a polished surface right off of the blade, which reduces time sanding, and enables you to remove material without the panel moving too much due to its stability.
Although you can glue a pierced panel into a veneered piece, I decided to go with frame and panel since this table presented certain design challenges. This method is normally used when working with solid wood. To prepare the panel, I brought it down gradually to a final thickness of 3/8″, a more critical step when working on larger panels. You will know right off the saw if the wood is under tension; if it is, you may need to allow the wood an extra day to relax before continuing to remove material. I routed a 1/8″ tongue around the perimeter of the panel and shaped a slight dome profile on the face using a chair scraper and files. At this point, I made small adjustments to fit the panel into its opening, a step that is better performed now than with the delicate finished carving. For other applications, such as creating a pierced carved lid or table leg, this would be the best time to mortise for hinges, drill pilot holes, or complete necessary joinery.
I transferred the drawing onto the panel using carbon paper. However, the dark colour of the rosewood made seeing the carbon outline difficult, so I went over it with a white pencil crayon. Taking the panel to the drill press, I drilled a pilot hole just inside the perimeter of each waste that was slightly larger then the #5 scroll saw blade I planned on using for the removal of each waste area. I also used smaller sized drill bits to remove the waste in the tight areas between some branches, which would have been difficult to remove later on with the scroll saw. I then took my Swiss cheese panel to the scroll saw and, starting with the middle section, slowly cut out each waste area.
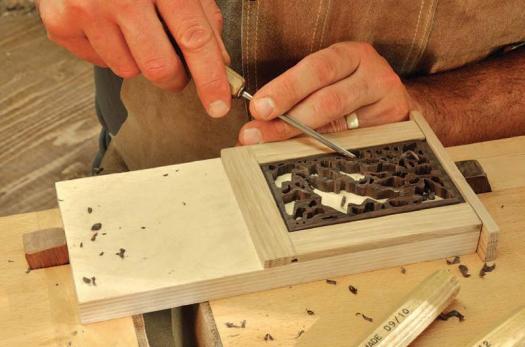
Bringing the panel back to the bench, I placed it into a custom- made holder to prevent any possible movement when using hand tools. I added a little more dimension using carving gouges and files, while still maintaining its overall impressionist appearance. The amount of detail and realism you want your panel to include depends on your personal preference. Although I kept things simple, one could spend several hours carving to achieve a three dimensional panel filled with intertwined branches. Once I had the shape I was looking for, I softened and rounded the edges using a file and sandpaper.
The finish you apply needs to go on easily and provide you with sufficient time to remove any excess. On this panel I used a three part mixture of Waterlox orginal satin, pure tung oil, and mineral spirits; once it dried, I applied a single coat of Clapham’s beeswax polish. I always like to pre-finish the separate parts of a piece before assembly to give me enough time to resolve any possible finishing issues and ensure crisp joints after glue-up.
To ensure you enjoy both the results and experience of pierce carving, it is important to carefully consider each step, from finding a suitable design to selecting an appropriate type of wood and deciding on the most effective methods for the removal of material. The possibilities are endless after creating a pierced carving, making it a sound option if one wishes to add a tangible difference to your upcoming piece.
Photos credit: Jason Klager Lead Photo by Ingeborg Suzanne
Transfer the Drawing
Once you have a sketch that you like, use tracing paper to transfer the design to the wood. Klager used a white pencil to lighten the line on the dark rosewood he was carving.

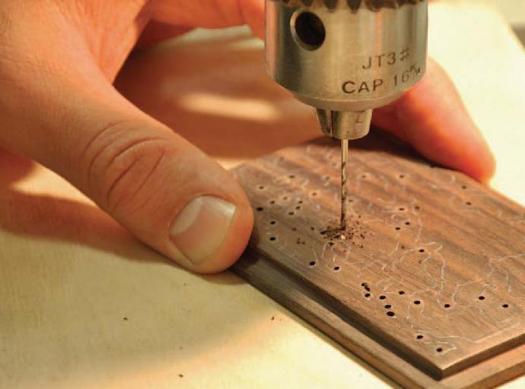
Drill Some Holes
In order to insert the scroll saw blade into each section to be removed, many small holes are required.
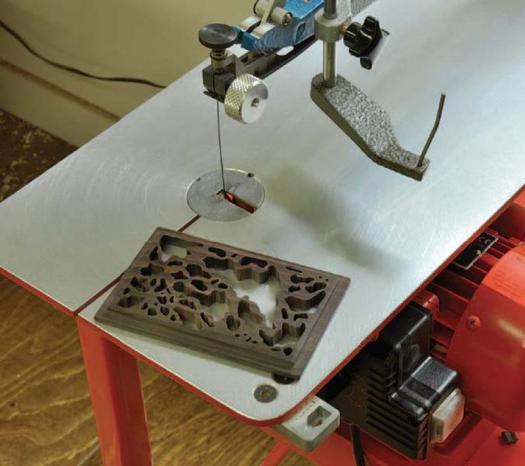
Remove Some Wood
At the scroll saw remove the bulk of the waste. Spend some time getting comfortable because you may be there for a while! Take your time, as attention to detail is important.
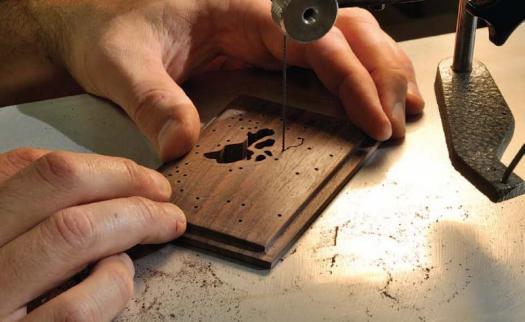
Start Carving
With the carving mounted in a jig, Klager is able to carve and shape it as needed.
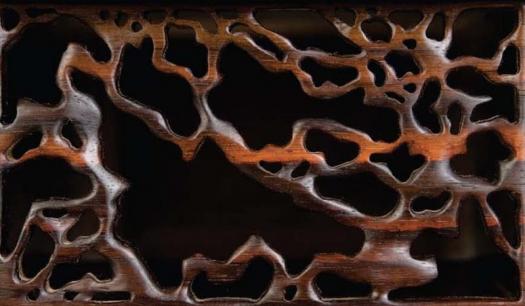
The Finished Pierced Carving
A finish is applied and the carving is mounted in the piece of furniture. It’s hard not to look at and touch the carving. (Photo by Ingeborg Suzanne)