TIPS & HOW TO
Meet the Mitre

Tom Fidgen

This shop-made mitre box will make cutting a mitre a little more enjoyable ... seriously.
The mitre joint; if you take a moment now before you continue reading this article and glance around the room you’re in, there’s a good chance you’ll see a mitre joint or two somewhere. We find it used and abused in so many applications around us that we sometimes take it for granted. From the common door and window trim to ornamental picture frames and elaborate cabinet mouldings, it’s a joint that people may consider a simple form of joinery and probably not very difficult to make.
Now, the woodworker cutting these mitres knows better and understands just how challenging a good fitting mitre joint can be. We know first-hand just how testing they can quickly become without using the proper tools and techniques.
When I worked in the set building industry I never enjoyed cutting mitres. My options in those large industrial shops were usually limited between a chop saw and a table saw. Using a chop saw often resulted in less than ideal joinery, especially while working with smaller scale pieces like thin, hardwood quarter mouldings or something similar in weight and dimension. The chop saw could easily lead to tear-out or, worse – and far more dangerous – wooden debris flying around the work place.
My alternative was a table saw with a mitre fence (which happened to be my preference) but again, how do you safely and accurately cut mitres on 12′ stock with a table saw? When doing multiple angles or working with over-sized pieces, it seemed I spent more time setting and re-setting fences, jigs and other work holding, make shift inventions and less time on the actual projects.
Fast forward to present day, where I work in a ‘hand tool only’ woodshop. Mitres can be more enjoyable and accurate thanks to some simple bench-top appliances.
This article will focus on the mitre hook and mitre box but as soon as you’re finished making them you’ll want to finish the joint on a shooting board; but that’s another appliance I’ll cover in a future article.
Mitre boxes – or even more simply, mitre ‘hooks’ – are examples of workbench jigs that no shop, whether it is for power or hand tools, hobby or commercial, should be without. You can purchase a few manufactured varieties or you can do as I do and build your own. It only takes a few minutes to build one with some scrap wood and you can easily tune in and custom cut any uncommon angles for precise and repeated results, no matter what scale your work may be.
Left- and right-handed mitres won’t be a problem and 45° is no longer a boundary or a threshold. For straight sawing as well, a mitre hook will help with your sawing technique, and having the option to add as many angles as you desire will assist in any complex moulding situations you may encounter in your work.
Before I get into the specific construction of the jigs, I should state the obvious and say that before you make a mitre hook you need a decent back saw. Thankfully, we’re living through a kind of hand tool renaissance, so you shouldn’t have a hard time finding a saw to suit your needs and budget. Some things to remember when you’re shopping for a hand saw:
- Like all tools, you really get what you pay for.
- Saw sizes should be determined by the scale of the work you do and not by the size of your cranium or forearm.
- Saws should feel ‘balanced’ and ‘comfortable’ in hand while in use and should not require a great deal of muscle to push or pull.
- Saws come in different ppi (points per inch); the higher this number is generally means the finer and slower the saw cut.
- Wood shows and hand tool events are a great way to test drive these tools before you buy so try to get out and support them!
To begin we’ll take a look at a mitre hook. This is a simplified version of the mitre box and I use mine on a daily basis in my work space. It is nothing more than an off-cut of suitable material and a cleat fastened to the underside front that keeps this appliance from moving about on the workbench while in use. (This is provided you’re using a Western-style push saw, but we’ll talk more about that in a minute.)
Add a hardwood fence approximately 1″ square and just slightly shorter than the width of the work surface and you’re in business.
The exact placement and size of the fence depends on a few factors – again, the size of the work needs to be considered. If you’re cutting mitres for miniature picture frame components then you can place the fence fairly close to the front of the jig for comfort. If you deal with heavy mouldings on a regular basis then you may need a larger fence, as well as placing it further back on a larger work surface. I mentioned Western-style push saws and the relevance to the fence and hook placement because if you use a Japanese-style pull saw then the work piece must be held on the opposite side of the fence, away from you. If that’s the case then you’ll have to have enough surface back there for the stock to rest. The Western-style pushes so the work piece needs to be in front.
Sounds simple enough? It is, and that’s the beauty of these shop-made jigs.
To make your own mitre hook, begin by cutting out the surface piece to size and if necessary, plane it flat, square and true without and wind or twist. Glue and screw the cleat or hook in place on the front underside of the surface.
The third and final component is the top fence and, as mentioned above, its exact positioning needs to be addressed in relation to the work you’re doing. My bench hook is used for general cabinet-making and can accommodate both a push- and a pull-style hand saw.
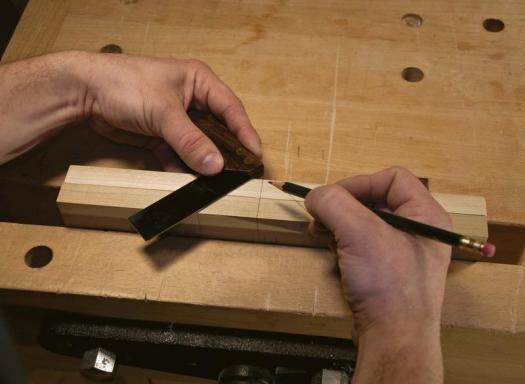
The fence should be made from square, stable stock and I begin by first marking out its final location on the work surface. Remove the fence and drill some holes down through the work surface, keeping in mind the position of the saw cuts later on. Countersink these holes in the bottom to allow a screw to sit flush underneath the jig but also countersink the top of the hole slightly where you began to drill down through. This is good practice for all mechanical fasteners used in the wood shop; it will ensure that no small debris or tear-out is present around the hole while gluing and it will give a bit more surface area for the glue to hold onto. Once the glue has cured and you know exactly where the screws are installed, take the same back saw you’ll be using to do your sawing (this is an important step) and carefully lay out, mark and saw down the desired kerfs into your fence. Ninety, forty-five, thirty-two and a half degrees – whatever angles you may require. It’s important to use the same hand saw that you’ll be doing your mitring with because you’ll want those saw kerfs to fit the saw plate perfectly. If you were to use a wider saw then you’d have a loose fitting back saw for the real work later on. Once the saw kerfs are established, you’re done. It’s really that simple and, depending on the angles you’ll need, you can make as many kerfs as necessary. A straight 90° is in the center with two mirrored 45° saw cuts on each side. This is a typical mitre hook lay-out.
I have a saw hook dedicated for straight cuts and another couple from past jobs with an assortment of mitre angles and sizes. I’ve used everything from MDF and plywood to pine and oak off-cuts for the work surface depending on the application and size required. Solid wood is easier on saw blades but the manufactured products will work in a pinch. I recommend the fences be made from solid hardwood; my experience using manufactured products and softer species is that they never seemed to hold up as long as the solid wood. Quarter-sawn stock for the fence is always nice but you don’t need to get too caught up on materials. Scrap wood and a few minutes work – keep it simple unless you really enjoy the process of making jigs – then spend as much time as you like and build something you’ll be proud of in years to come.
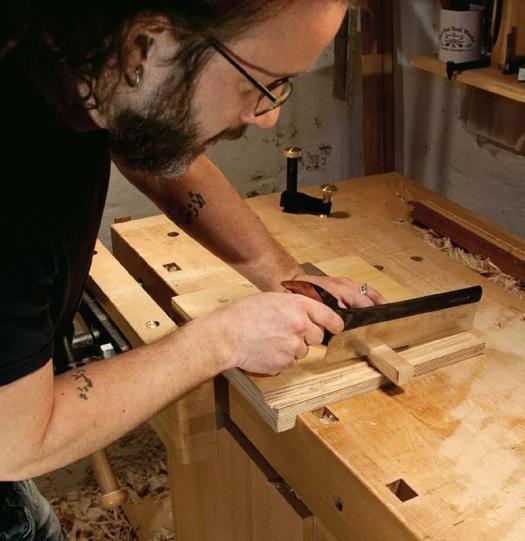
The mitre box is essentially a ‘souped up’ version of the mitre hook. It has two fences to guide the saw instead of only one and is usually made to match the required depth needed for a specific job, meaning it doesn’t have the full surface and the fences are a pre-determined width depending on the size of the saw. Most mitre boxes don’t have any hooks or cleats and are used with a bench vise or some other similar work holding devices. I generally use mine while held in my tail vise but you could just as easily add a cleat system like the mitre hook above and use it in the same way with only the force of the sawing motion pushing the jig onto the workbench top while holding it in place.
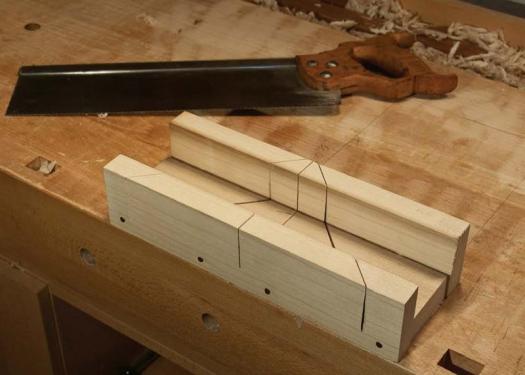
To assemble the mitre box I first establish the sizes of the three required pieces and plane them all flat and square. Before I attach the front and back fences, I’ll lay out and saw the kerfs with the front and back fences clamped tightly together; this will ensure that the two mitres are cut at exactly the same angle; remember not to saw completely down through them.
Once you have all of the desired kerfs established you can glue them to the main surface piece. For the last one I made I used some bronze ring nails as well as the glue for some extra strength. Rabbets along the bottom surface would be excessive but, if you’re making one you’d like to have last for many hard years of use, then some joinery options could easily be used to attach the pieces together.
Use the same saw as a guide while you line up the pieces to fasten them, making sure you’re not inadvertently twisting the saw plate out of line and creating a mitre angle that isn’t correct. I usually spread some glue across the back fence and attach it in place first, centering it on the lower surface piece. Then, when the glue is set on the back fence, spread some across the front edge and insert the saw down into the kerfs aligning the front to the back and checking with an angle finder to ensure accuracy. Once you’re set you can carefully apply a clamp, holding the assembly together until the glue sets up again. When dry you can add some mechanical fasteners and finally get back to work.
Again the great thing about these jigs is to make them work for the job at hand and not to lose much time in the process. Sometimes one design will work in one scenario but not be appropriate for another. Try out a few of these set-ups and do some sawing of your own; I’m confident you’ll soon find a system for the mitring you’re doing and you’ll wonder how you ever got along without them.
Photos credit: Vic Tesolin; Lead photo by Dan Russell
A hook for every saw
Depending on the type of saw you use, make your hook to suit.

Happy medium
If you own push and pull-type saws you can make a hook that can handle both by putting the fence in the middle.
Souped-up hook
By adding a second fence you can make a more robust version called a mitre box.
Two for one
Clamp your two fences together to make the layout simple.
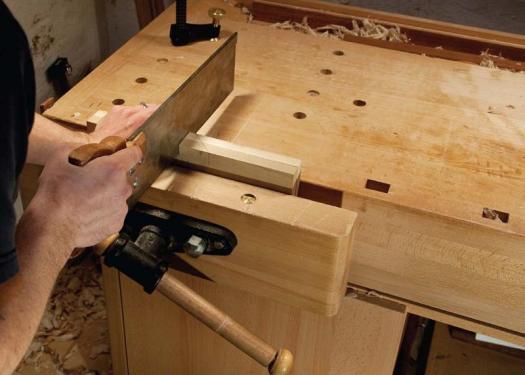
Sawing for two
it is much easier to saw the two fences when they are clamped side by side.


I made these when I was at school 60 years ago.