TIPS & HOW TO
Levelling a Problem Floor

Matt Dunkin

From carpenters to floor installers to homeowners, nobody likes an uneven floor. Learn a few tips on how to level a floor before laying a brand new floor. Once the job is complete you’ll be thankful you spent the extra time.
Time, gravity and structural deficiencies can wreak havoc on residential floors. If you’re contemplating laying a new floor and need to shim some low spots, or gutting a bathroom or kitchen in preparation for new fixtures or cabinetry, you are presented with an opportunity to correct the problem as part of the scope of work and improve the results of subsequent projects.
Identifying the Cause
If a floor has sagged or dropped, it’s important to figure out why. Identify and correct the underlying problem, whether it’s due to undersized framing, rot, a sinking basement post, or offset load paths between floors. Ultimately, if a structure has sagged and a floor has fallen, it needs to be supported to stop further sag and then the uneven or out-of-level area needs to be shimmed to correct it, over top of the existing sub-floor.
Levelling
If you’ve got a defined space like a bathroom, a shower stall or a kitchen and you want to level the floor, your best tool will be a laser level. Figure out which way the floor framing is running, and chalk or draw lines overtop of the existing floor joists. Then shoot measurements from the height of the laser line to the sub-floor and you can write the measurements on the sub-floor with a permanent marker. The smallest number will be your high point, and you can subtract this height from each measurement to determine the thickness of the furring strips you’ll need to cut.
If, along the length of one joist, the difference in height from the laser line is consistent, you can rip a consistent 2× furring strip with your table saw. If it changes, however, you will need to rip a tapered furring strip off a straight piece of wood using a circular saw and following a line drawn between several measurements along the length to mimic the subtle curve of the floor, taking care that the saw doesn’t bind and kick back when ripping.
Once you have ripped the furring strips you can lay them down with construction adhesive beneath, screw them into the existing framing below, and then check them with a straight-edge or with the laser level again. Any fine-tuning at this point could be accomplished by adding a shim beneath the furring strip to raise the height if there is a low spot, or by employing a belt sander with coarse sandpaper if it’s too high.
Once you’re happy with the results, a new sub-floor can be laid overtop and fastened into the furring strips with more construction adhesive in between to stop squeaks. The result will be a level sub-floor to lay your finish floor on.
Evening Out the Low Spots
In areas where there’s too much drop to level the floor, the better option is to make it less uneven by shimming the low spots. If it’s a small area adjacent to a load-bearing wall, or where there is an isolated dip, it can be shimmed or filled with self-levelling compound. Self-levelling compound however can crack over time so I would use it over a plywood sub-floor instead of over tongue-and-groove boards to limit the movement beneath the compound
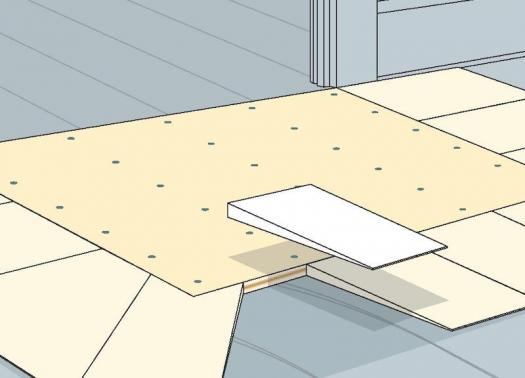
If it’s a larger area, a different approach should be taken. I recommend defining it by drawing the edge of the low spot on the floor, then cutting a section of 1/4″ or 3/8″ plywood to the shape of the low spot, stepped back the approximate length of a shim, and then using wide cedar shim shingles to feather out from there.
| [[asset:image:20385 {"mode":"small","align":"left"}]]The quickest and easiest way to level rough wood is with a belt sander. Look for one with variable speed, tool-free beld release, flush sanding capability, automatic belt tracking, and an effictient dust collection system. Ridgid.com |
In extreme cases you may need to use more than one layer of plywood to reach a desirable height. Once I have a layer of plywood and shingles cut and arranged, I check it with a straightedge. I’m looking not for level here, but for an even blend into the rest of the floor. I go back and use construction adhesive beneath the shims and plywood, and then fasten the shims with a narrow crown stapler into the sub-floor, and screw the plywood to the sub-floor. Once the low spot has been evened out, a new sub-floor surface of 3/8″ or 1/2″ plywood can be screwed down overtop the entire floor area, creating an even base for finish flooring. Time and patience will yield results that will greatly improve the safety and aesthetics of the floor.
Photos credit: Dreamstime
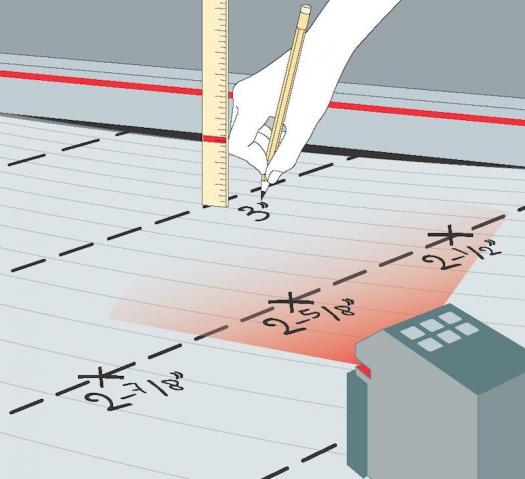
Find the High Spot
With a laser level turned on and a ruler in one hand, go around the room and mark the distance between the laser line and the floor on the sub-floor. The smallest measurement is the one you should aim to level the rest of the floor to.
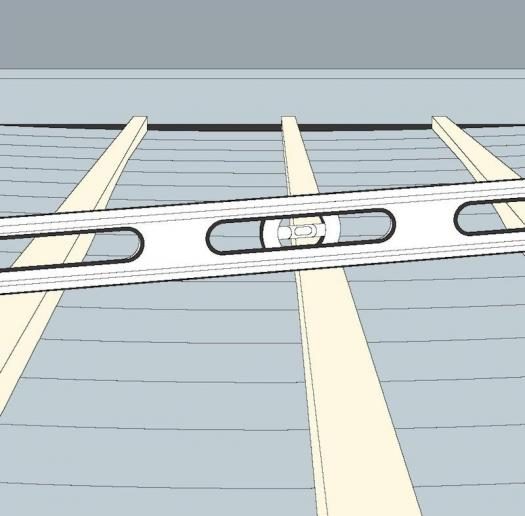
All Level Now?
With the furring strips in place, use a level to check everything is level. There may be high or low spots that still need evening out.
Remove Any High Spots
A belt sander, equipped with a coarse belt, will remove any high spots on the furring strips.

Raising a Large Area
To level large areas to the high spots of the floor you can cut a piece of plywood to fit the low area, then feather out the difference with cedar shims.
Raising a Small Area
If the low area is fairly small you can raise it with a series of overlapping cedar shims. Self-levelling compound can also be used for small areas.