TIPS & HOW TO
Just Plane Romance

Rob Cosman

In the age of electric machinery, some woodworkers have forgot about the simple but trusty hand plane. They have also become confused about sharpening a blade. With the right approach to sharpening, you’ll be happy you took your hand plane off the shelf.
During the past 10 years, I have spent most weekends teaching woodworking in various locations around North America and the UK. I cater to those interested in hand tools and hand tool methods, yet, to my surprise, the vast majority of hobby woodworkers have not discovered what I consider the most efficient tool in the shop. This “cordless” tool can turn rough lumber into perfectly flat, square and smooth beautiful boards. It can leave a surface on the most figured wood unmatched by any grit of sandpaper. It can take two raw edges and, in seconds, produce an imperceptible joint. It can move large amounts of stock, leaving you kneedeep, or peel a shaving so thin it will float in midair. All of this while the music plays softly in the background and the clean fragrant scent is enjoyed without the least bit of concern for protective equipment. The safety glasses remain in the case, the dust mask stays in the box and the earplugs hang on the wall.
I have spent 30 years working in a fully equipped commercial wood shop; wearing a dust mask when it is 30° inside and your face is drenched in perspiration/condensation is not fun. I have damaged my hearing in one ear due to the scream of a worn-out router bearing. Learning from that lesson, and trying to keep safety glasses from fogging up while wearing a dust mask and ear muffs at the same time made the end of the day a welcome relief. I got into woodworking for the love of the wood, doing it for a living under these circumstances didn’t add anything to the fun factor. Shutting it all down, especially my loud dust collector, to pull out a plane and relax to the wisp of sub-thou shavings, the actual fragrant smell of the wood and the indescribable feel of fresh planed timber instantly brings me back to why I do this. If it sounds too good to be true, you may be missing the most relaxing process in woodworking. The lowly hand plane is in the early stages of regaining its stature as more folks look to avoid some of the dust, danger and noise long associated with the craft.
More Affordable Every Day
This trend started several years ago but as the premium tools made their debut, they came with a hefty price tag. For several years running, a good hand plane was going to cost you upwards of $350 before you bought the support gear. Thanks to some retailers, that entry level cost for a new premium plane has recently been cut in half, helping to make hand planes affordable to many more “part time” woodworkers. With the growing interest, I expect there will be more offerings, from more retailers, in the near future.
I spend nearly every weekend demonstrating sharpening and hand planing to classes of 20 or so enthusiasts in four-hour seminars. As I peel off half-thou shavings from a piece of figured maple with a plane just out of the box, the response is always the same: “I wouldn’t believe it if I didn’t see it”! For those already possessing the skill of sharpening and using planes, this is no big deal, but the recent converts from the power tool side get as giddy as kids in a candy store. Not that long ago, buying a new plane meant hours of fettling, which included flattening the sole, cleaning up rough castings, flattening and polishing the blade and fitting the cap iron. A lot of this was beyond the skill and/or interest of many woodworkers. Now with several ready-out-of-the-box brands of planes equipped with thick pre-flattened blades and mated cap irons, the only thing required is a quick honing of the blade. That said, the latter process is what still holds so many would-be hand planers hostage. For some reason, this one procedure had been lost to so many woodworkers.
How Sharp?
Several years ago, I had the pleasure of befriending David Charlsworth, a renowned English craftsman, known for his woodworking precision and game-changing “ruler trick”. The latter, combined with something called a tertiary bevel, are what liberate woodworkers from the perceived drudgery of sharpening plane blades. To best introduce this technique, an explanation of “sharp” is necessary. In the simplest terms, a cutting edge is the apex where two (usually) flat surfaces meet. When both surfaces are polished, the result is an edge that can quickly improve the surface of a board, so much so that the raw wood will reflect like a mirror. The key to the sharpening is realizing how much of the two surfaces need polishing. Since only the leading edge touches the wood when using a plane, polishing more than the smallest strip on either side is a waste of time and material. For those who have always polished the entire primary bevel, what is to be gained for all the extra work? I spend less than a minute getting from dull to sharp and have the results to prove it.
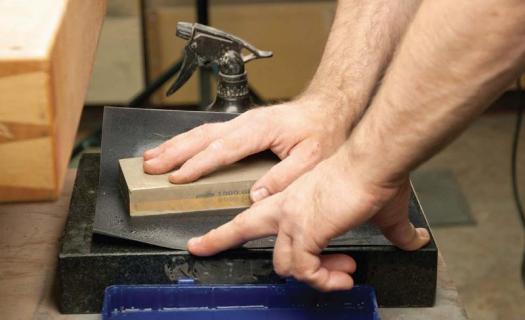
To start the task, we need some type of sharpening stone. In simple terms, stones are not much more than small measured abrasive particles held in place by some form of matrix, often made from clay. As the stone is used, the wearing breaks down the matrix and provides fresh sharp cutting particles. The downside of this is that the wearing puts the stone out of flat. Since sharpening blades require flat stones, the wearing has to be balanced with some form of flattening. This may need to be as frequent as every minute or less. This is the best reason I can think of for selecting stones that cut fast. An easy way to flatten a stone is to use wet/dry sand paper on a flat backing, such as float glass or a granite reference block. A few circles on the wet/dry paper are all it takes, providing the stone is never allowed to get seriously dished.
Get to Work on the Bevel
To sharpen, start on a coarse grit; 1k works well. It is easy to register the primary bevel on the stone particularly on thick blades where the bevel is usually ¼” or wider. Once registered, you raise up off that bevel about three or four degrees. Spend about 10 seconds making small circles as you move over the length of the stone; this prevents dishing and evens out the wear on the stone surface. After 10 seconds, you should feel a burr that runs corner to corner, signifying you have straightened the edge and you are ready to move to the next and final grit. This last stone should be 8k or higher. Once again, you will register the blade on the primary bevel. This time, raise up five or six degrees, a few degrees higher than on the previous stone. Providing your stone is flat and the edge of the blade is perfectly straight, the entire apex will touch the stone and, in a mere 10 seconds of honing, you will have created a very small but effective third or tertiary bevel. If I am sharpening a smoother blade, I do a few seconds of work on each corner independently. This is done at the end of the 10-second work on the tertiary bevel. While still in motion, I press down on one corner for a few seconds, doing circles, then switch to the opposite corner for the same length of time. This creates a light feathering that prevents plane tracks when smoothing wide surfaces. The finer the grit of the last stone (or the higher the grit number), the sharper the edge; the finer the scratch pattern, the more metal there will be on the edge and the longer it will last.
Sharpen the Back
The final step is done on the back of the blade. If the back is flat (now standard for most premium blades), I create a small back bevel using a thin steel rule held flush with one edge of the stone. If you lay the blade on the rule with the bevel facing up and the sharp edge on the opposite side of the stone, moving the blade edge back and forth within a ¼” of the opposite edge of stone, you will create a less than one degree micro or back bevel.
If working a blade for the first time, I follow this process starting on the 1k stone. I spend 15 seconds creating the back bevel then polish it for 15 seconds on the final stone using the same procedure. On all subsequent sharpenings, this process takes just three seconds on just the final stone to simply remove any remaining burr. What you now have is a very small, highly polished strip on the back meeting a highly polished strip on the front, creating a great cutting edge with minimal work.
Why the Ruler?
There has been some resistance to the ruler trick, which I expect is due to “that’s not the way I was taught”! For those struggling with the concept, consider why we all do some form of micro-bevel on the bevel side of the blade: to reduce the surface area needing polish. Now consider the same thinking for the back of the blade, before we would flatten and polish the entire back or a large section of it just to use the very tip. With manufacturers willing to sell us pre-flattened blades, we need only polish the part we use: the very tip.
Most of us would tend to shun the extra exercise of doing it all with hand planes, and while I regularly teach that method, I think there is a smart approach that everyone can adopt. Learning to sharpen and use a hand plane can be a huge asset to your woodworking regime; your sanding can be cut in half or more by using a hand plane to eliminate the machine marks on the show surfaces. Your joinery can be tighter by using a plane to sneak up on that perfect fit, a thou at a time, lots of control. Your glue joints can be invisible by taking a few swipes with a plane after the power jointer but just before the glue and clamps. And your stress level can be lowered in just a few minutes at the bench with a sharp plane and a willing board.
Enjoy your time in the shop!
Photos credit: John Robichaud; Lead Photo by Rob Brown
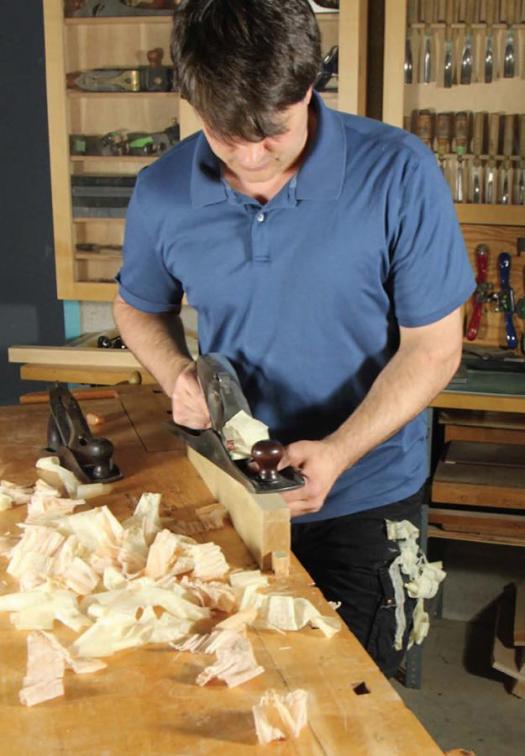
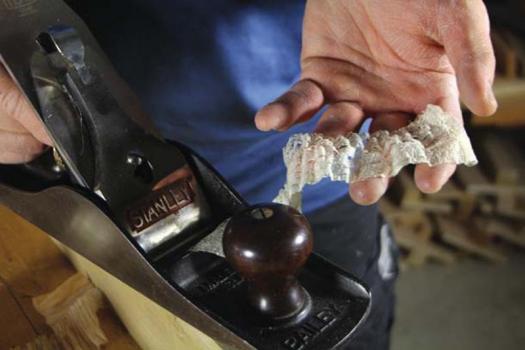
Safe, Simple and Satisfying
Cosman teaches the good times of hand planing to many woodworkers, who are often surprised at the results that can be achieved from an old restored plane. (Photo by Rob Brown)
Flatten Your Stone
Starting off with a flat stone is the first step in sharpening a blade. A glass or granite surface is best.
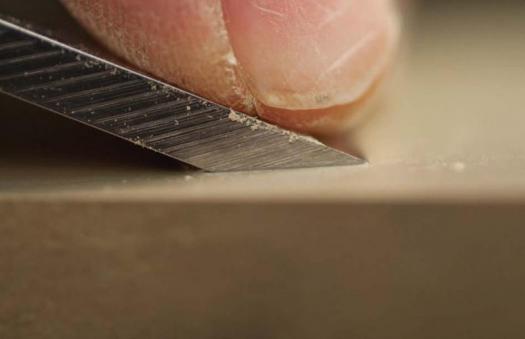
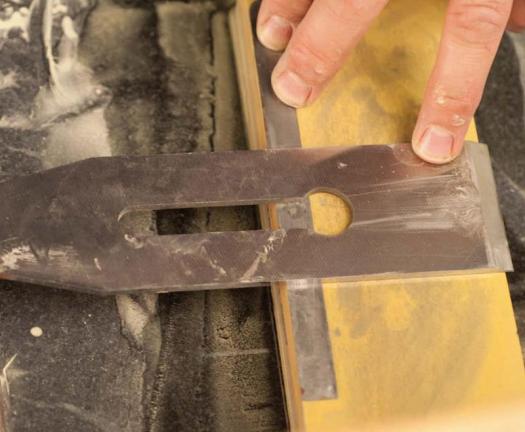
A Slight Shift
Register the primary bevel flat on the stones’ surface and make the first set of passes with a course grit. The secondary bevel is then created by titling the blade up about three or four degrees as you spend about 10 seconds moving the blade across the stone (below).
Feel the Burr
If the secondary bevel is done properly, you should be able to feel a burr across the entire length of the back of the blade.
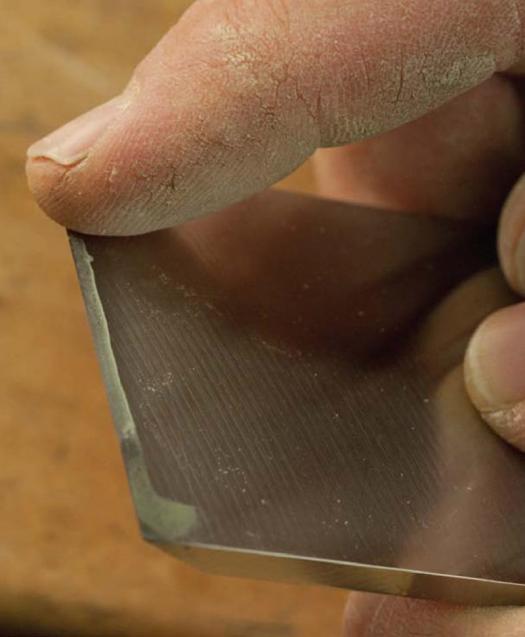
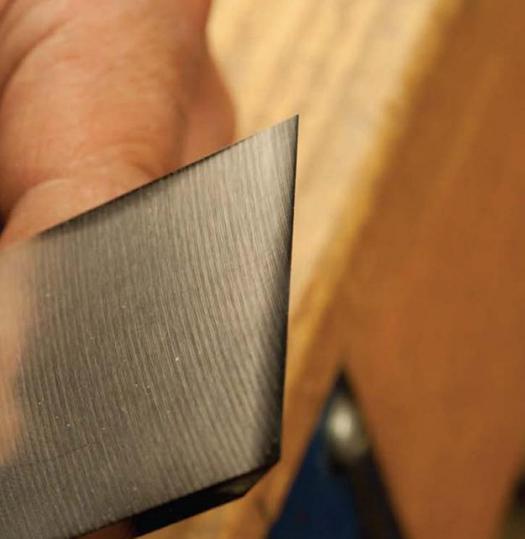
Look Closely
When the bevel is done there will be three visible surfaces, which get narrower as they approach the cutting edge.
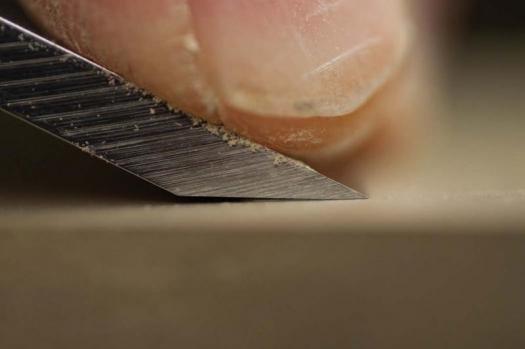
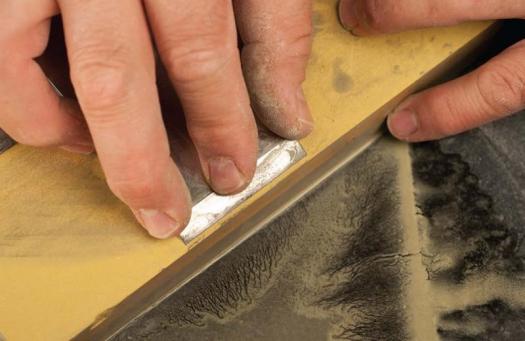
Good Trick
By placing a thin ruler in line with the edge of the stone and running the back of the blade on top of it, the blade will be on a one-degree angle (above). This makes it easier and faster to work the back side of the blade. When sharpening the blade, use the opposite ½" of the stone (below).
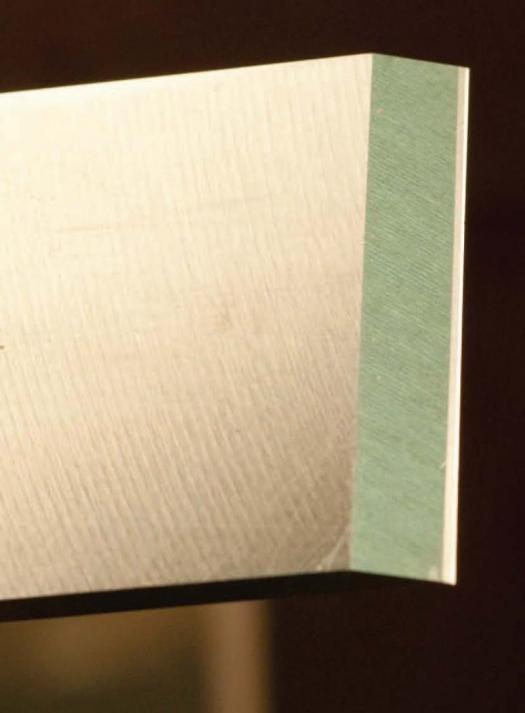
Just Polish the End
Even though the entire back of the blade will not be polished, the blade will still work perfectly, as long as the ¼" or so near the end has been polished.


I enjoyed this article, especially the sharpening tips. But I had to chuckle when you referred to planing as “the most relaxing process in woodworking.” I don’t own any heavy equipment, so my jack plane is my primary surface prep tool. And I’m using old, weathered scrap wood to build my workbench, so I have a lot of material to remove before I get to the fine smoothing stage. For me, planing is the best cardio workout I’ve found aside from cycling. 🙂