TIPS & HOW TO
How to install beadboard

Rob Brown

Installing beadboard is a great way to transform and update a room. With only a few tools, and a medium amount of skill, you can create a look that you’ll be proud of.
Beadboard can be used in the same situations as traditional wainscoting. In centuries past it helped insulate a room, cover up any unsightly water damage/ wear and tear, or even protect homeowners from sharp stone walls. Beadboard is flat panels of wood or sheet material that have a small bead between all the joints. The bead helps conceal the joint and adds an element of design to the finished wall.
You can make your own beadboard, but it’s a fair bit of work. I purchased 8′ long lengths of it from my local hardware store. It’s made from MDF. I made my own baseboard and trim from solid wood. I kept the overall look very simple, though you can get as fancy as you wish. You can also purchase beadboard with narrower flats between the beads, though this can make a large room look too busy. Smaller rooms like bathrooms might be a better option for these types of beadboards.
MDF doesn’t shrink and swell like solid wood does, but it still moves. I would recommend not installing beadboard during the middle of summer or winter, as that is when you will have an extreme amount of wood movement to contend with. This will avoid gaps or buckling of material down the road. Also, it’s best to let material acclimatize before installing it.
Generally speaking, the installation process moves along fairly quickly if you’re working on a long wall. The difficult part is working into corners, around doors and windows and dealing with electrical outlets and light switches. Take your time around these challenging areas and the finished look will turn out much nicer.
Preparation
Do yourself and your family a favour by not taking on this project the day before a big family gathering or dinner. Especially if you’re working in the kitchen. It’s much easier to do this job in a timely fashion if you can move a lot of the larger pieces of furniture out of the room, and there’s not much traffic flow through the area. You can remove the baseboards now, as well as do any repair work to the portion of the wall that will remain visible above the beadboard.
In my shop I first cut the beadboard to length and applied one coat of paint to the already primed lengths of beadboard. The final coat would be applied after the beadboard and trim was installed.
As a general rule, you should start applying beadboard in the most visible areas, and work towards the less visible areas. Joints that complete a wall almost always finish with a partial flat, and can look ever-so-slightly off. If you want to go the extra mile, you can measure the width of a wall, determine how many panels of beadboard will cover the wall, then even out the gaps on either side. There’s also the chance that beadboard panels will be slightly angled after a long run of wall, and the final few beadboard joints will have to be either angled to make up the difference, or you will have to cut an angle on the end piece. Either way, the look can be less than perfect and is best placed behind a refrigerator or armoire if possible.
How high?
There are many guidelines regarding how high to stop the beadboard, but I would say each situation is different. It’s very common to stop beadboard at about 1/3 of the ceiling height, though this wasn’t the look I was after. I stopped the top of my beadboard at just over 6′ high, though the exact height was dictated by the trim over a small cupboard, as I thought it would be best to ensure that the cap rail above the beadboard I installed lined up with the trim nicely. I would encourage you to make any small adjustments to the height of your beadboard to work with the room you’re renovating.
Add some lines
Start by marking level height lines on the walls. I marked lines at the height I wanted the beadboard to stop at, not the top of the cap rail. I also marked the studs near the bottom of the walls, but not so low that the baseboards would cover them up. These lines would help me secure the baseboards to the walls.
Baseboards first
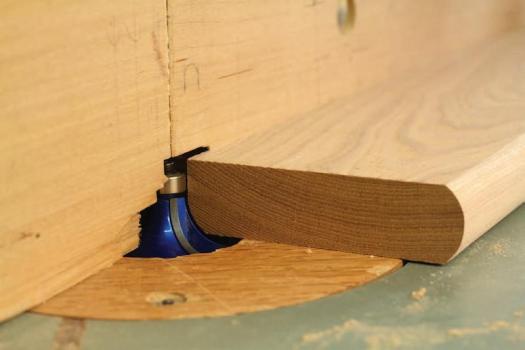
One installation option would be to install the baseboard, then rest the beadboards directly on top of the baseboard and cover the joint with a small cap moulding. I wanted an even simpler look, so I machined the baseboards, then added a small rabbet in the top, back edge of the baseboard that would accept the beadboard. My baseboard would hold the beadboard in place against the wall, as well as simplify the look of the joint. With long nails in my brad nailer, and some construction adhesive on the back of my baseboards, I installed the baseboard around the perimeter of the room. Just be sure the baseboards are installed level – quarter-round will hide any variation between the floor and the baseboard.
Beadboards next
With the beadboard cut to length and painted, apply a few lines of construction adhesive to the back of a length and insert it into the rabbet in the baseboard. When applying the adhesive I made sure to run a healthy bead about 1″ away from the bottom edge of the length so it would help push the beadboard length against the back of the rabbet in the baseboard, and keep the joint as tight as possible.
Every time I was on top of a stud I made sure to secure the length to the stud. Otherwise I made sure to rub the beadboard into the wall for the best adhesion.
Things go great, until …
Repeat this technique until that dreaded moment when you hit an electrical outlet, light switch or other obstacle. It seems as if 20% of your time is spent doing the final 80% of the work area, while 80% of your time is spent doing 20% of the work area (fine tuning corner joints, and cutting around obstacles).
I think admitting this problem is half the battle in producing great beadboard walls.There are many ways to work around small obstacles like outlets and light switches, but I think the easiest (if you’re not an electrician, that is) is to keep the electrical-related items in place and work around them. I stopped the beadboard about 3/8″ away from the obstacle, then used a solid wood frame to trim out the switch or outlet and hide the edge of the beadboard. More on that process later.
For now, just place the piece of beadboard to be cut against its mate, and down into the baseboard rabbet, if possible. If this isn’t possible you will have to work with a tape measure to determine the cut-out locations. Mark the location of the cut-out, keeping in mind to add a 3/8″ gap, then carefully cut out the waste.
Corners
As you approach a corner or long length of door or window trim, you should measure the distance that the top and bottom of the beadboard are away from the trim. If off by a decent amount, you should angle the final few lengths of beadboard to even out the discrepancy.
Inside corners are fairly easy to do. Rip the first corner piece slightly less than the width required. You may also have to cut it on a slight angle. Once it’s in place, the small gap will be covered by the second corner piece. This piece requires more exact measuring and cutting. Instead of applying the last few pieces one at a time, it’s best to place the last few lengths of the mating inner corner wall in place to determine how wide the final piece will need to be, then cut it to exact width. Apply adhesive to all the pieces, fit their side tenons into their mating grooves and fold them into place. Any gap in the corner can be covered with a small line of caulk before the final coat of paint.
Outside corners can be covered with a corner cap. This will help protect the corner, especially if it’s a high-use area. Another option would be to mitre the ends of the two outside corner pieces, glue them together, then fit it to the mating pieces on either side. This can be tricky to do, but creates a very simple looking corner.
Top trim
Trim will cover the tops of all the lengths of baseboard, and visually finish off the look. Again, it can be as elaborate as you wish, but I went simple. I applied a 2-1/2″ wide × 3/4″ thick piece to the face of the beadboard, then added a top cap to the top of it. The 2-1/2″ wide piece of face trim had a 15° angle cut into about half of its face, strictly for aesthetics.
I milled the solid wood for the front trim, then set my table saw blade to rip the 15° angle on the face of the trim. I then milled the wood for the 1-1/2″ wide × 1″ thick bullnose top cap. Rather than cut this to width, then mill a bullnose, I kept the stock at 3-1/2″ wide. I could easily mill the bullnose on both sides of the stock with two passes over a large roundover bit.
Once I cut the parts to final size, I eased their ends where they met the door and window trim so they looked nice. I then primed and painted all the trim pieces. With the parts all cut to size I just placed the front trim pieces over the faces of the beadboards, making sure the top of the front trim was about 1/2″ higher than the tops of the beadboard. With the pieces level I nailed them in place. A touch of adhesive was all that was needed.
To attach the top caps I added a small bead of adhesive to the top edge of the face trim, then nailed down through the top cap into the face trim.
Trim the fixtures
I left the outlets and switches in place, stopped the beadboard about 3/8″ away from them, then made and installed a simple frame.
To make the frame material I cut enough 1′ thick stock to create enough frames. I didn’t rip the stock to 3/4″ wide yet, as cutting rabbets in stock that wide is dangerous. I proceeded to cut the rabbets in the stock, leaving a 3/16″ wide lip intact. The depth of the rabbet needed to be equal to the thickness of the beadboard, so the 3/16″ lip would stop flush on the wall.
I then routed a partial round over into the inner edge of the frame material so users wouldn’t knock their fingers or chip paint easily. I then mitred pieces to go around each outlet, then assembled the frames with masking tape and glue. A quick sanding and the frames were ready to be primed, painted and installed with adhesive and a few pins.
One final coat of paint
Quarter-round will cover any gaps between the baseboard and the floor. Use caulk to fill any small gaps or pin holes, then apply one final coat of paint. It can be tricky to paint all the beads, with their tiny little valleys, but a roller with a higher nap will help out quite a bit.
Have you ever added beadboard to a room in your home? Share your experience with us at the end of this article on our website.
Photos credit: Rob Brown
Find the Studs
Locate the studs and mark their positions on the wall. You will need the locations while installing the baseboard, so ensure you mark high enough on the wall that you can still see the marks with the baseboard in place.
Attach the Baseboards
After milling the baseboard to size, and adding a rabbet in its back to accept the beadboard lengths, fix it to the wall.
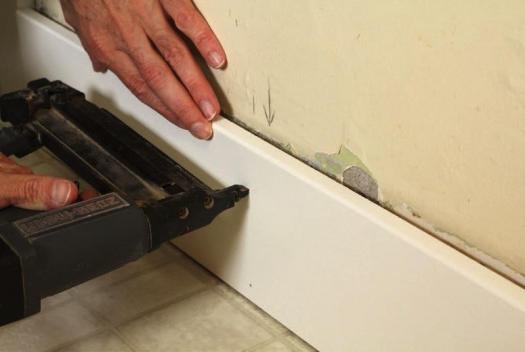
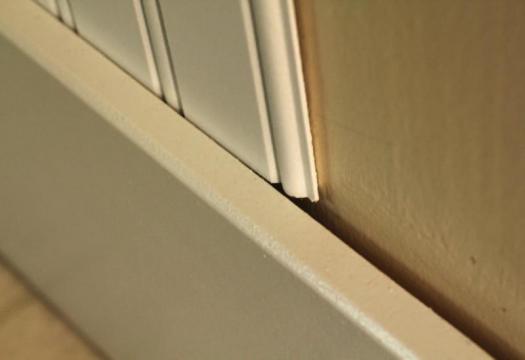
Small Rabbet
With adhesive on the back of the beadboard lengths, Brown slides the pieces in place and secures them to the wall. A bit of extra adhesive near the bottom of the beadboard length will ensure there’s adequate support and pressure holding the beadboard into the baseboard.
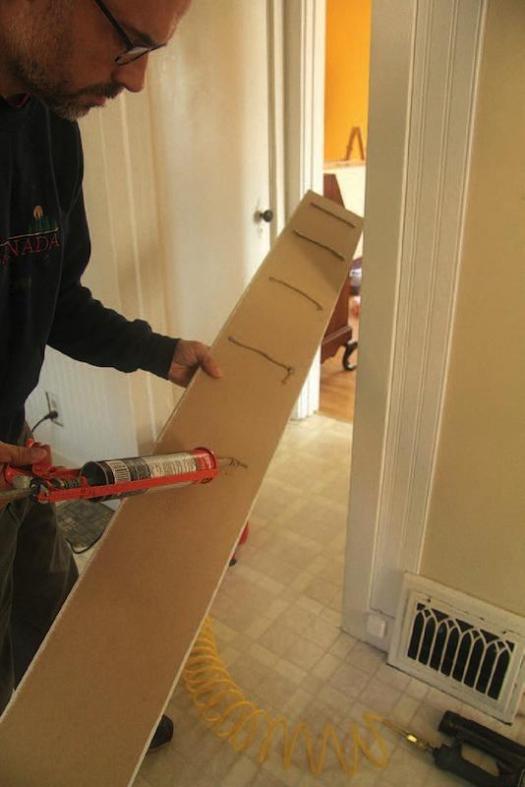
Add Adhesive
Add adhesive to the backs of the beadboard as you work.
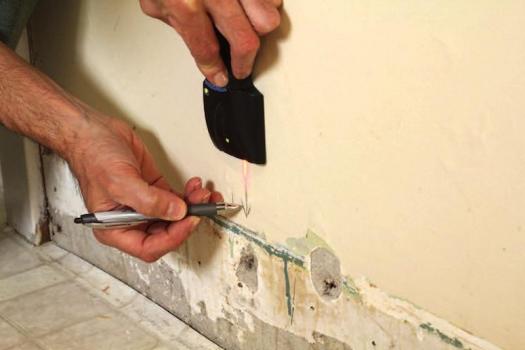
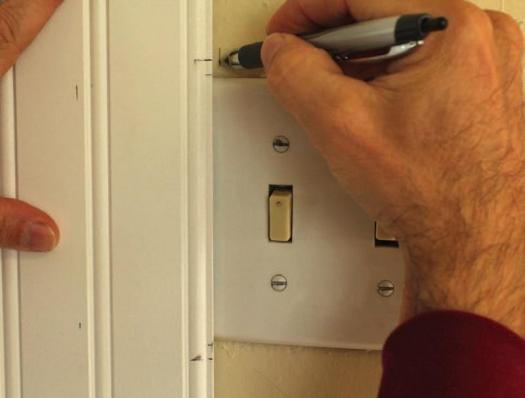
Mark Carefully
To work around outlets and switches Brown marks then cuts the beadboard to leave a 3/8" opening. A wood frame will eventually cover this gap.
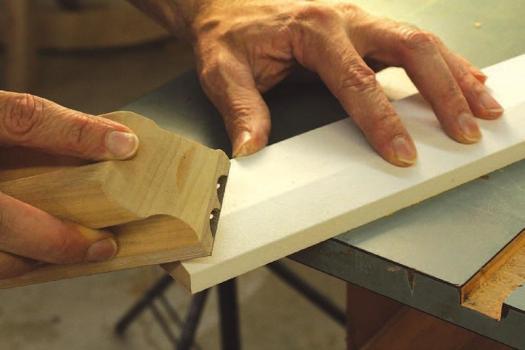
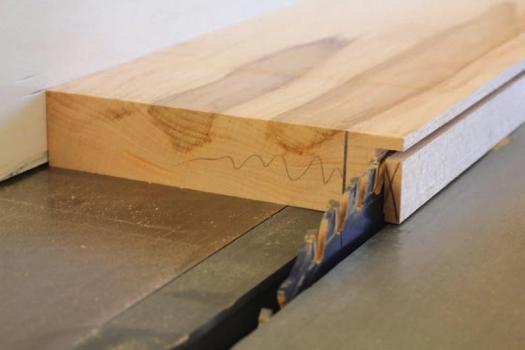
Mill a Top Cap
The face trim and top cap can be milled from solid wood. Here Brown mills two top cap lengths from one workpiece, as it’s safer and easier. Once the bullnose is complete Brown rips the two 1-1/2" wide top caps from the blank.
Watch the Corners
Be aware of where the trim meets a window, door or corner. Rounding the edge of the trim can create a nice transition at the end of a piece of trim.
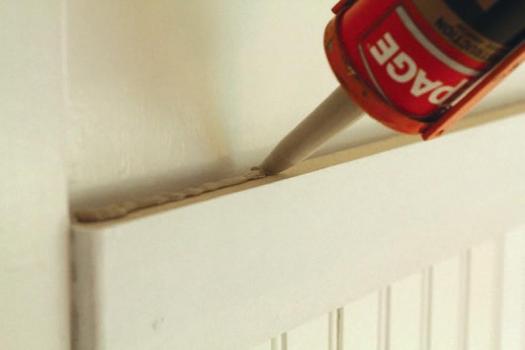
Strong Joint
Once the face trim is in place run a small bead of adhesive along its top edge and install the top cap from above with an air nailer.
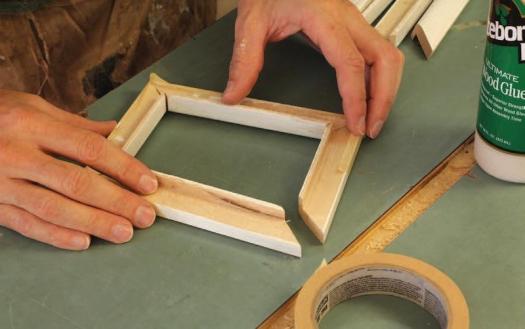
Frame Material
Brown cuts rabbets in the outlet and switch frame material while they’re still part of a larger workpiece. The remaining 3/16" wide strip of wood will fit against the wall, between the cover plate and the beadboard.
Wrap it Together
With the frame material milled and mitred to length Brown tapes their ends together, applies glue and wraps them together to form the frames.
Trimmed Out
The finished frame installed around the cover plates is a nice touch, and provides a small point of interest.


The product I used was tongue and groove and I found it useful/necessary to tap the boards together with hammer and scrap of wood to protect the edge. Doing so almost eliminated any sign of the joint making it difficult to tell that the mdf boards are actually 6 inches wide.