TIPS & HOW TO
How to build solid wood countertops

JASON KLAGER

Solid wood counters have been around since the beginning of time, and for good reason, as this natural material has proven to be durable, resilient and timeless.
Granite, laminate, Corian, quartz and tile are just a few of the many options available for today’s countertops. One option that’s sometimes overlooked is solid wood. Hiring out such a countertop is a costly venture, but with a little muscle and knowledge of a few basic woodworking techniques, building it yourself can become an affordable and enjoyable option.
Some serious wood
Granite, laminate, Corian, quartz and tile are just a few of the many options available for today’s countertops. One option that’s sometimes overlooked is solid wood. Hiring out such a countertop is a costly venture, but with a little muscle and knowledge of a few basic woodworking techniques, building it yourself can become an affordable and enjoyable option.
As with any project, the first step is to choose your wood. I decided to use white oak, a hardwood that will stand up to daily activities. The finished counter should be about 1-1/2″ thick and no less than 1-1/4″, which means it’s best to start with 8/4 stock. Using 8/4 stock makes squaring, removing any cup, bow or wind, less stressful, especially when working with longer lengths. Take the time to find boards free of large defects, such as knots or cracks which may open up over time and create a haven for water and bacteria. Find boards that have a width around 6″, as a standard counter should be made up of at least four boards to remain stable. The greater the number of boards you join, the more stable your finished countertop will be. An end-grain butcher block countertop is made by joining several parallel strips that are an inch and a half to two inches wide. This is a very time-consuming but incredibly stable method. Either way you go, be sure to first determine your finished dimensions and add a few inches to both the width and length to accommodate any adjustments later.
With your lumber home, be sure to allow the wood to acclimatize to your shop environment before turning on the machines. When it comes time to mill your boards, leave an extra 1/8 ” in thickness for levelling. Mill your boards square on all four sides and arrange them on a flat surface, paying attention to colour and grain graphics. Aesthetics always comes first, but when possible, try to alternate the growth rings. With your boards arranged to your liking, mark the position of each board. You can join the boards off of the jointer, but for a seamless joint use a hand-plane to remove the machine marks left on the edges. Lastly, adding a few biscuits along the edge of the board will help to keep the faces remaining flush during glue-up. Unless you have a very poor edge, joint biscuits don’t add any strength to the joint, but they do assist with alignment.
Time for adhesive
After a dry run, glue the boards together with a waterproof glue such as Titebond III. For larger glue-ups, I prefer using G2 epoxy by System Three Resins, which is a waterproof glue that has an open time of 60 minutes. The leftover epoxy is perfect for filling in small surface cracks or knots. Placing a piece of wax or parchment paper under the glued joint keeps the glue away from your clamps. Once out of the clamps, the glued countertop can either be passed through a drum sander or just hand-sanded to a finish grit of either 180 or 220.
Fit the countertop
A few things still need to be taken care of before applying a finish. One may be to scribe the counter to a wall and/or fit it into a corner. A corner can be finished with either a butt or mitre joint. Both will move with the seasons, but a butt joint will not open up like a mitre joint will. A mitre will open and close along the joint, whereas the two halves of a butt joint will only slide against each other.
Use a few counter connectors to join sections of counters. When machining the joinery for the connectors, leave a little room for seasonal movement. Installing a few tenons will also help keep the top aligned. If you plan on using dowels, be sure to only use them in one location across the joint, and be sure to allow the rest of the countertop to move. If you’re using tenons, glue half of the tenon into one mortise and widen the mortise across from it, allowing the tenon to move freely. When the time comes to connect the two counters, be sure to apply a bead of silicone caulking along the edge of the joining counter. It will move with the joint. After your counter is sized and fitting correctly, make the necessary adjustments to the front overhang before adding an edge profile.
Sink and faucet openings
The last step may be to cut out an opening for a sink and faucet. Using the manufacturer’s sink template, outline the position of your sink and cut along the line using a jigsaw. If you are installing an under-mounted sink, this template can be used to make a reverse guide template out of a piece of 1/2″ MDF or plywood.
Carefully position and clamp the guide template to the top of your counter. Using a plunge router fitted with a guide bushing, rout along the guide using an up-cut spiral bit until you have reached the other side. Take your time to slowly remove the material with only 1/8 “– 1/4” increments and clean out the shavings after each pass. The MDF cut-away portion from the center of your sink template can be attached in the middle to support both sides of the router. Remember again to add a bead of silicone caulking when installing both the sink and the faucet.
Finish line
With all my woodwork, I like to use Waterlox Original Tung oil finish. This waterproof, heat-resistant finish is food safe and will easily stand up to daily use on kitchen counters. It is important to finish both sides. Apply at least four coats to the top and three coats to the underside. For a flawless finish, do a light sanding before applying the final coat.
Allow for movement during installation
Take the necessary steps to allow for seasonal movement when the time comes to install the countertop. A standard countertop could move 3/8″ seasonally. To accommodate for this, epoxy an oversized washer with a 1/2″ center to the underside of the cabinet supports and drill out the center.
Attach the counter through this 1/2″ hole. This opening will provide enough room for the screw to travel seasonally. A second washer is fitted nicely around the fastening screw’s head to prevent it going through the opening. For a 1-1/2″ thick countertop, the wood screws should be long enough to go through the cabinet supports and into the counter at least 3/4″. Be sure to fasten the counter in several spots. The only screw that doesn’t need to travel is the one placed closest to the wall. This will allow all seasonal movement to happen away from the wall.
Wood is timeless, inspiring and comforting to have around us daily. With a little bit of work, it can also become the perfect surface to make your morning cup of joe.
For a full list of articles on “Building Kitchen Cabinets” click here.
Photos credit: Jason Klager
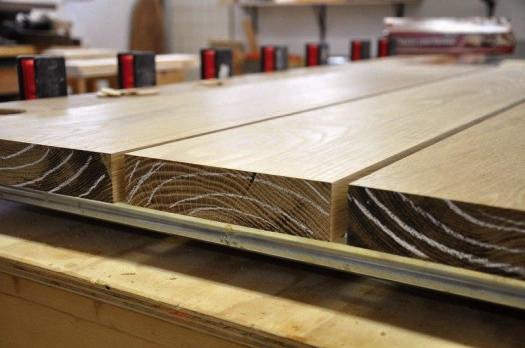
Balanced Construction
By opposing the direction of the growth rings Klager creates a more stable top. It’s sometimes a trade-off between grain graphics and stability, and a judgement call needs to be made.
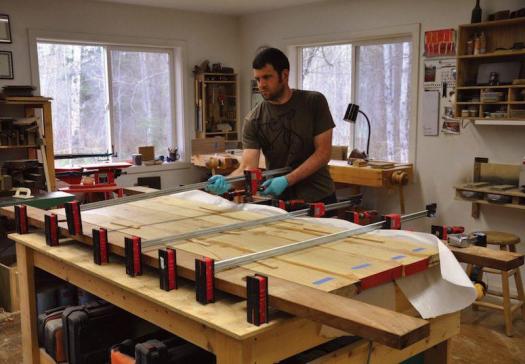
Big Glue-Up
After a dry run, Klager applies the adhesive and brings the boards together for good. A flat, large surface is necessary for laminating the parts of a countertop. Notice how Klager alternates the position of the clamps, above and below the workpiece, for even pressure and less cupping.
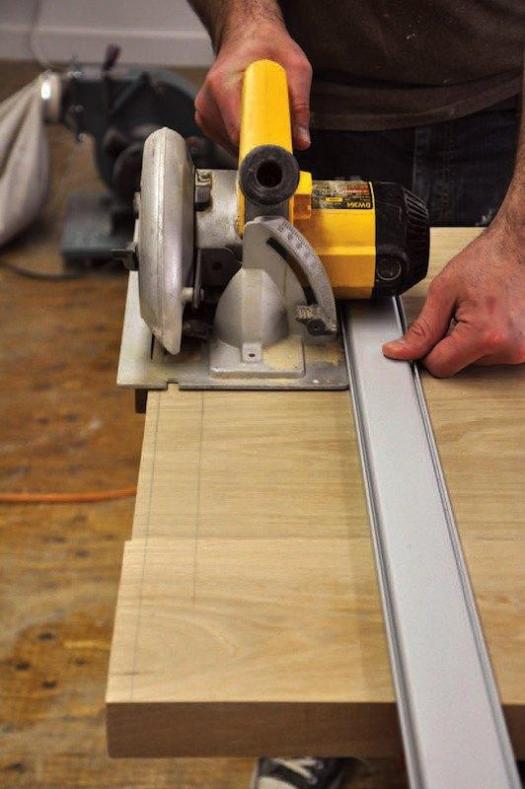
Big Cuts
A track saw, or a circular saw and a straightedge, are great for making long cuts in heavy panels.
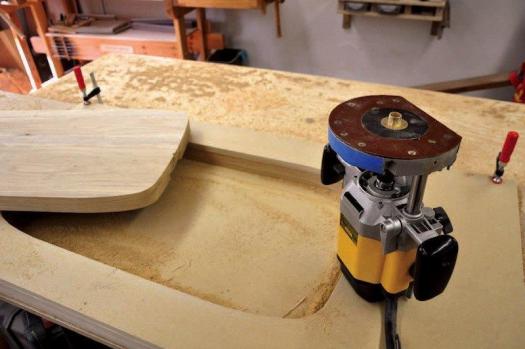
Sink Opening
Working with the supplied paper template Klager made an MDF pattern to rout the sink opening. Use a router, equipped with a guide bushing, to make several passes, to complete the job.
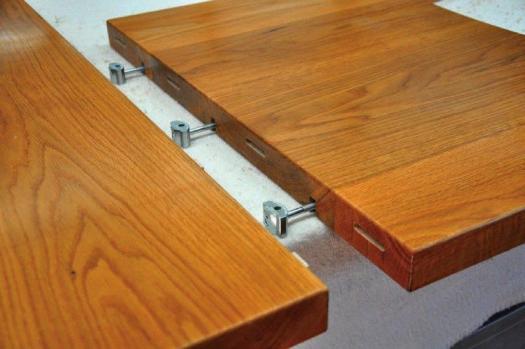
Come Together
Counter connectors, available from many different suppliers, are perfect for securing sections of counter to each other. Be sure to account for wood movement when machining the holes and grooves the hardware fits into.


Thanks for giving good advice. Wooden countertops are a great choice for me, indeed!