TIPS & HOW TO
Cyclone dust collection for a small shop

Marty Schlosser

Cyclone collectors provide an efficient and effective alternative to conventional dust management systems for professional and dedicated amateur woodworkers.
After expanding my shop and adding some additional machinery, I realized that I needed to upgrade my dust collection system. At the time my table saw and planer were connected to a shop-built cyclone dust collector, and I used a shop vacuum to collect dust at source from my other machines or other power tools as needed.
In this article I’ll walk you through the process I followed in selecting and installing my shop’s new cyclone dust collection system. The transition from an unhealthy and sometimes unsafe environment to one that’s virtually dust-free and a joy to work in took a fair amount of research, somewhat more money than a shop built system, and a lot of hard work, but the end result was worth it.
Shop Layout - The Starting Point
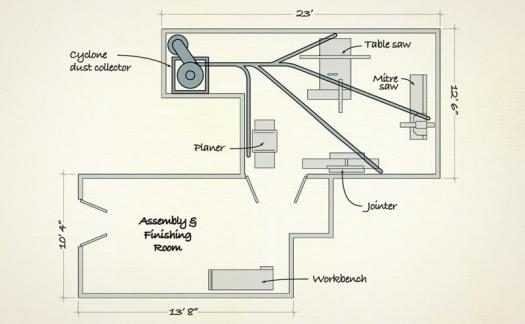
The first step involved laying out a simple floor plan for my expanded shop. The shop is divided into two areas, a milling room, and a bench/finishing room. The cyclone was to be located in a small nook in the back of the milling room, and connected to the table saw and mitre saw, which would remain stationary, and to the jointer and planer, which would need to be movable to facilitate milling of long boards. I decided to include a 2 ½” flex hose drop near my mitre saw, to service less frequently used power tools, and a floor sweep near the jointer.
The floor plan, size of the machinery, and knowing which machines I’d likely have powered on at the same time, determined the size and type of ducting and fittings required to connect them to the dust collector. More importantly, it also told me the two critical figures I needed to select a dust collector that would satisfy my shop’s requirements. The first figure, CFM (cubic feet per minute), denotes the collector’s capacity required to clear away chips, shavings and dust. The second figure, SP (static pressure), is the resistance encountered by the air stream and particulate as it makes its way down the ducting system. Although there are a few books that walk you through the process to determine the CFM and SP peculiar to your set-up, I particularly liked how Air Handling System simplifies the process. According to their calculations, I needed a dust collector capable of delivering 850 CFM at 8″ of SP.
Other Considerations
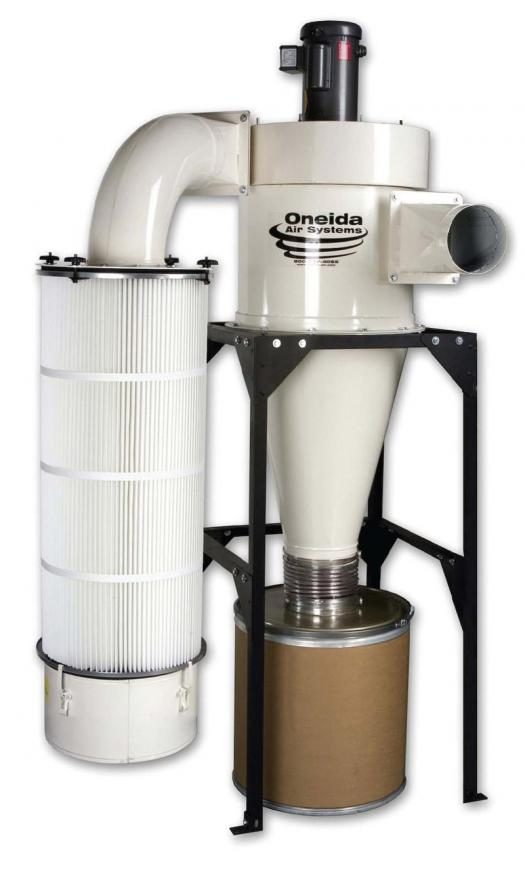
I knew from my previous set-up that I wanted a cyclone separator. Unlike single-stage collectors, these units divert the heavier material and dust away from the filter so it can do its job more efficiently. That capacity comes with a price though, and I don’t mean only money. Most cyclones are taller than other styles of dust collectors and my shop’s ceiling is 8′. I also needed to ensure my shop’s electrical system could accommodate the extra power requirements of the dust collector. For health reasons, I wanted a system capable of filtering out the dust particles most harmful to your health – those in the .2 to 10 micron range. Because I have a basement shop, a relatively quiet operating system was preferred, and of course, one that would be reliable. Finally, I wanted the system to have an easy-to-dump, relatively large capacity dustbin. After some comparative shopping I elected to go with the Oneida Air Systems Pro Series 1500 (oneida-air.com). The Oneida system met all my requirements (along with a five year warranty); and the friendly folks at Oneida helped me design my ducting system and answered my many questions. Oneida cyclones and dusting system accessories are also available from Welbeck Sawmill (welbecksawmill.com).
Preparing Machinery for Hook-up
The machinery you’ll connect to a cyclone system need to be outfitted with properly sized dust ports, or your dust collection performance will suffer. Large tools such as table saws, planers, jointers and drum sanders, usually require 5″ ports, while smaller tools such as router tables can normally get by with 4″ ones. Hand held power tools will normally be connected to the system via 2 ½” or smaller flexible hoses. You also need to bear in mind that tools such as mitre saws and router tables may require two dust ports.
Tool manufacturers have only recently outfitted their machinery with truly effective dust ports, so if you have some vintage iron, you may need to make your own ports. I recommend Bill Pentz’s very informative website for ideas (billpentz.com/woodworking). I used the thinner, 18 gauge boots to make most of my dust ports, largely because 16 gauge boots aren’t a standard stock item. Furthermore, ports are located at the furthest end of the ducting system where pressures aren’t as high, so the lighter 18 gauge boots worked out just fine for me.
Ducting
The ducting plan I obtained from Oneida called for 7″ diameter ducting at the dust collector to run along the ceiling, and then reduce to 6″ at the first branch. Continuing along the ceiling, branch lines were to be 6″ in diameter then reduced to 5″ once they turned to go down the wall. According to the staff at Oneida, these smaller wall sections help maintain the high (3,500 to 4,000 feet per minute) air velocity needed to efficiently move those shavings, chips and dust up and away to the dust bin.
Ducting System
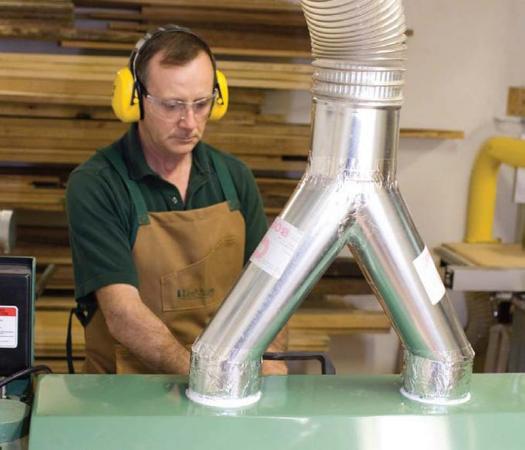
A ducting system consists of everything required to connect machinery and power tools to the dust collector. The list includes: pipes, junctions, ‘Y’s, reducers, airflow control gates, boots, flex hoses, hose connectors, clamps and strapping. These parts are joined together with pop rivets or sheet metal screws and sealed with silicone caulking and foil (not duct) tape. Most experts agree that PVC pipes should not be used because they are capable of causing hazardous static charges and, potentially, explosions. To install ducting you’ll need both a hand crimper and sheet metal snips. Safety glasses and gloves should always be worn when cutting and handling sheet metal ducting.
Sources
I was able to purchase many of the ducting system components from my local heating and ventilation systems supplier (check your local Yellow Pages). For airflow control gates and connectors I used Workshop Supply (workshopsupply.com), and purchased the various hoses from Flexmaster Canada (novaflex.com). To ensure everything would be strong enough to resist the high vacuum pressures, I installed mostly 16 gauge sheet metal components (except 18 gauge for the boots). I opted to use spiral piping for the main trunk line, which although more expensive, has fewer joints. It comes in 10′ and longer lengths, as compared to 16 gauge snap ducting, which comes in standard 30″ lengths.
Installation
Installing the duct work was relatively straightforward but quite time consuming. I began by installing the rigid ducting first. I elected to start at the tool furthest from my dust collector and worked my way towards the dust collector, one run at a time. In all cases, I first layed out and assembled the required ducting components on the floor. For maximum airflow efficiency and quieter operation I oriented everything with the male ends aiming towards the dust collector. A friend helped me raise the runs into position one at a time and affix them temporarily into place before connecting adjoining sections. I opted to pop-rivet (three per joint) all components together, then sealed all joints with metal tape or silicone caulk in hard to reach areas. You don’t need to waste your time taping the snap seams on any of the snap ducting. However, the elbow ‘knuckles’ are potential air leak sources and need to be sealed. Speaking of elbows, try to keep any turns as gradual as possible; radii no less than two times the diameter of the ducting is ideal, as air velocity drops in tight turns, due to the increased SP. This may dictate that you use two 90º elbows at each corner, each set to approximately 45º. Similarly, never use right angle fittings, instead use 45º ‘Y’ branch fittings where possible.
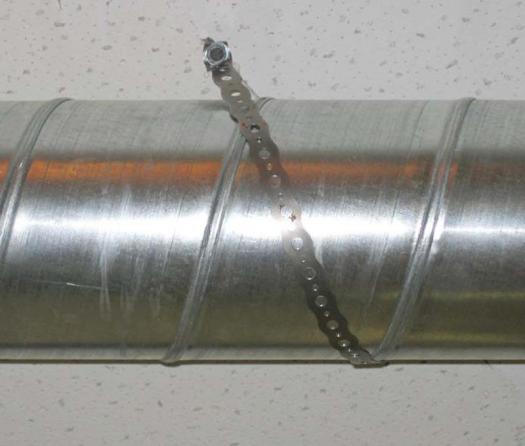
Once you have your first run temporarily mounted in place, move on to the next section. I used standard metal strapping and wood screws to fasten ducting to ceiling joists and the walls. As luck would have it, none of my wall sections ran near studs, so I made 3″ x 8″ mounting plates of ¾” plywood scraps, which I fastened to the walls using drywall screws. I placed these plates wherever things needed to be strapped down, such as where the ducting began its run down the wall and at air control gate locations.
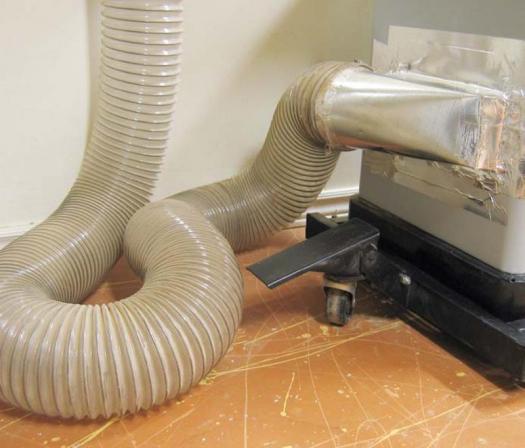
After I had installed all the rigid ducting and connected it to the dust collector, I turned my focus to hooking up the machinery. As mentioned, because of the size and configuration of my shop, I need to move my jointer and planer from their usual positions when milling long boards. On rare occasions, I also need to be able to move my table saw. Hence, these three main tools would be linked to the rigid ducting using 8′ flex hoses. Bear in mind that flex hoses provide considerably more SP than smooth walled ducting sections, so keep them as short as practical. For my other moveable power tools I outfitted them with quick connectors, to facilitate connecting them as needed to the dust collection system.
To deal with shavings and residual dust, I installed a floor sweep and mounted its air control gate just above waist level. These sweeps are relatively inexpensive. I highly recommend that you add one to your shop, as they really simplify clean up.
My new dust collection system has greatly improved working conditions in my shop. Gone are the days of sawdust and shavings underfoot. Clean up is now fast and easy and all that’s usually required is to vacuum hand tool shavings and the small amount of dust that somehow escapes. My spouse is much happier, too, as there’s considerably less dust being tracked into the rest of our house, and a lot less noise generated than with my previous system. Looking back, if I were to do anything differently, it would have been to invest in a new dust collection system years ago.
Shop floor plan
Oneida Pro 1500 cyclone collector
Planer flex hose

Shop-built floor sweep
Commercial drum sander connector
Shop-built jointer connector
Spiral duct strapped to ceiling
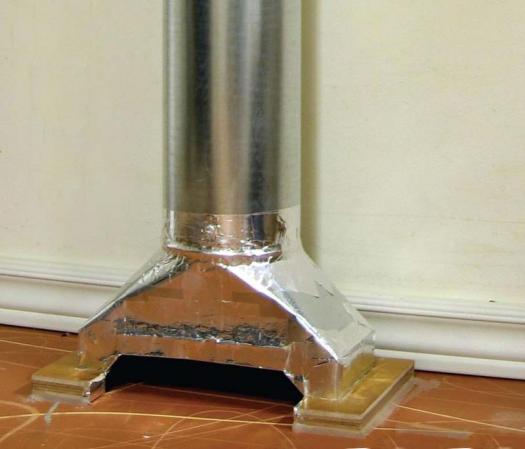
Wall mounting plate at elbow