TIPS & HOW TO
Crafting a window seat

Matt Dunkin

Use some time-saving tricks to make this window seat, then take all the time in the world to relax in it.
A window seat has the potential to be a magical place. A well-designed one becomes a place set away from the main activity of a house, where people can have a quiet conversation or read a book but still remain involved in whatever else is happening. The window seat allows you to be nearer to the out of doors while you are still sheltered inside your home.
When we bought our 1920s house, there was a cantilevered area projecting almost two feet beyond the side of the dining room that provided an ideal nook for a window seat; it was five and a half feet long with a double window. During the first few years that we lived in the house it contained a large dark sideboard that acted as storage for napkins and candles, wine, hot plates and dish towels. As a storage area the sideboard was conveniently located near our dining room table but it blocked light from streaming through the window and made the room feel crowded. I began to dream of building a window seat in that nook with storage beneath it and finally got the opportunity last winter. We were fortunate to have the cantilevered nook to house our window seat but we could also have built a bank of shelves or cabinets on either side of the window to provide a backrest and create the alcove into which a window seat fits so ideally. Because built-in window seats belong to the disciplines of furniture making, cabinetry, and trim carpentry, they require a well-rounded approach to their design and construction.
Design Parameters
In approaching the design of the built-in seat, I knew that retaining the storage area of the piece of furniture we were removing from the nook would be a priority.
Because it would be low to the ground and almost as deep as kitchen cabinets, drawers with full extension slides would allow the most storage and the easiest access. I wanted the seat to fit in with the painted trim of the house and be a comfortable place to sit and read a book but also a place that could be used as additional dining room seating for large family gatherings.
In formulating the finished height of the seat, I projected that a piece of 3″ upholstery grade polyurethane foam set on a 16 ½” plywood seat base (when compressed by a sitting person) would match our dining room chair height of 18 ½”. I divided the drawer area into three and kept the center drawer bank, as the widest, at 30″ making for little waste with the ¾” x 5′ x 5′ Baltic birch plywood that I planned to use as the material of choice for the carcase, the drawer sides and some of the drawer fronts. I happened to have a considerable stock of plywood off-cuts that I could incorporate into the project. While this would make for drawer boxes that were of thicker stock than was necessary I wanted to ensure that I used the materials at hand and created a seat that wouldn’t shift or flex under pressure, especially if my kids were ever to try and step on the drawers.
The Frame
I began by carefully removing the historic baseboard and saving it for future projects. I sealed the area where the plaster met the floor with sprayfoam to seal any gaps. Knowing that the cantilevered projection would not be square, I made my carcase smaller by a generous ½” and was glad I did. This allowed me some adjustment during installation. Once my width dimensions were set, I proceeded to create a simple vertical frame out of ¾” plywood with sides, a back and a divider between each bank of drawers to hold the drawer slides. I decided it was unnecessary to create a base with a recessed toe kick and it would have robbed me of precious storage space. I glued and screwed into the sides and dividers through the plywood back and then prepared to get measurements for drawers.
The Drawers
I wanted to incorporate a wine rack into the window seat, so on the left hand side I laid out three drawers: two blind drawers recessed above the one bottom drawer to which I would attach the drawer front. This would allow the facade to maintain its symmetry, matching the one full-height drawer on the right side that would serve as a liquor cabinet. The center drawer bank would have three shallow drawers for napkins, place mats, candles and other supplies.
I attached the full extension self-close drawer slides with a Kreg drawer slide jig. I then measured for the drawer boxes and began to rip the drawer material from plywood offcuts. I made the sides of the drawers full length and then ripped a channel ¼” deep and ¼” above the bottom of the drawer bottom with a dado blade on my table saw that would allow me to insert a ¼” plywood drawer bottom. Knowing that drawer fronts would cover that channel at the front, and that the back would never be seen, I didn’t bother concealing it. I cut the plywood drawer bottom material ⅛” smaller to allow the drawers to be squared when assembled. I glued and fastened through the drawer fronts into the drawer sides with pocket screws that would again be hidden at the back of the drawer or by the drawer fronts. For the two blind drawers I fastened the drawer front to the sides with a mitre joint and brad nails after scalloping a shallow pull on the bandsaw at the top of the drawer fronts. I flipped the drawer boxes upside down, squared them and ran a bead of hot-melt glue around the perimeter of where the sides and bottom met to keep them square. I then installed the drawer slides onto the sides of the boxes.
The Installation Begins
With the carcase and drawers built, I was ready to install the window seat. I inserted the window seat into its nook so it would be flush with the walls of the nook area and installed the drawers, testing them to make sure they were square and opened and closed smoothly. The floor rose dramatically where the cantilevered area had settled, so I had to shim the frame with cedar shims to level it. I then shimmed the space between the wall and the top of the frame of the seat and fastened to the wall framing with 3″ screws, testing the drawers for smooth functioning again. I repeated the shimming, screwing and testing procedure at the front where the carcase met the floor at either side. Finally, I countersunk and toenail-screwed through the fronts of the partition between the drawer banks with 3″ screws down into the floor. This I later covered with veneer edging and paint.
A Simple Approach to Cutting an Irregular Shape
The nook area to which I would be fitting the top of the window seat was nowhere near square. I used a simple method to cut a custom shape that would reference each corner but that wouldn’t involve a lot of guesswork. I took a piece of plywood smaller than the top of the seat provided and cut four scraps of 1×4 stock and cut a 45° angle at one end of each. I then laid the 1×4 pieces down on the piece of plywood and fit the points of the 45° angle into the four corners of the seat, leaving myself ⅛” of an inch of clearance to get them in and out (even then it was snug due to its irregular shape). I screwed the 1x4s in place onto the plywood, labelled the window side and then carried the jig out to my waiting sheet of ¾”x4x8 paint grade birch plywood. I turned it upside down and marked all four corners onto the plywood with two of the points along the factory edge. I then used a long straightedge to connect the points and cut the resulting trapezoid out with my Festool Track saw. I was pleased with the fit of the resulting top when I flipped it over and inserted it. I fastened the frame to the top with pocket screws. A small bead of paint-grade caulking would close the ⅛” perimeter gap.
Matching Historic Trim
I wanted the window seat to look as if it had always been there, and so matching it to the trim in our house was important. The door openings in our house are trimmed in a traditional style with (from bottom to top) plinth blocks, side casing, a bead moulding, frieze board and a special cap moulding. I was fortunate to find some pieces of poplar cap moulding at a local Habitat for Humanity Re-store, and the rest I made myself with the table saw and a router, scaling the width of the trim down to more closely match the scale of the seat.
My first step was to cut mitred returns to reveal the profile of the cap moulding where it met the wall and glued and brad nailed the returns into place. Next I joined the cap moulding to the plywood top with biscuits, pocket screws and glue, then sanded the surface perfectly flush. I set my router table up with a ¼” roundover bit to handle the next three pieces of trim. I cut plinth blocks out of dressed 1 ¼” stock and rounded them over on the three exposed edges of the face side; that would provide a stop for where the dining room baseboard met the window seat. One-by-two poplar provided the short section of casing, again rounded over on two sides with the router table. Finally, to create the bead moulding I ripped down some 1 ¼” poplar to ⅜” thick and rounded over two edges. I then mitred a return for the bead moulding and added a short section of frieze to complete the trim. I was now ready to add drawer fronts and continue the bead across the front to complete the look.
The Drawer Fronts
The three long central drawers I ripped out of 1×6 poplar leaving a ⅛” gap between the drawers. I removed the top two drawer boxes and the resulting space allowed me to mount the front onto the bottom drawer with 1 ¼” pocket hole screws drilled straight through from the inside. I like pocket screws for this application because they are self-tapping and have a large pan head to pull tight against the inside of the drawer box. With the middle drawer box back in place, I rested the drawer front on ⅛” spacers set on the drawer front below and screwed it into place. The remaining top drawer front was installed with the drawer front again installed on spacers but this time with the drawers open a few inches to allow my drill access.
Taking careful measurements for the side drawer fronts, I cut them out of a single piece of ¾” Baltic birch and sanded the edges to smooth them for paint and fine-tune the fit. To install these I started my screws inside the drawer box and let them protrude through the box by ⅛”, fit the drawer front where it needed to go and then pressed hard to create two tiny holes in the back of the drawer front. Opening the drawer I then used the holes and screws to index where the drawer front should attach and screwed it into place. I was able to then draw a horizontal line with a straight edge to locate where the final piece of bead trim was to go. I ripped it to the correct depth so that it would make a clean line, which continued right across and tied the look of the seat in with the nearby door and window casing. I fastened it to the drawer fronts with glue and brad nails, holding it in place with small clamps until the glue dried.
The Finish
Indoor air quality was an important consideration for me when I approached the finishing of the window seat. My clients are often interested in using materials that are good for the environment and that are healthful for people. The paint of choice for the outside of the window seat was two coats of low-VOC (Volatile Organic Compounds) Aura Latex Paint in a Satin finish from Benjamin Moore. It had a fast dry time, minimal odour and, importantly, is easily wipeable, unlike less durable zero-VOC paints. I wanted to clear-coat the interior of the drawer boxes and chose an AFM Safecoat Low Odour Polyureseal BP in a Satin Finish. Safecoat products are often acceptable to people with environmental sensitivities and contain minimal VOCs. Wetting the wood beforehand and dewhiskering the resulting raised wood fibre saved on the amount of sanding between the two coats I applied.
The Cushion
I sourced the 3″ polyurethane foam for the cushion, from a local upholstery shop and they cut it to my measurements; purposefully snug so that it would prevent movement. I ordered the cover for the foam from Tonic Living (www.tonicliving.com) in Toronto, who took my measurements and then shipped it to me. I was able to order the espresso colour in an organic cotton, with a wrap-around zipper and piping. Wanting the cover to be tight, I sized the cover ½” smaller than the foam and was pleased with the resulting fit. The recommendation was that the cover be dry cleaned but we have washed and hung it with no ill effects. Some throw pillows of various sizes provide ample and flexible padding for our backs.
Our window seat continues to be both a meeting place for our family, and a quiet place to curl up and find some solitude. It has become a central feature of our home, and an addition that has added both to our home’s value, and our enjoyment as we live here. And I enjoyed the process of turning it from dream to reality.
Photos credit: Matt Dunkin
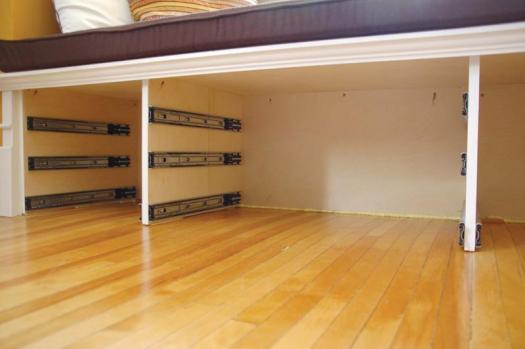
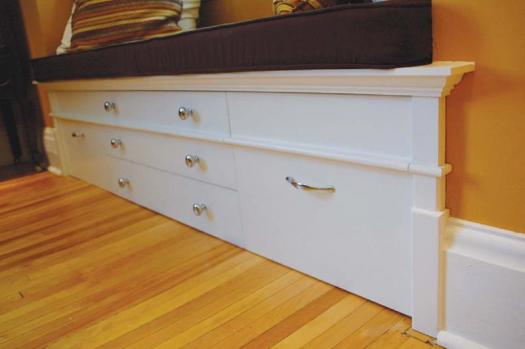
Strong and Straightforward
The structure is made of ¾" plywood and sits directly on the floor, where it can be shimmed. To secure the structure, fastening methods are kept simple: pocket screws and toenailed screws do the job nicely.
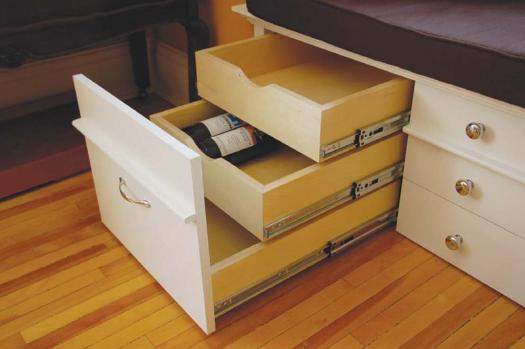
Easy Access
Full extension slides reveal a full selection of wines and liquor. To keep the façade uncluttered, one drawer front is used for three drawers on the left side of the bench.
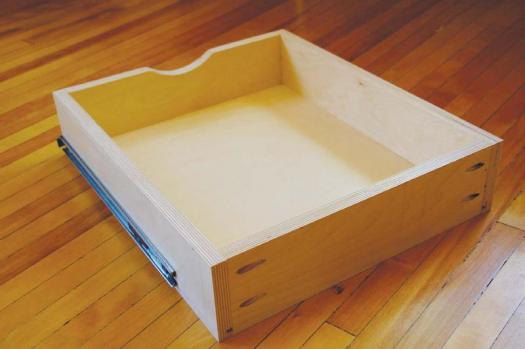
Keep It Simple, Smarty
Mitre joints and butt joints re-enforced with pocket screws are used for the drawers. A curved recess at the front of the drawer allows it to be pulled out.
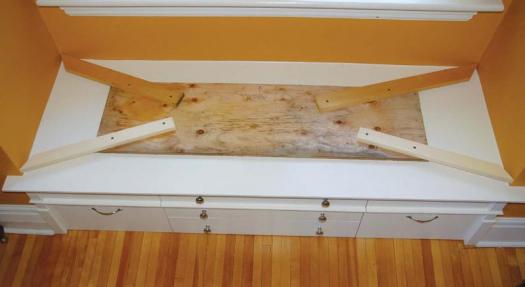
Good Point
To make it easier to obtain the shape of the nook, Dunkin used this simple four-point jig. Each arm can be extended right into the corner and screwed into place. Those measurements can be transferred to the work piece.
Details Are Important
Detail of existing trim that needs to be matched.
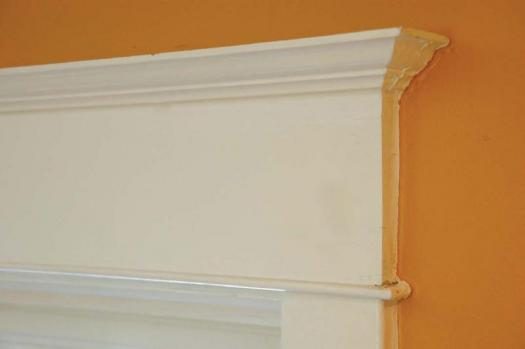
A Good Match
The trim incorporated into the bench makes it seem like it was always there.
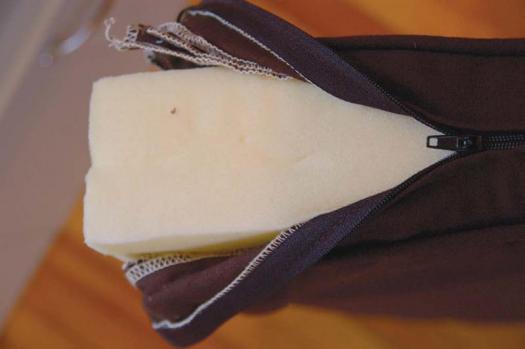
Comfy Cushion
A custom-made cover with a generous cushion helps give the entire area a professional look. And it’s comfortable to sit on too.


What a beautiful job. I love the 3-in-1 drawer idea. Makes such good use of the bump-out area.