PROJECT
Wine Rack with Serving Tray

Michael Kampen

Find more Home Decor projects
This simple to build wine rack will store up to eight one-litre bottles of wine.
It has a handy shelf that you can use to store a cork remover, wine guide, white gloves and the like, and a removable top that does double duty as a serving tray.
A bit too small for your collection of Mouton Rothschild 1945? No problem – you can easily extend the storage capacity by making the sides taller and adding more rails.
However if you do build a taller rack secure it to the wall to prevent it from tipping over. To simplify joinery I used dowels, splines and knock-down hardware. Connector bolts hold the side assemblies to the rails for easy
disassembly. If you don’t have access to a doweling jig for this project you can use biscuit joinery, mortise and tenon joinery, or countersunk screws. To keep the design as clean and uncluttered as possible, and to reduce material costs, I chose quarter-sawn red oak. In place of oak you can use any hardwood that compliments the decor in whichever room you put your wine rack.
Wine Rack with Serving Tray
Legs and Stretchers Bear the Load
To simplify joinery I used dowels, splines and knock-down hardware. Connector bolts hold the side assemblies to the rails for easy disassembly. If you don’t have access to a doweling jig for this project you can use biscuit joinery, mortise and tenon joinery, or countersunk screws. To keep the design as clean and uncluttered as possible, and to reduce material costs, I chose quarter-sawn red oak. In place of oak you can use any hardwood that compliments the decor in whichever room you put your wine rack.
To avoid glue lines and achieve a slim, straight look, begin with 8/4 (2″ thick) quarter sawn-stock. If you can’t get 8/4 stock, glue together three pieces of 3/4″ stock, mill it ⅛” undersized, and then glue a piece of ⅛” veneer over the glue line. It is quite easy to re-saw your own veneer (for more on re-sawing see the “Little Ripper” article in Canadian Woodworking magazine, Feb/Mar’04, Issue #28). You’ll want to place the best side of each leg facing towards the front, which will be most visible.
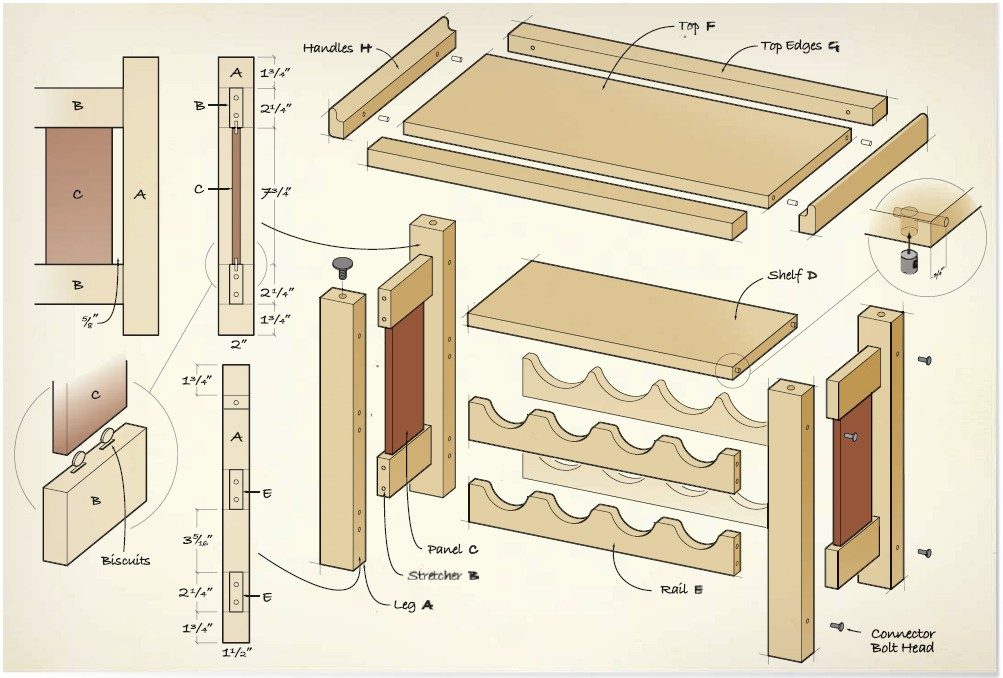
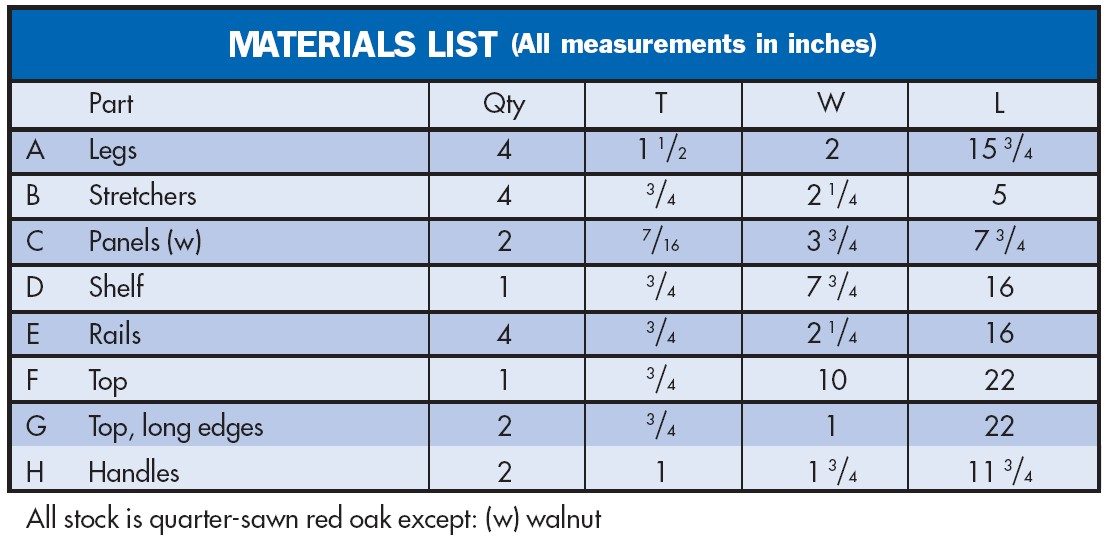
- Cut and mill stock for the legs (A) stretchers (B).
- Locate and drill ⅜” dowel holes, first on the stretchers, and then on the legs.
- Dry fit the legs and stretchers together with dowels.
- Before you mill stock for the panel (C), measure the distance between the upper and lower stretchers and the legs. Ensure that you cut the panel so it fits snugly between the stretchers.
- You can dowel or biscuit the panel to the stretchers. I used #10 biscuits.
- Dry fit the end assemblies to be sure everything lines up.
Rack and Rail
The rails that hold the bottles in place form the racking for this stand. Select the material for the front rails carefully, as they will be most visible. Choose pieces that have straight grain; wild looking grain will clash with the curves on the rails and give the project a confused look.
- Cut and mill the material for the shelf (D) and the rails (E).
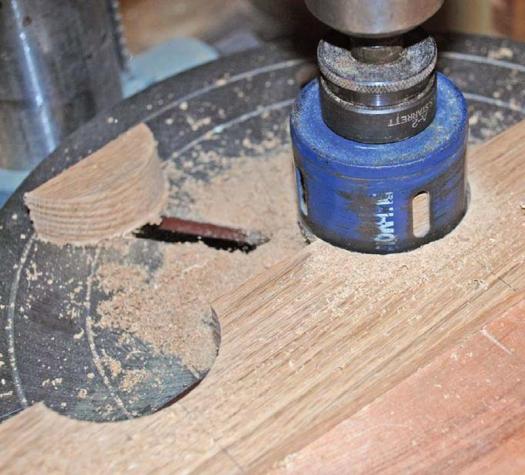
- Use a drill press to cut the curves into the rails that will hold the bottles. The curves for the rear rails are cut with a 4″ hole saw and the ones on the front rails are cut with a 2″ hole saw. Clamp a piece of plywood to the drill press table as a fence and clamp the wood to the table when drilling the holes.
- Drill ⅜” dowel holes in both ends of each rail and one ¼” hole in both ends of the shelf. Center the shelf holes ¾” from the outside edge.
- Locate and drill corresponding dowel holes on the legs (A).
- Dry fit the end assemblies, and then dry fit the rails and shelf in place.
Knock Down Fittings for a Collapsible Rack
To make this unit collapsible, a few of the dowel holes that have already been drilled will need to be enlarged. However, if you prefer to permanently assemble this rack, skip the knock-down section below, and just assemble the unit with dowels.
- Using a ¼” drill bit,
A Convertible Top
- If you do not have material that is wide enough, select some straight-grained boards and glue up stock for the top (F). Mill it flat and cut it to size.
- Cut the material for the long edges (G) and the handles (H), and mill to size using the jointer and thickness planer.
- Drill two ⅜” dowel holes in the edge of the top, and then corresponding holes in the handles.
- Using a hand plane or sandpaper, gently round over the top side of the long edges.
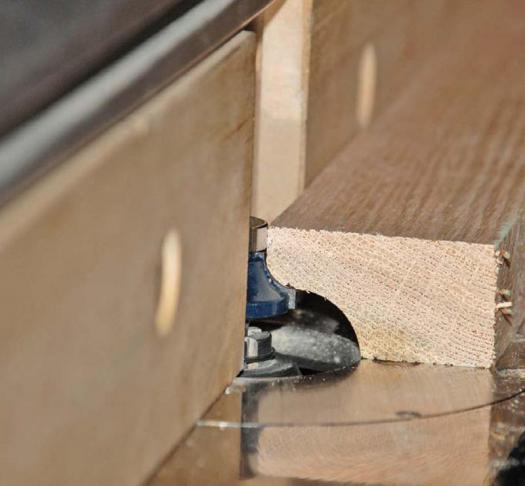
- Install a ½” piloted cove bit in the router table. Using a fence in combination with the bit rout a cove on the inside edge of both handles.
- Install a ¼” piloted round over bit in the router table and raise the bit above the table to cut the round over adjacent to the cove. With the first side cut, lower the bit, turn the piece over and run a cove on the other side as well to form a smooth rounded top on the handle.
- Install a ½” piloted round over bit in the router table and round over the outside lower edge of the two handle pieces.
- Put a ⅛” wide chamfer on all edges of the four legs, the four long edges on each stretcher, the four long edges on each panel, and the four long edges on each rail. You can do this quickly with a block hand plane on the straight sections, and with a 45º chamfer bit in the router table for the curved sections.
Apply Finish Before Assembly
At this stage, all of the pieces have been machined and shaped. Sand the pieces with 150 and 180 grit sandpaper. Apply a coat of Watco Natural Danish Oil Finish to every part, being careful not to get any finish in the dowel holes or on surfaces that will be glued – a thin strip of masking tape will help with this. Follow up with a coat of wax. If you are building this piece to match an existing set of cabinets or furniture adjust your finish to suit.
All Good Things Come To an End
This project goes together without much fuss. The important thing to remember is not to glue the rails to the dowels if you are making a knock down rack. For the splines you can use ⅛” plywood or solid wood.
- Glue and clamp the long rails (G) to the top (F). Let the glue dry.
- Apply glue to the dowel holes on the handles (H) and the top, insert the dowels, clamp and let the glue dry. Be careful when tightening the clamps; the handle ends are rounded and tall, and your clamps may want to pinch the pieces together, opening up the joint on the underside.
- Apply glue to the dowel holes on one set of stretchers (B) and the legs (A), insert the dowels into the leg holes, insert the biscuits (or dowels) in the stretchers, slip the panels (C) onto the biscuits, and clamp the legs to the stretchers. Check for square.
- Repeat for the other set of stretchers and legs.
- When the glue has cured on the end assemblies insert dowels in the ends of the rails, and clamp the legs in place.
- Slip the shelf (D) into place.
- Insert the connector bolt cross-dowels into the shelf and the lower rails, and feed the connector bolts through the legs into the shelf and the lower rails.
- Carefully tighten the connector bolts.
- Using a ½” Forstner bit, drill a hole in the top of each leg to receive a 1/2″ diameter ‘nail in’ furniture glide. The hole should be slightly deeper than the nylon glide is thick. Set the four glides in these holes, nail pointing up, and center the tray on the wine rack. Press it in place until the glides stick, and then turn the rack over and use a tack hammer to drive them in the rest of the way. This will keep the tray centered on the rack and prevent it from sliding off the legs.
- Wait one half hour after applying the glue and then remove any squeeze out before it hardens completely.
- Once the glue has dried give everything a final coat of wax to even out the sheen on the project.
Now you’re ready for the most important part of the project. Place the rack in its domain, stock it with your favourite bottles of the fruit of the vine, cozy into your favourite armchair with this month’s copy of Canadian Woodworking, put your feet up, and toast the completion of another project.
Use hole saw to drill curves
First rout handle with ½" piloted cove bit

Rout again with ¼" piloted round over bit
Finish with ½" piloted round over bit
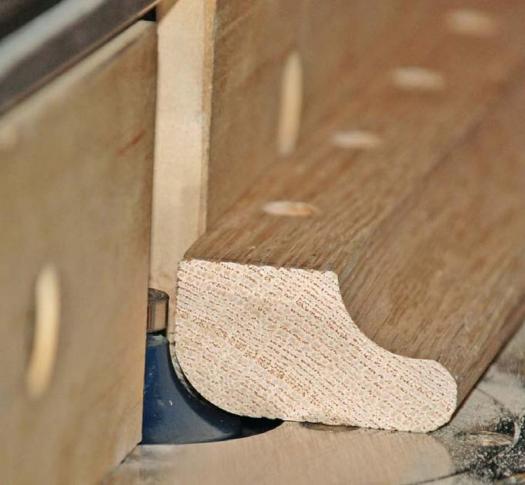
Illustration by James Provost


Why are the wine bottles lying down? Surely Canada has screw tops by now.
Corked wine is stored horizontally to keep the wine in contact with the cork and help prevent the cork from drying out. Screw top wine bottles can be stores upright.