PROJECT
Ultimate router fence

Michael Kampen

Find more Shop projects projects
Build this rock solid fence to handle any routing task with ease and accuracy.
This fence is designed to be used with my router table (“Router Work Station”, Issue #47, Apr/May ‘07). It is meant to be securely clamped to the overhanging edges of the Veritas table top (item 05J20.01), leevalley.com, by means of a couple of C-clamps. If you use a different table, adjust the dimensions in the Materials List accordingly, and if there are slots in your top, add some slots to the base (part ‘A’) to facilitate clamping it to the top.
The fence features a 2 ½” dust collection fitting (E) and sacrificial fence sections (G) that can be closed up on the bit for more effective control and dust collection. To keep this project straight and square, I used ¾” Baltic birch plywood and created a solid joint along the two long edges using the Dowelmax jig (dowelmax.com). The rest of the joints are held with countersunk brass screws.
Ultimate router fence
Making the Fence
• Begin by cutting the base (A), face (B) and top (C) to size. Be sure that they are perfectly square or your fence will have a slight curve or twist to it.
• Mark the center of the base and fence and then cut out the 3-3/4″ x 2-1/8″ opening on the two pieces. Use a scroll saw or bandsaw for this. I sized this opening to accommodate the largest router bit I would likely use (a large horizontal panel raising set). You can make this opening larger or smaller to suit the largest bit you are likely to use.
• Use a dowelling jig to drill a series of holes along the two edges where the base, top and face pieces meet. Because of the bit cut-out, drill two groups of holes for each edge and index them from either end toward the middle. This might seem like overkill, but you want the fence to be as rigid as possible.
• Fit the pieces together and then cut the four gussets (D) to fit.
• Cut the back (E) of the chip collection box to size from some 3/8″ plywood and mark the center of the piece. Draw a circle onto this to accommodate the opening of your dust collector pick-up and cut this out using a scroll saw. You could also use a hole saw on the drill press but be sure to secure your piece properly to prevent it from spinning as the hole is cut. I simply force fit my dust hose into the opening I cut in piece E. Alternately, you could attach an ABS dust port (item 03J61.01), (leevalley.com), onto the back of piece E. If you opt to do this use 3/4″ ply for the back (E) rather than 3/8″ material, as you don’t want the screws to penetrate through the other side, where they might serve to trap wood chips.
• Use four dowels to temporarily assemble the base, fence and top. Mark the locations of the gussets and then locate the stopped slots to fasten the sacrificial faces to the front of the fence.
• Use a router jig (“Mortising Jig” Issue #56, Oct/Nov ‘08) or a router table to cut these slots into the fence.
• Glue the base, fence and top together using dowels and clamps. Be sure to check to see that it is square. Slide the gussets into place and then drill countersunk pilot holes and drive in some steel screws. When all of the steel screws have been driven in, back them out one at a time and replace them with brass screws. This is really an extra bit of precaution; I always use brass, rather than steel screws, in the vicinity of blades and bits.
• Cut the front face piece (F) and run a rabbet along the lower edge to accommodate the T-slot track. Mount the T-track in the rabbet. T-track is available from most hardware stores.
• Mill the piece for the sacrificial faces (G) and then cut it in half. Locate the two mounting holes and drill these on the drill press using a fence to keep them perfectly in-line. Begin by using a Forstner bit to drill a 3/4″ diameter hole, 1/4″ deep for the bolt head and then switch to a 1/4″ bit to complete the hole for the shaft. Optionally you can use a piece of 3/4″ melamine or phenolic plywood for the sacrificial face. They provide a much smoother surface than Baltic birch. I made a spare set of sacrificial fences as it’s inevitable that they will become damaged over time.
• Turn the fence upside down on your work bench and use the top of the bench to align the front face piece with the top edge of the jig and then drive a few screws into it from the back. I’m assuming of course that your workbench top is flat; if not, cover it with a piece of plywood before assembling the router fence.
• Fasten the sacrificial faces to the fence using 1/4″ x 20 large head bolts and handles.
Using the Fence
To use this fence, simply clamp it to the surface of your router table with a couple of C clamps at the sides. Adjust the moveable sacrificial faces to close up on the bit and hook up a dust collector to the 2-1/2″ fitting on the back. The T-track on the front is used to hold feather boards, (“Featherboard”, Issue #53, Apr/May ‘08) or end stops in place as required.
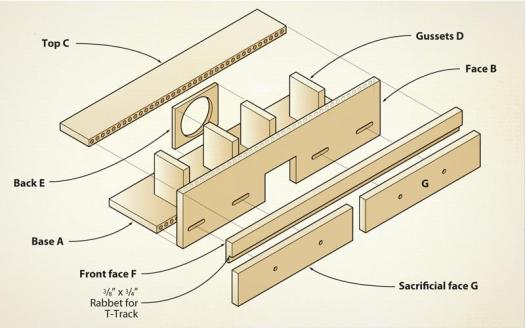
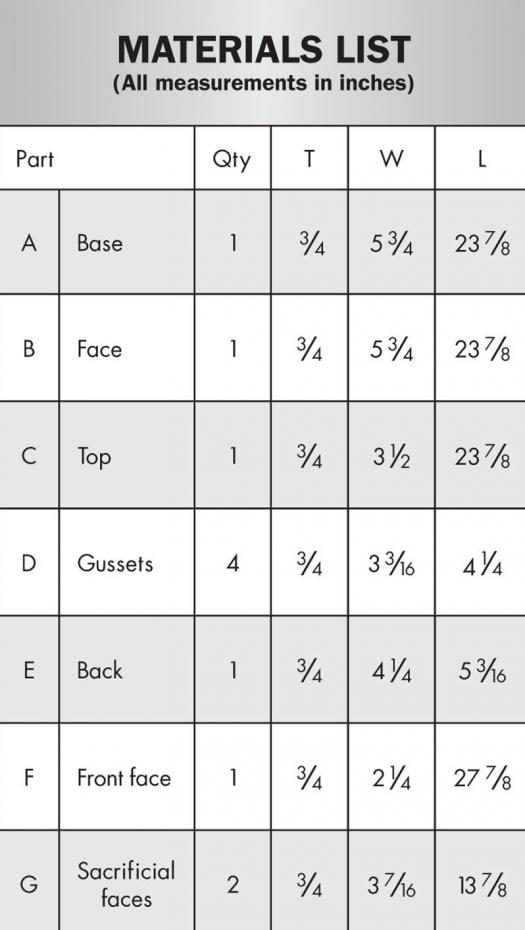
Illustration by James Provost