PROJECT
The glow of tradition: build a wood and copper lantern

Rick Campbell

Find more Featured projects , Gifts / Crafts projects
Few projects combine rustic charm and timeless craftsmanship as beautifully as these wood and copper lanterns.
Whether displayed indoors or out, a pair of these lanterns will instantly light up any space with a comforting glow and cozy ambiance. The textured glass panels framed on the sides and the gracefully aged copper domes crowning the top lend a hint of old-world character to this timeless design.
The weathered patina applied to the copper is a simple process involving just a few common household ingredients – one of which may surprise you. Don’t be intimidated by the thought of working with glass and metal because a few handy shop tips and clever shortcuts offered along the way will bring this project well within reach.
The glow of tradition: build a wood and copper lantern
Rails and stiles
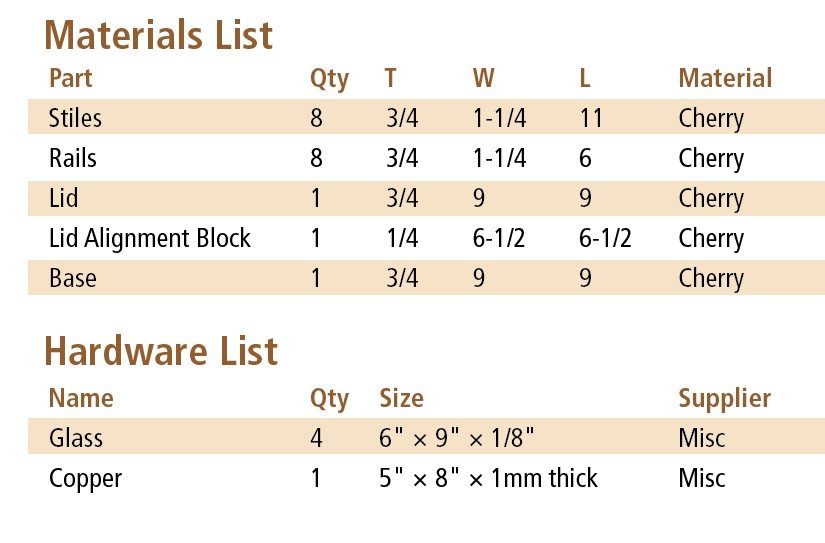
Begin by preparing the horizontal rails and vertical stiles that comprise the frames for the side panels. Mill up enough 3/4″ thick material to yield all the frame members you’ll require. Don’t forget to double the parts count provided in the materials list if you plan to construct a matching pair of lanterns. Also, plan for a few extra parts that will be used as test pieces during the construction process.
After jointing one edge of your stock, rip enough 1-1/4″ wide strips to create blanks for all the frame members and the additional spares. Square up one end of the blanks, then crosscut the parts to their final length using a stop block for consistency and a backer board to help prevent tear-out.
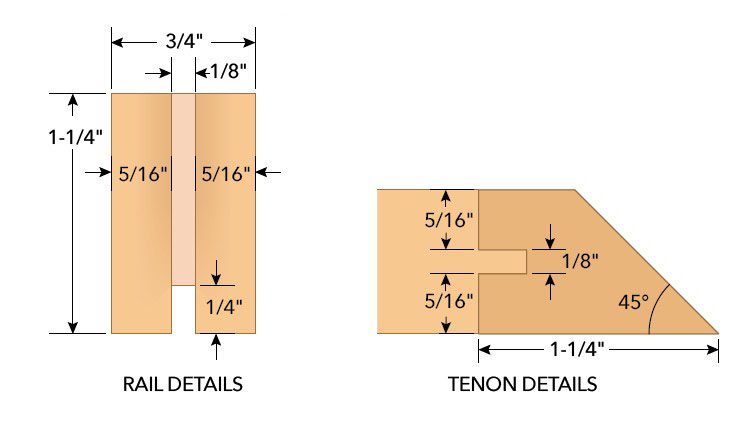
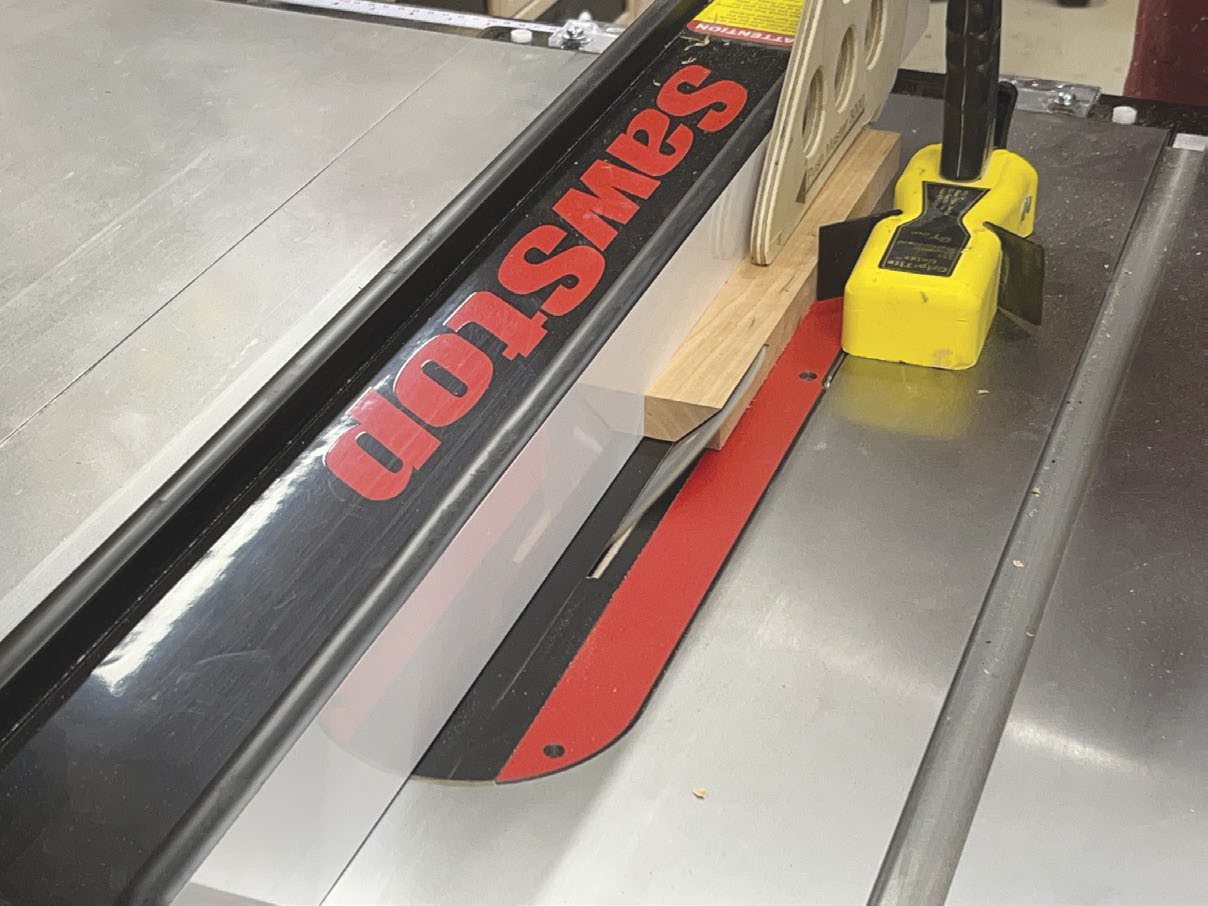
Next, mill a 1/4″ deep slot down the centre of each frame member to capture the edges of the glass panels. The groove should be about 1/8″ wide, though the exact dimension will depend on the thickness of the glass you have sourced for the project. Begin by positioning your saw fence so the blade is centred on the edge of the blanks and then set the cutting depth to 1/4″. Using a featherboard to hold the material firmly against the fence and a push stick to keep hands clear of the blade, run one of your test pieces to cut a groove. Now, rotate the workpiece 180° and complete another pass. This two-cut method will result in a perfectly centred groove every time.
Slide your sheet of glass into the slot to check the fit. Your goal is a comfortable fit without excessive wiggle room that could cause the glass to rattle in the slot. If you’re not satisfied with the fit, nudge the fence slightly to make fine adjustments to the set-up, then try again with another test piece. Once you’ve achieved the results you’re looking for, go ahead and complete the grooves for all the rails and stiles.
Time for tenons
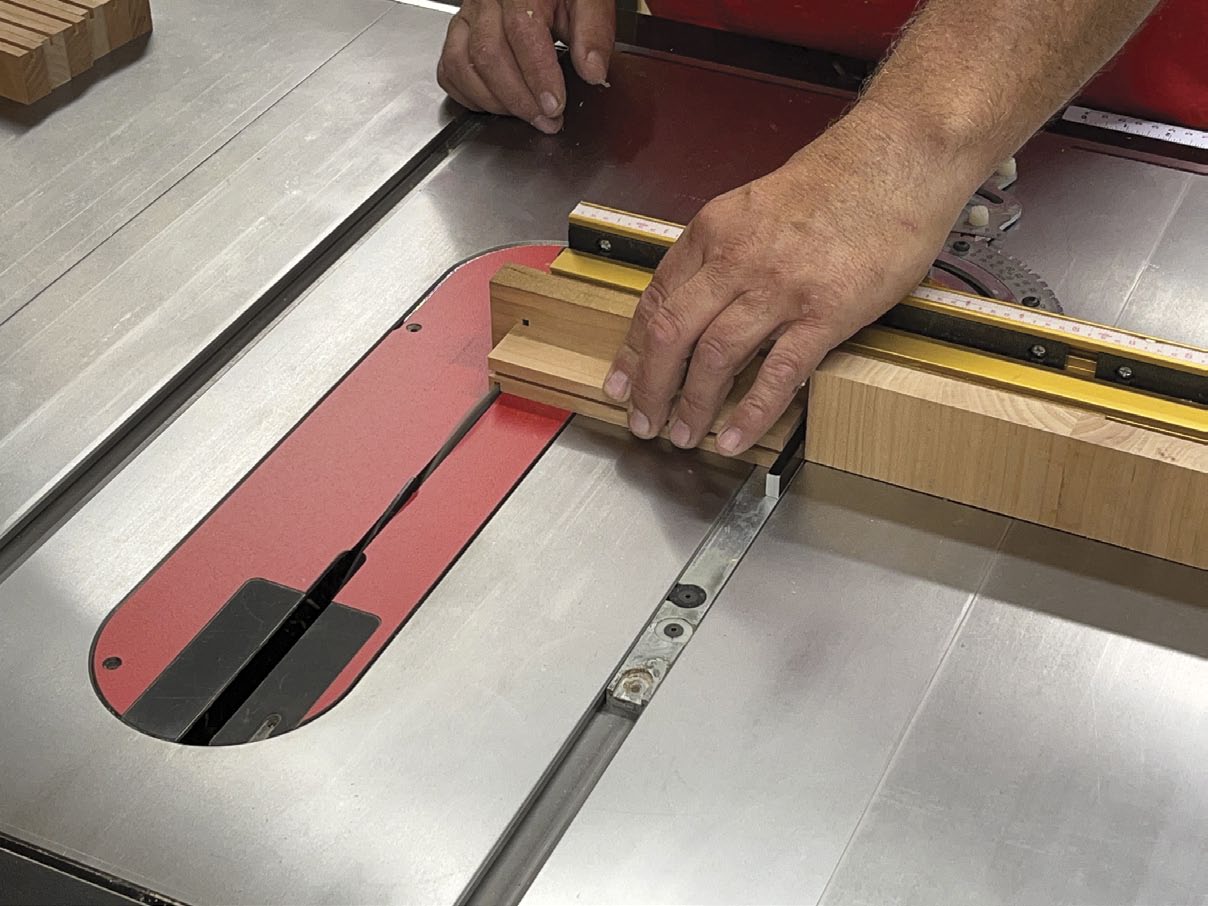
The next step is to mill stub tenons on the ends of the horizontal rails. These short tenons will complete the connection with the stiles and should be sized to fit snugly in the same slots that receive the glass. Start by using one of your frame parts as a gauge to set the blade height just shy of the slot opening. Attach a backer board to your mitre gauge, then position a stop block so the end of the rail blanks just barely graze the edge of the saw blade. Insert a 1/4″ thick spacer (or a commercial set-up gauge) between the stop block and the end of the rail blank, then make a cut to establish the tenon cheek on one side. Remove the spacer and complete more passes to clear the remaining waste from the end.
Flip the piece over and repeat the entire procedure to form the other side of the tenon. At this stage, the tenon is intentionally slightly too thick to fit comfortably within the groove. Sneak up on the perfect fit by using a sharp chisel or shoulder plane to gradually remove material from the face until the tenon end slides into the slot with gentle pressure. As you custom fit each joint, mark the mating parts so they can be returned to the same location during final assembly.
Bevel the edges
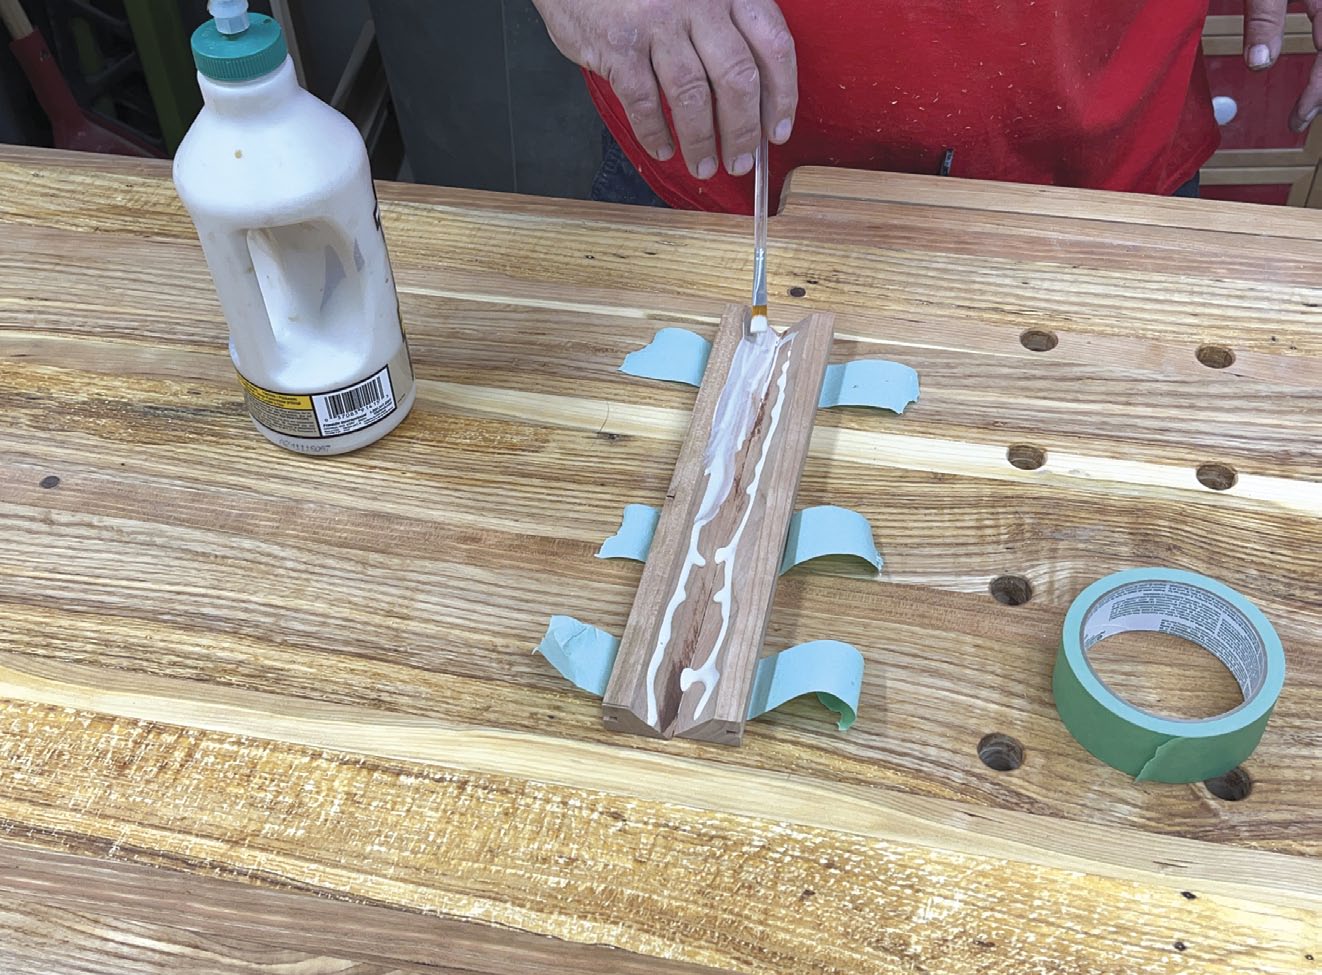
The next task is to bevel the edge of the stiles to make the connection in the corners. This work is completed at the table saw with the blade tilted to 45° and the fence set to make a cut that exactly intersects the outside corner of the stiles. As always, test cuts are your friend, so use them to fine-tune the set-up before cutting into your finished parts. When the set-up is to your satisfaction, go ahead and bevel the outside edge of each vertical frame member.
When this work is done, pair up the stiles to assemble the corners with glue applied to the joints. If you intend to use your lanterns outdoors, be sure to use a weatherproof adhesive, such as Titebond Type III PVA. Traditional clamps won’t work to secure the mitred joints while the glue dries, so a simple solution is to tightly apply pieces of masking tape across the tips of the mating bevel joints, then wrap / fold the assemblies together with strips of tape added to keep the glue joint tight. Clean up any squeeze-out from the inside corners before the glue has a chance to harden.
Optional approach
If you don’t like the thought of bevelling the narrow stiles, you could adjust the order of operations slightly. Assembling each side (with two rails, two stiles and a piece of glass), then machining the bevels, will also work. You might find it easier to control each side assembly, rather than each single stile. It also might make assembling the four sides easier.
Glass panels
Next, clear the bench of woodworking tools and prepare to cut the glass panels. I sourced the glass for my lanterns from a local stained-glass supplier. Most suppliers will have a wide variety of styles and colours to choose from. If you’re going to cut the glass yourself, you’ll need a straight edge to serve as a guide, a felt-tip marker to lay out the cuts, oil for lubrication and a carbide-cutting wheel to score the glass.
Pad the work area with cardboard or a few layers of craft paper to protect the glass. Lay the glass sheet flat on the work surface and mark the required cuts with a felt-tip marker. Dip the cutter wheel in oil, then press down firmly as you draw the tool across the glass, guided by the straightedge. You’re not trying to cut through the glass, just create a controlled fracture line. To break the piece, place a narrow dowel directly under the scored line and gently apply even pressure on both sides until the glass snaps cleanly along the fracture line.
I confess, I wasn’t brave enough to cut the glass myself. A good friend who is a stained-glass artist took care of this for me. If you don’t know someone with that skill, most glass suppliers will cut the panels to size for a nominal fee.
Frame assembly
With your glass panels in hand, you’re almost ready to assemble the framed sides. However, before you do, consider sanding and applying finish to the interior face and edges of the frame members. It’s much easier to tackle this now, before the glass panels are installed. If you decide to pre-finish these areas, be sure to mask off any sections that will receive glue to avoid adhesion problems later on.
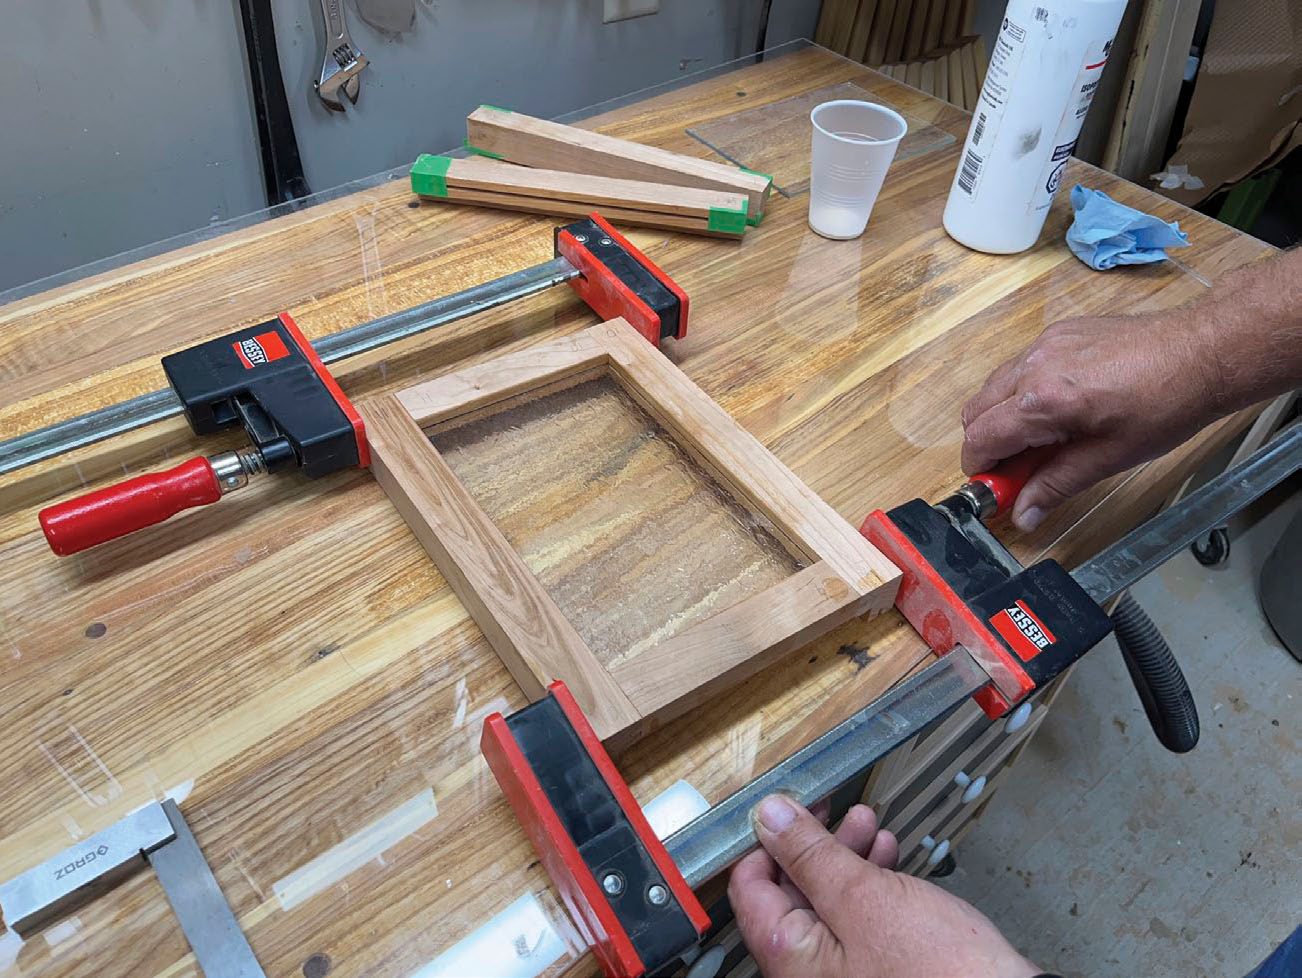
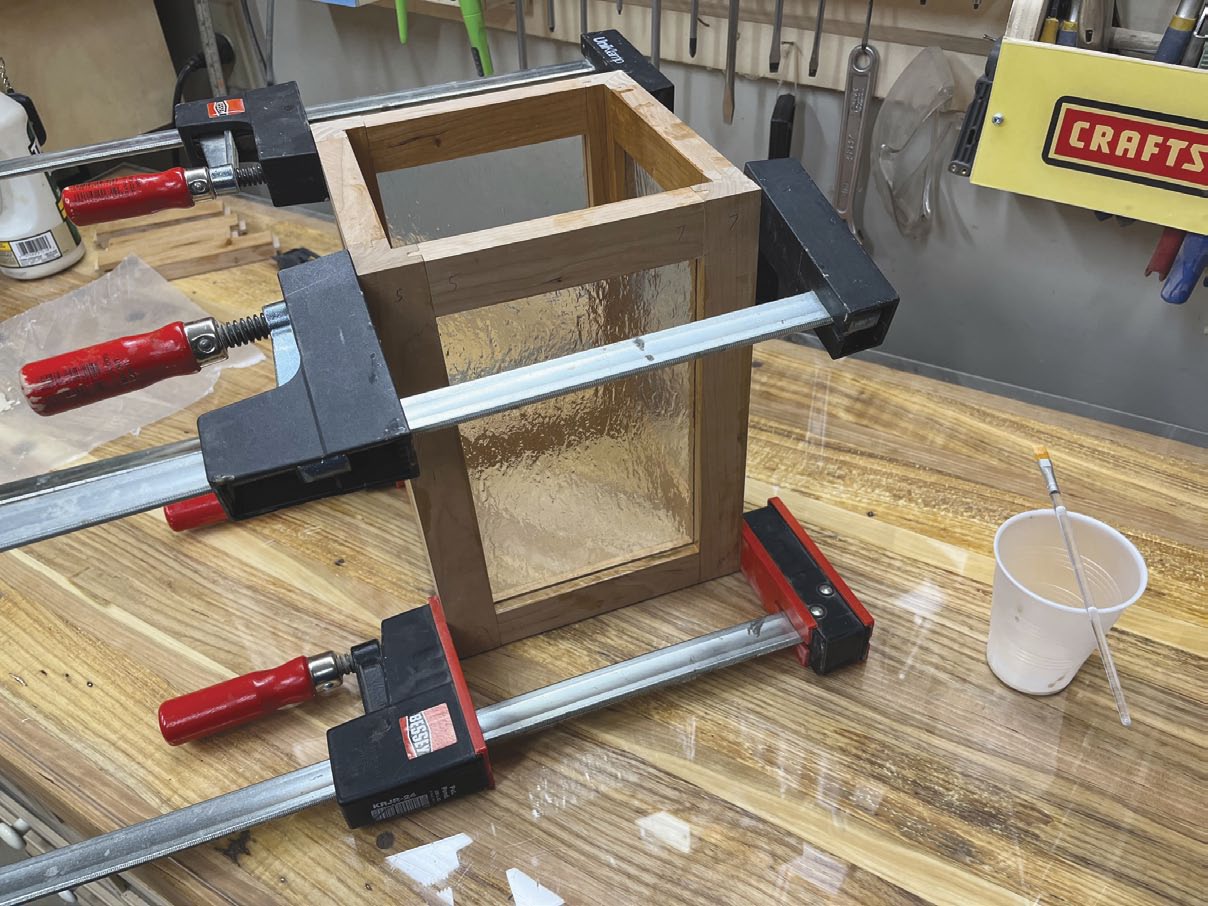
I assembled my frames in stages so I wouldn’t be racing the clock to finish the job before the glue set up. The first stage is to assemble the panels from two opposing sides. Brush glue on the rail tenons, then fit the frame members together with the glass in place. If you are using textured glass, make sure the textured face is oriented the same way on each panel for a consistent appearance. Clamp the assemblies and check for square before setting the panels aside to dry. Once the glue is fully cured, connect the two completed frames with the remaining rails and glass. Check that the opening on the top of the completed assembly is square before the glue has an opportunity to cure.
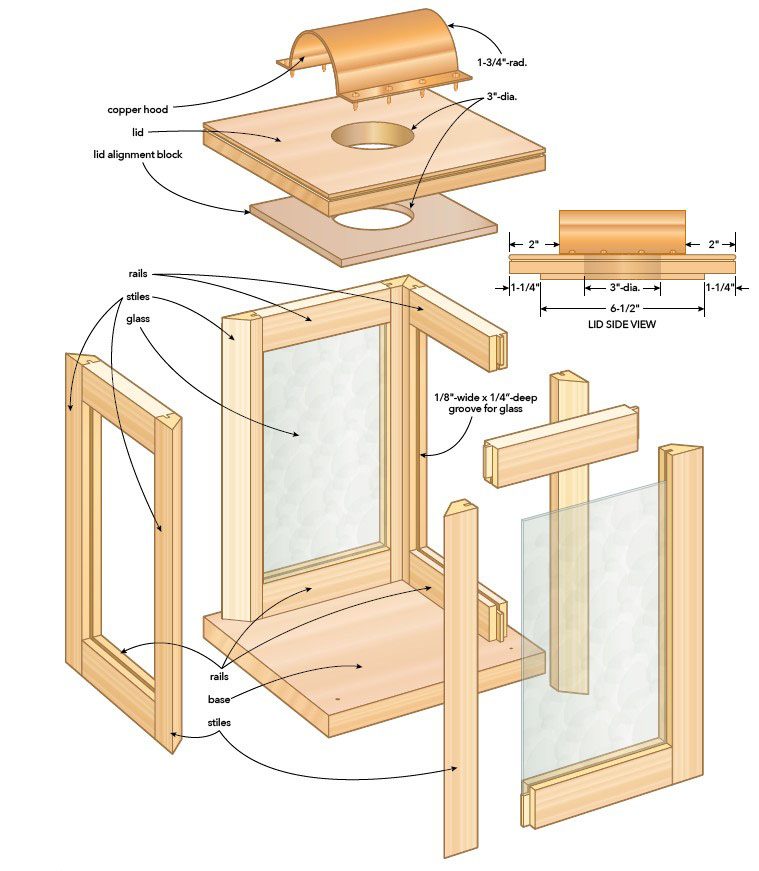
Base and lid
The lid and base for this project are identical in shape and size. I didn’t have stock wide enough to make these parts from a single board, so I edge-glued narrower stock to create two wide panels. Complete a crosscut to square up one end of each panel, then set the fence to cut the 9″× 9″ parts to their final size.
Before moving on, mark the exact centere of the lid panel by scribing diagonal pencil lines from the corners.
The intersection of the lines is where a hole will be located later on to vent a lit candle. We need to mark this location now, before the edges of the lid are rounded over in the next step.
There’s a decorative bead detail around the top edge of both the lid and base. This profile is milled at the router table using a 1/4″ beading bit and a fence. If you didn’t have a bead bit, using another profile (Roman ogee, round over with fillet, chamfer, etc.) would also work nicely. The choice is strictly an aesthetic one. Use some scrap to dial in the bit height and fence position before committing your finished panels to the router. It’s best to profile the end grain edges first, so any tear-out is cleaned up when you move onto the sides that run parallel with the grain.
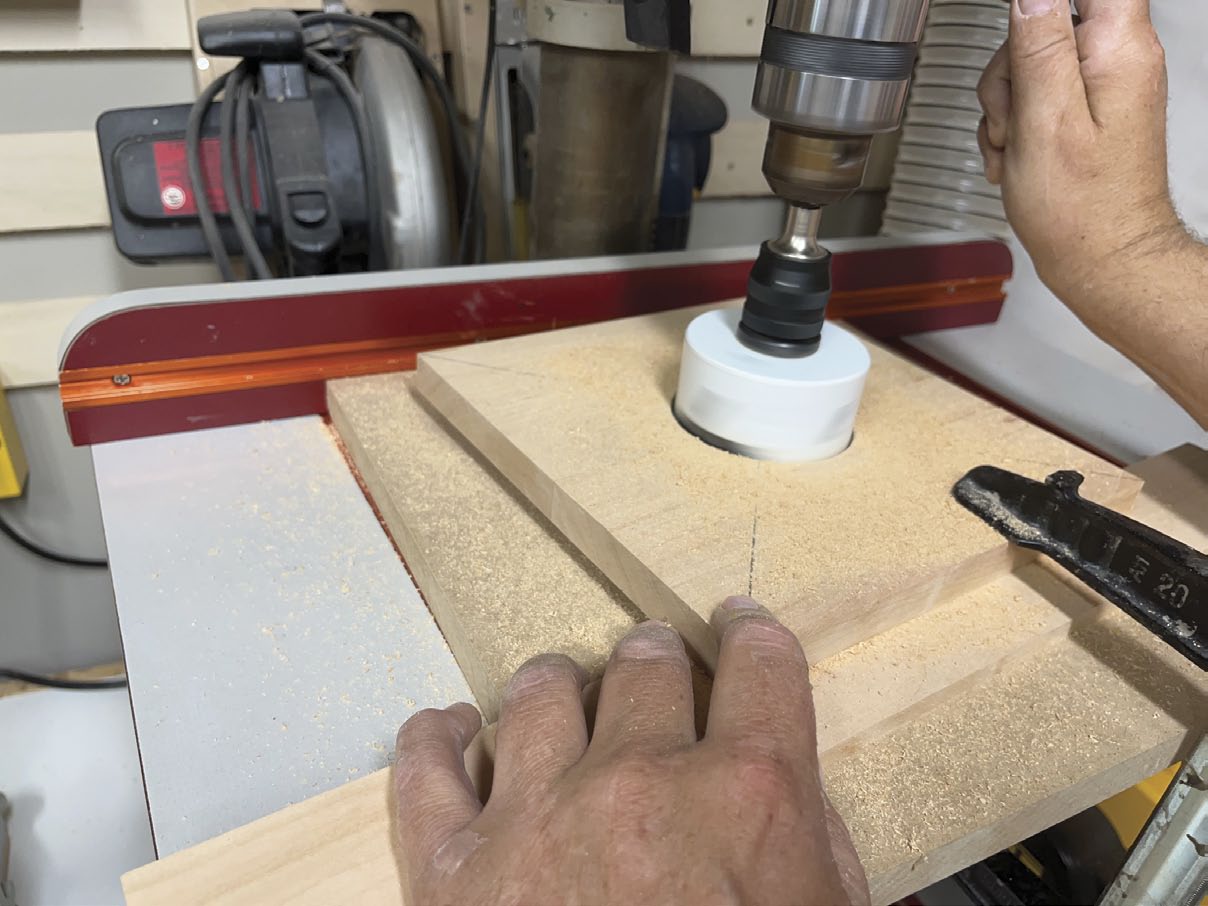
At this stage, the bottom panel is finished, but there is a bit more work ahead to complete the lid. First, cut out a 1/4″ thick alignment block that will keep the lid positioned on top of the frames. Don’t rely solely on the plans for the dimensions of this part because slight adjustments may be required to compensate for small variations in the size of your frame assembly opening. Measure the interior of the frames for yourself, then cut the block to fit. Apply glue, then clamp the alignment block in place with an even reveal around all four sides. When you do this, make sure the grain on the alignment block is running in the same direction as the grain on the lid. This is necessary to avoid issues with seasonal expansion and contraction. Keeping the alignment block slightly smaller than the opening in the lantern will also ensure the lid will fit onto the lantern year-round.
Next, drill the vent hole in the lid at the previously marked location. For this, I used my drill press and a 3″ diameter hole saw. Be sure to secure the workpiece to the drill press table with clamps to prevent the part from spinning dangerously out of control when the hole saw bites into the wood. If you don’t have a hole saw, alternatively lay out the circle with a compass and cut the opening with a scroll saw.
Now you can test fit the lid on the frame assembly and secure the base to the bottom with a screw installed in each corner. Predrill for the screws and countersink the heads flush. A few strips of double-sided tape will help keep the base aligned while you bore the holes.
Copper top
I purchased the copper for my lanterns from a local metal
supplier. Since I was making a pair of lanterns, I ordered two 5″ × 8″ pieces of 1 mm-thick copper that was cut to size while I waited. By having the metal store make the cuts for me, there was no waste and it was a much neater job than I could have achieved in the shop with tin snips. There’s a 1″ wide flange formed on each end of the copper panel. Use a pencil and a square to lay out these flanges now on both the top and bottom face of the panel.
The dome is attached to the lid with four screws installed through predrilled holes in each flanged end. It’s easier to drill these holes now, while the copper panel is still flat. Mark the screw locations with an awl, then use a 1/8″ diameter bit to bore the holes at the drill press.
The next step is to apply 90° bends to the flange ends. The easiest way to achieve a uniform crease is to use bending blocks situated directly adjacent to the layout lines on both the top and bottom of the copper panel. A 45° bevel needs to be applied to the ends of the blocks situated on top to provide the necessary range of motion while bending the metal. With these bending blocks clamped securely in place, the copper will bend easily by hand. When the adjacent bevelled edges on the top blocks meet, you know the bend has reached 90°. Repeat this procedure for both ends of the copper panel.
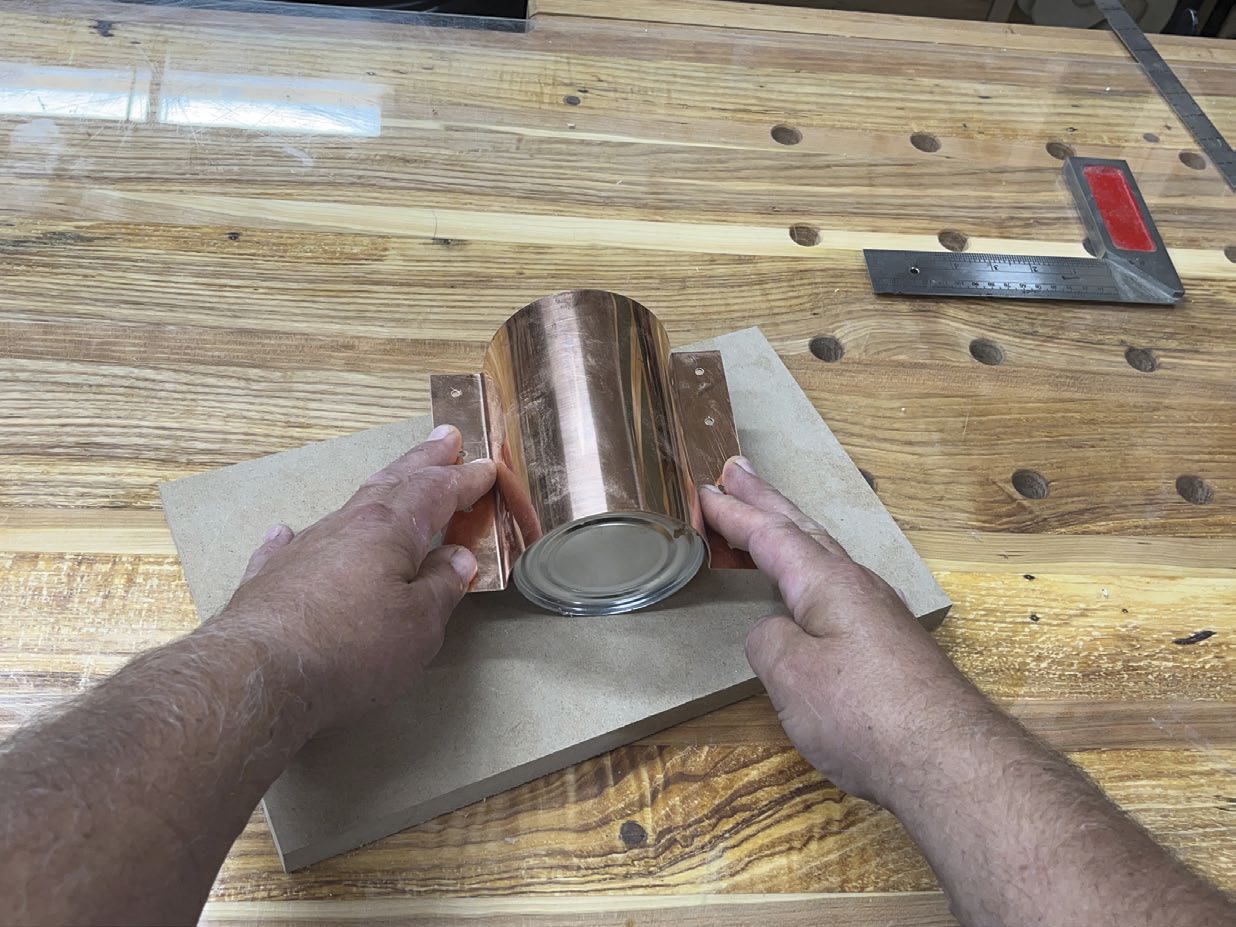
Forming the curved profile in the centre of the copper top may look complicated but it’s really not. Simply raid the pantry to find a can that’s roughly 3-1/2″ in diameter, then bend the copper around the perimeter by hand. Ensure the copper is centred on the can before applying even pressure on both sides to form a uniform arch.
Getting old
I decided to add an aged patina to my copper domes, but you may prefer a shiny finish for a more contemporary look. If you want to go with the aged look, I’ll share the process that worked well for me.
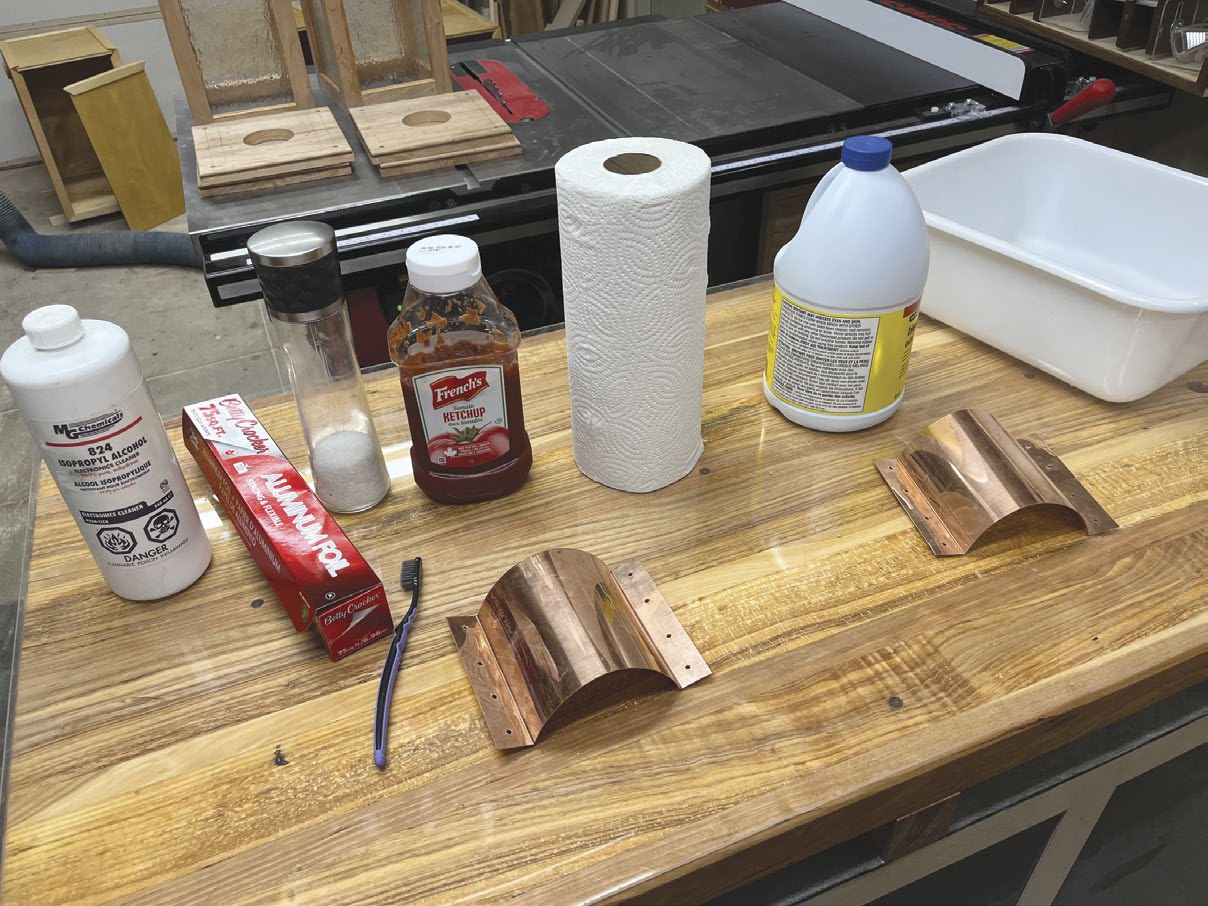
First, thoroughly clean the copper. For this, you may be surprised to learn that I used regular ketchup. Squirt ketchup onto both sides of the copper, then scrub the surface vigorously with a toothbrush to remove any grime or oils. Rinse off the ketchup with water and dry the copper thoroughly before proceeding with the next step.
The aging process requires a plastic tub, aluminum foil, household ammonia in a spray bottle, paper towels and coarse salt. For protection, you’ll also need latex gloves and a respirator-type facemask. Start by balling up sheets of paper towels and arranging them in a solid layer on the bottom of the tub. Soak the paper towels with the spray bottle of ammonia and sprinkle a liberal amount of coarse salt on top. Place the copper panel in the bin, on top of the bed of saturated paper towels. Soak several more balled-up paper towels with ammonia, season liberally with coarse salt, and carefully pack them around the top of the copper piece. Avoid spraying ammonia directly on the copper while you work. At this stage, the copper should be completely buried under a pile of paper towels. Seal the bin with sheets of aluminum foil, then leave the copper to marinate for about six hours. If you can’t resist a peek, lift a corner of the foil and remove a couple of pieces of paper towel to occasionally check your progress.
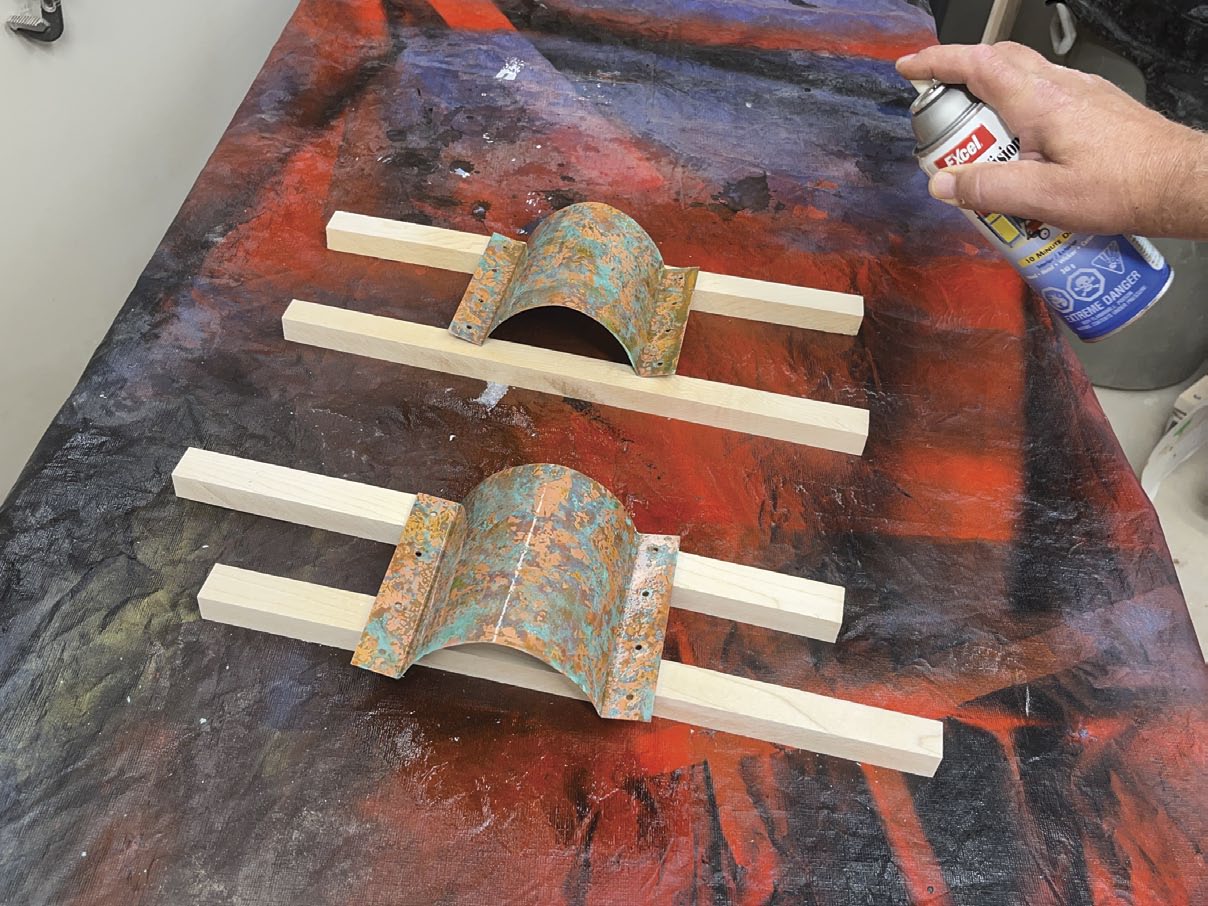
When you’re happy with the look of the patina, remove the panel from the bin and gently rinse the copper under running water. Resist the temptation to rub the surface because the patina is delicate at this stage. Let the panel air dry, then seal the finish with a couple of coats of spray lacquer.
To install the dome on top of the lid, hold the part in place while you mark pilot holes for screws. I drilled my screw holes at the drill press, but a hand drill will work as well. I went with #6 1/2″ round-head brass screws to complement the look of the copper. Brass is very soft, so proceed with caution when you drive the screws in place, or you risk twisting the heads off. Go ahead and ask me how I know this.
Finishing
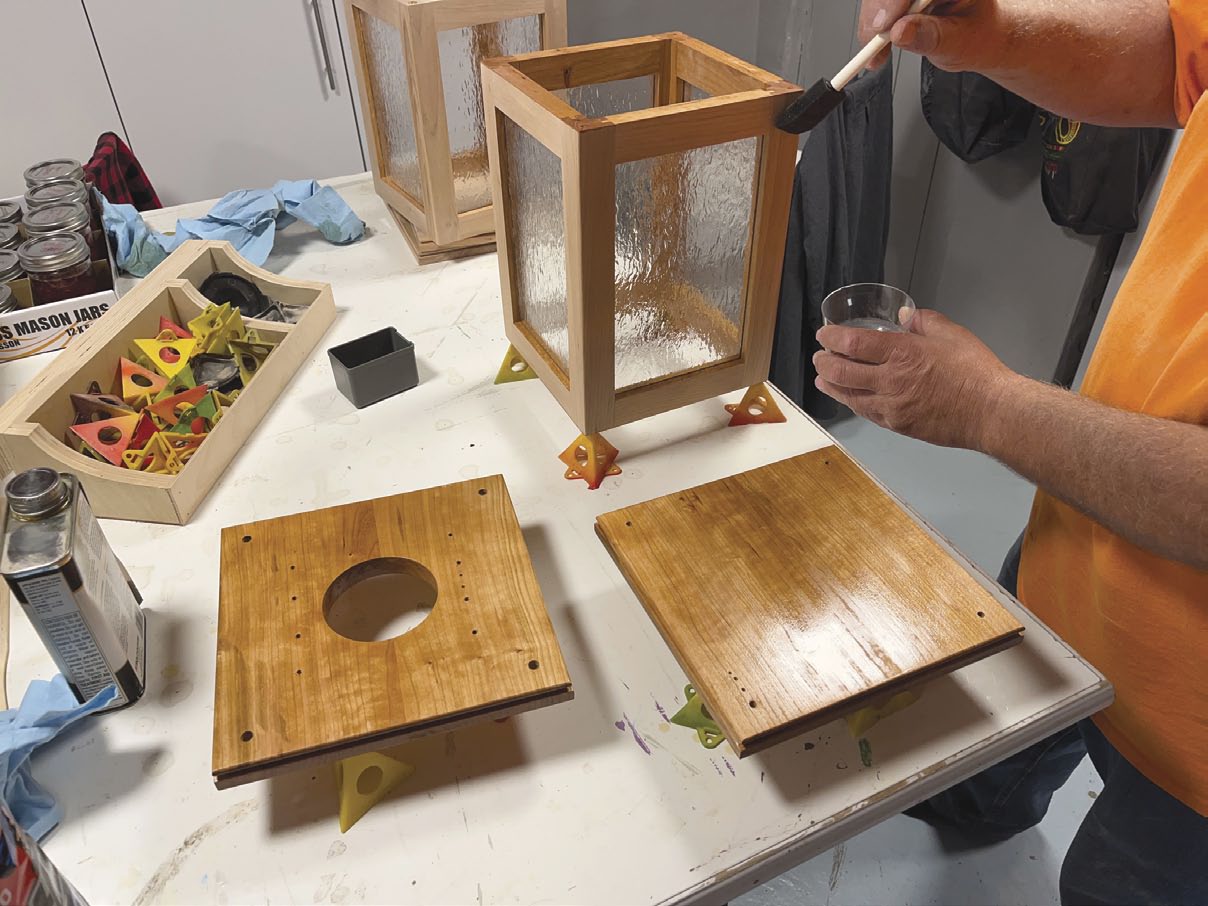
Construction is now complete, so that means it’s time for finishing. Start by separating the base and lid from the glass frame assembly, then remove the copper dome from the top of the lid. Finish sand all the wood parts and apply the finish of your choice. If you have already applied finish to the inside faces and edges of the frames, you have a head start on this process.
After the finish has cured, reinstall the base on the bottom of the side frames and the copper top on the lid. Your lantern is now ready to light up your life. You could use real wax candles inside, but they tend to be messy. I prefer a type of realistic-looking battery-powered candle that has a feature which automatically turns the simulated flame on and off at set times.
Once you’ve constructed one set of these beautiful lanterns, be prepared to make several more, because family and friends are certain to request a pair for their own homes.
Photos by Rick Campbell
Nice Fit
The glass should easily fit in the groove, without any force.

Create the Shoulder
Campbell set his stop up so the end of the workpiece ever so slightly touched the inner edge of the blade, then used a 1/4" spacer between the stop and the workpiece to provide him with a 1/4" stub tenon. Once the shoulder was machined, Campbell removed the spacer and nibbled away at the remaining waste to create the stub tenon.
Bevelled Edges
The outer edges of each stile get bevelled on the table saw. It’s also possible to bevel these edges once the frame assemblies have been glued together.
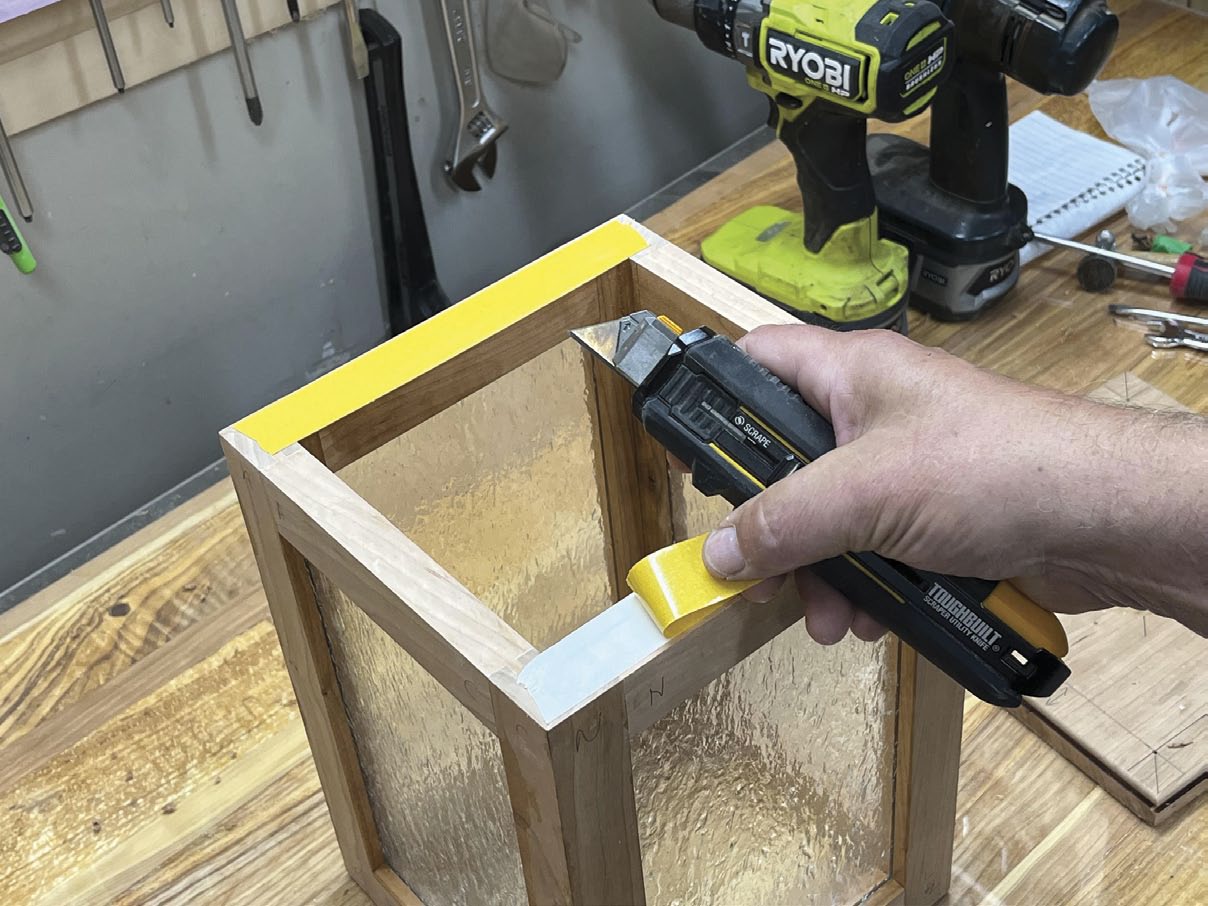
Tape, Glue and Wrap
Campbell applies tape across the mating bevel joints, then flips the pair of parts over and applies glue, before wrapping the two parts together and applying more tape to hold the joint closed.
Clamp It Snug
Although you don’t need a large amount of force, some clamping pressure will bring the frame joints together nicely. Ensure each sub-assembly is square before letting it dry.
Large Vent Hole
Once the alignment block is glued to the underside of the lid, the hole can be bored through the two parts. Secure the lid assembly to the drill press table so it doesn’t catch and rotate quickly, causing damage to you and the workpiece.
Final Assembly
Once the two opposing frame sub-assemblies are dry, bring the two of them together with the final four rails for good.
In Place
Some double-sided tape will keep the base assembly stable while you drill pilot holes through the bottom.
Be Gentle
Brass screws to fix the base in place are a nice touch, but be sure to drill a large enough pilot hole and to drive them home carefully, as their heads tend to break off.

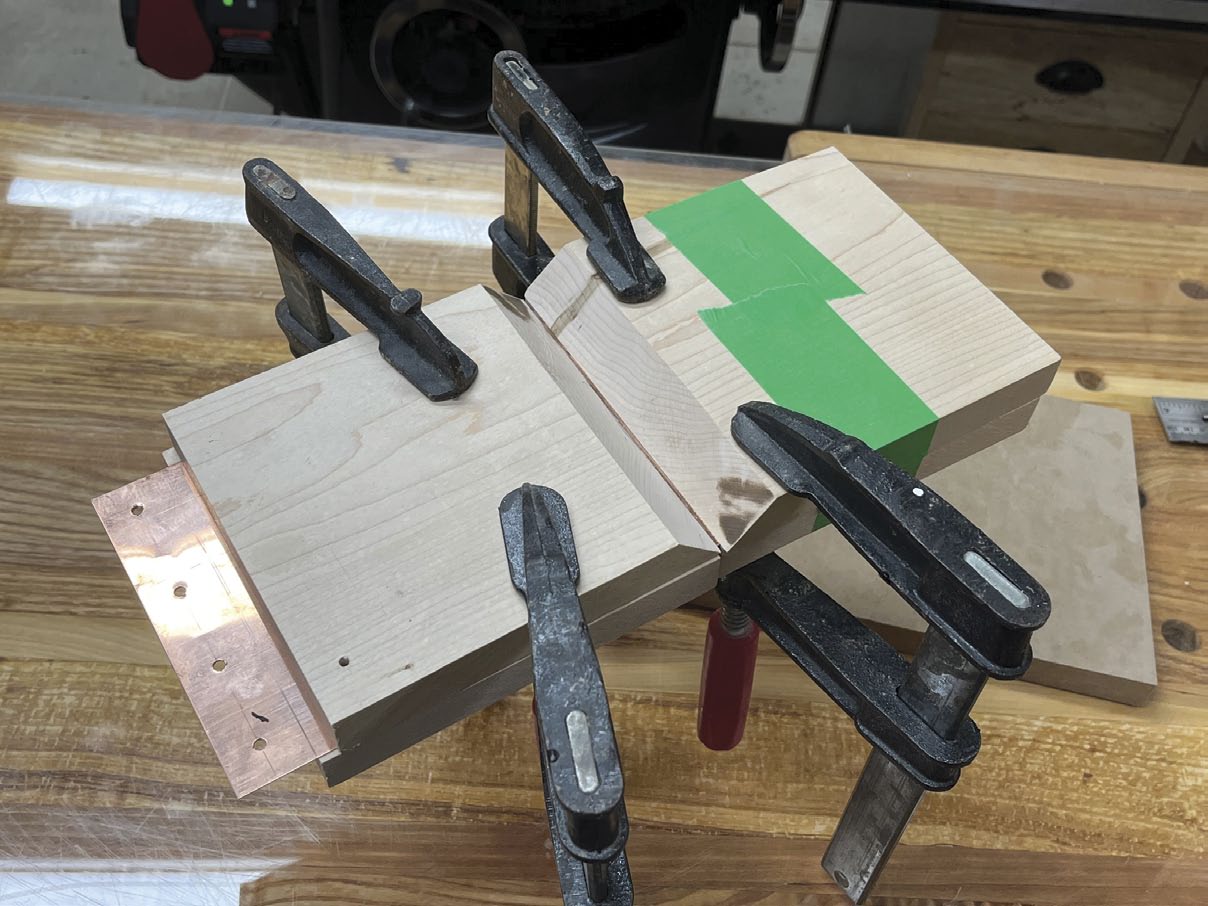
Fold It Together
To make a 90° bend in the copper, use two pieces of bevelled material. Clamp them, along with two backer pieces, to the copper and create the bend.
An Even Curve
A tin can will give you a good template to curve the copper around.
Ready to Add Age
A collection of items is needed to add patina to the copper.
All Done
Campbell takes the copper out of the bin when it has the desired effect. This took about six hours, though time varies depending on how much of the ingredients you use.
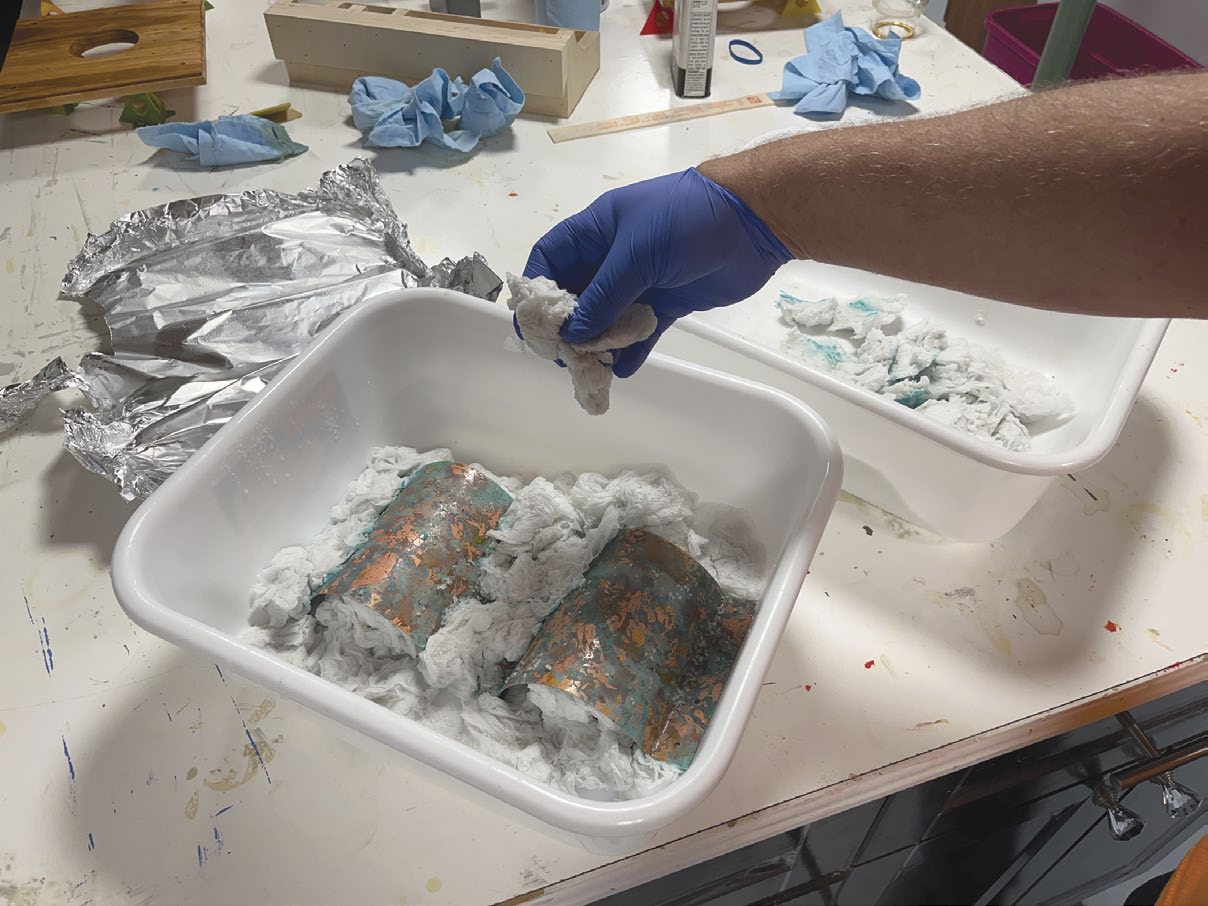
Lots of Layers
Once the paper towels are soaked in ammonia, sprinkle coarse salt on the paper towels. Place the copper onto the paper towels, followed by another layer of soaked paper towels and coarse salt on top of the copper.

Protective Layer
A clear coat of finish will protect the patina and keep it looking as-is for a long time.
Finish It Off
A few coats of finish will add colour and protection to these lanterns. Be careful when applying it around the glass panels. You could even tape the panels off if you wanted to