PROJECT
Tapering jig – a new slant

Mark Salusbury

Find more Jigs projects
Simple to construct, this jig will make tapering workpieces easy and accurate.
Including strong, dynamic compound angles in the design of a chair, bench, table, tray or box makes them easy to place in any setting and adds an uplifting, vertical energy. But how to craft such a design?
I found a lot of information in print and online about “compound angle joinery” based on trigonometry, angle charts, drafting instruments, site lines employing bent wire, and set-ups using mitre guides and angled blocks, but I was looking for a simple one-step solution that would let me focus on my project, not intricate math. I wanted a safe, repeatable, adaptable, low-cost method that would let my table saw shine.
My solution is a simple, flush cutting sled for a table saw that glides along the mitre slot while holding the workpiece securely. If the sawblade is vertical you rip simple tapers; if it’s tilted, you rip angled or compound angled cuts with the waste dropping safely clear after the cut.
This design works wonderfully when you need to make parts that are either tapered, angled or both. It’s repeatably precise, and time and cost effective. And if this version proves a bit too short or shallow for a certain job, a longer or wider jig can be just as easily made to suit the job, greatly extending the jig’s range of possibilities.
Tapering jig – a new slant
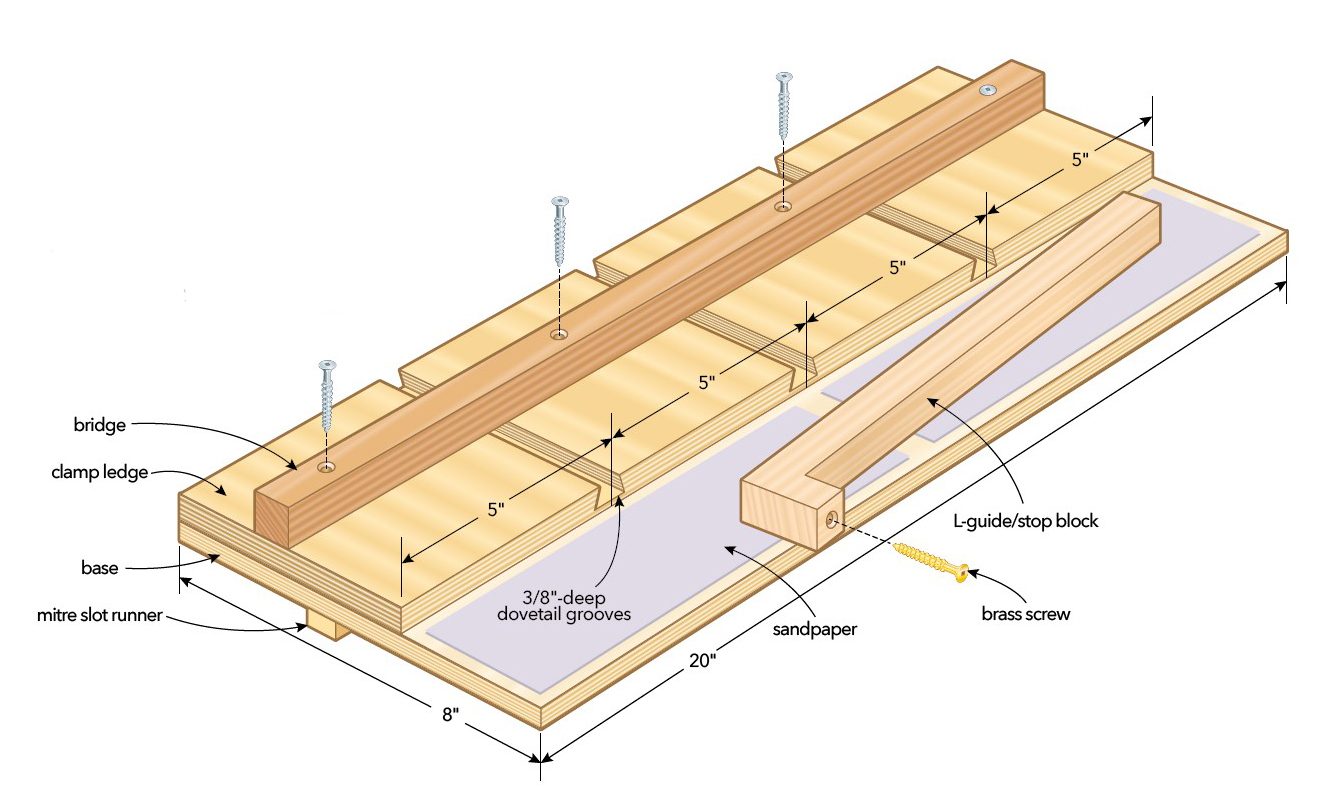
To make one
From dense, stable Baltic birch plywood cut a 3/8″ thick base and a 1/2″ thick clamp ledge. Next, from straight, stable hardwood (I used quarter sawn bloodwood), cut a runner the length of the base, fit-formed to the dimensions of the table saw’s mitre slot but a tad shy of its full depth. Remember to use the mitre slot on the side that the blade tilts away from (on a right-tilting saw use the left slot). Make the runner a snug fit with no side-to-side play but free to glide the slot’s length. From similar hardwood stock, mill the bridge the same length as the clamp ledge. The bridge gives structural balance and reinforcing stiffness, plus a handhold during use. The jig shown is designed for use on the left side of a saw with a right-tilting blade. For table saws with left-tilting blades, simply reverse the jig and locate the runner to fit into the right mitre slot.
Begin assembly by aligning the long edge of the clamp ledge with the same of the base plate, then tape the alignment firmly with painter’s tape, forming a hinge. Gently open the hinge, coat the inside of the clamp ledge with a thin veneer of glue, close the hinge and bond the two parts so they’re aligned flush along the hinge edge and both ends. Once the glue is cured, remove the tape and trim away any squeeze-out or slight misalignment.
Rout the dovetail grooves
Mark the centre, and also mark 5″ in from each end across the top and down both edges of the assembly. With a 1/4″ straight bit, rout a 5/16″ deep slot centred on each of these marks across the clamp ledge’s top surface. This step removes much of the material, making the next step easier. Swap the 1/4″ bit for a 1/2″ × 14° dovetail bit and re-rout the slots 3/8″ deep, creating pockets for the dovetail clamps.
Back to assembly
To bond the mitre slot runner, place coins or washers along the bottom of the slot to support the runner along its length while lifting it so its top surface is just a tad higher than the table saw surface. Then, locate the runner with its near end flush with the infeed edge of the saw table.
With the sawblade below the table saw’s surface, lock the saw’s rip fence in place so its vertical face is directly above the centre of the sawblade teeth, and apply a thin veneer of wood glue along the runner’s top length. Now, with the clamp ledge facing up, hold the 3/8″ thick edge of the base against the rip fence, its near end flush with the table edge and runner strip, and carefully lower the base onto the strip. Apply about 40 pounds (18 kg) of weight squarely over the runner, pressing the base onto the strip as the glue cures. Later, cleanly countersink 1″ × #6 flathead screws to hold the strip firmly in place.
Trim the base flush
With the runner installed, move the rip fence aside, raise the saw blade 1/2″ and pass the base slowly along the mitre slot, trimming the base flush with the sawblade along the jig’s material ledge.
Next, wick thin cyanoacrylate (CA) adhesive along the routed dovetail slots to firm up the wood fibres. Once the glue has hardened, ease the crisp edges with fine sandpaper, then sand the top of the clamp ledge. Follow by gluing and clamping the bridge in place, centred 2-7/8″ back from the shoulder of the material ledge. Add screws after the glue has cured.
Finishing touches
Apply a thin coat of dewaxed shellac overall (except the runner) to seal the wood, and add a couple coats of clear finish. Next, tape sandpaper strips along the material ledge using double-sided woodworker’s tape. Slip dovetail clamps into the slots and you’re almost ready to get to shaping tapers and compound angles.
The Dovetail clamp hold-downs
The key to safe, precise use of this jig is the hold-downs. I used Microjig Matchfit dovetail clamps with the heads reversed on the clamp body. When the pad is sitting flat on the project part, only firm finger pressure is needed to press the part down onto the jig’s sandpaper-coated base. Easy to adjust or reposition, they can be readily removed and reverted to standard clamping.
Fast and easy duplication
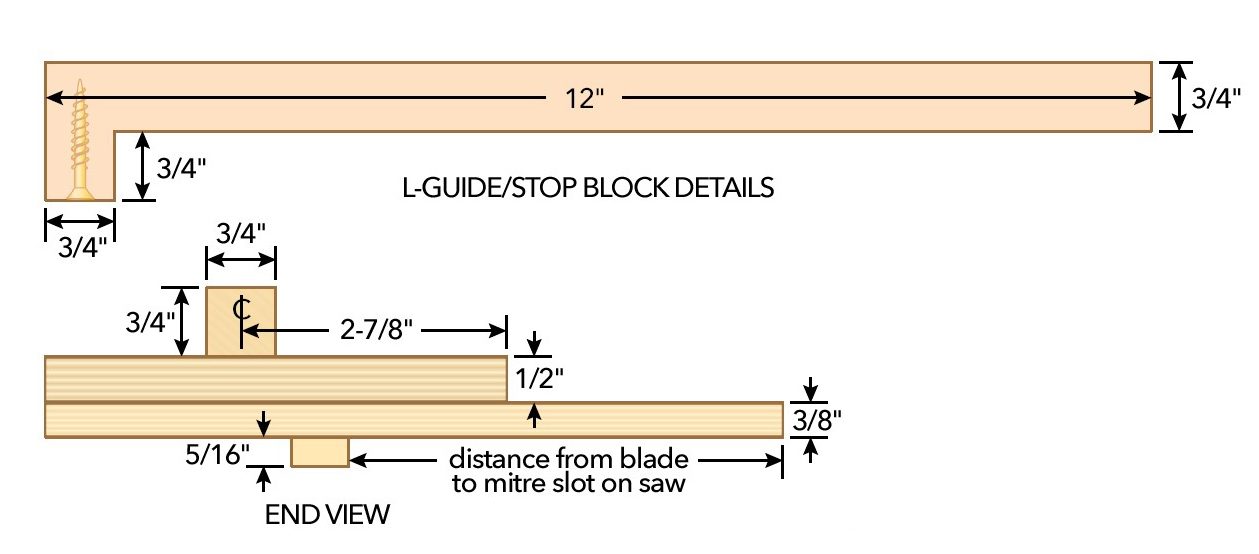
Cut a strip of 3/4″ thick hardwood or plywood, say 1-1/2″ × 12″, and shape it to form an “L” so in cross section it’s 3/4″ × 3/4″ overall. If you’re using hardwood, you may want to reinforce the foot with a countersunk 1-1/4″ screw or wood dowel. Ease the edges and finish as above to complete the movable L-stop block.
Easy to use
Because the sawblade tilts away from the jig, you’re ready to rip a taper or compound angle on any stock or project part you want. Start by marking out the line you wish to rip to on what will be the underside of the piece, then align that mark along the edge of the material ledge. Use the two outer dovetail clamps to hold the stock down to that setting.
If you’re making multiple cuts, flush the L-stop block along the back edge and end of the piece you’re shaping, then use the centre clamp to secure the stop block in place.
To simply taper your stock, keep the sawblade set at 90° to do a simple rip cut. Because the material ledge is thin, a 10″ sawblade will allow you to rip stock +2″ in thickness safely when it’s clamped snugly down against the sandpaper.
To rip a compound angle, set the sawblade at your preferred vertical angle, align your cut-mark with the edge of the jig to create your preferred longitudinal angle and repeat as above.
I’m sure this jig will add a new dimension to your creative output.
Photos by Mark Salusbury
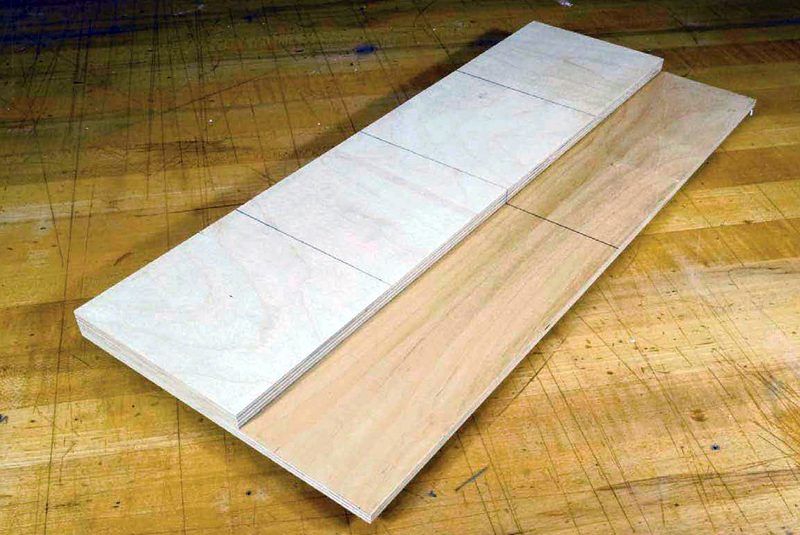
Mark the Base
Here, Salusbury has assembled the two plywood parts of the base and marked the location of the dovetail slots that will be routed to accept the dovetail clamps.
Ready for Repeats
With the L-stop block located and clamped in place, you can easily make many workpieces exactly the same.
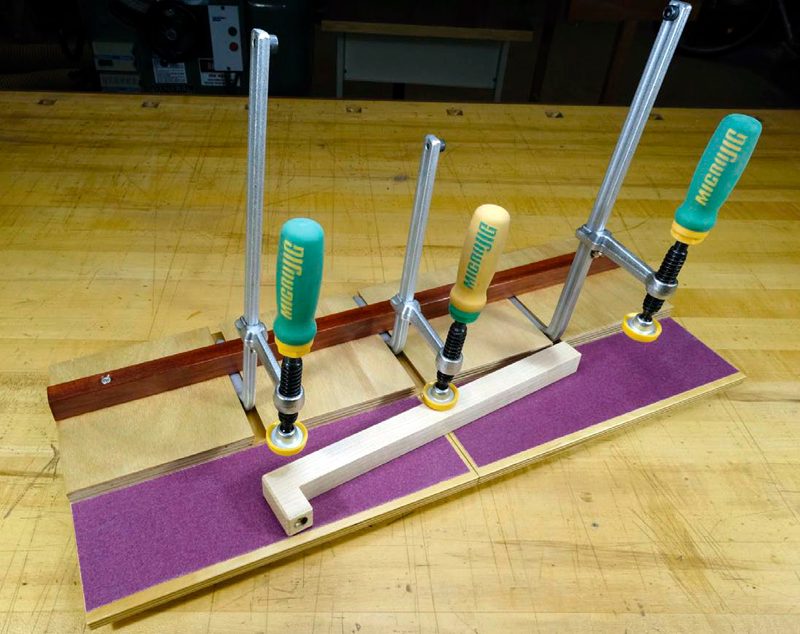
Illustration by Len Churchill