PROJECT
Streamlined workbench

Carl Duguay

Find more Workbenches projects
A good workbench is one of the most important tools in a workshop.
After recently downsizing to a 350 sq ft shop, I realized that I could easily do with a smaller workbench, and save some precious floor space. My old workbench was quite large, better suited for making cabinets than furniture. I didn’t want to spend a lot of money on the bench, nor did I want to invest a lot of time building it. After looking through a number of books (see Reading List) I finally decided on a simple design, with the legs aligned flush to the top, a tail vise, front vise, and a single row of round bench dog holes. Rather than a conventional shoulder for the tail vise I opted for a housed tail vise (or wagon vise), somewhat similar to the Powel design featured in ‘The Workbench Book’.
I chose to make the bench out of kiln-dried Douglas fir. It’s dimensionally stable, has high stiffness and crushing strengths, and typically comes in long straight grained, knot free lengths. Best of all, I had a source of it for under $3 a board foot – too good a deal to turn away. While this is a fairly small bench, measuring 32″ high, and just over 20″ wide and 68″ long, I’ve found it very stable in use for the kind of work I now do. My guess is that the bench weighs about 300 pounds. You can easily modify the design to suit your particular requirements – none of the dimensions are overly critical. Make it longer, wider or higher; add an extra row of dog holes, a tool well, or cabinet below the top. Keep the bench utilitarian or embellish it with dovetail joinery or inlays using exotic wood.
After bringing the lumber into the shop I milled it to rough dimensions, leaving an extra ⅛” on width and thickness, and a couple of inches on length. I then stickered the lumber and let it acclimatize for a week. At this point I ordered the hardware (see Supply Checklist).
Streamlined workbench
Start With the Base
Building the base first is a good idea, as it gives you something on which to assemble the rest of the components. I was fortunate to have 4″ stock for the legs. If you don’t have thick stock, laminate the legs from thinner, ¾” stock, and glue a ⅛” thick skin across the glued-up edges to conceal the glue lines. To keep the end grain on the bottom of the legs from splintering when the bench is pulled across the shop floor countersink and screw ½” blocks (H) under each leg.
The top rails (B) and the lower rails (G), are joined to the legs (E) with a lap joint, cut on the table saw. I placed the lower rails about 4″ above the floor to provide enough height to vacuum underneath the bench. If you sweep rather than vacuum consider placing the lower rails a bit higher, around 6″ above the floor. On this bench the top rails also serve as the sides for the bench top, so they need to sit 1 ⅞” above the top of the legs – 1 ¾” for the thickness of the top plus ⅛” so the rails can be planed level with the top after assembly.
At this stage I measured the location for the front vise, and drilled the access holes for the guide rods and the guide screw on the drill press. Mounting the front vise is straightforward as the instructions provided for the Lee Valley vise are easy to follow. You will also need to cut a piece of wood for the front vise face (I) and drill the matching access holes.
Once the base was assembled I rounded off all sharp corners with a block plane (except the inside edge of the top rails), and applied half a dozen coats of wiping varnish – Varathane Interior Polyurethane thinned 30% with mineral spirits. Now is a good time to install the shelf (O) at the bottom of the base, held in place with a couple of battens (N), to store power tools and the like. It’s easier to install it now than when the top is on. You could use a sheet of plywood, but it would act as a reservoir for dust and shavings. Alternately, you could install a cabinet below the top.
Move On to the Top
The top (A) has a 3 ¼” x 11″ cavity on the right to accommodate the end vise block (J). While you could cut the cavity out after assembling the top, it is a whole lot easier to leave room for the vise block during assembly. I wanted to keep the vise block as close to the front of the bench as possible. I find it easier planing stock close to the edge rather than having to lean over the top. Just be sure to leave enough room to accommodate the two sliders (L, M) that are screwed underneath the top and on the left side of the end block vise.
Biscuits will help you align the boards during glue up. The stock I had was just shy of 2″ thick. After gluing up I had the top thickness sanded on both sides, which took it down to just over 1 ¾” thick. You could also hand plane the top level, or go at it with a belt sander. Before cutting the glued-up top to size, measure the opening between the top rails (B). Then cut the top just slightly wider, about 1/32″ .You can then fine tune the final width with a hand plane for a perfect fit. I also cut the top overlong and trimmed it to size with a circular saw after installing it on the base.
The top is glued to the side rails, and then further secured with ½” x 3″ dowels. The end caps (C) are attached to the top and side rails by ⅜” x 4″ lag screws. This goes against conventional wisdom, which says that the bench top will expand and contract with humidity changes, and that the end caps will constrain the movement of the top, causing it to split or warp. However, I always maintain a consistent temperature and humidity level in my shop, and in the eight months that I’ve been using this bench the top has remained stress-free. If you don’t like the stark look of a butt joint for the top rails and end caps you could use dovetails or box joints.
Before attaching the end caps, remember to drill the hole for the end vise screw and cut a mortise for the shoulder on the inside of the right end cap. I also screwed cap support blocks (D) into the end caps to provide a bit of extra load-bearing support for the ends of the bench top. If you install the support blocks you’ll need to cut out a small notch on the right side block to accommodate the end-vise screw.
The end-vise block (J) ‘floats’ in the notch built into the top. It is supported by a ¼” plywood guide (K) dadoed into each side. The guides ride on a plywood slider (L, M) that is screwed into the bottom of the benchtop. You will also need to cut a small notch on the underside of the vise block tongue to accommodate the end guide for the shoulder vise screw. With the top in place, plane the top rails, end caps, front vise face, and end vise block flush with the workbench top. You can use a belt sander for this job, but it is just as easy to use a fore plane.
Round over any sharp edges and then drill ¾” dog holes. I like the holes pretty close together, and space them 3 ¾” on center. To drill the holes relatively square to the top, drill a ¾” hole through a piece of 2″ scrap, and then use this as a guide with your power drill. I only drilled a single row of holes; I’ll add additional holes as the need arises.
Once the dog holes are drilled remove the bolts that hold the top in place, and remove it from the base. The top is pretty heavy, you might want to have someone help you lift it. Turn the top over and apply five or six coats of a wiping varnish. Right-side-up the top again, and finish the top side as well.
Making a workbench is a lot easier than you might imagine; but the real enjoyment comes in using it on a daily basis.
Supply Checklist
8 – 3/8” x 5” lag bolts and flat washers (for legs)
10 – 3/8” x 4” lag bolts and flat washers
10 – 1/2” x 3” dowels
1 – Regular front vise, Lee Valley #70G08.01
1 – Shoulder vise, Lee Valley #70G01.51
2 – Vise handles, Lee Valley #05G12.03
Reading List
Sam Allan, “Making Workbenches” ISBN #1402741936
Mark Corke, “Build Your Own Custom Workbench” ISBN #15587806781
Scott Landis, “The Workbench Book” ISBN #1561582700
Lon Schleining, “The Workbench” ISBN #1561585946
Christopher Schwartz, “Workbenches” ISBN #155708405
Photos by Carl Duguay
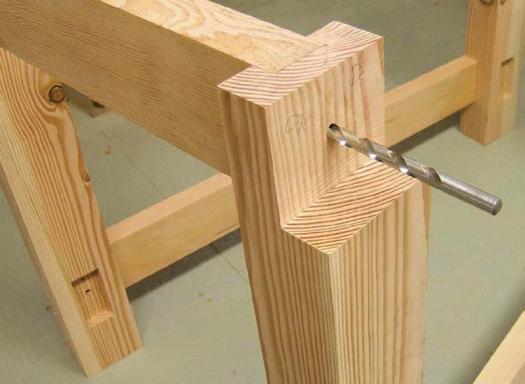
Start With the Base
Drill the holes to receive the lag bolts that hold things together.
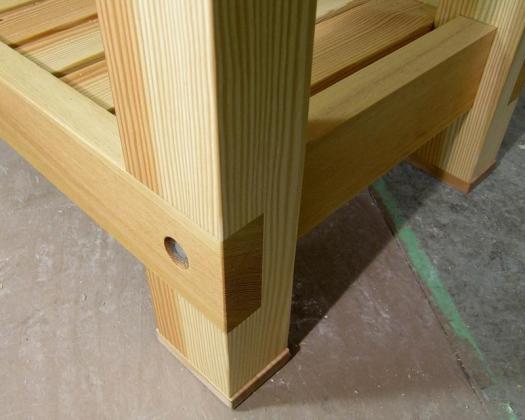
Tough Joinery
Lower rails are lapped and bolted in position to create a strong connection point that will resist racking.
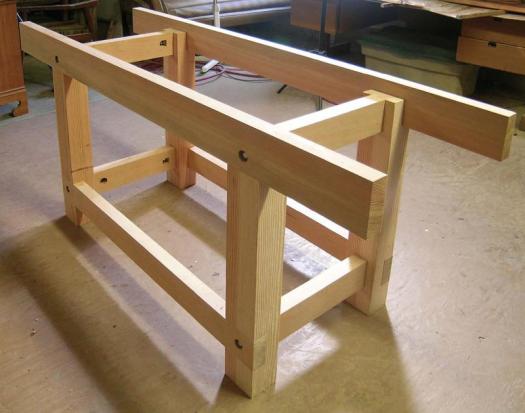
Large Top Rails
With the base bolted together and the top rails in place, you can see the heft of this workbench.
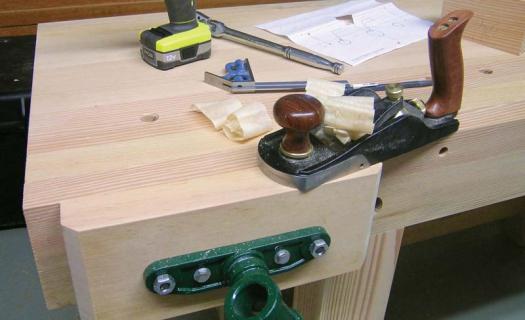
Follow Directions
The Lee Valley vise comes with excellent instructions for the installation of the front vise – a hand plane is the best way to flush up the vise pad.
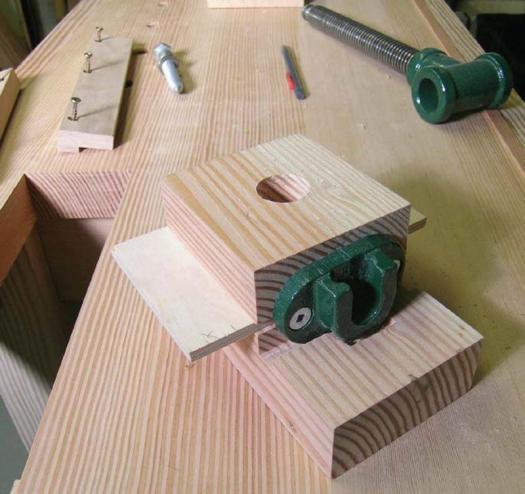
Wagon Vise
All the pieces for the housed vise are ready for installation. The wagon vise is an alternative to the more common tail vise.
Under the Top
This view gives some insight into how the vise travels in its captured space.
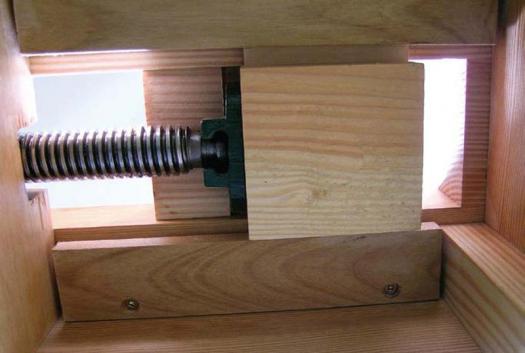
Illustration by James Provost


My father had a similar workbench a long time ago. I was 6 years old when he died, and now I’m 72. Almost nothing is left of his tools. But the memories worked.
Hi Carl, would you cut all the pieces for the workbench and send them to me for assembly? I don’t have the ability to build myself.
Come on Terry – it’s an easy build. If I can do it anybody can!
Was the 4 x4 inch DFir sourced from 4 x 4 inch posts available almost anywhere.
I got my DF from https://www.westwindhardwood.com/ You can use any decently knot-free DF.