PROJECT
Build a sapele deck box

David Bedrosian

With routed mortises and other time-honored joinery, this deck box is built to last so it will enhance the look of your outdoor space for years to come.
This project is elegant and multi-functional, as it can be used as both a deck box and a bench. I used sapele, which looks great and is well suited for outdoor use. Other wood options include white oak, mahogany, ipe or cedar. The box would also work well as a toy chest or blanket chest indoors.
Build a sapele deck box
Rough mill all of the lumber
There are more than 60 workpieces in this project so take your time with the layout. As each piece is rough cut to length, mark the end so you don’t lose track later. Many of the pieces are relatively short so I often doubled up the length to reduce the number of pieces I had to run through the jointer and the planer. I like to mill the wood thicker than the final dimension and let it sit until I am ready to use it. If it twists, I can joint the board again before I take it down to its final thickness.
The frame of the box is made from 5/4 stock machined to a finished thickness of 1″. The slats are milled from relatively flat 4/4 stock milled to a finished thickness of 7/8″. This results in the frame being 1/8″ proud of the slats, which adds some interesting shadow lines. If you can’t quite get a full 7/8″ thick from your 4/4 material, dressing it down a bit further isn’t going to cause any problems as long as you adjust for that new thickness when machining the joinery.
The top of the box is milled from 4/4 stock, and I aimed for a finished thickness of about 7/8″. If your 4/4 stock is not very flat, you may have to mill it thinner than 7/8″ which is fine as long as all of the lid pieces are the same thickness.
Build a simple router mortising jig
The frame of this box is held together with mortise and tenon joinery. The rails connect to 3/8″ wide mortises in the legs that are slightly deeper than 1-1/2″. My longest 3/8″ spiral router bit can rout that deep, but only if the router is sitting directly on the workpiece. If you’re careful, you can rout the mortises using an edge guide, but I prefer a wider and more stable platform to keep the router flat on the edge of the workpiece.
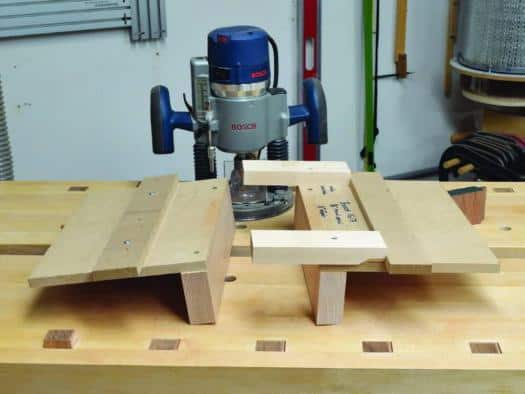
To make such a platform, I glued and screwed two pieces of MDF to some thick pieces of maple that I clamped on opposite faces of the workpiece. The router base sits on top of the MDF and slides against a wooden fence. The fence must be parallel with the front of the jig and offset so the mortise is 5/16″ from the edge of the workpiece. Make one or more test cuts to dial in the fence position, noting the 5/16″ offset is not critical as long as the mortise is parallel with the edge of the workpiece. For a little more stability, a second fence can be added to keep the router tight against the primary fence.
Machine the legs
Each leg consists of two pieces of 19″ long stock joined with a 3/8″ wide tongue and matching slot. This joint doesn’t add any strength to the leg, but it keeps the two pieces aligned when the box is glued together. Rout the slot on the router table, locating it so the tongue will be centered on the mating piece. When the two pieces are joined, they should each be 3″ across. It’s possible to join the two pieces that make up each of the four legs with bevel joints so the joint is less visible.
Lay the legs out to form a box using the 3″ wide pieces (the ones with the routed slots) for the front and back of the box. Mark the top of each piece and lay out the mortises. The bottom mortise starts 1-3/4″ from the bottom of the leg and is 2-1/4″ long. The top mortise starts 1/2″ from the top of the leg and is 1-1/2″ long. Mark the inside face of each leg piece to use as the reference face for the joinery. This will ensure the slats are flush with the inside of the box and therefore recessed from the front. Rout all of the mortises to a depth of just over 1-1/2″.
Set up your router table with a 1/4″ slot cutting bit positioned so the bottom of the cutter is 5/16″ above the surface of the table. Use a test piece to confirm the bit height and to adjust your fence to cut a slot 1/2″ deep. If possible, you will want to leave this router setup in place to rout all of the slots in the frame pieces as well as the slats. Start with the legs and rout a slot between the mortises. Be sure to have the inside face of each piece against the router table.
Drawbored mortise and tenons
The rails connect to the legs using 1-1/2″ deep tenons that are drawbored for extra strength and to simplify the assembly. There are many ways to cut the tenons. I chose to use my table saw to form the shoulders and my band saw to cut the cheeks. Start by cutting the rails to length – 15-1/2″ for the short rails and 45″ for the long rails. Lower your blade to just over 5/16″ and adjust your fence (and optionally a small stop block) so the left side of the blade will cut exactly 1-1/2″ from the end of the wood. Start with a test piece and then cut all four faces which define the shoulders for the tenons. If your fence is not perpendicular to the table or is not parallel with your blade, the shoulders may not line up. If this happens, try referencing instead off a small 1-2-3 machinist block pushed against the fence. When you are satisfied with the setup, make the same four cuts on the end of each rail.
To cut the cheeks, move to your band saw. Set the fence to cut away the cheeks, leaving the tenons slightly thick so they can be cleaned up with a shoulder plane. Round-over the tenon to match the ends of the mortise. You’ll need to fine-tune the fit with a chisel to ensure the joint seats properly and fully. Confirm that the shoulders are square to the rails so the frame will be square when the drawbored pegs are installed.
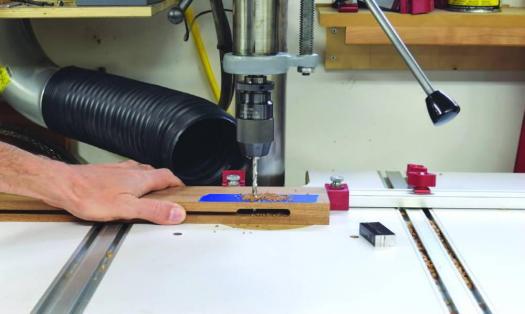
Use a 7/32″ brad point bit to drill the holes for the drawbored pegs. Start with the legs and be sure to remove the rails since the tenons are marked and drilled in the next step. The bottom mortises have a pair of pegs and the narrower top mortises have a single peg.
Dry fit the rails into the legs and pare the tenons as needed so the top rail is flush with the top of each leg and the bottom rail is 1-1/2″ from the bottom of each leg. Use clamps if needed to ensure the tenons are fully seated in the mortises. Using the same 7/32″ brad point bit, transfer the center of each hole to the tenon and then disassemble the frame. If you drilled holes through the tenons using these center points, you would have a pegged mortise and tenon joint. To drawbore the joint, you need to slightly offset the hole towards the shoulder of the tenon.
Complete the rails and dividers
The front and back of the deck box each have two vertical dividers that are mortised into the rails. The mortises are 1-1/2″ long and slightly over 1-1/4″ deep. Start by cutting the four dividers to a length of 15″. Referencing the inside face of each piece, follow the same procedure as before to machine the mortises in the rails and matching tenons on the dividers. Use the slot cutter bit setup in your router table to cut 1/4″ wide grooves on both sides of the dividers and the inside edges of the top and bottom rails.
The four bottom rails have a decorative cutout that’s rough cut with the band saw and flush trimmed with a template and a pattern bit in your router table. The final step with the bottom rails is to machine a small chamfer where the slats meet the rail to promote water runoff. The chamfer runs the full length of the short rails and is stopped where the dividers join the bottom rail. You may want to defer these last two routing steps until the slats are completed, since they will use the same slot cutting bit setup as the frame pieces.
Tongue and groove slats
Each panel in the deck box consists of three slats joined with a tongue and groove on all four sides. To allow for seasonal variations in the slat width, there is a 1/8″ gap between the slats. No gap is needed on the top and bottom; the slats can butt tightly against the rails. Each slat is 4″ wide, excluding the 1/2″ wide tongue portion. One slat per panel has a tongue all the way around the perimeter so this board needs to be cut 5″ wide. These are the center slats. The other two slats are cut 4-1/2″ wide since they have a tongue on the top, bottom and only one side; the opposite side has a matching slot. The length of each slat should be about 7/8″ more than the 12-1/2″ distance between the rails. When the shoulders are cut, the slats should fit snugly between the rails.
Using the same slot cutter setup as before, rout the 1/2″ deep slots in one side of the 4-1/2″ wide slats, keeping the inside face against the router table. To rout the tongues along the length of the slats, switch to a rabbeting bit and set the height so the top of the cutter is 5/16″ above the table and the rabbet depth is 1/2″ deep. Use a test piece the same thickness as the slats to dial in the fit. If the slats are not exactly 7/8″ thick, or your slot cutter is not exactly 1/4″ wide, you may need to remove different amounts of wood from opposite faces of the slats. You could raise and lower the rabbeting bit when switching sides, but I find it easier to use a shim between the slat and the router table for the face that needs less wood removed. Use veneer or several layers of paper. Even a few strips of masking tape can quickly act as a shim. To get a clean cut, you may want to rout the rabbets in several passes to get the full 1/2″ depth.
To machine the tongues on each end of the slats, use the same table saw and band saw setup when the tenons were cut. This will give a cleaner and more consistent shoulder. Follow up with the shoulder plane to clean up the face of the tongues so they fit in the grooves in the rails.
Glue up in stages
Be sure to use an exterior adhesive for the assembly of this project, as the elements will cause a non-exterior grade adhesive to fail. With all this careful machining, the last thing you want to do is watch your deck box fall apart over the span of a few months. A waterproof epoxy is the option I went with, though a Type-II or Type-III PVA adhesive would also work well outdoors. Every adhesive has its strengths and weaknesses, so make sure you know the characteristics of the adhesive you’re using before assembling a project.
There are too many pieces to glue the deck box together at one time, so I glue it up in stages. I started with the end panels before moving on to the front and back. Dry fit the pieces so you can work out an even spacing between the slats. I used some thin offcuts and built up to the required spacer thickness with a few layers of blue tape. The slats are glued into the rails, but only use glue over the center inch to allow them to expand and contract with the seasons. No glue is used between the slats or where the slats join the legs or the dividers.
While the glue is drying, follow the same steps to make the top of the box. Adjust the mortise offset to account for the thinner stock. Rout the slots so the slats are flush with the top of the lid so it can be used as a seat.
Finishing touches
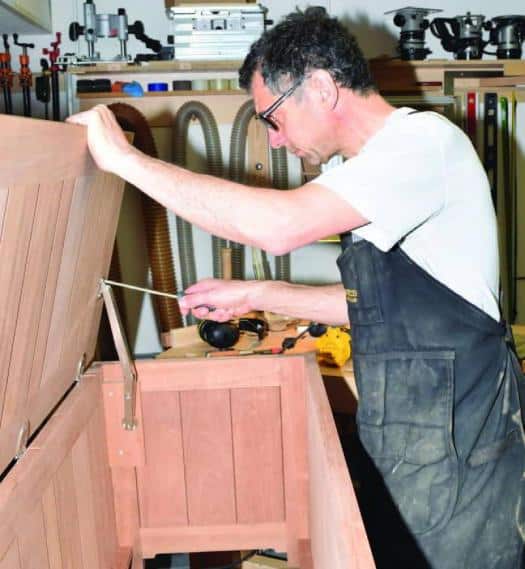
If the box is going to be used outdoors, I recommend using recessed/flush stainless-steel hinges such as item 01W9873 from Lee Valley Tools. One half of the hinge is screwed to the underside of the top with flat head screws. The other half has the counter-sunk holes against the back of the box, so it’s fastened with round head screws, also in stainless steel. Rout small mortises in the upper edge of the upper back rail. This allows the leaf that’s attached to the underside of the seat to have clearance when the seat is closed. The underside of the seat sits flush on the box.
Soft-close lid supports are required to keep this heavy lid from crashing down. Choose ones rated for the weight of the lid, which will depend on the wood species you choose. I added a block to the inner face of the end assembly in order to give me something to attach it to.
I used sapele for the slats that make up the box bottom. I glued a cleat along the inner faces of the front and rear lower rails to support the slats. I routed 1/2″ deep grooves in their edges and joined the pieces with splines. I left a gap to allow for seasonal changes in the width of each board. A single stainless-steel screw in each end of the slats, driven from below through the cleats, secures the slats in place. A bottom made of a less expensive wood could also be used.
Most outdoor wood will fade to a silvery grey if left unfinished. If you want to maintain the colour, there are many suitable outdoor finishes to choose from. I used Cutek Extreme oil and applied two coats following the manufacturer’s instructions. Once complete, take your box outside where your hard work can be admired.
Photos by David Bedrosian
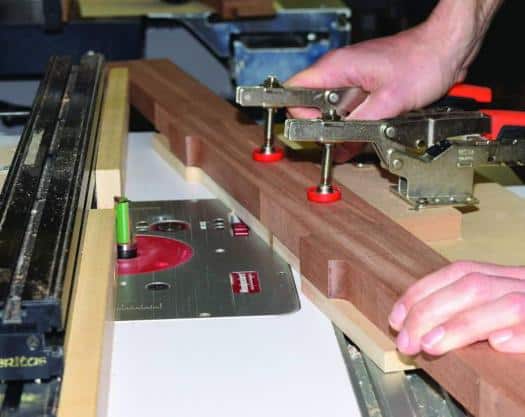
Simple Mortising Jig
The two vertical maple faces sandwich the workpiece while this mortising jig is in use. The router is guided by the two MDF strips that are screwed to the main MDF base parts. Those two MDF strips must be parallel with the maple faces or the mortises won’t be parallel with the faces of the workpieces.
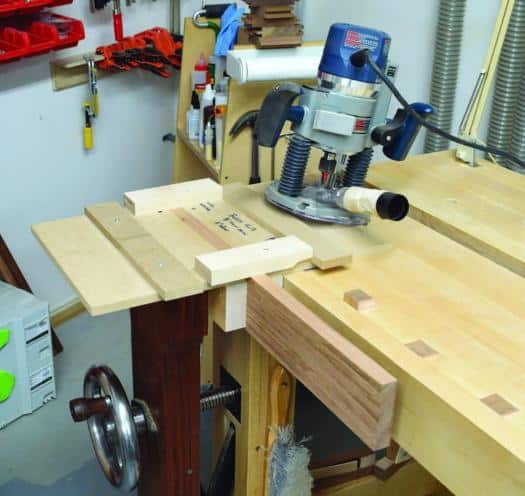
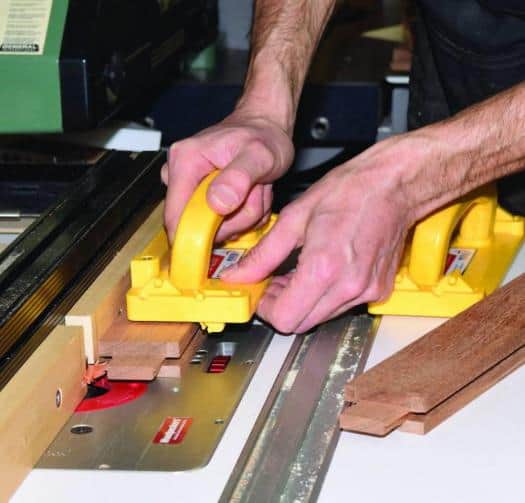
Ready for Action
Once set up, the mortise routing operation is easy. Take multiple passes as the router is guided between the two maple stops, limiting travel and determining the length of the mortise.
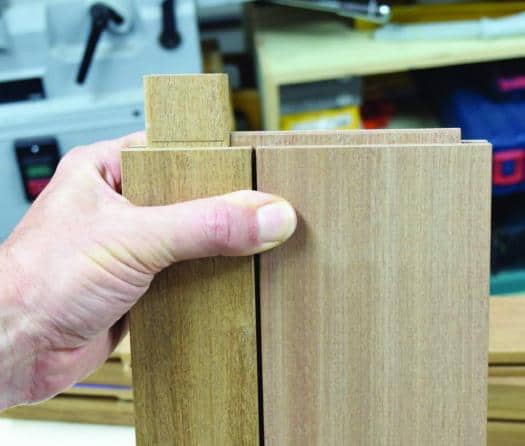
Keep the Corners Aligned
To ensure the two halves of each leg mate together perfectly, Bedrosian first machined a groove in the wider portion of each leg. This groove was positioned so it was at the center of the mating board. Next, he ran a pair of rabbets along the edges of the other leg portion, creating a tenon that fit into the groove. This kept the parts aligned during assembly.

Rout a Slot
Once both sides of the leg assemblies have been mortised, and the groove and rabbet joint to secure the two parts together has been completed, it’s time to rout the 1/4" wide slot to accept the panels. This slot is cut between the two mortises.

Table Saw Tenons
First, Bedrosian machines the tenon shoulders on his table saw. The location of these cuts determines the length of the tenons, so keep your mortise depths in mind during this setup.

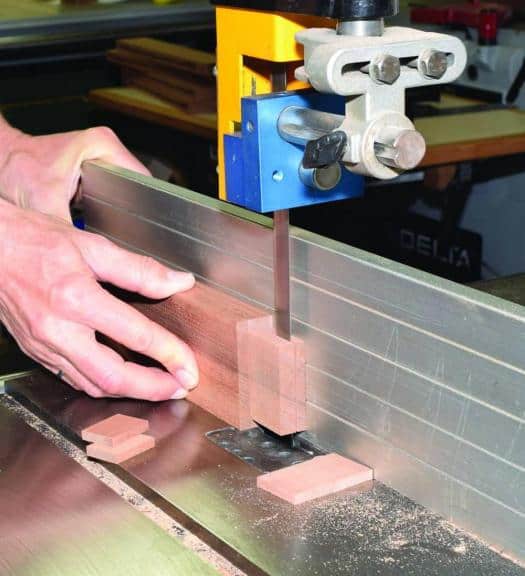
Cut the Cheeks
With the band saw set up to create a slightly oversized tenon, Bedrosian makes cuts on four sides of the workpiece, stopping at the table saw shoulder cuts.
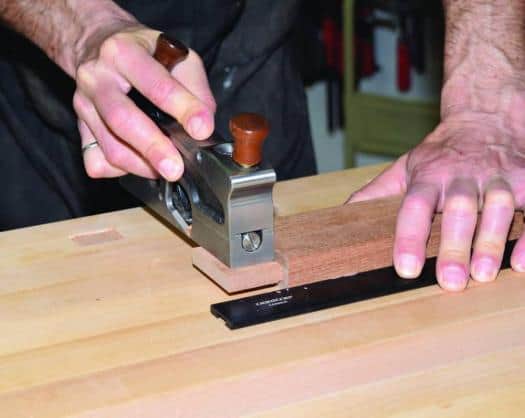
Sneak Up to Perfection
With the help of a shoulder plane, Bedrosian shaves the tenon down to fit into its mating mortise. If the band saw setup was done carefully, this process won’t take long.
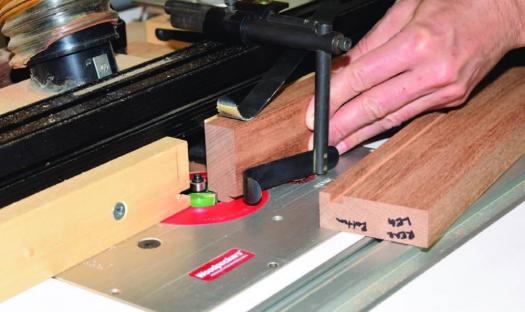
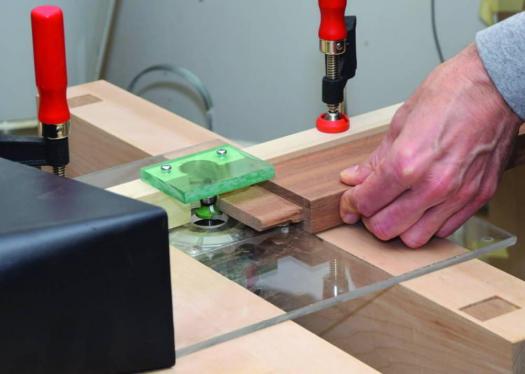
Ease the Edges
With the help of a small round-over bit, the edges of the tenons can be eased so they fit into the mortises nicely.
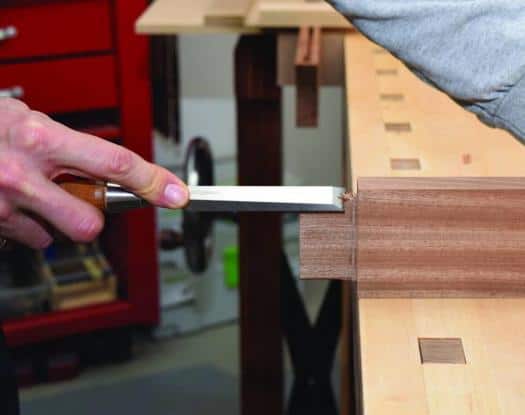
Chisel to the Rescue
Because the small round-over router bit can’t quite reach the end of the mortise, Bedrosian uses a chisel to make quick work of the task.
Drawboring
The first step in creating a drawbored joint is to drill a hole directly through the mortise cavity. It should be centered across the depth of the mortise. The lower mortises receive two pegs, while the upper mortises receive one peg.
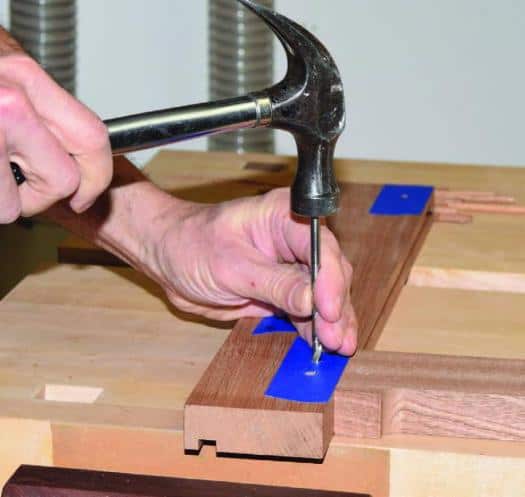
Dry Assemble and Mark
Assemble a joint and use a Brad point drill bit the same size as the hole to mark the center of the hole on the mortise with a light tap of a hammer.
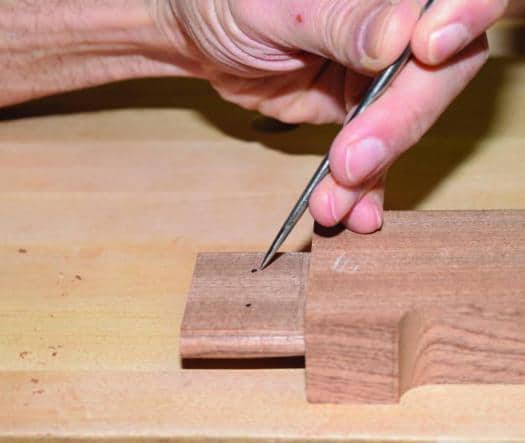
Slightly Offset
Bedrosian touches the marked center of the hole with a black marker for clarity, then he uses an awl to add a dimple that’s offset from the original mark by about 1/32" to 1/16" before drilling the holes with the same Brad point bit.
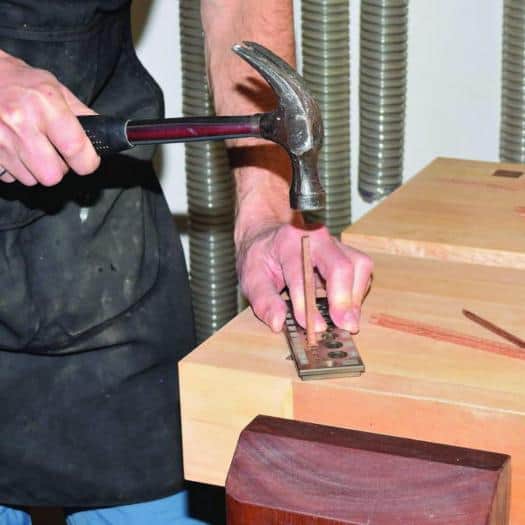
Make the Drawbored Pegs
After ripping strips of wood slightly wider than the hole’s diameter, he creates a taper on one end. Using a dowel former, Bedrosian hammers the strips of wood through the correct hole to create the pegs.
Vertical Dividers
Four vertical dividers are needed; two for the front and two for the back of the deck box. Tenons on their ends fit into mortises in the horizontal rails, while slots in their sides accept the solid wood parts that form the panels. The inside edges of the top and bottom rails will also need this same slot machined between the mortises that fix the vertical dividers in place.
Decorative Detail
The four bottom rails have a decorative detail routed into them with the help of a jig. Most of the waste is removed with a band saw, then the jig finishes the details
Tricky Tenons
The three slats that make up each section between the vertical rails all have stub tenons on both their ends to fit into the top and bottom rails. The slat in the center has a tenon on both sides, too. Two of the three slats have a tenon on only one side.
Sub-Assemblies
Because it’s too difficult to assemble everything at once, Bedrosian started with the two end panels. He used spacers to help position the slats evenly until the glue dried. As always, being prepared for a glue-up is essential.

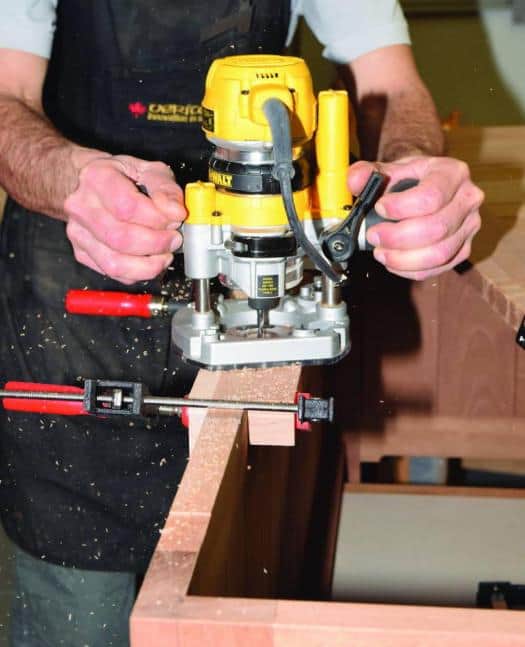
A Helping Hand
With the end assemblies complete, it was time to bring the front and rear panels together with the end assemblies. An extra set of hands is great to have nearby, but using square brackets to keep things not only together but square also works wonders.

Hinge Mortises
Although it depends on the type of hinge you use, many mortises can be marked to width with a marking knife, then routed to depth freehand. A sharp chisel can fine-tune the joint. An extra piece (or, in this case, two) of scrap wood clamped to the rail, flush with the top, will provide support for your router.
Outside the Box
Although it’s a slightly unorthodox installation, it works like a charm. Bedrosian attached one hinge leaf to the back of the upper rail and the other leaf to the underside of the seat. He routed a notch in the upper edge of the top rail to allow clearance for the upper leaf when the seat is closed.

A Strong Stay
A stay will help keep the top from slamming shut, potentially hurting someone. It’s also a nice touch to a beautiful project.
Bottom Slats
Bedrosian glued a cleat to the inside face of the bottom rails, then cut slats to fit in place. The slats had a groove on both edges and a spline was inserted between each slat. Ample space was left between the slats for seasonal movement.
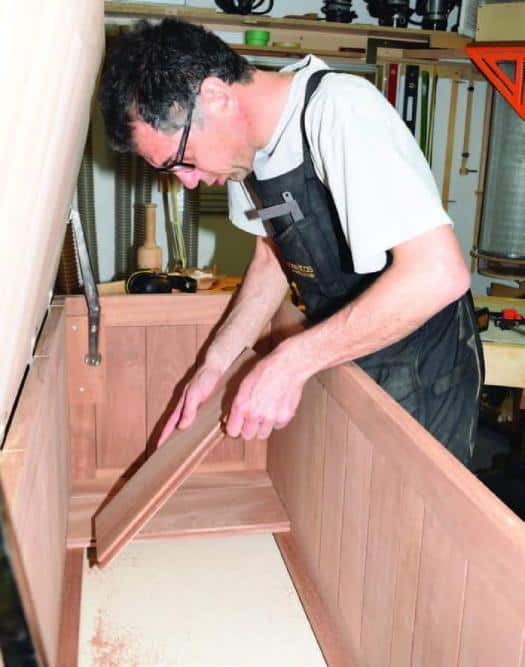
Illustration by Len Churchill