PROJECT
Making Turned Boxes

Stevcen Kennard

Find more Woodturning projects
The great thing about box making is that it can be a good way of using up a small piece of wood, even an offcut, that might otherwise end up being discarded. It can be transformed into a thing of beauty, using your imagination, originality and skill.
- Smooth dovetail jaws in a scroll chuck 1/16″ parting tool 1/4″ gouge for hollowing
- Small skew chisel (1/2″ or smaller)
- Small round-nosed scraper
- Vinyl electrical tape
- Vernier callipers
Making Turned Boxes
Method of holding
Most species of wood can be used to make a box, although a fine-grained hardwood or an exotic are best suited for the purpose. It’s essential that the wood should be dry and well seasoned. For this article I have used an offcut of cherry. It measures 3″ x 3″ x 4.5″ long, which will make a finished box about 3″ high. I suggest you use a piece this size, if possible, but don’t feel restricted if your offcut is smaller. I’ve made boxes out of wood half this size.
Another thing to bear in mind is although this article demonstrates the making of a very simple turned box, the principles and methods can be applied to the making of all turned boxes, including those that are more ornate. You will be working to much finer tolerances than is common in other types of woodturning, so be sure to work slowly and carefully to get the best result.
It’s vital to use smooth dovetail jaws on your chuck in all turned box making. Dovetail jaws are far more accurate than jaws with serrations and allow the piece of wood to be removed from the chuck and replaced. Serrated jaws, by their nature, compress the fibres of wood when tightened and make it impossible to remove and replace pieces you are working on with the degree of accuracy required.
Begin by mounting your wood between centers and, with a roughing gouge, turn your piece of wood to a cylinder, making sure the diameter is consistent along its length. At each end cut a dovetail, which will be used to mount the wood on the chuck. After it has been turned, mount the wood in the jaws of the chuck.
Marking out and lid separation
Put a pencil mark on the cylinder of wood to establish the bottom and the very top of the box, evenly spaced on the block. Make a third pencil mark to establish the separation point between top and bottom. There are, of course, no hard and fast rules as to where you might do this, but proportions in this situation really look best at two-thirds and one third, with the lid being approximately 1″ and the bottom being about 2″ high. Use a 1/16″ parting tool to make a cut on the bottom and on the top line, to a depth of about 1/2″. This will mark the finished top and bottom of your box. Any parting tool could be used, but I use a parting tool of this size in order to remove as little wood as possible, so the grain will flow as closely as possible from top to bottom. Use the same parting tool to completely remove the top part of the box from the bottom. Set the top aside.
Preparing the lip in the base
With the parting tool 3/16″ from the freshly cut edge, cut the rabbet which will form the lip for the lid, to a depth of about 1/8″. These light finishing cuts are the final cuts. I use a sharp skew chisel sitting flat on my tool-rest as a scraper to make these.
Hollowing the base
The wood from the interior of the box can be removed entirely with a gouge or a large proportion of it can be removed with a Forstner or sawtooth bit in a chuck in the tailstock and finish with a gouge and scraper. If you use a bit, don’t bore the hole to the full depth or you will have the spur point hole left in the bottom when you finish. Hollow to a depth to leave approximately 1/4″ as the box base. I make the final cuts of the bottom and inside corner of my box with a small round-nosed scraper, so as to leave a radius in the corner, which makes it easier to remove the contents from the finished box. The interior of the box is now ready to be sanded and finished. Starting from 180 grit, proceed through 320, 600, 800 and 1000 grit. You should be able to make a silky smooth surface, ready to take your chosen polish. A good friction polish such as Shellawax will give a hard, durable surface and can be left glossy or dulled to a satin with #0000 steel wool and some paste wax.
It’s important to keep any heat generated from the hollowing and sanding to a minimum. When using the Forstner bit and while sanding use a very slow speed. This will enable the grits on your sandpaper to cut more efficiently and at the same time, any friction heat will be minimal. Excessive heat can cause unwanted movement and checking.
Now is the time to remove the bottom of your box from the chuck to make way for the lid.
Working on the Lid
Attach the top section of the box to the chuck. You will be preparing the lid to fit the lip you cut earlier.
Start by taking a measurement of the lip you created on the bottom half of the box, with Vernier callipers. Use a sharp pencil to transfer this dimension to the face of the mounted top.
Using the skew chisel flat on the tool-rest as described before, make a cut by pushing the point of the skew into the wood just inside the pencil mark and then with a gouge remove about 1/4″ of the wood from the interior of the lid. Then, once again using the skew chisel, form the bottom of the rabbet, cut to a depth of approximately 3/16″. You can now finish cutting the sides of the rabbet to accept the lip on the bottom of the box. Very carefully, so as to create a comfortable fit, offer the bottom of the box up to the rabbet to check for fit. Try it frequently, taking off a small amount of wood each time until the lid fits without any resistance. I like a lid to fit without any tightness so when the box is opened the two halves separate with ease. This allows for one-handed opening and eliminates the risk of the bottom dropping off the top when picked up, which it might if too tight. You don’t want it so loose that it rattles, though.
Use the sharp edge of the skew once again as you would a scraper to finish the inside top lid and sides as you did the bottom. Repeat the sanding and finishing procedure that you previously used.
The final stages
Remove the finished top from the chuck and replace it with the bottom. Once you’re sure the bottom is running true, attach the lid. It’s now possible to sand the exterior to the final finish and apply the polish. Ideally, you should leave it for an hour or two for the polish to harden.
Stretch vinyl electrical tape tightly across the joint of the lid and the bottom, winding it around three or four times. Make sure it’s always under tension so it firmly holds the two parts together.
Using a gouge, remove as much of the remaining wood as possible before removing the tailstock. Remember, this is only being held together with electrical tape at this point and although quite strong, there is no point in putting more stresses on the joint than necessary.
Finish the top with gentle cuts, then sand and finish as before. When you’re satisfied, remove the electrical tape and set aside the finished lid. You can now use the parting tool to remove the bottom of the box from the dovetail mount.
To finish the underside of the box, reverse-chuck it either the way I do, by attaching it to a scroll chuck with rubber stoppers replacing the jaws, or by winding vinyl tape around the top opening of the box for protection and gently tightening it into the jaws of the chuck.
The vinyl tape should prevent damage to the sides. Gently finish the bottom of the box, making it slightly concave to prevent it rocking on a flat surface. Sand and polish as before. Don’t forget to sign and date it.
Photos by Steven Kennard
Turn a Dovetail
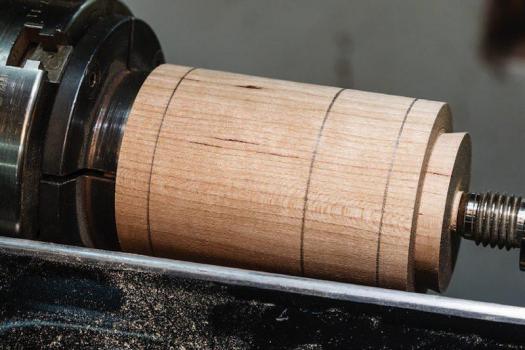
Once you have the dovetail turned, you can add pencil lines to mark the top, bottom and separation between the two halves.
Continuous Grain
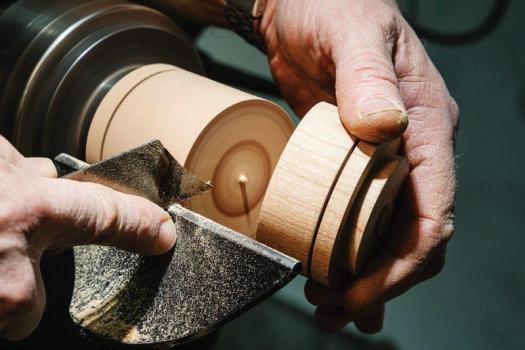
Kennard uses a thin parting tool to separate the two halves. This is the best way to keep the grain looking continuous.
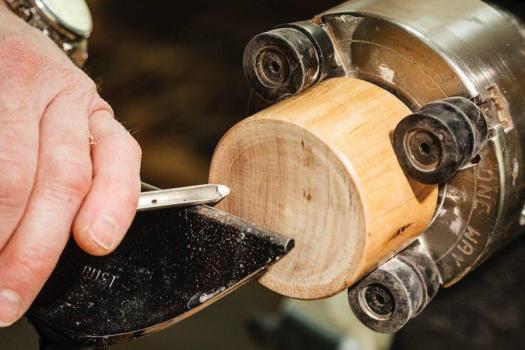
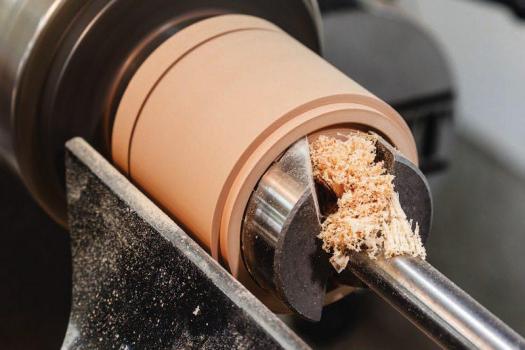
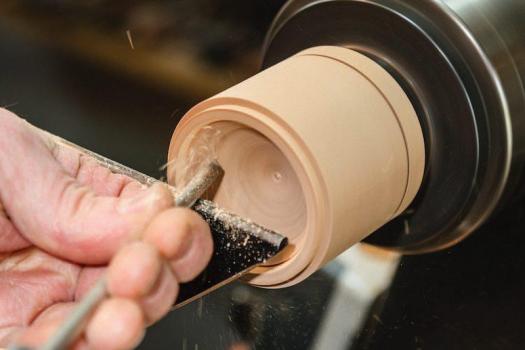
Two Options for Hollowing
One method of removing the waste in the lower portion is with a bit chucked in the tailstock (above). Another option is to use a gouge (below). Both are acceptable, so use whichever method you feel most comfortable with.
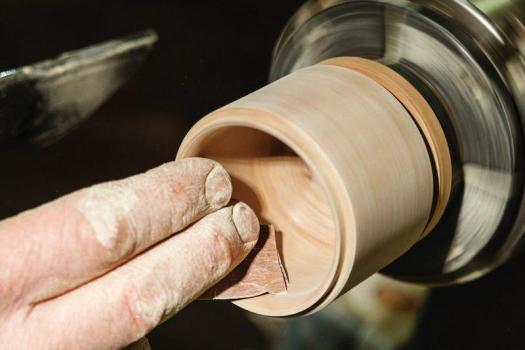
Slow Sanding
Reduce the speed of your lathe in order to sand the inner surfaces. A slower speed will reduce heat, and many potential problems.
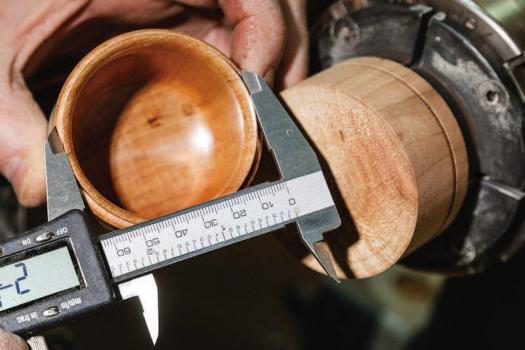
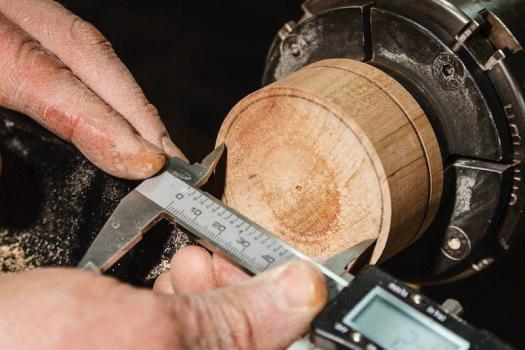
Exact Measurement
Measure the diameter of the lip (above) and transfer it to the underside of the top with a sharp pencil (below). Now you have something to guide you while mating the top to the base.
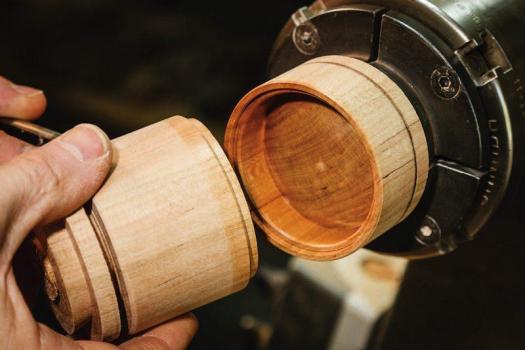
Perfect Fit
Make sure to shape the lip on the lid carefully. A friction fit, one that is not too tight, and not too loose, is what you’re aiming for.
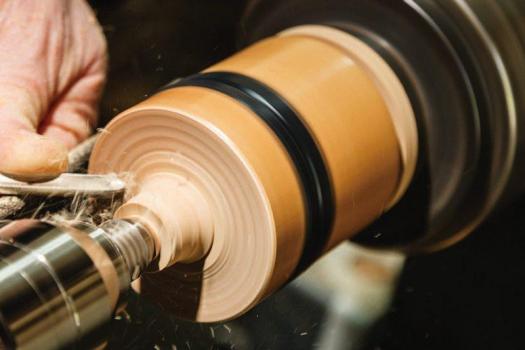
Sticky Situation
Kennard stretches electrical tape across the joint of the lid and the bottom. This allows him to lightly work the upper portion of the box.

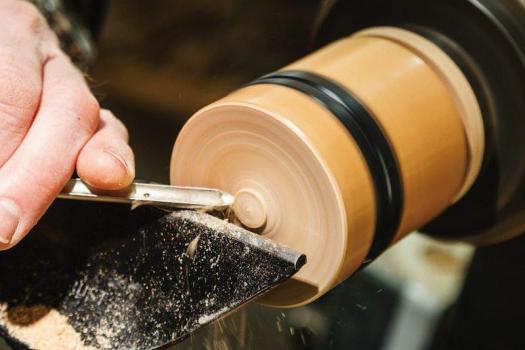
Finishing the Top
With the tailstock in place, Kennard removes as much material as possible (above). To complete the final shaping of the top, Kennard removes the tailstock and carefully finishes shaping the top (below).
Stable Base
The bottom of the box should be slightly concave to ensure it doesn’t rock while in use.