PROJECT
Make a triangle box

James Dobson

Find more Boxes projects
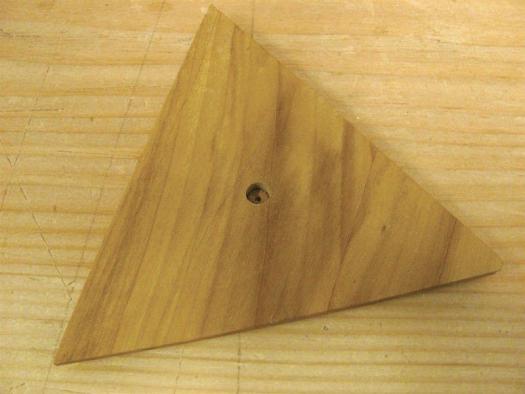
This visually striking box is simple to make, and can be customized many ways.
“What are you going to put in that?” was the first question my wife asked when I brought this little box out of my shop and set it down on the coffee table. It was a good question. One that I maybe should have asked before I started building it. But here’s the thing. It was a small build that leaves plenty of options for design so I didn’t really think too much about the end use as I started. For those of us who are less pragmatic than my wife you won’t need an excuse to build this.
Make a triangle box
Box design
The small size of this box means that subtle design changes can make a big difference. Play with the shape of your pull or try different wood combinations. These boxes are also great to paint, especially the lids. Use a wood like pine or poplar and paint with milk paint or acrylics. Add texture by carving the lids or leaving the bandsawn sides rough. Because these boxes are fairly simple to make you can experiment with little risk. Make them as wild or subdued as you want. This box is meant to be looked at and touched, so have fun.
Wood selection
This box is small so wood selection makes a big difference. I’ve chosen a piece of very straight grained quartersawn ash. For box sides I prefer the muted simplicity of straight grains over wild grained or spalted options. But with a small box like this you can let your imagination run wild and use whatever combinations you like. The temptation is to use scraps from previous projects which can work but don’t let that come at the expense of the finished project. Use the right piece. I’m using 8/4 lumber though if you work carefully you could cut the pieces you need from 4/4. You will need a piece about 4-1/2” long and 2” tall, but exact dimensions are not critical. For the lid I’m using apple. It’s warm brown tones compliment the brightness of the ash perfectly.
Stock preparation
Because the piece of wood I start with is so small it is not a great idea to run it over a jointer or planer, so I square it with my hand planes. On a piece this size that only takes a minute or so. Make sure to use a sharp blade and you won’t even have to sand once the piece is assembled.
Grooving
When building a box, the normal order of operations is to cut the grooves after sizing the sides. However, here it is easier to cut the groove first. I used a Stanley 45 with a 1/8” blade to make the groove but you can use a table saw or router to do the same. Just make sure that your 1/8” groove is 1/8” deep and 1/8” from the bottom of the box.
Ripping the sides
Now that your groove is cut take the blank to the bandsaw and set your fence for 1/4”. Cut the side of the box free. You will need to repeat these steps for all three sides. Plane the blank smooth again, cut a groove, and then rip the next side free. Once you have all three sides cut, you can smooth the bandsawn faces or leave them rough for additional texture. I have made boxes with both smooth and rough sides and I’m not sure which I like best.
Prefinishing
This box is easier to finish if you apply your finish before cutting your mitres. The inside corners are very tight and it isn’t easy to get into them. Prepare your surface by sanding or with a sharp smoothing plane. I use three coats of shellac rubbed on with a clean lint free cloth. Allow to dry between each coat and scuff with a fine sandpaper before applying your next coat. Once you cut your mitres you will have bare wood for gluing and a finished interior.
Cutting the angles
Cutting the angles at the ends of the sides requires a jig. Build the jig by screwing a piece of wood at least as tall as your box side to a piece of thin plywood that will fit on the bed of your mitre saw. This will serve as an auxiliary fence. I used a handsaw and mitre box, but this technique will also work on a chop saw. Use a square to align the auxiliary fence at 90 degrees to the saw’s fence and then clamp the plywood down to the table. Set the saw to cut at 30 degrees. A stop block should be added to the auxiliary fence so all the sides are cut to the same length. Position your box side against the fence and secure with a clamp. Ensure that the groove faces towards the saw blade. Make your cut and then flip the box side to cut the other end. Repeat with the other two sides.
The bottom
Before gluing the box together, determine the size of the box bottom and lid. I use painter’s tape to secure the box in its final shape and then trace the opening onto a piece of 1/8” plywood. Enlarge the bottom by offsetting the traced lines by just under a 1/8”. This will allow the bottom to fit in your grooves. You can glue a layer of paper, or fabric, or leather, to the bottom. Just make sure that your grooves are wide enough to hold whatever it is that you are decorating with.
Glue up
One of the first things woodworkers learn about glue-ups is that end grain glue-ups are inherently weak and should never be done. Nonsense. Yes, they are weaker than a long grain joint but if done correctly an end grain mitre joint is perfectly strong for a project this size. Splines are not necessary. To do it properly one must first size your end grain. A glue size is a 50:50 mixture of glue and water. Using a small brush spread the size over the end grain and let it dry. The end grain will suck the thinned glue into the grain where it will harden. Then, when you are ready to glue in earnest, the glue will stay in the joint and give you a perfectly acceptable connection. I use green tape again as a clamp by wrapping it tightly around the box. Green tape is also placed inside the box to keep glue off of the inside corners. Remember to insert your bottom before gluing.
Even if you have prefinished it is a good idea to add masking tape in the interior corners to help prevent squeezed out glue from collecting. These tight corners are very difficult to clean out.
The top
Repeat the trace and offset step with your lid material. Here I am using apple that I milled from a tree out of my parent’s backyard. Apple is a wonderful wood to work with, but feel free to use any contrasting species here. I’ve also used milk paint on lids for these boxes, and that looks great too. Once you’ve cut out your lid you will need to cut a rabbet along all three edges. This should be cut back to the original traced lines. You can do this on the table saw, router table or by hand like I did with a handsaw and chisel. If using power tools be sure to support the backside of the piece to avoid any spelching.
The pull
I’ve used a piece of Karelian birch for the pull. It was a left over from a pen blank. If you have a chuck you can go from start to finish with your pull in the chuck. If not, start by turning between centres. I start by making a long tenon 1/4” thick and then shape the knob. Once you have the profile you want, remove the pull and re-mount it in a Jacobs chuck to finish the top of the pull. Alternatively, you can drill a 1/4” hole in a block of wood mounted to a faceplate and use hot glue to hold the pull while you finish turning it. Trim the tenon down to 3/16”.
Mounting the pull
To determine where on the lid the pull should be mounted, I start by finding the centre point of each side with a pair of dividers. Make a line from the centre point to the opposing corner. I place the pull where the three lines intersect. Using a 1/4” bit drill a blind hole and then glue in your pull.
Finish
Though the inside should already be finished, the outside now needs to be coated. I’ve finished this box with three coats of dewaxed shellac followed by a soft wax I buy from another local craftsman. Sand lightly with 220 or finer grit paper between coats of shellac and buff out your wax with a soft lint free cloth.
With small projects like this it can be fun to play around with a new finish. Try some milk paint, as colours can really add a strong visual to the project. Even using standard wall paint, or even a colourful aerosol spray, can provide a serious hit of colour. And you don’t need to colour the entire box. Just adding colour to either the lid or main box is often enough. Experimenting on a piece of scrap is a great way to determine what finish colours look best with clear-coated solid wood.
Photos by James Dobson
Keep Things Quiet
Although a larger piece of material could be machined with a thickness planer, Dobson chose to use a smaller piece and dress it with hand tools.

Bottom Groove
A groove to accept the bottom was then cut into the smooth face of the blank.

Rip it to Thickness
The bandsaw is a great tool for resawing material, and that’s exactly what Dobson uses to create each side of the box.

Smooth or Rough?
Once the side is separated from the blank with the bandsaw, a hand plane can be used to smooth the outer surface of the part. For a textured look you can even leave the surface rough.

On an Angle
Because the cuts on the ends of the sides need to be well over 45 degrees, and most mitre saws can’t make those cuts, Dobson clamped a piece of wood to his mitre box at a 90-degree angle. This allowed him to hold the workpieces perpendicular to the back of the mitre box and obtain the correct angle.

Ready for Action
With the workpiece clamped to the other piece of wood he could make the proper cut with his handsaw.

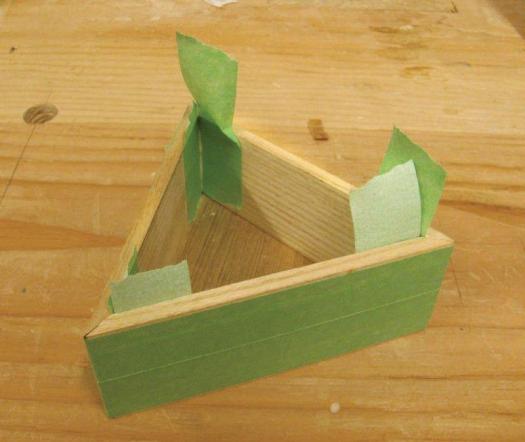
Dry Run
Without glue, Dobson tapes the corners together to obtain the size needed for the bottom.

Trace, Then Cut
Trace the size and shape of the dry-assembled box onto the scrap, then cut it to size, keeping in mind there needs to be a rabbet on all three sides that extends into the grooves in the box sides.

Protect the Surfaces
Dobson adds short strips of masking tape to the inner areas of the sides, directly beside the joints. This protects the inner faces from getting glue on them during assembly.

Tape, Then Wrap
With tape across the outer surfaces of the sides, the joints can be glued and the sides can be wrapped together. A few pieces of tape across the final joint is all that’s needed.
Top it Off
Once the top is cut to size, a rabbet can be cut into the three sides so it sits inside the assembled box nicely.

Turn a Pull
Start by turning a 1/4” diameter tenon, to fit into a hole that will be bored in the top of the lid. Next, shape the pull to your liking.

Finish it Off
Chuck the tenon in your lathe and complete the pull so it feels nice when grasped.

A Centered Hole
Once a hole is drilled in the center of the lid, the pull can be glued in place.