PROJECT
Make a treadmill laptop desk

Rob Brown

Find more Desks , Gifts / Crafts projects
If you work on a laptop for much of the day, you’ll feel better if you’re able to move while working. A laptop treadmill desk is the perfect project to improve your health and get more work done.
I have two jobs, and in many ways they’re opposite from each other. When I’m building custom furniture I’m usually standing and moving. When I’m taking care of my magazine tasks I’m almost always doing one thing: sitting. I think a mix of standing and sitting is good, but the problem I usually have is when I stand for most of one day and sit for most of the next day. My back is usually sorer after sitting all day than standing. That is, until I made my first treadmill desk for my laptop.
Make a treadmill laptop desk
Take care of yourself
I find that after sitting for long periods of time my back aches and I generally feel worse. Getting up regularly, even for a minute or two, will help me feel a bit better, but the most helpful thing for me to do is to simply not sit for much of each day.
I do all of my editing work on a laptop. A few years ago, I made a very rudimentary (ugly) stand that fit on the display panel of my treadmill to hold my laptop while I used it. It looked awful, but it did the trick. I was able to break up all the sitting on my magazine days, and I always felt better at the end of the day. Then my treadmill broke, and the ugly treadmill desk didn’t fit on my new treadmill. The solution was simple; make a new treadmill desk, this time taking care to make something more visually appealing.
Are we just creating different problems?
If you do too much of anything your body will rebel. The purpose of this treadmill desk isn’t so you can walk for eight hours every day while working on your laptop. The aim of this treadmill desk is to give you another option for how your body is positioned while going through your workday. Like sitting, if you spent too much time using a treadmill desk, you would probably quickly develop wrist and forearm troubles, not to mention other potential upper body, and maybe even lower body, injuries. I’m certainly not trying to scare you away, as this treadmill desk has worked wonders for me. But as my doctor says, everything in moderation, and I find this treadmill desk is great for breaking up long sitting periods and allows me to burn some extra calories while working. A half hour here and there is enough to have me feeling much better by the end of the day.
Laptop position is critical
Before you go too far down the design path, seriously consider three things when positioning a laptop on your treadmill. If your laptop keypad isn’t positioned properly, your upper body, and maybe your back or lower body, will be sore after using the desk for even a short period of time. This is the opposite of what we’re trying to accomplish.
The first consideration is laptop height. While walking, the keypad and tracking pad should be at a comfortable height. In a perfect world you wouldn’t feel the need to lift your shoulders towards your ears to better position your hands. I’m no ergonomic expert, but I think a 90° angle at your elbows would be great, though I doubt the geometry of most treadmills would allow for this. I found that if I position my elbows slightly in front of my body while using the treadmill desk, my elbows are somewhat close to 90°. My shoulders are relaxed during use, mainly because my wrists are supported in front of my laptop, taking the weight off my shoulders.
The second consideration is the distance of the laptop from the user. The keypad should be close enough so you don’t need to reach too far to use it. If the laptop is too far forward, you have to reach for the keypad, causing upper body stress. Also, when considering this dimension keep in mind where your feet are landing on the treadmill with each step during use. If your wood treadmill desk is positioned too far forward, you’ll have to walk more towards the front of your treadmill and your toes might come into contact with the plastic guard at the very front of the walking belt with each step. This would be frustrating as well as maybe unsafe.
The third consideration is keypad angle. If the front of your laptop is positioned too low, the upper portion of your forearms will have to constantly flex to keep your fingers high enough to type. Although I’ll get to the details shortly, incorporating a wrist support into the piece of wood that supports the laptop helps. This takes the weight of your arms off your shoulders and positions your hands over the keyboard comfortably. As long as the wrist support is at the right height, your hands and wrists should feel fine after typing for an hour or so.
Form follows function
Making the desk fit the treadmill and hold a laptop at the correct position was important. First on my list was to design with the above three main points in mind to ensure it worked well and fit me comfortably. Making the treadmill desk look attractive was easy.
Every treadmill is different, though they almost all have some sort of cavities, ledges or rails near the display area. Although you’ll need to figure out how to design your treadmill desk so it stays on your own treadmill display and holds your laptop, I’ll take you through the process I used and give you some tips on how to ensure your treadmill desk functions flawlessly.
Make a rough model
The simplest thing to do is to make a quick and dirty model with some rough material. I started by cutting a rough piece of plywood (particleboard or MDF would also work) to the size I thought would work. For me, this was 19″ × 16″. I would suggest cutting your piece on the large side now, as you can always trim it down after positioning it on your treadmill. Remember, this first step is just rough, so don’t worry about precision or beauty at this stage. You could probably even use a fairly rigid piece of cardboard if you had some. I placed the piece of plywood over the display area to see what my next step would be.
Add some arms or cleats
When considering how to support the main surface of your treadmill desk, a good rule of thumb is to ensure the four corners of the desk are either supported or at least come into contact with the treadmill. This will ensure the desk stays put during use. This isn’t always possible, but the closer the contact points are to the corners of the display, the more stable the desk will be with a laptop on it.
In order to keep the desk in place you’ll need to add some bits and pieces. The first treadmill desk I made had a wide horizontal handrail towards the user, so I made two short arms with curved ends to fit over the rail on either side of the plywood base. This kept the desk from falling. The side of the desk that was away from me was positioned so it just rested on a wide horizontal rail on the display. This meant the four corners were supported and wouldn’t go anywhere while in use.
My new treadmill had a number of cavities and protrusions to work with. The largest and simplest were the two holders on either side of the main display for a water bottle or accessories. I made two simple arms that could be attached to the sides of the base and protrude into the cavities. After returning to the treadmill, I screwed the arms to the sides of the base and tested it out for stability. The only other things I needed to keep the desk from moving during use were small spacers that would support the user-side of the desk on a pair of small handrails, but I’d wait to sort out this detail until I had a chance to put the nearly completed desk on the treadmill and see how it fit. With these general measurements and details, I was ready to start making the real thing.
Basic dimensions
Everyone’s treadmill desk will likely differ, but to give you an idea of some of the dimensions I landed on, here’s a quick list. The base is 18″ × 15″ and the edging is 5/8″ thick. The arms are 1-1/8″ wide. The laptop support is about 3-1/2″ high, 13″ wide and 7/8″ thick.
The real deal – the base
After seeing my model sit on the treadmill, I decided to shrink it a little in both directions to help the arms fit into the cavities a bit better, plus the extra depth wasn’t needed. The location of the arms on the model worked great, and with a pair of small supports on the underside of the base it would be supported near all four corners.
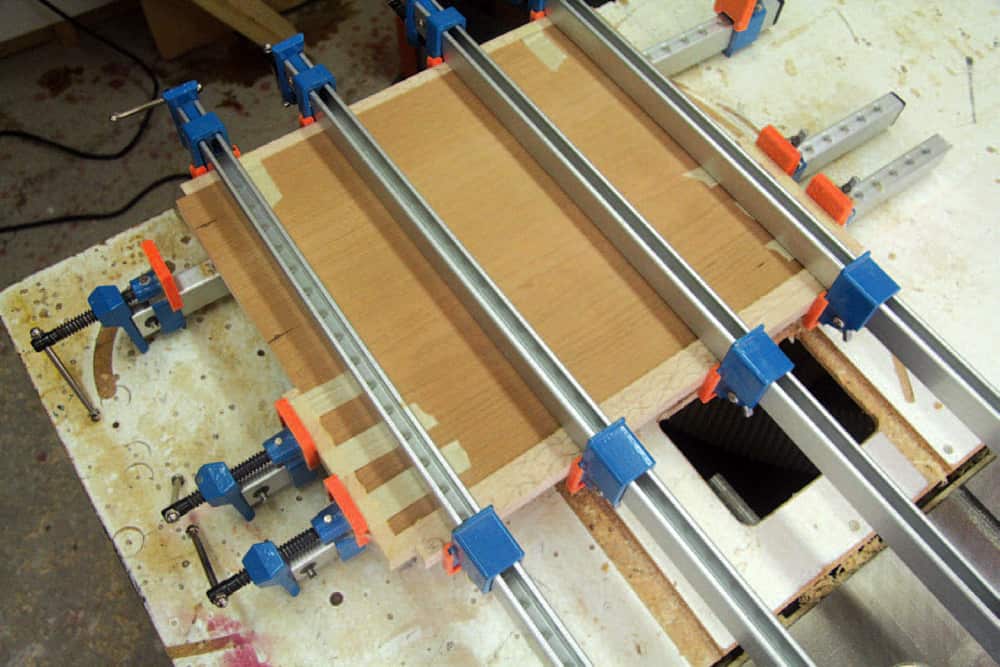
For the base you can either use a piece of pre-veneered 3/4″ thick plywood or apply some figured veneer to a piece of plywood. With it cut to size, I milled up enough lengths of edging to cover the four sides with a bit left over for the two arms.
Mitred corners make for a very clean look. I cut the mitred corners on my table saw with a sled, then glued them in place. I started with the long edge away from the user side of the desk. When that was dry, I added two side pieces that extended part way across the sides. They stopped to make room for the arms, which were next to be cut and glued in place. Because the arms extend away from the base, and they’re only fixed to the base with a small amount of surface area, I made sure to butt the arms into the ends of the first two pieces of edging on the side of the base. And by applying pressure to the next two pieces of side edging strips, the arms would be locked into place even more solidly. Hopefully, an errant bump down the road wouldn’t cause the arms to get knocked off.
Once the arms were glued in place, I took the desk back to the treadmill to double-check its dimensions. At this point I realized the arms didn’t need to be 3″ long. The extra length only made them more of a target and would provide more leverage if a knock did happen. I trimmed them down so they extended only about 1-1/2″ beyond the base.
Trim and round over the edging
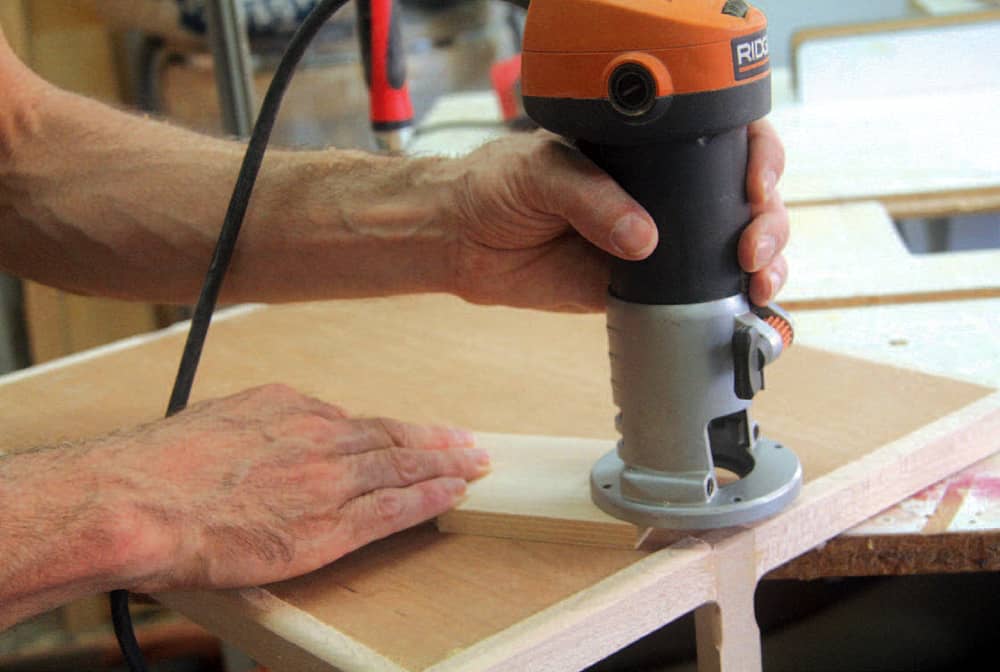
Next, I had to trim and round over the solid wood edging. I did both of these steps with my router. It was tricky around the arm, because I couldn’t trim the edging flush with the underside of the base, but a flush cut hand saw and a chisel worked just fine.
I started by rounding over the edges even though the edging wasn’t flush. This just removed material that I didn’t need to deal with while flushing up the edges. I used a router attached to a simple base jig to trim the edging. The jig was a flat, rectangular piece of 1/2″ plywood, but it was attached to the router’s base so it only covered about 40% of the base. A straight router bit protruded from the router so it was perfectly flush with the underside of the rectangular jig. The plywood jig ran on the plywood base of the treadmill, and I moved the router so the bit trimmed the edging flush with the plywood. I could only get within a couple of inches of the protruding arms, so I eventually used a flush cut saw, some hand tools and a sanding block to flush the edging in that area. When the edging was flush, I ran the round over bit around the edging and the arm once again.
Laptop support
I machined the laptop support on the tall side, then tested it in place before ripping it to final height. I also added a 1/4″ groove close to the top of the support to hold the front edge of my laptop. I headed to the treadmill with the main section, the laptop support and my laptop to check out the ergonomics. The laptop support wasn’t attached to the main section yet. To my surprise, the height of the laptop support was pretty much perfect at about 3-1/4″ wide. Every treadmill is different, though, and every person is different, so how high yours should be may be completely different. I ended up with the base of the treadmill desk sitting at about 30° off level, while the keyboard of my laptop sitting at about 10° once it’s in position on the treadmill desk. The overall height of the front edge of your laptop relative to your body is an important consideration. If I were to just stand on my treadmill, the front edge of my laptop is at elbow height.
If you have multiple laptops in your house, you could make the laptop support edge removable to accommodate other laptops. The thickness of the leading edge of a laptop keyboard differs between brands, and the groove might have to be different. The front edge of my laptop is quite thin. Also, the height of different users may require a laptop support to be specific to each person. Some simple knock-down fasteners and maybe even some jig hardware could be used to make laptop support changeovers quick and tool-free.
Comfort counts
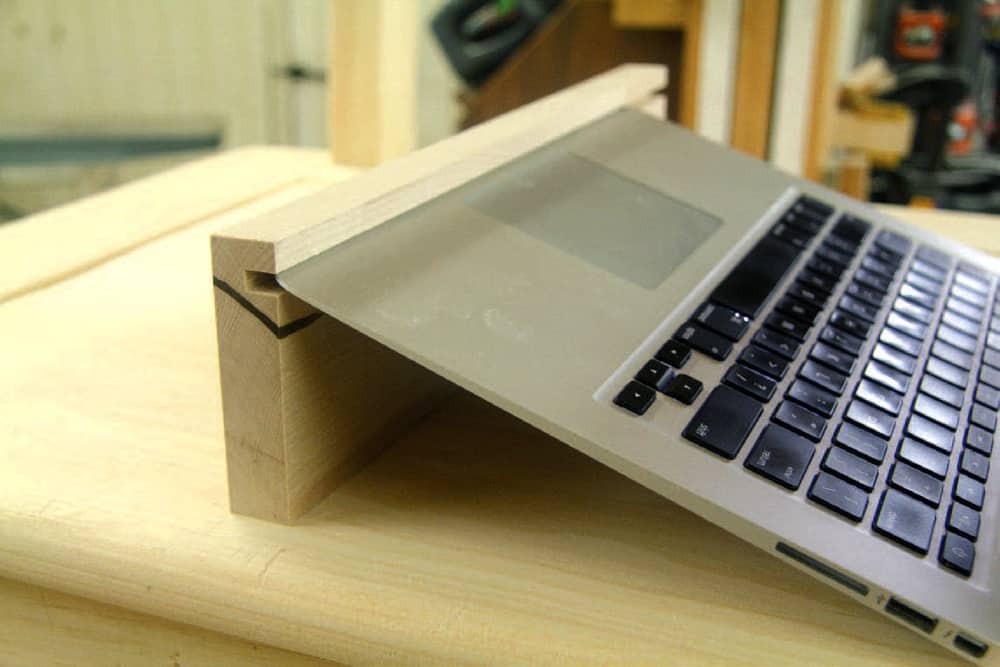
While in use, my wrists rest on the top edge of the laptop support so the edges and surface need to be smooth and comfortable. I bevelled the top edge at about 15°, then heavily eased all the corners. I also removed some material near the center of the laptop support so I could more easily access my track pad. Even though my laptop support edge was only 1/4″ higher than my track pad, it interfered with its use.
With my last treadmill desk I would lift the desk while my laptop was on it so I could adjust the speed or incline. It wasn’t a smart thing to do as my laptop could slide off, but I know I will try that trick again with my new desk. To help keep the laptop from sliding off while the treadmill desk is being held for a moment, I added a small tab on either side of the slot that holds the front edge of the keypad. When complete, the laptop support gets screwed to the base from the underside.
Balancing act
It’s important the treadmill desk is stable while in use on the treadmill. Supporting the four corners makes it super solid, but might not be easily done. Any touch points create a more stable desk.
The far edge of my treadmill desk was supported across most of its width. At the edge closest to me, the desk was supported in the center. The base was pretty stable, but it didn’t take much to cause it to shift a bit. I added a short strip on the underside of the base, directly beside the arm. This supported the left and right side of the desk, while also providing the arm with some structural integrity, as I glued it to both the base and arm.
If you want to go that extra mile, you could drill a hole in the desk so you could hang it on a wall or maybe a hook attached to the treadmill. I find that when something has a specific home it usually makes it back there, otherwise it gets kicked around and damaged.
Finish it off
Pretty much any finish will do. Extreme durability isn’t needed. This treadmill desk isn’t going to see any rain or direct sunlight. The only real considerations are ease of application and the look of the wood; both of these differ from woodworker to woodworker.
I chose a urethane aerosol spray from Varathane. I like the look of it on cherry and maple, and I had some in the shop. An aerosol spray can also make it easy to get into all the nooks and crannies of a small project like this.
At this point it was time to grab my walking shoes and cancel my next chiropractor appointment. A bit of movement is the best medicine for my aching back.
Rob thinks it’s not a surprise this is the first article he’s written with his new treadmill desk. His back is feeling better already.
Photos by Photocomposite by Rob Brown/Shutterstock
Learn from the Past
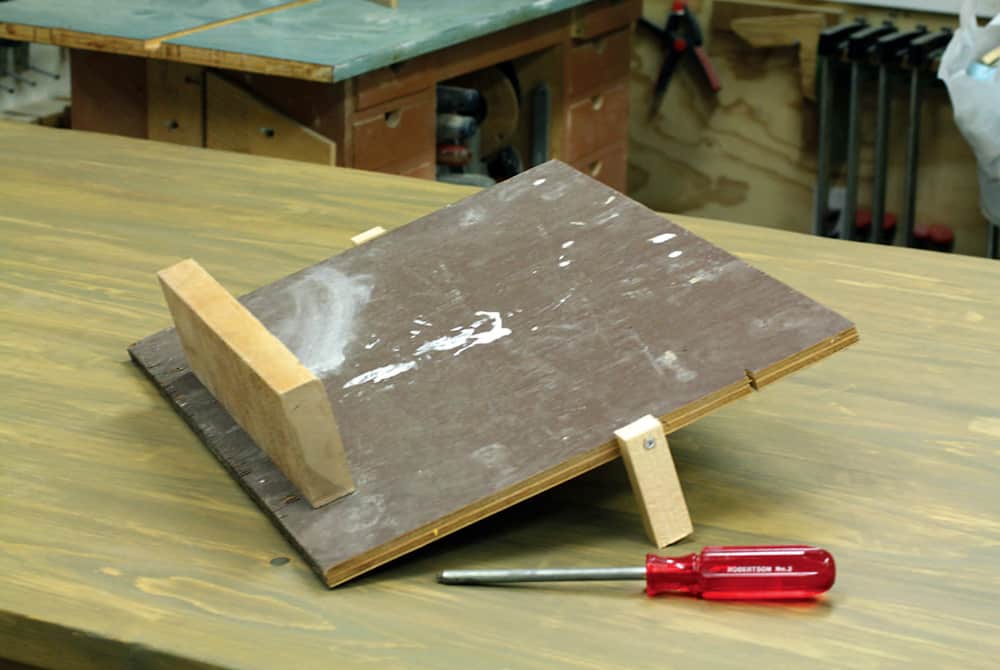
My first treadmill desk was ugly, but it worked. A plywood base with a laptop support and a pair of cleats to fix the treadmill desk to the treadmill are all you really need.
Start Rough
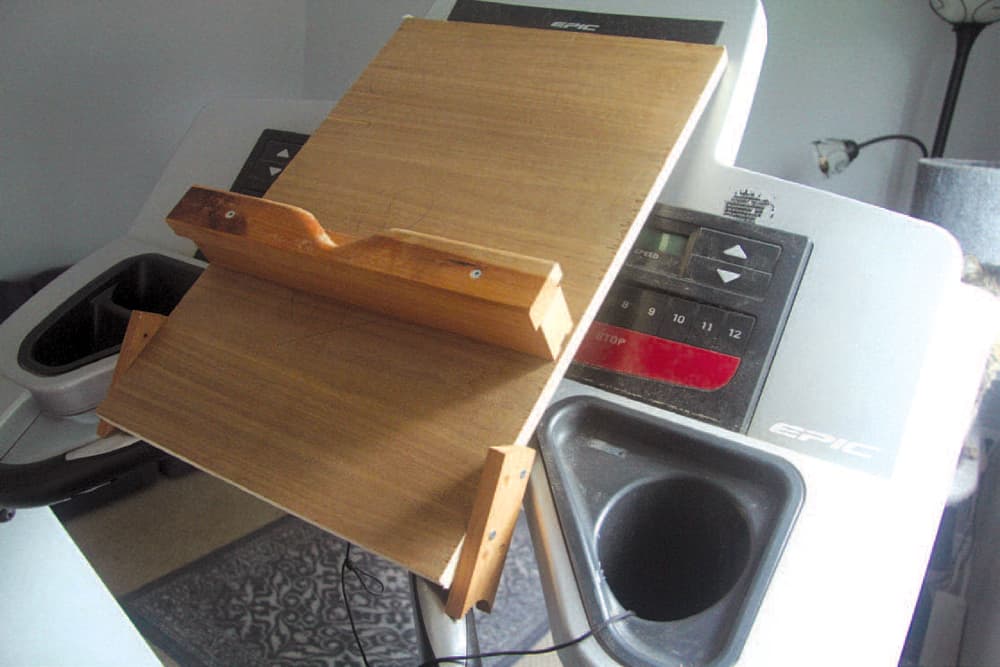
In order to get a good idea of how large to make your treadmill desk, and whether it will be comfortable and stay in place, it’s a good idea to make a very rough model. Brown started with an old piece of plywood and screwed an arm to either side. He could then put it in place and start to get an idea of how it would work.
Matching Grain
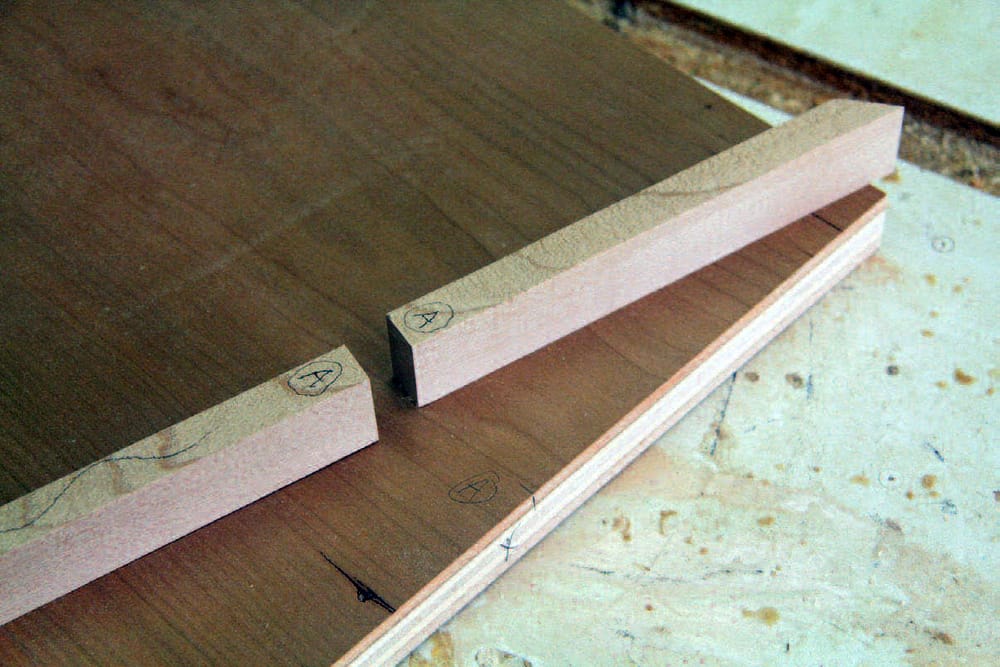
Brown cut the two pieces of side edging from one length of wood so the grain and colour would be continuous and even across the edge of the treadmill desk
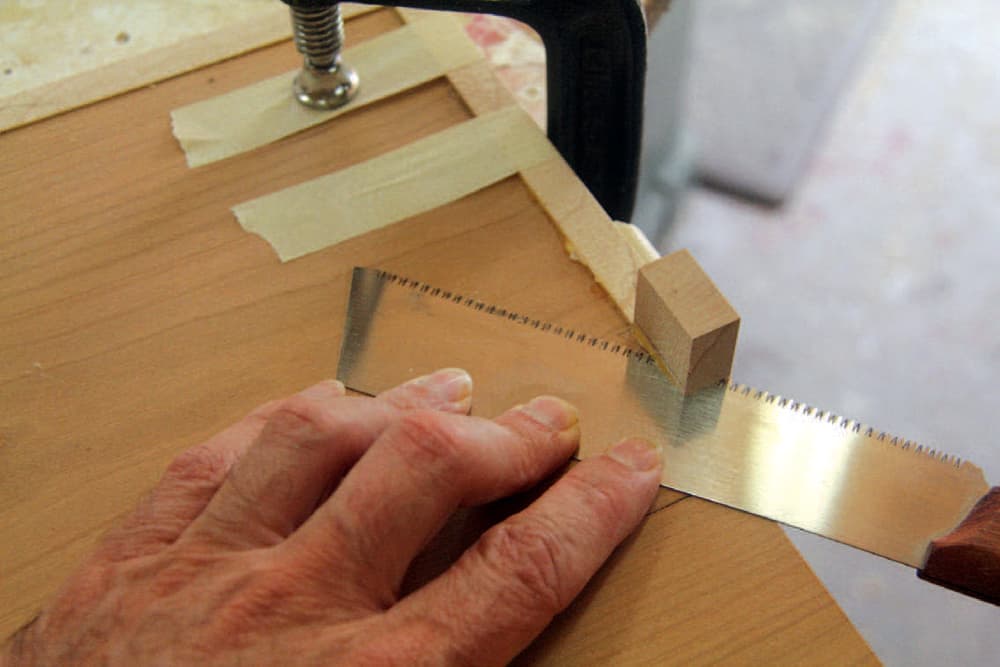
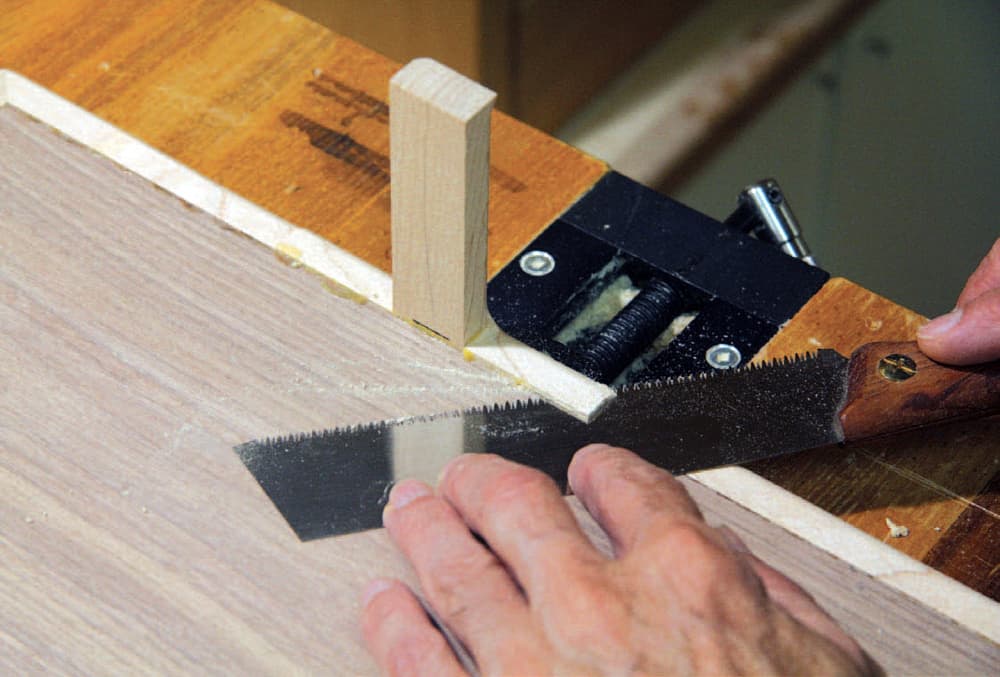
Trim the Arms
With the arms glued in place, trim them flush with the upper surface of the desk. Brown used a Japanese flush trim saw.
Glue on the Edges
Once the position of the two arms was determined, Brown added two short pieces of mitred side edging to either side of the base. He then added a mitred piece of edging to one long edge.
Flush Bit and Base
With a small piece of plywood attached to the base, adjust the height of the base so the underside of the plywood is perfectly flush with the end of a straight router bit.

Trim the Edging
As the plywood runs on the treadmill desk base, the router bit trims the edging flush. Take your time, as multiple passes are needed, especially if you’re using a narrow router bit.
Round Over
Ease the edges with a round over bit. It’s tricky working around the arms on the underside of the base, but do your best to keep the router steady and moving or you may have to deal with gouges and burn marks. A small round over bit is much more forgiving than a large bit.

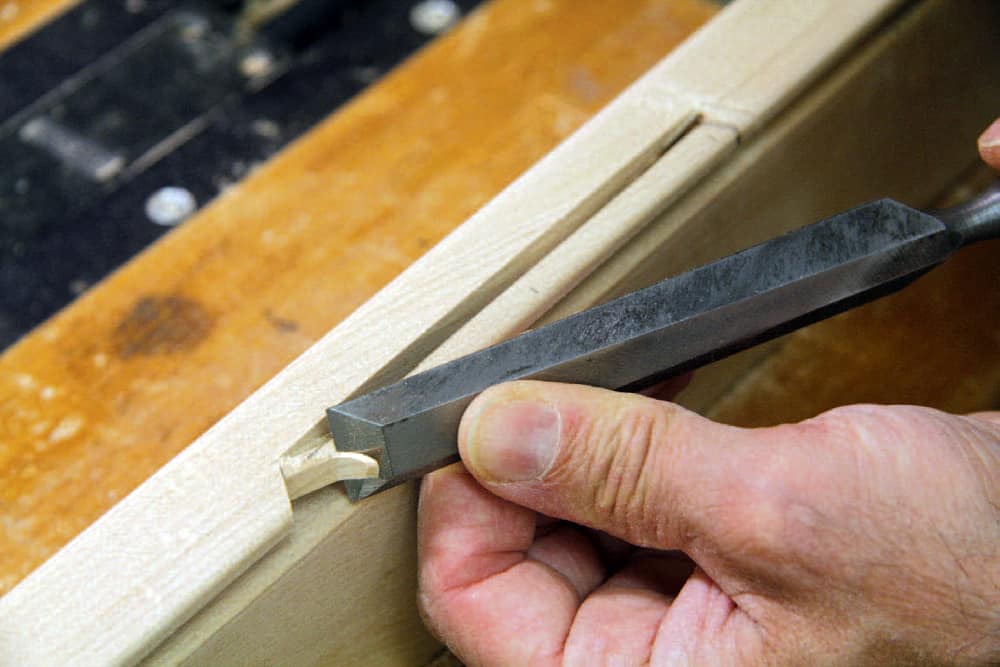
Some Hand Tools
Brown uses a flush cut saw to trim the edging where the router wouldn’t reach. To further fine tune the joint, a sharp block plane and chisels are the answer.
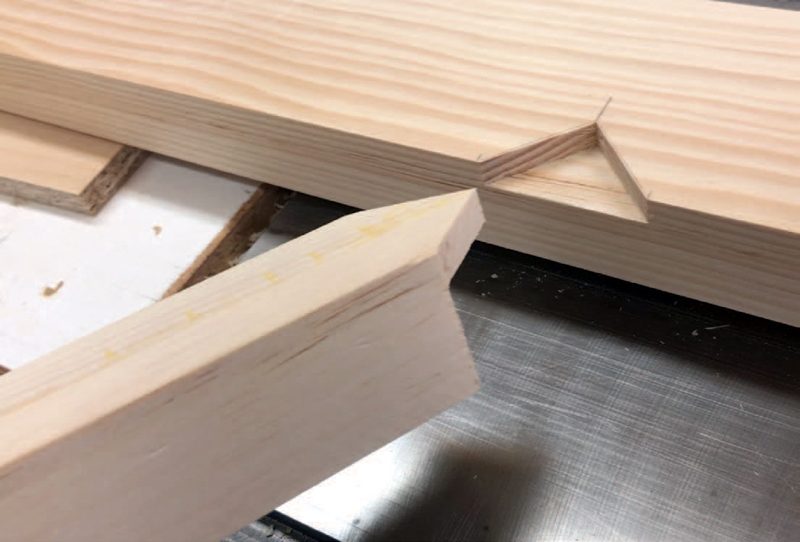
Track Pad Clearance
The track pad on Brown’s laptop is close to the front edge of his laptop, so he had to relieve the center section of the laptop support. A stopped cut on the table saw, followed by a 45° saw cut, allowed Brown to use a chisel, file and sanding block to adjust the opening so it was functional and comfortable.
Laptop Support
Determining the height of the laptop support needs to be done at the treadmill with the desk in place. While you’re in the shop, make the laptop support higher than needed, then test it for comfort on your treadmill and adjust it later.
Attach from the Underside
Once the best location is determined, the laptop support gets fixed in place with a few screws. Brown didn’t use any glue, as he knew a new laptop would likely need to have a new laptop support made. He plugged the holes, but didn’t use glue while installing the plugs. A friction fit keeps them in place and a few coats of finish also help.

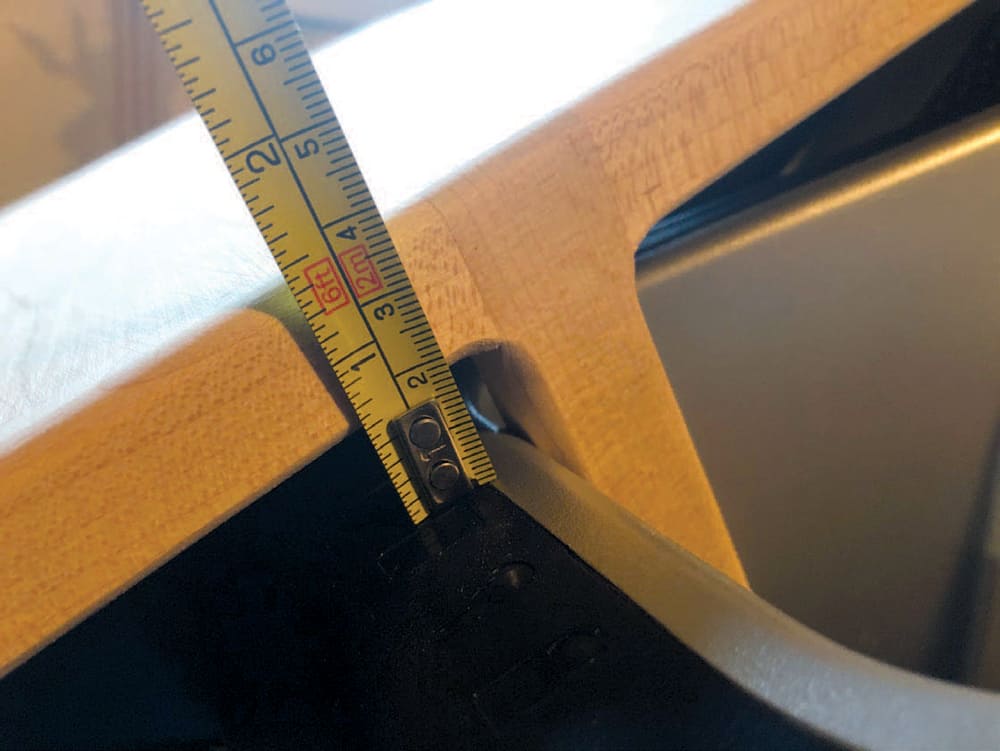
Check the Fit
Brown placed the desk on his treadmill to check it for fit and comfort. Not only does it need to stay put on the treadmill and be steady, but it has to be comfortable. Here, Brown measures for the small support blocks on the underside of the desk. These will stop the desk from tilting and shifting when the desk is in use.
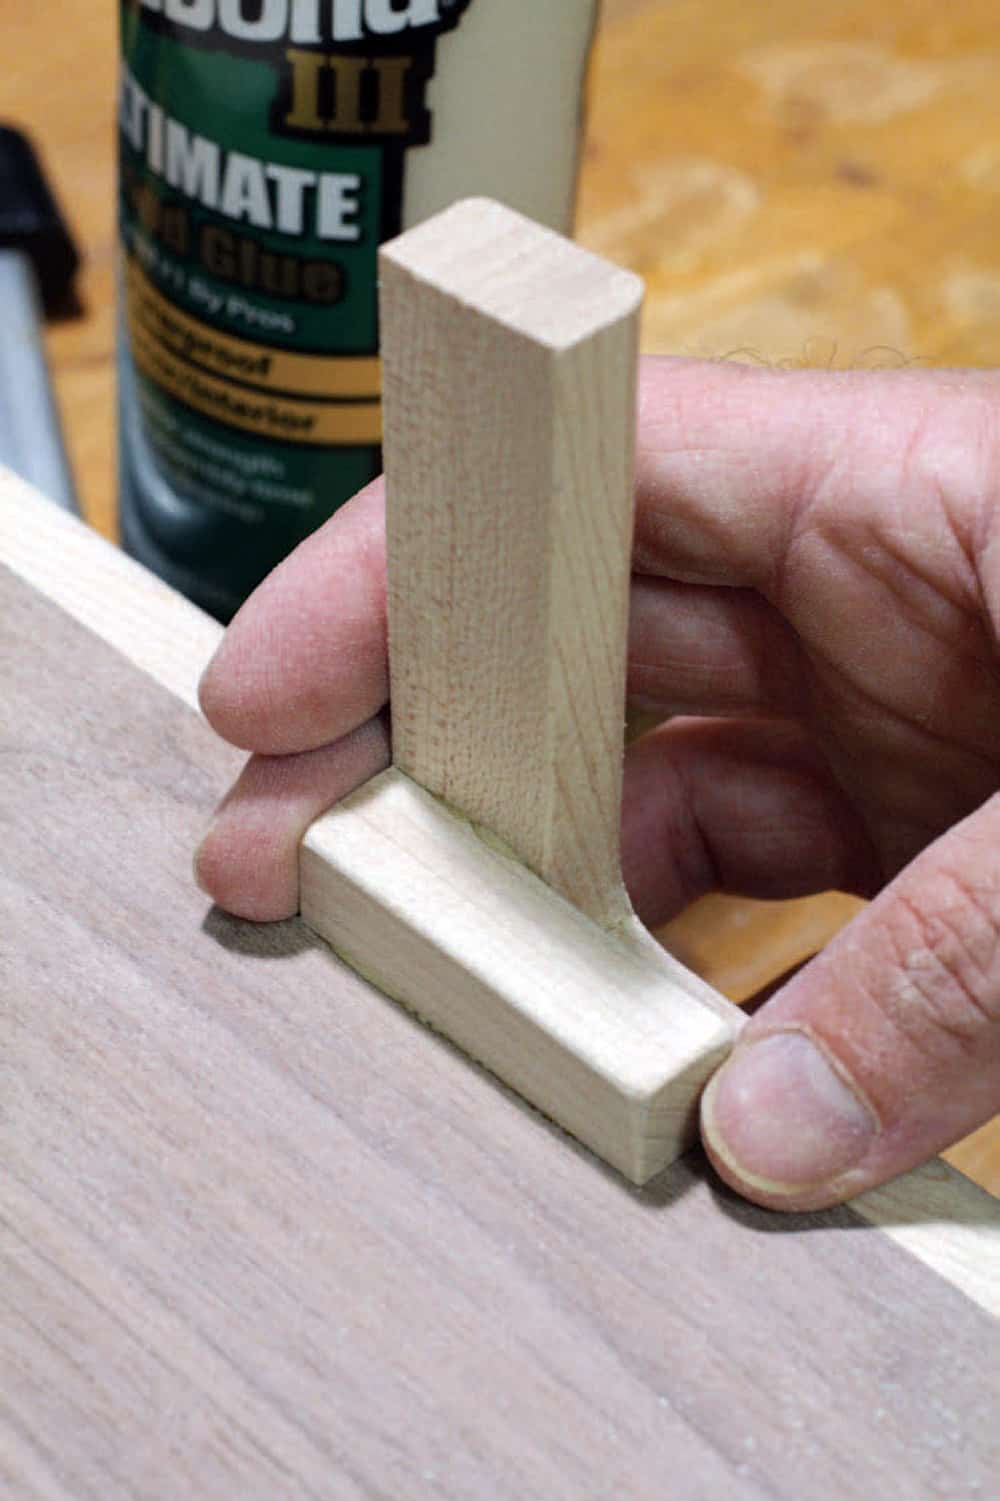
Multi-Purpose Supports
These small blocks give some strength to the arms so they are less likely to break. They are also dimensioned and positioned to come into contact with the treadmill to ensure the desk is stable while in use.
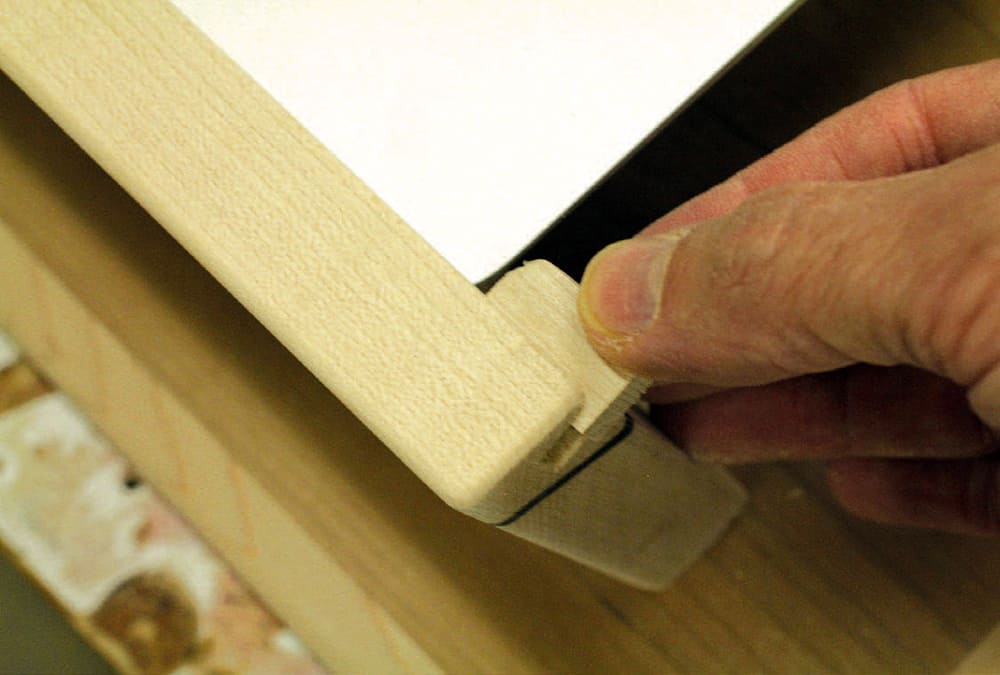
No-Slip Tabs
Although you should never transport your laptop in the treadmill desk, Brown often forgets the rules of common sense. He sometimes lifts the desk with his laptop on it to adjust the speed or inclination of the treadmill. Though he hasn’t dropped his laptop on the ground yet, these tabs will help keep the laptop from falling off the desk.