PROJECT
Make a stylish gift box for pens

James Dobson

Find more Boxes projects
The only thing better than giving someone a turned pen is presenting it in a custom-made box.
Turning pens was my gateway into woodworking. They can be as easy or as difficult as you want them to be, and they make fantastic gifts. But simply handing a hand-turned pen to someone seems too casual, too mundane. But put that same pen in a special box and suddenly the gift-giving experience is elevated to something else entirely. These presentation boxes are a simple build that you can finish in a single day and will perfectly showcase your pen-turning abilities.
I’m batching out three versions of this box so you’ll notice the wood species changes throughout the photographs. You don’t need a lot of lumber for this project, so I went through my scrap bin and found some walnut, ash and boxwood. Make sure you can get all the parts out of a single board. Differences in grain patterns and colour can really show in a small project like this.
Make a stylish gift box for pens
Breakout
There are two basic approaches to breaking out the parts for these boxes. One is to cut your parts from the blank in the order they will go back together in during assembly. Cut your left side, then your front, then the right side, followed by the back. This ensures continuous grain and colour all around the front and sides of the box.
I chose another approach for a couple of reasons. As these parts are so short, and the grain and colour in the material I was using was fairly straight and even, the grain and colour don’t change much. This option also makes it a bit easier to machine these small parts, as they’re all ripped to width while still part of a large blank.
Start by dimensioning your lumber. I’ll show how to do this with machines, but the small size of this project makes it a good candidate for hand tools.
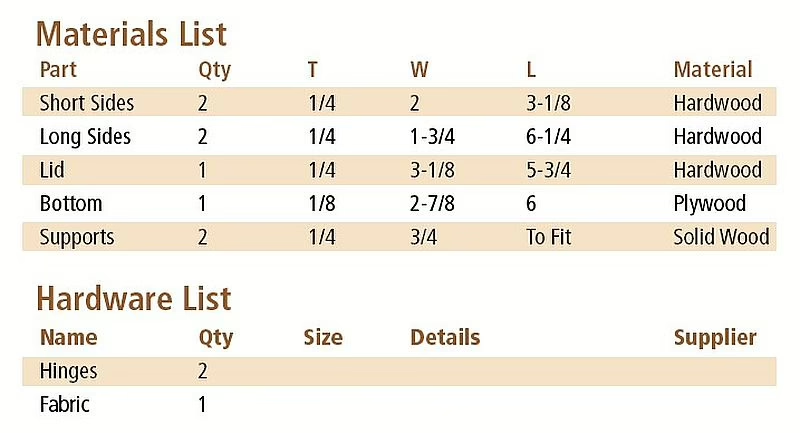
Flatten one face and one edge on the jointer and then plane down to a thickness of 1/4″. At the table saw, set your fence for a rip cut based on the widest required component, which is the lid. Make sure your flattened edge is against your table saw fence and that you’re cutting off your uneven edge. Using a table saw sled or your mitre gauge with a sacrificial fence, crosscut the lid to length. If you’re batching out multiple boxes, use a stop on your fence to ensure each lid piece is the same length.
Set up your fence at 2″ for another rip cut for the short sides. With your cut complete, move back to the sled or mitre gauge for the crosscut. This time, use a stop even if you’re only building one box. You need to ensure both short sides are exactly the same length.
Repeat this process for the long sides. Set your fence at 1-3/4″, rip, and then crosscut to 6-1/4″ using the stop to make sure your long sides are also exactly the same length.
Box bottom
Set your stock aside for a moment and turn your attention to the box bottom. I’m using 1/8″ plywood covered with fabric. I salvage a lot of 1/8″ plywood from shipping materials and fruit crates. It’s often of somewhat poor quality but I can usually work around the defects to find enough for bottoms for small boxes like these. The fabric bottoms are a nod to Connecticut box builder Matt Kenney, who has been including this detail in his boxes for years.
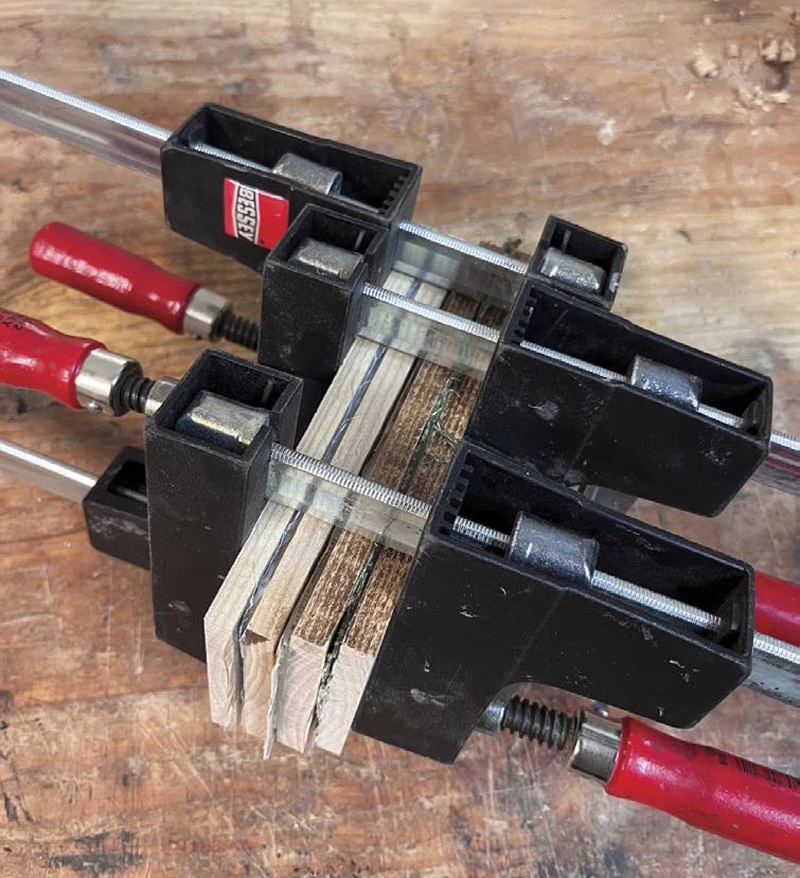
Look for fabrics with a small print that won’t overwhelm and in colours that complement your wood species. You need only a small piece, so quilting squares are often a good choice. You can always skip the fabric and just veneer the plywood. In any case, I treat the fabric like a veneer and spread a thin, even layer of glue on the plywood, ensuring the glue comes right to the edges, and then apply an oversized piece of fabric. It should hang over each edge by about 1/4″. Clamp this between two cauls (blocks of wood covered in packing tape to ensure the glue doesn’t adhere to them). Because I’m batching boxes, I’ve made a stack with cauls between each layer. Allow the glue to dry and then trim the fabric flush with the plywood.
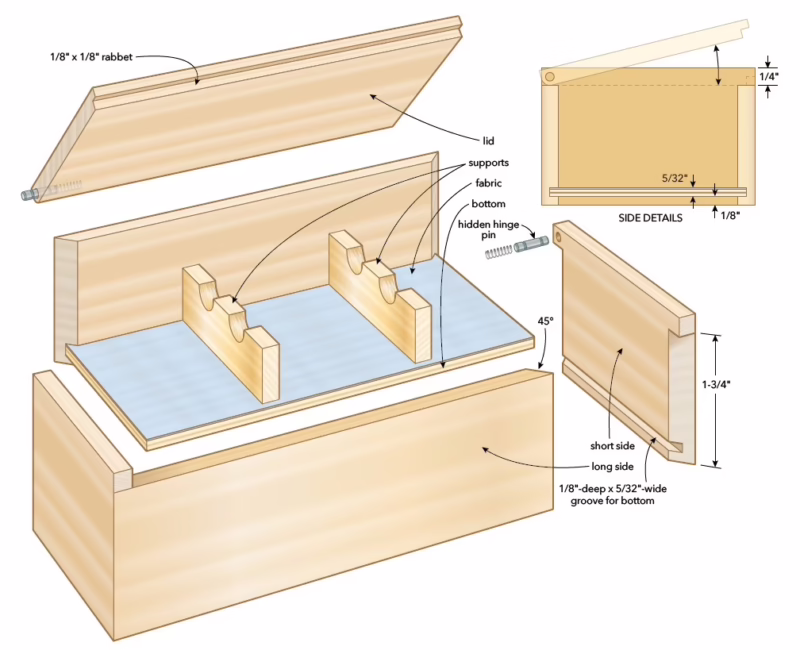
Return to your box sides, and cut a groove 1/8″ wide and 1/8″ deep, 1/8″ from the lower edge of each side with your table saw or router table. Your bottom will sit in this groove. Because we’ve added fabric to the plywood, it will now be slightly thicker than 1/8″. Nudge your fence over slightly, 1/32″ or so, and widen your groove. Check to see if your bottom fits snugly. If you need to widen it more, do so until the bottom fits well. There’s nothing wrong with cutting the grooves to accept the bottom after you mitre the corners of the box, as there will be less chance of tear-out near the grooves.
Mitred corner joints
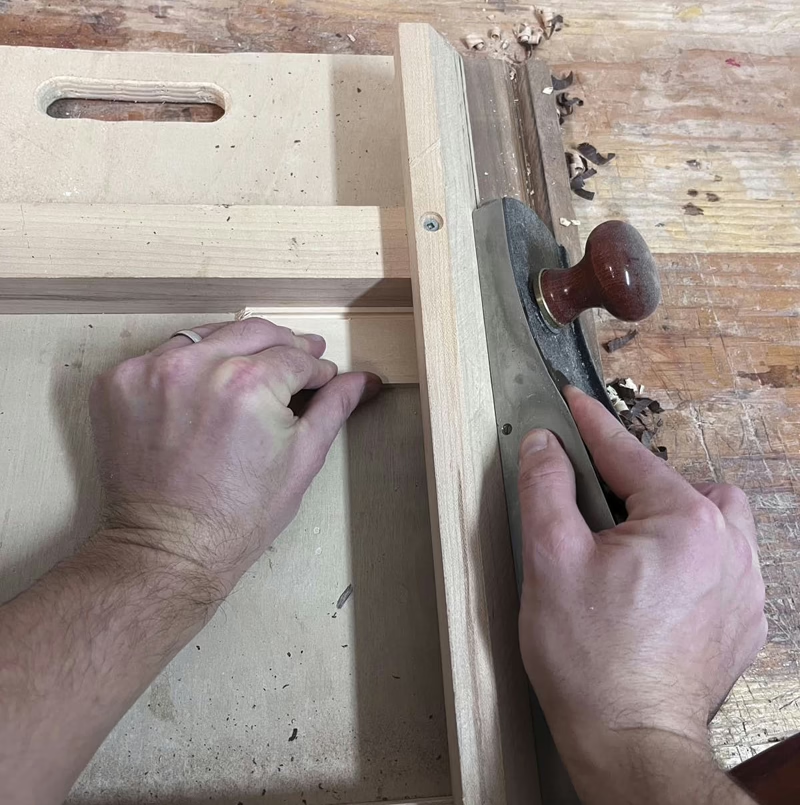
These are simple mitred boxes with 45° angles on each corner. You can cut the mitres on the long sides at the table saw, but I prefer to use my 45° shooting board because it takes no time to set up. Align the long sides with the fence and plane the end grain away. Count the number of passes it takes to complete the mitre. Depending on the wood species, it took me 15 to 18 passes. It really doesn’t take long. Use the same number of passes on the other edges to make sure your sides stay the same length.
The short sides are complicated by the fact that the design calls for stopped mitres. These will need to be cut differently. You could cut these on the table saw, but this is another operation where hand tools are more efficient.
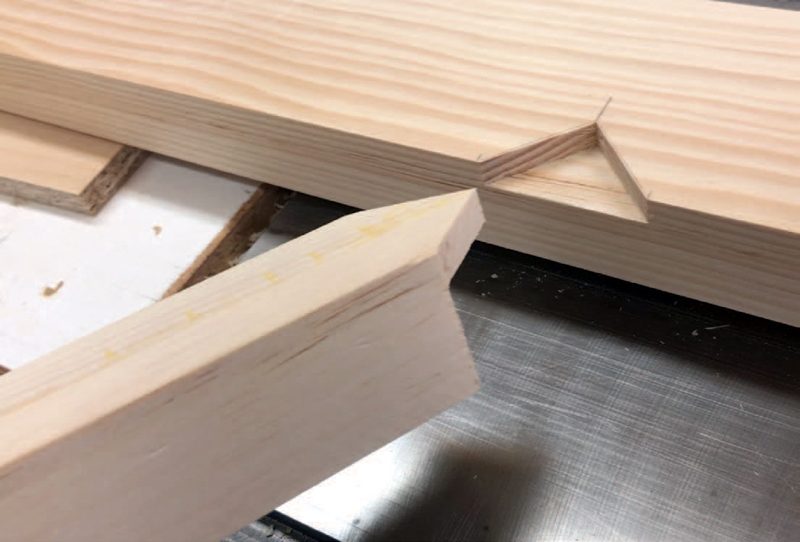
Start with the layout. Use a square to mark where the mitres need to stop. The portion of material that will remain unmitred equals the thickness of the lid. Set your marking gauge to the thickness of the short side and then scribe a line on both edges of the inside face from the lower edge of the box up to the line marking the stop. Turn the side so the lower edge of the board is facing up and mark a 45° angle on the edge connecting the scribed line with the corner of the board.
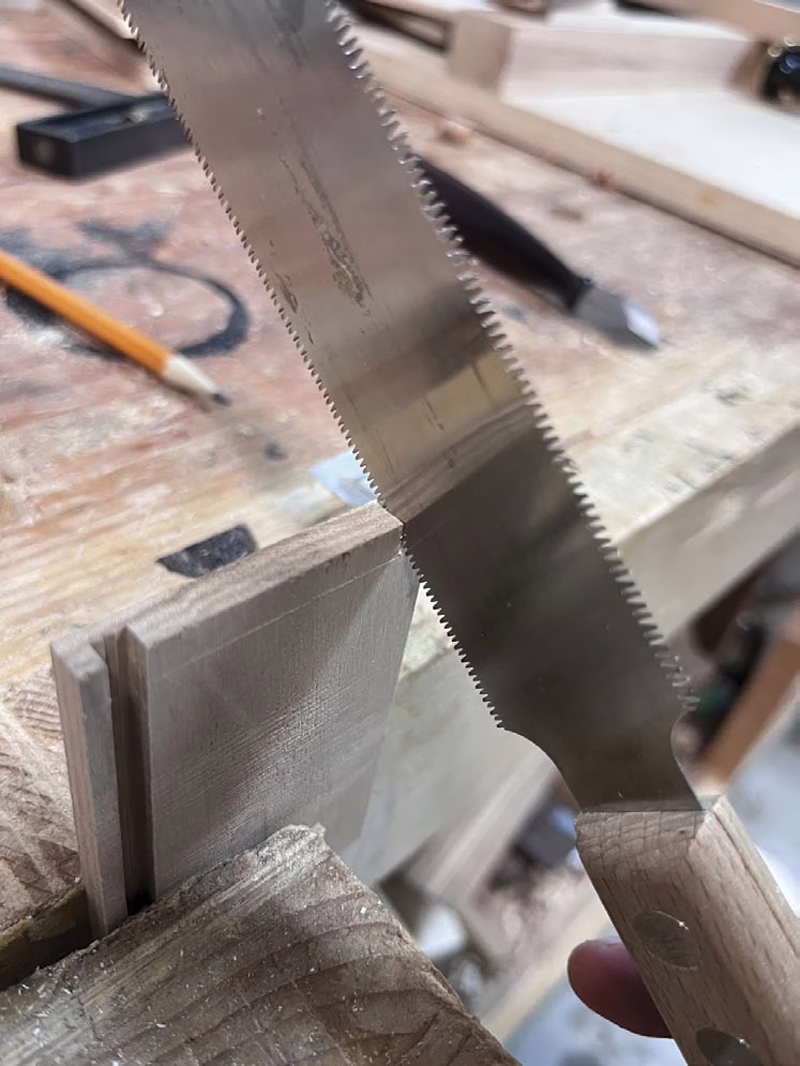
Using a fine-toothed hand saw, make a cut on the waste side of the stop line, connecting the outer edge and the scribed line. Be sure not to cut into the show face of the board. Turn the side back on its edge and saw away as much of the waste from the mitre as you can to make the next step easier. It’s better to leave extra wood here than to cut into the show face. With the mitres roughed out, clamp a block of wood with a 45° angle cut on one face against the scribed line. Use a freshly sharpened chisel registered against the angled back to pare the sides to a perfect 45°.
Hinge holes
You now need to drill the holes in the sides for the hidden hinge pins. Use a marking gauge and an awl to mark the point 1/8″ from the top and 1/8″ from the rear edge on the short sides. Make sure the holes will both be on the rear, rather than the front, of the side when the box is glued together. Use a 1/8″ drill bit to drill 3/16″ deep holes at that point. A strip of tape can be used to set the depth. Don’t use a brad point drill bit to ensure you don’t go all the way through with the small centre spur.
Sand and assemble
Pre-finish the inside faces of your edges in preparation for glue-up. Sand the parts, then coat them with your favourite finish. Linseed oil or shellac are good options. I like to avoid finishes with strong odours, especially inside boxes.
Ensure the faces of the mitres stay free of finish.
Once the finish is dry, prepare for the glue-up. Start by aligning one short side and one long side, show-face up, against a straightedge. I’m using the fence on my shooting board, but you can use your table saw fence or any other straightedge. Use a strip of masking tape stretched over the joint to connect the two pieces. Add the next short side and then the final long side, both with more tape.
Flip the assembly over and apply glue into the valleys created by the mitres. Aim for thin coverage on both sides of the joint. Apply a small amount of glue in the bottom grooves. Place your bottom piece into one groove, ensuring your fabric is the right way up, then start folding the sides around it. One more piece of tape to connect the edges will keep it together. You can use clamps, but I find wrapping small boxes like this with masking tape works better, as clamps can apply so much pressure the box flexes, causing the joints to not align properly. Keep the tape stretched as you work a single piece around all four sides. Two strips of tape should provide enough pressure. Double check for square, then set aside.
The lid
The lid looks simple, but there are some tricky operations here. Before you do anything, ensure your lid fits the glued-up box. Use a shooting board or your table saw to make any necessary adjustments.
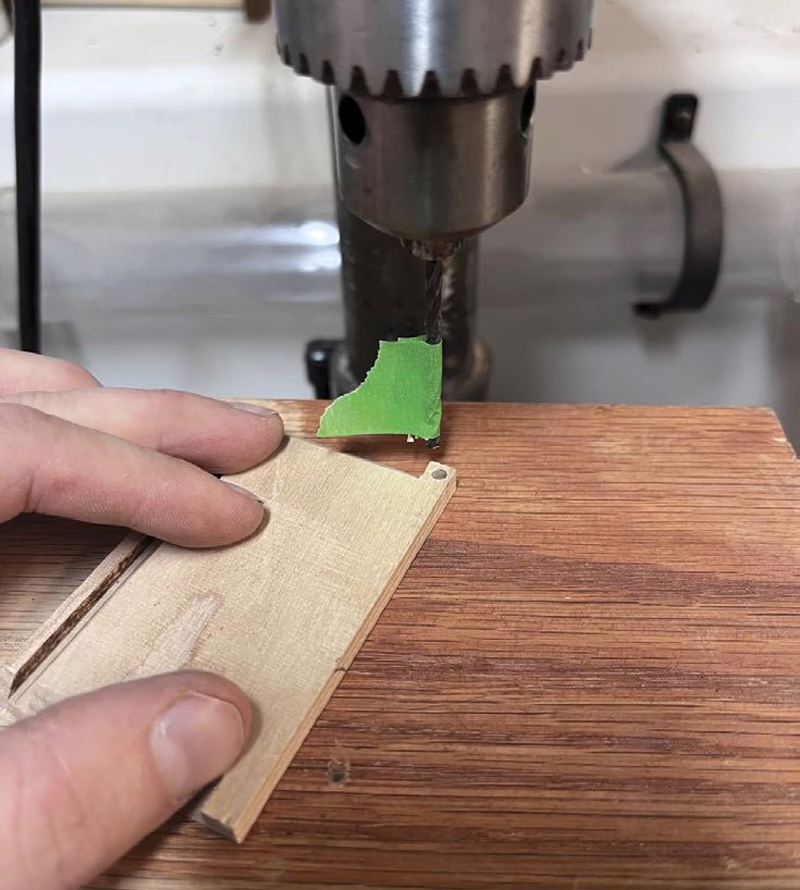
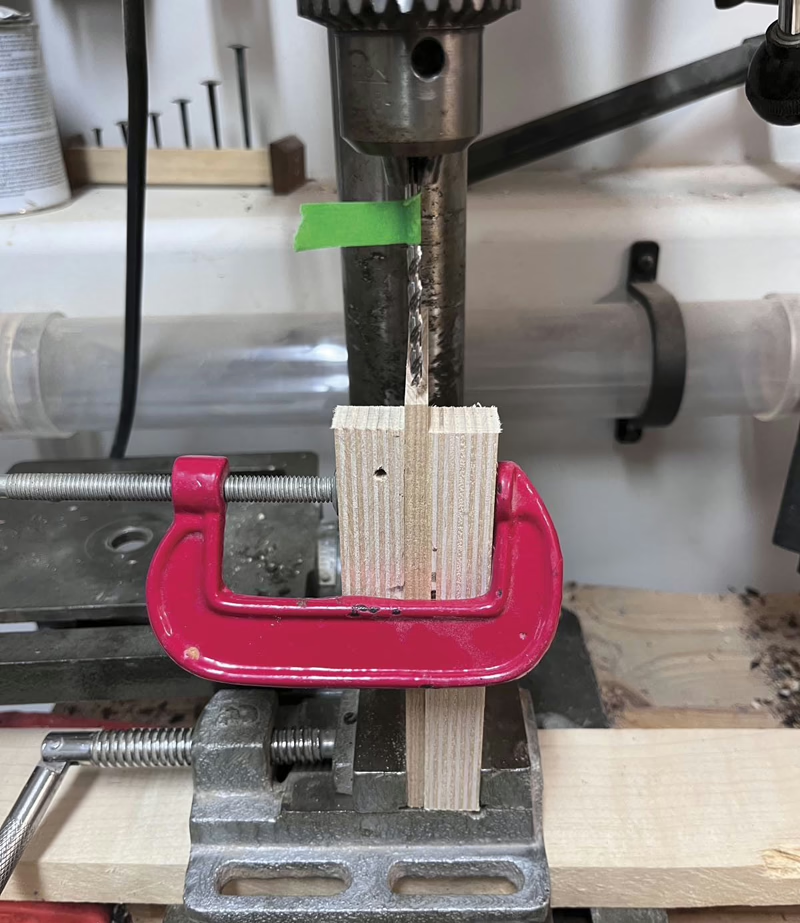
The holes for the hinges are the most critical part of the entire project. I highly recommend using a drill press for this operation. Mark the centre of the holes 1/8″ from the side and 1/8″ from the rear edge. Use an awl to give the bit a starting point. I use a brad point bit for this hole. You don’t want to drill into an unsupported board so clamp two pieces of scrap along with your lid board to ensure it’s well supported. Ensure your lid is parallel to the bit and then drill 1-3/8″ into the lid. Repeat on the other side.
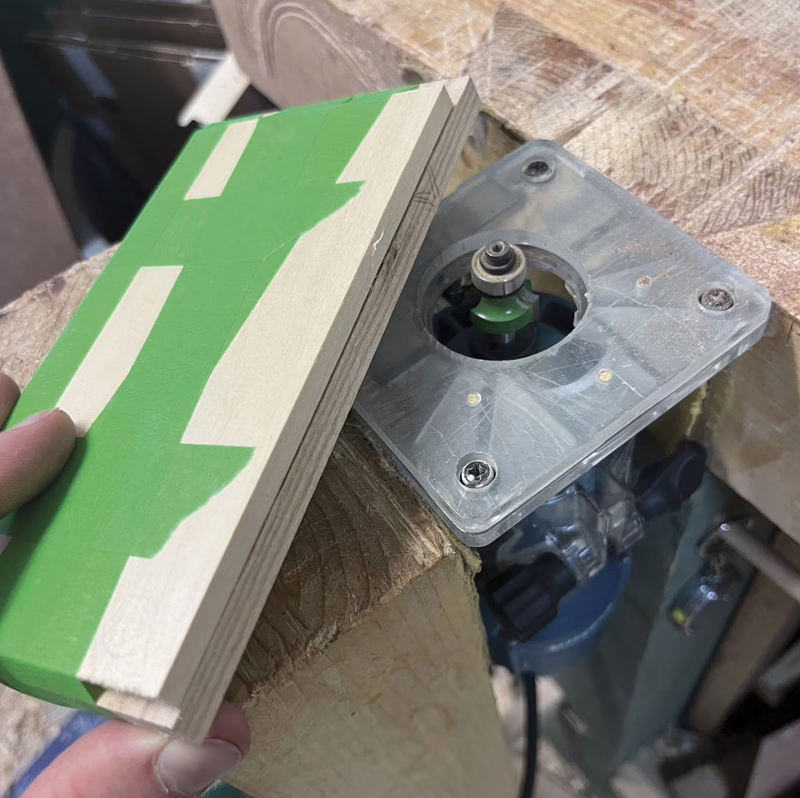
To ensure you have clearance to open the lid you need to add a 1/8″ round over to the rear bottom edge of the lid. Unfortunately, working with stock this thin means that the bearing on most router bits may not catch the solid edge and cause damage. You can get around this by taping a fence along the top of the lid for the bearing to run against. Another approach is to use a block plane.
Finally, cut a 1/8″ × 1/8″ groove on the underside of the front of the lid to act as a pull. I did this at the router table, but you can easily do it on the table saw, too. Even a chamfer with a block plane will give you a positive edge to grasp while opening the lid.
Apply a finish
Remove the tape from your box and sand it and the lid to prepare for finishing. I like to add a strip of milk paint in the groove on the lid. Pick a colour that matches your fabric and accents your wood selection. A little splash of colour on the outside of the box can do wonders to make it stand out. Finish with the same product that you used on the interior.
Pen supports
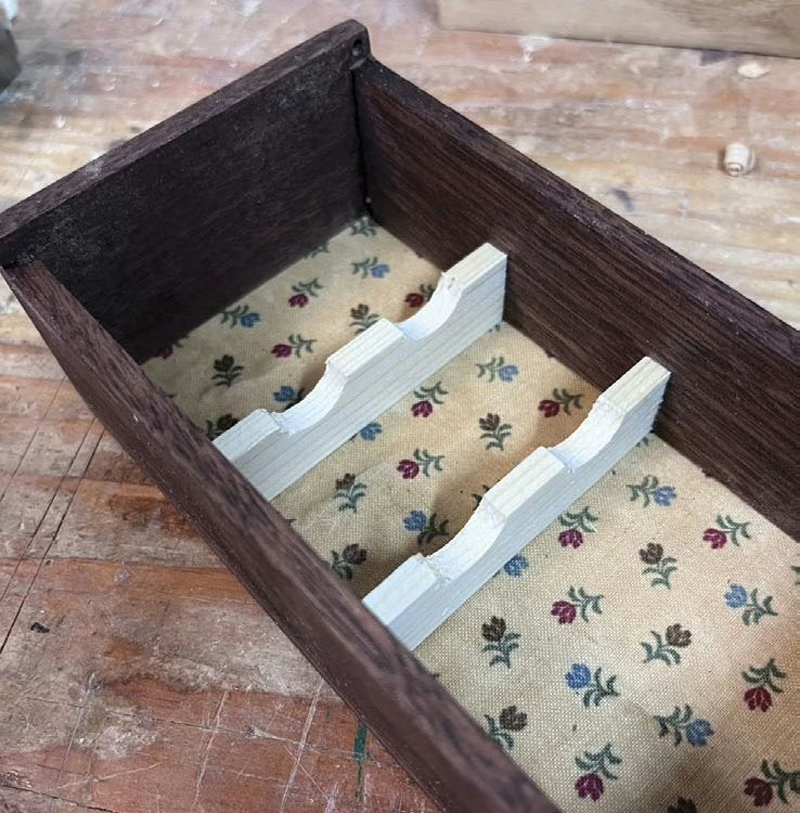
To support the pens inside their boxes I friction-fit two pieces of pine between the front and back. I don’t glue these in because I want the recipient to be able to repurpose the box if they wish. I often use pine for the supports, but the choice is yours.
Start by drilling two holes in a piece of straight-grained 2×4. Holes should be sized according to the diameter of your pens. As you cut these to size they will become fragile, so drilling the holes first will save you the frustration of splitting the piece. Rough cut it to length and width at the bandsaw or with a hand saw and then cut in half, leaving semi-circles that will cradle the pens. Using a shooting board and a sharp plane, clean up the edges and size them until they fit nicely into the box. A pass with a 1/2″ drill-mounted sanding drum will quickly smooth the cradle if your drill bit didn’t leave an even surface.
Final assembly is done by inserting the hidden hinge pins. Once you have installed these there is no way to disassemble unless you follow the instructions for the pins and include an access slot. I haven’t included this because I don’t care for how it looks.
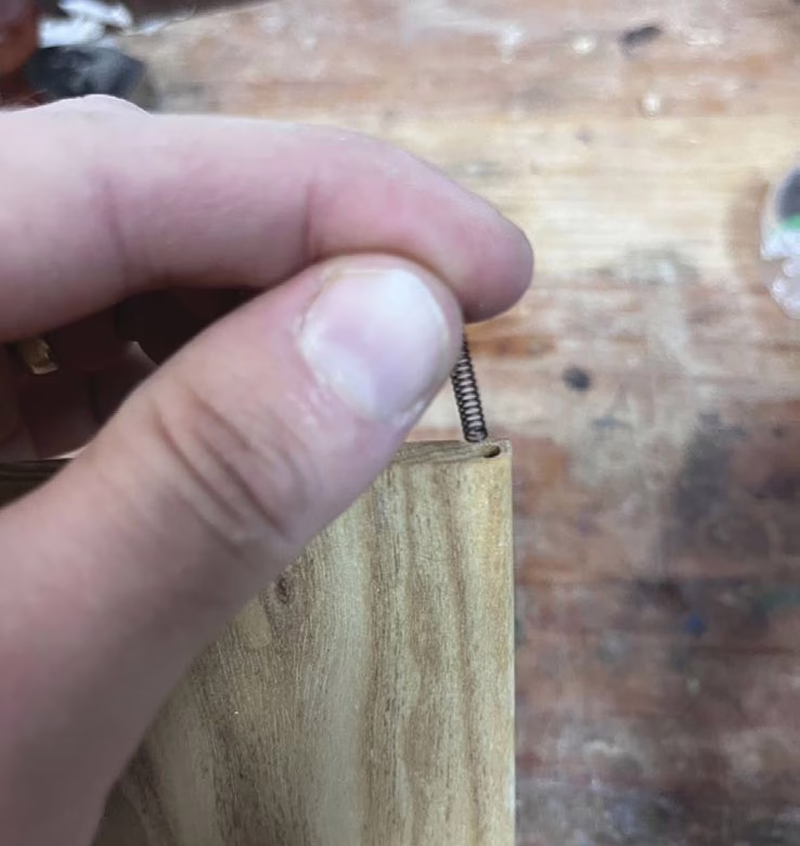
Ensure your round over provides enough clearance. Put a spring into each of the holes in the lid and then insert the pins. Push the pins into the lid by compressing the spring and then align the lid on the box. Allow the springs to push the pins into the holes drilled in the side of the box. This will lock the lid in place for good.
Now you’re ready to fire up the lathe and turn a couple of your favourite pens.
Photos by James Dobson
Set a Stop
Setting a stop on your mitre saw or table saw will ensure all the workpieces are cut to the exact same length.
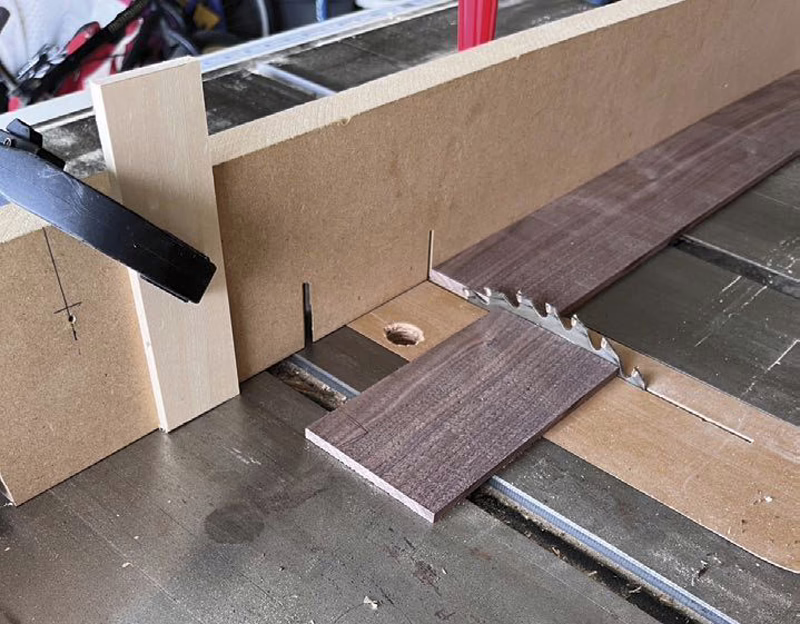
Cauls and Clamps
Adhere the fabric to the bottoms with glue. Use cauls slightly larger than the bottoms between each lamination to even out the pressure.
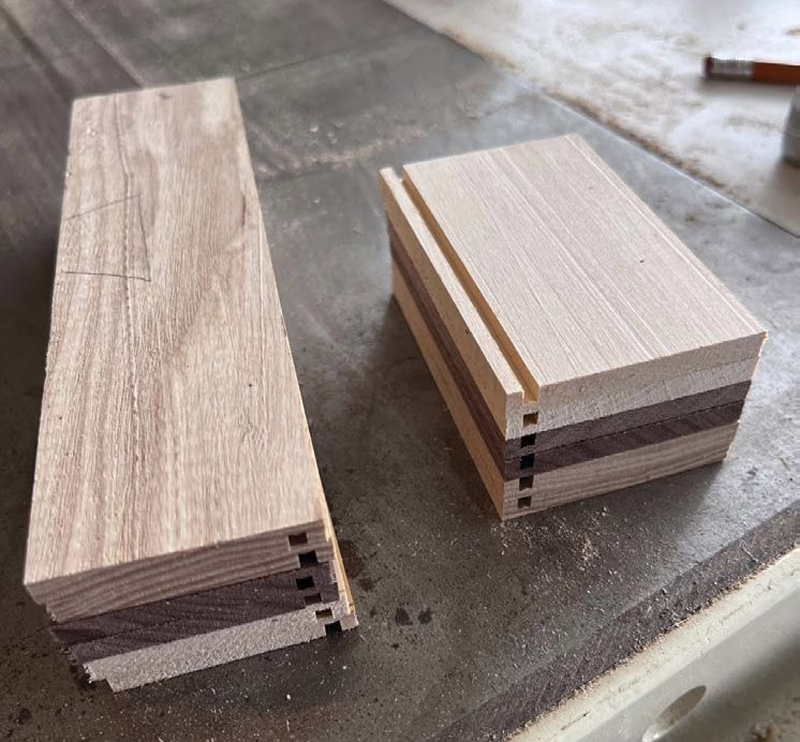
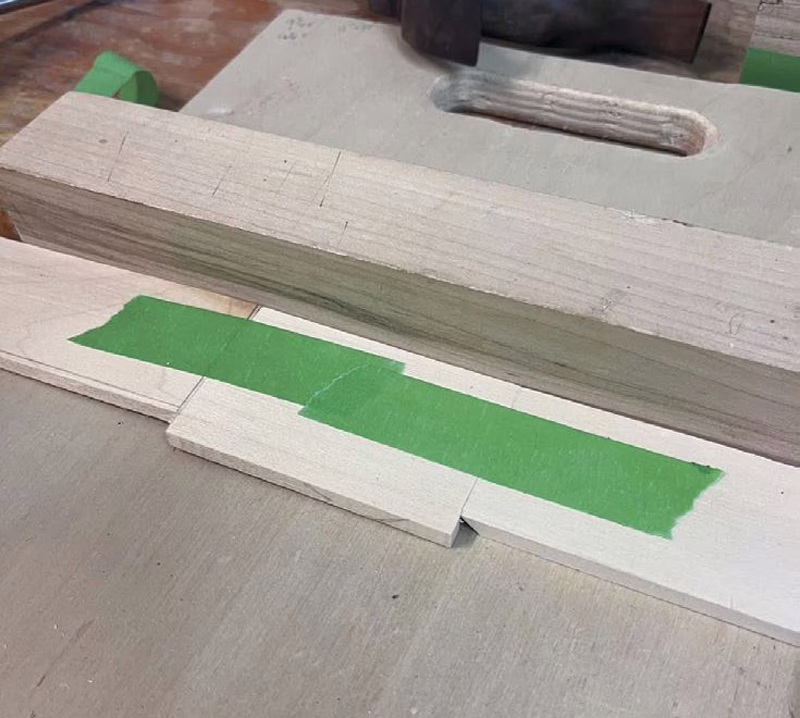
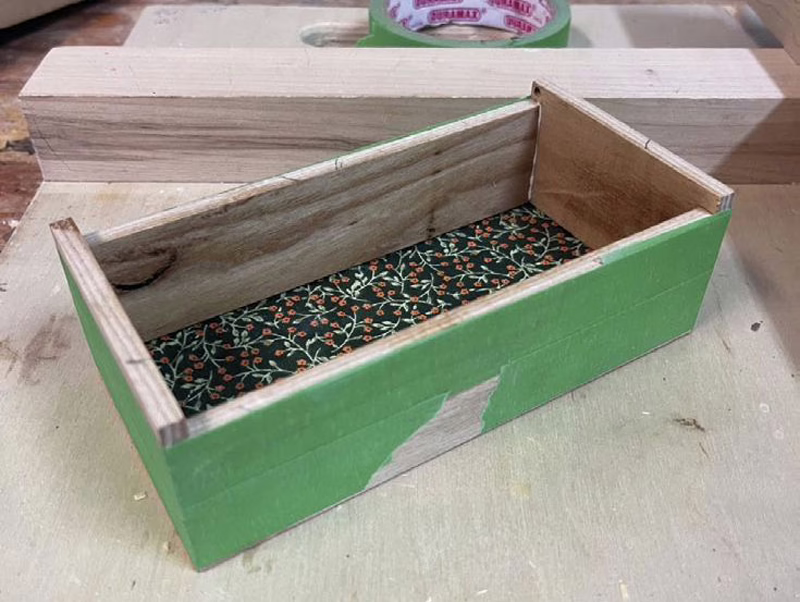
Ready for Mitres
These box parts are cut to size and have the bottom grooves machined in them.
Mitre Time
Dobson uses his plane and shooting board to cut the mitres on the ends of the workpieces.
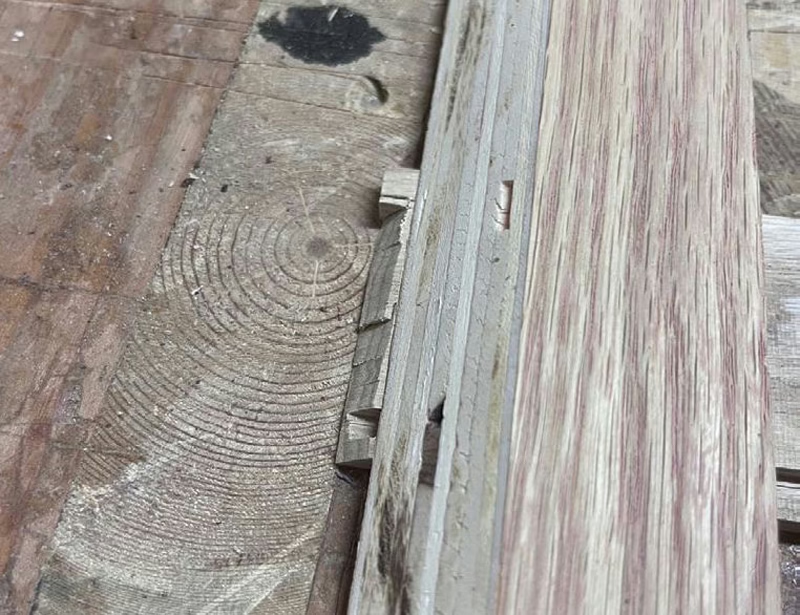
Sides Are Tricky
The sides need a stopped mitre as they extend above the front and back pieces. Mark the mitre on the lower edge to help guide you.
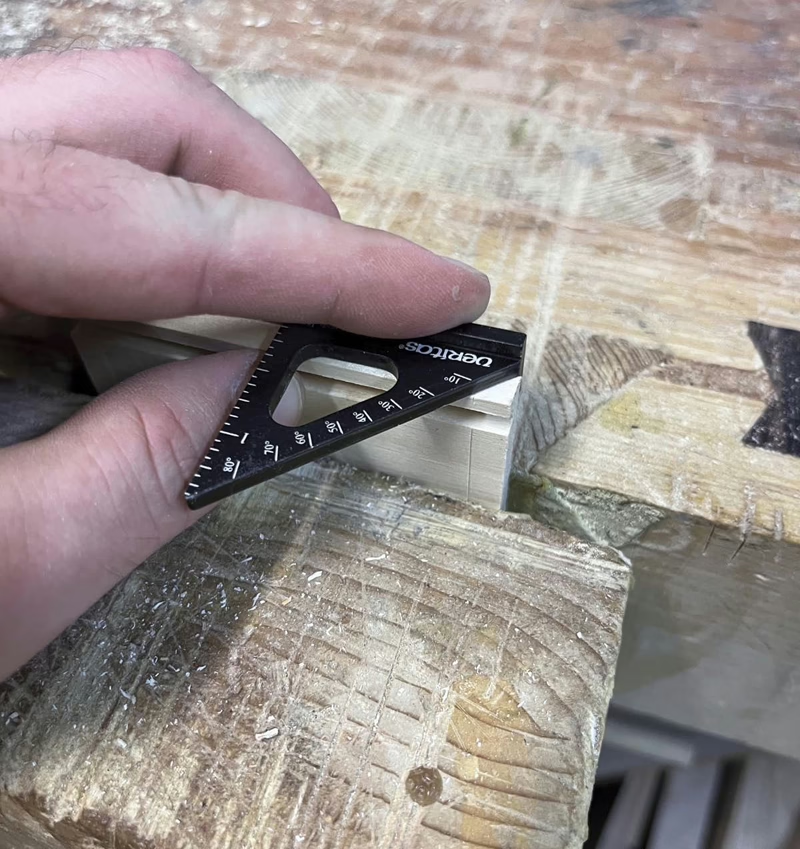
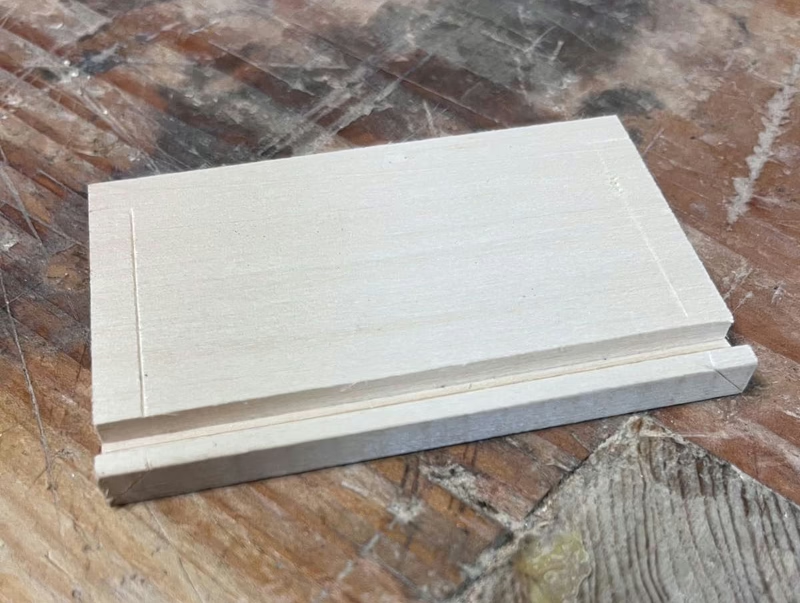
All Marked Up
Proper layout will go a long way to having success with these stopped mitres.
Start with the Saw
Use a hand saw to remove most of the waste. Start with a notch just below the stopped portion of the joint, then cut at an angle, across the grain, to start to shape the mitre.
Pare the Waste
Dobson uses a block with a 45° mitred edge to help guide his chisel as he pares away the waste.
Tiny Holes
A shallow, accurately located hole needs to be bored in the upper back corner of each side. Mark the centre with an awl, then use your drill press to bore the hole. Be sure not to bore too deeply or the hole will be visible on the other side and the hinge won’t work.
Tape Works Great
When stretched over each joint, masking tape will act as a clamp to bring the joints together. Apply it to the back of each joint with the mating edges butted together.
Let It Dry
Tape surrounding the box will hold the joints in place until the glue dries.
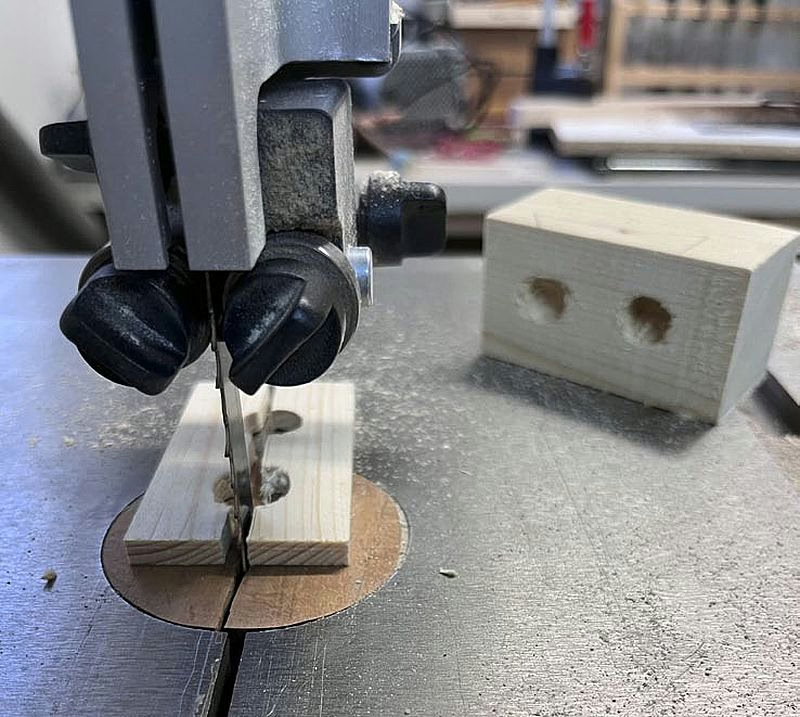
Divide and Conquer
Once the two holes are bored in a blank and a strip has been cut from the blank, rip in half with a bandsaw or hand saw before smoothing it with sandpaper.
Friction Fit
The pen holders are secured with a friction fit to allow the recipient to repurpose the box if they wish.
Add the Hinge
The hinges can be inserted into the holes in the lid and the lid can be installed. Once installed, the lid can’t be removed, so ensure you’re ready for this step.
Careful Drilling Operation
Use some scraps to ensure the lid is parallel with the drill bit when you drill the hinge hole in the side of the lid.
Rout a Round Over
Dobson secures an auxiliary fence on top of his lid so the router bearing will run on it. This operation can also be completed with a block plane.
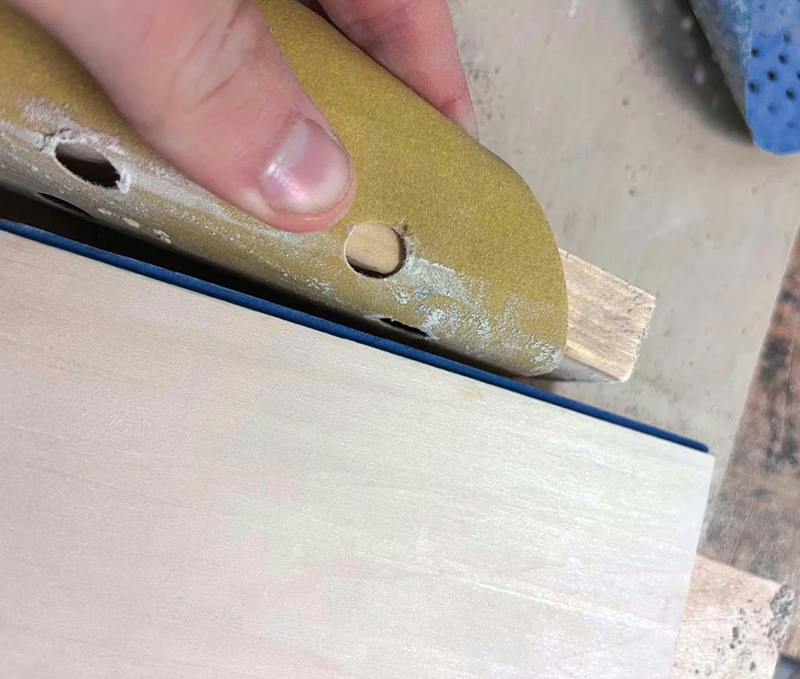
Sand It Clean
Once a contrasting paint colour has been applied to the lid handle rabbet, use sandpaper and a block to sand any excess paint off the mating surfaces.
Tiny Rabbet
A simple straightedge clamped to your router table will guide your lid across a straight router bit to add the small recess that acts as a handle to open the box lid.
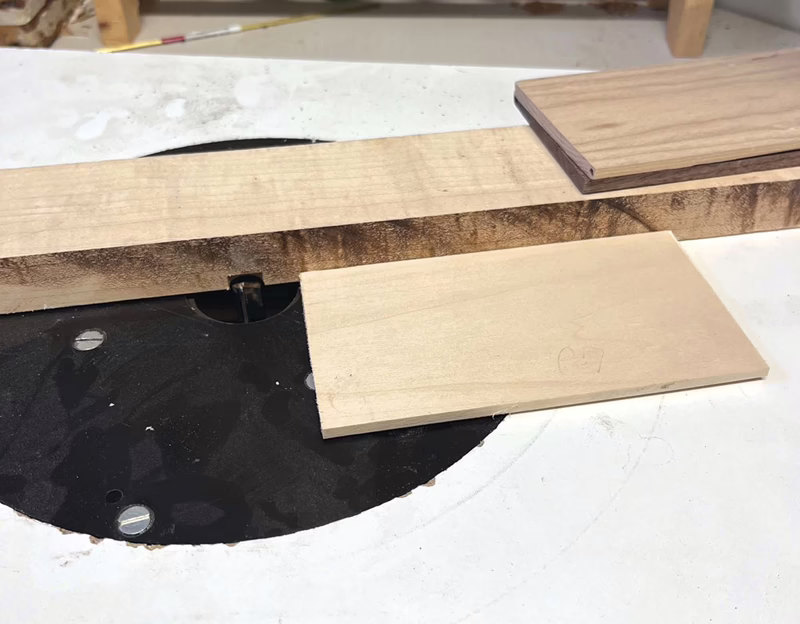
Illustration by Len Churchill


I’m also a pen turner, and it was also my first entry into woodworking. I was drawn to this project for the same reason you described, wanting to add another dimension to gifting a hand-turned pen. As I continued reading though, I was noticing an increasing level of apprehension at tackling this project due to the equipment required, and some assumptions of woodworking knowledge that were made beyond what I consider a 2/5 level of difficulty. Perhaps I’ll get there, however it would be also nice to have either some other options or descriptions of the process. Maybe a simpler design to offer with this, that a beginner woodworker could hone skills, and not feel intimidated by. I do appreciate the intent and basis for the project, even with my apprehension. Definitely will file this one away for future ideas. Thanks.
Hello Richard,
Not sure if you looked, there are reader options in the article. Just after the intro paragraph, under the “DIFFICULTY LENGTH/TIME COST” table. Suggest clicking on the “PHOTOS” option which shows steps with setup procedures that Mr. Dobson used.