PROJECT
Make a live edge cribbage board

Rodger Nicholson

Find more Gifts / Crafts projects
Cribbage is a great game to play with friends and family. A handmade cribbage board can make a nice gift, and, best of all, it’s an easy project that can be made in only a few hours with minimal material and tools.
I used a piece of live edge walnut for this cribbage board, but you could easily glue up a few scrap pieces to form a blank. This small project is also a great time to use some solid exotic wood. If you’ve ever been intrigued by veneer, this is the perfect chance to practice the basics, because this is a small workpiece and there’s only one piece that makes up the entire project. The rough blank (whether laminated, a single piece or veneered) should be about 6″ x 20″. This will allow room for hand plane work and trimming after the material is milled.
I used a jointer and planer to mill up my blank, but a piece of pre-milled lumber would be fine if you don’t have access to milling machines. The final thickness is not critical, but I wouldn’t go any thinner than 1/2″ for aesthetics. My final blank was 3/4″ thick, 5-1/2″ wide and 17″ long.
Make a live edge cribbage board
Repair any defects
It’s rare to find a piece of live edge lumber that doesn’t have any defects, but they add to the charm of the finished project. The first task was to remove the bark and clean up the edges. I pried the bark off with a paint scraper, and then cleaned up the edge with a wire brush, followed by some sanding. Next, I mixed up some two-part epoxy (adding a drop of black dye) and over-filled any voids or cracks in the show surface. Using painter’s tape can help keep the epoxy off surrounding areas. After letting the epoxy dry overnight, level off the surface with a block plane, card scraper or sanding block.
Pre-finish for less hassle
It will be much easier to prepare and finish the blank now, before all the holes are drilled. Sand the project up to 220 grit and round over all the edges with a 1/8″ round over bit.
For a finish, I sprayed on two coats of water-based polyurethane (sanding with 400 grit between coats). Other finishes would be very suitable here, including shellac or wipe-on polyurethane. Whatever finish you use, let it cure for a few days before coming back to drill out the board.
A template saves time
You could manually lay out all the holes in a custom pattern, but I chose to buy an inexpensive commercial paper template (about $2). Tape the paper template to the blank and then punch each hole with an awl. This will allow the drill bit to “find” the dimple left by the awl and drill a perfectly placed hole.
With the holes all marked, remove the template and set it aside. Chuck up a 1/8″ brad point drill in your drill press and set the depth stop to drill 3/8″ deep holes. Test in scrap to confirm your settings and that your game markers will fit nicely in the hole, then begin the task of drilling out all the holes. You don’t want your pegs to be difficult to remove from the holes.
Finishing touches
With the holes drilled out, an optional final step is to add a marking for the “skunk line.” I used a simple dot of red paint at the 90th hole set to add a visual reference for the players. Cribbage pegs can be purchased commercially from a games supply store (often metal or plastic), or you could use 1/8″ dowel for custom pegs. If you use custom pegs, make sure to use wax for the finish to allow them to move in and out of the holes with ease. Finally, add adhesive-backed cork or vinyl feet to the bottom of your board to keep it from slipping around as players move the pegs across the board. Now, deal the cards!
Using a blend of modern and traditional methods (and relying heavily on organization) allows Rodger to build furniture pieces that would otherwise be challenging to make in a very small workshop.
Remove the Bark
Use a drawknife to help remove any loose bark. Follow up with a wire brush and some sandpaper.

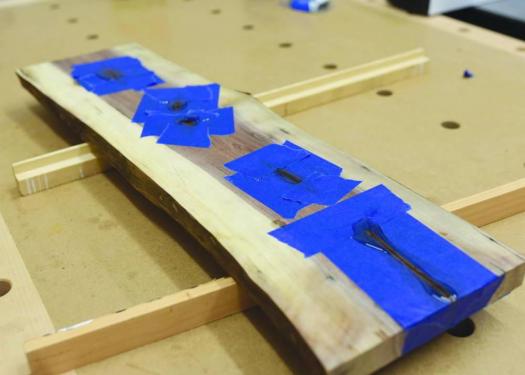
Epoxy Fill
Mask off any areas that need repair, then overfill the gaps with tinted epoxy. Go with a matching colour for a more muted look, or a bright or bold colour for a bit of extra zing.
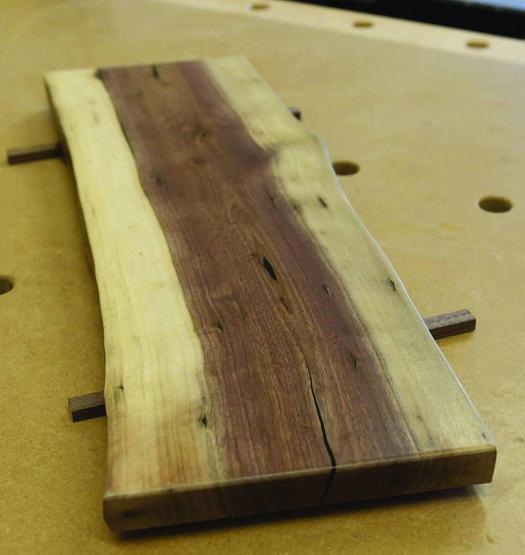
Completed Blank
It’s easiest to finish the project before the holes are drilled. Most finishes will work, so the choice for what finish you apply will likely come down to how the finish makes the wood look and how easy it is to apply.
Using a Template
Accuracy is important. Use an awl and a template to lay out and dimple all the holes so your drill bit will have a physical guide to help locate each hole.

Depth Setting
Nicholson marks a line 3/8" down on a piece of scrap the same thickness as the workpiece to ensure the drill press is set properly. He also tests the fit of the peg, aiming for a slightly loose fit so the pegs aren’t difficult to remove during play.


Do you have a recommendation for a cribbage board hole template?