PROJECT
Mahogany secretary desk – part 1

Rob Brown

Find more Desks projects
The secretary desk has been a popular piece of furniture since the 17th century.
Also called a ‘slant top’ or ‘drop front’ desk, this style of desk offers a great combination of storage space and beauty in a small amount of floor space.
This is a very simple, functional design that is often ornamented in two ways – veneer work on the drop front and drawers, and an elaborate interior gallery. This is the first of two articles and will focus on the case, base and large drawers. The second article will detail how to construct the gallery and finish the piece. Solid African mahogany was the primary species with maple as the secondary species.
It’s good idea to purchase all the hardware before you begin construction.
Mahogany secretary desk – part 1
Start With the Case
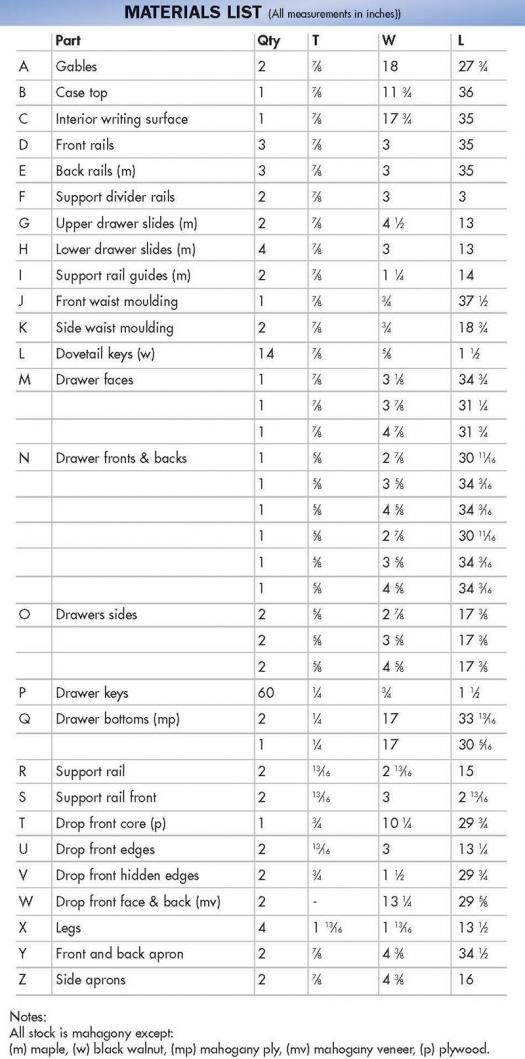
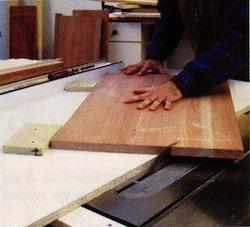
• Glue up sufficient stock for the panels that make up the gables (A), case top (B) and interior writing surface (C), and mill them to size.
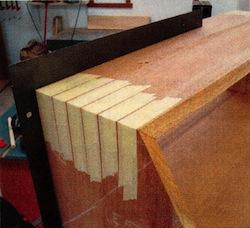
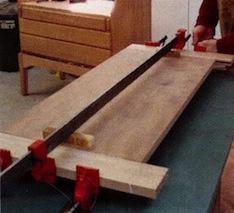
• With the help of a piece of ¾” plywood, cut a 30º angle into the front top edge of the gables. Do this by screwing a number of stops to the ¾” board to hold each gable in place, and then run an edge of the board against the table saw fence. Use a toggle clamp to secure the gables to the plywood.
• Rip the matching angle on the front edge of the case top.
• Using a table saw cut 45º mitres on the tops of the gables and both edges of the case top.
• On the case top (B) bevel the underside edge of the angle with a block plane. This will take away the sharply angled edge where the slant top will close against the case top.
• Use a block plane to bevel the angled edge of the gables (A) to meet up with the hand planed bevel on the case top.
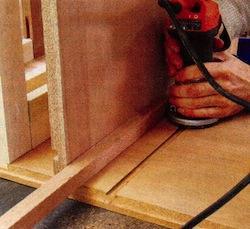
• Machine the eight front, back and support divider rails (D, E, F), six drawer slides (G, H) and two support rail guides (I) to finished width and thickness. However, leave them a couple of inches longer than their finished dimensions.
• On the router table machine ⅝” wide dovetail grooves in the gables (A). There are eight grooves – two for the interior writing surface and six for the drawer slides.
• Rout the two dovetail grooves in the underside of the writing surface (C) using the same dovetail bit.
• You can now determine the length of the rails (D, E, F). Add the distance between gables and the depth of two dovetail grooves to get the length of the rails. Cut the eight rails and interior writing surface to length.
• Rout two ⅝” dovetail grooves in the upper side of the front top rail.
• Without changing the height of the dovetail bit in the router table, set the fence to cut the dovetail tenons on the eight rails (D, E, F), the interior writing surface (C), the six drawer slides (G, H).
• Cut a 4″ long groove at both ends of the inside of the rails. This groove will accept the tenons on either end of the drawer slides (G, H). The groove should be centered and about ⅓ the thickness of the rail.
• Determine the length of the drawer slides – keep the slides at least ⅛” short between the tenons’ shoulders to allow the gables to expand and contract with seasonal movement.
• Cut the slides to length and machine a tenon on both ends of the six slides. This tenon will not be glued during assembly. The upper two drawer slides need to be extra wide to reach past the support rail divider.
• Rabbet the back of the case top and gables to accept the back panel. Rip the interior writing surface to width to allow the back to sit properly in the rabbet. With a ¼” back, the interior writing surface should be ripped to 17 ¾”.
• Drill a ¼” hole through either end of the top front rail (D). The hole should be directly centered under the support rails. Later a dowel will be inserted into the hole from below that will fit into a groove in the underside of the support rail and will act as a stop.
• Sand and dry fit the carcass.
Assemble the Case
• The first step in the assembly process is to glue up the two gables, case top and interior writing surface. Put ample masking tape on the mitre joint that will connect the case top to the gables. Apply glue to the mitre joint and fold the case top and gables together. Slide the interior writing surface in from the back with no glue. When it’s about ¾ of the way in apply glue to the front ¼ of the dovetail groove and the back ¼ of the dovetail tenon and bring the writing surface to its final position, flush with the front of the gables.
• Allow the glue to dry.
• Once the case has dried, glue in the three front rails (D). Make sure the upper rail has the dovetail grooves positioned correctly.
• Install the two support divider rails (F) that will separate the upper drawer and the support rails (R, S).
• When the front rails have dried, slide the drawer slides (G, H) in. Do not apply any glue.
• Glue the three back rails (E) into the dovetail grooves in the gables (A).
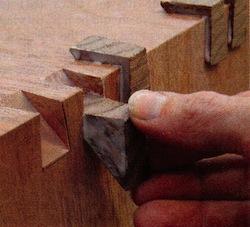
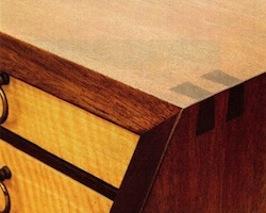
• With the case dry, set up the router and dovetail key jig to machine the keys (L) in the mitred case corners. You want the keys to appear to be the same thickness as the gable when you are complete, so set the depth accordingly. A couple of trial cuts on a piece of scrap is essential.
• Rip a dovetail strip on the table saw that will be inserted into the dovetail grooves. Tilt the blade to the same angle as the bit you used for machining the dovetail grooves in the mitred case. I used a 7º bit so I tilted the table saw blade to 7º. After each rip flip the board over to obtain the strips. The keys can be cut to rough length on the band saw and inserted into the grooves in the case. When dry, cut and sand them flush with the gables and top.
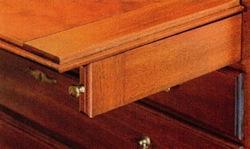
• Machine the support rails and the support rail fronts to rough size (R, S). These rails will support the drop front when it is down. The grain runs horizontally for most of the rail but the front 3″ has a vertical piece tenoned to it. This provides side grain, as opposed to end grain, on the front of the support rail so the thumbnail profile can be routed to match the drawer fronts. Machine a tenon on the front end of the horizontal rail and a mating groove on the vertical piece that can be glued to the front of the rail. Apply glue to the tenons and grooves and let the two support rails dry.
• Machine a ⅜” wide groove in the underside of each support rail to accept the ¼” dowel that will be inserted into the frame. Stop the groove about ¾” from the front edge of the support rail.
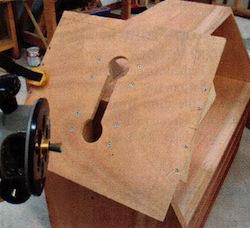
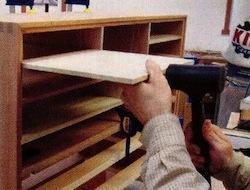
• From the back side of the desk slide the support rail guides (I) into the dovetail grooves on the underside of the interior writing surface. They will act as guides to keep the support rails tracking properly. (The guides will keep the support rails in place by trapping the support rails between the gable and the support rail guides).
The Base Provides a Secure Platform
• Machine four aprons (Y, Z) and four legs (X) to finished size. Don’t worry about apron length right now – just make sure they are long enough.
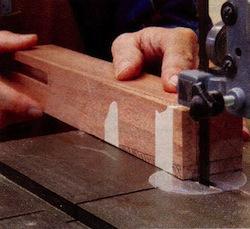
• Determine where dovetail grooves will be placed in the legs. The grooves should be as close to the outside of the leg as possible without weakening either side of the groove. Remove some of the material for the dovetail groove using the table saw. Notes: Removing all of that material while machining a dovetail groove will be dangerous.
• Set up the router table with an appropriate dovetail bit. It might have to be slightly smaller than the bit used for the case to ensure both sides of the groove in the leg have enough material to remain structurally strong.
• Determine the length of the aprons. When determining final length of the aprons keep in mind there will be a waist moulding that transitions the case from the base. I allowed ¾” extra on the front and two sides. You should know what profile you are going to use at this stage so you can allow for proper tolerances. Cut the aprons to length and machine dovetail tenons on both ends of the pieces.
• Cut the aprons to their final shape on the bandsaw.
• Draw the taper onto the four legs. Make the first cut on the band saw, and then use masking tape to re-secure the offcut onto the leg. Make the second cut on the line you have drawn.
• Plane and sand the legs to their final shape.
• Sand and assemble the eight parts that comprise the base. Ensure that the assembly is square.
• Make a moulding (J, K) for the transition between the case and the base. Machine a piece so you can obtain two widths of moulding out of it – about 3″ wide is good, but wider is better. Shape both of the edges and rip the final moulding to width. The moulding should overhang about 1⁄16″ on the legs and ⅛” on the apron.
Solid Drawers for Storage
• Mill material for the drawer faces (M), fronts and backs (N) and sides (O) and cut them to finished size. The drawer sides should be the length of the interior of the cabinet minus ½”. This allows the drawer face to be rabbeted and let into the case.
• On the table saw cut mitres for all four corner joints on the drawer.
• Run a groove around the drawer fronts, backs and sides that will accept the drawer bottoms (Q) – I used ¼” bottoms. For strength it should be at least ½” up from the bottom of the drawer side. On the back drawer pieces raise the blade on the table saw and cut through the material. This will allow the back piece to be inserted after the drawer has been assembled. It also has the benefit of allowing a bottom to be replaced if it breaks.
• Sand and assemble the drawer box with masking tape. I glue-size the partial end grain of the mitres so the glue doesn’t seep too far away from the joint. When you are gluing up the drawer don’t apply too much glue or the joint will not seat itself properly. (Note: Glue sizing refers to the application of a thin, often diluted, layer of glue to end grain. The glue is allowed to dry before the end grain piece is glued in place. The first coat of glue fills the pores of end grain to prevent over-absorption of glue, making the resulting bond stronger.)
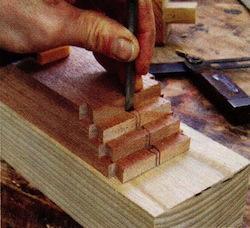
• When dry, cut the notches for the keyed finger joints with a ¼” wide dado blade on the table saw. You can space the joints so they look aesthetically pleasing. Having an odd number of joints with slightly uneven – but still symmetrical – spacing provides some tension to the design.
• Machine long strips of wood that will be cut to rough length (about 2″ long) and inserted as keys. The final pass when machining these keys to width should be made on a thickness planer so you have a nice smooth surface and you can fine tune the thickness.
• Cut the keys to rough length and glue them in place.
• Once the drawers are completely dry, trim and sand the keys flush. Sand, handplane or joint the sides to fit nicely inside the case. A gap of between 1⁄32″ and 1⁄16″ on either side makes for a well sliding drawer.
• Machine the drawer faces (M) to finished size. There should be a ¼” overlap on all sides except the top of the top drawer face. The top should be flush with the underside of the interior writing surface so the slant top will not interfere with it.
• On the router table rout a thumbnail profile on all four sides of each drawer face. I used a ¼” radius bit. Also, rout the same profile on the front four sides of the two support rails (R, S). Cut the support rails to length.
• Cut a ⅜” deep rabbet on all four sides of each drawer face – except the top of the top drawer face. This rabbet will allow the drawer front to sit ⅜” inside the case.
The Drop Front Is Faced with Figured Veneer
• As I mentioned earlier, one of the places that often is enhanced with figured wood is the drop front. I chose a wide piece of blistered mahogany veneer for the face and back (W) of the drop front. When veneering, always balance both sides of the veneered panel with the same (or very similar) veneer. This will protect against warping.
• Cut a ¾” thick piece of oversized plywood for the core (T) of the drop front. It must be flat, strong and have an even surface – don’t cheap out on plywood core quality.
• To avoid having any plywood showing, glue 1 ½” solid wood (V) along both long edges of the plywood. This will give you something to shape when the drop front is complete.
• When dry, trim the pieces of solid wood flush to the plywood core so the veneer can be adhered to the face of the drop front.
• Trim the veneer oversize.
• Assemble two flat cauls, sufficient clamps, glue, a glue roller, some clamping blocks and a few sheets of newsprint. A helper doesn’t hurt either.
• Roll the glue onto one side of the plywood core then place the core onto a piece of veneer. I put the glue on evenly and a little thicker than normal because I’m not putting any glue on the veneer – it will curl.
• Place some newsprint between the veneer and the caul. This stops the veneer from adhering to the caul if a bit of glue seeps out.
• Roll glue on the other side of the core and put the other veneer on.
• Sandwich everything between a couple of clamps and then double check – make sure the veneer is placed properly, the cauls have full coverage and the paper is in the right place.
• Put on all the clamps you can. Space them evenly and apply even pressure. You don’t need to use excessive force. Blocks or battens can be used to evenly distribute pressure and are especially helpful when you don’t have a lot of clamps.
• Let the piece dry overnight or longer.
• Determine the overall length of the drop front and attach the solid drop front sides. Machine a tenon on the drop front core and a groove on the drop front sides and glue them together.
• Take your time when cutting the drop front to size. First, measure the case opening for the drop front and determine how wide and long the drop front should be. Cut it oversize at first. When attached to the hinges it might sit differently than you anticipated.
• Machine a ¼” wide x ⅜” deep rabbet around the two sides and top of the drop front. Note that the edge that will be hinged to the case does not receive a rabbet. The rabbets will be cut on the back of the drop front and will allow it to sit partially inside the case.
• Mortise for the hinges. Attach both hinges and see how your top fits. It probably will not close properly, at first. Re-cut the drop front to size and re-rabbet the back edge until it fits.
• Rout the same thumbnail profile on the four front edges of the drop front as you did on the drawer fronts.
Finishing Touches
• Turn the base over and install adjustable levelers on the bottom of each leg. First, drill a 1″ hole ⅜” deep. This will accept the 3-Prong 1/4-20 T-Nuts (Lee Valley #00N22.03).
• Drill a ¼” hole at least 1 ¼” deep in the center of the larger hole to make room for the threaded plastic guide. Hammer in the T-Nut and screw in a plastic guide (Lee Valley #00F15.01).
• Attach the case to the base with four L-brackets or wooden cleats.
• Cut the waist moulding (J, K) to size. Glue the front piece directly to the lower front rail and strengthen it with glue blocks. The two side pieces will be glued to the case side for the front 4″ only. A screw in an elongated hole will hold the back of the moulding tight to the case and allow the gables to move with the seasonal changes.
In the next article I will describe how to build the gallery and finish the desk.
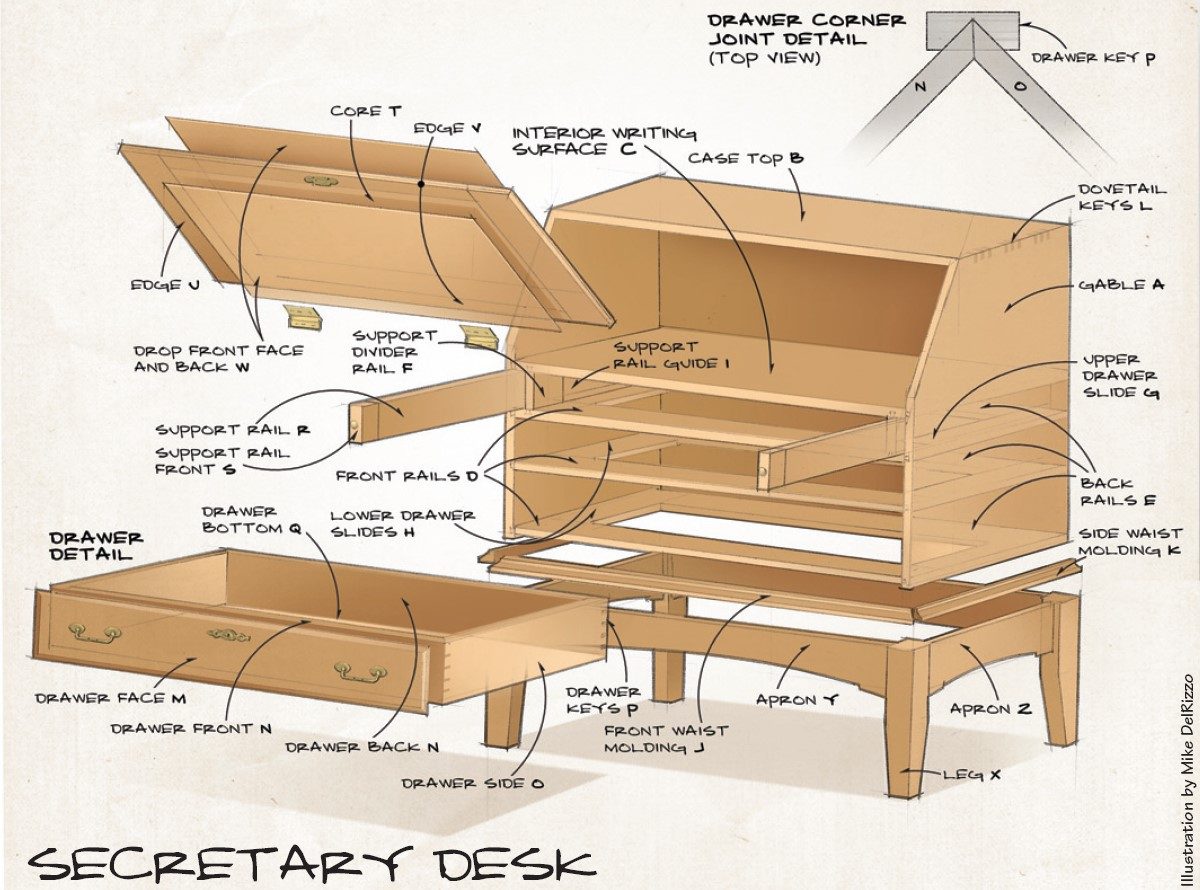
Cut gables with sled
Rout dados for the rails
Hold mitre joint with masking tape while glue dries
Mark out dovetails

Use jig for routing dovetail keys
Use jig for cutting drawer key slots
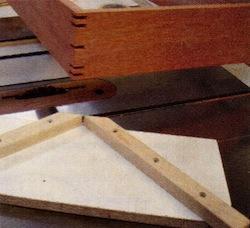
Cut slots for drawer keys
Cut dovetails
Insert shelves from back side
Support rail extended
Bandsaw legs to shape
Glue keys in place
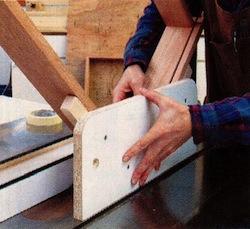
Clamp the drop front
Dovetail keys join side to top
Drawers assembled with keys
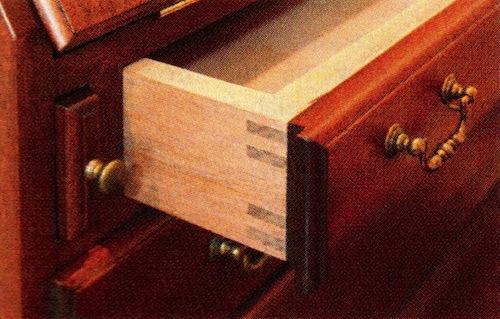
Illustration by Mike Del Rizzo


Are there any plans for the mahogany secretary desk that l can buy
Not at this time David. However, subscribers can access the back issues of all our magazine issues (the Secretary Desk is in Issue 47 April May 2007). If interested, you can purchase a digital subscription on our website (click SUBSCRIBE in the top right corner).