PROJECT
Build a round hammock

Rob Brown

Find more Outdoor projects
If you're after a unique place to lounge in the afternoon sun and are up for a challenging build, this round hammock might be the answer.
Sometimes projects don’t end up exactly how you thought they would. I started out to build a traditional porch rocker, but once I started it I quickly realized my heart wasn’t in it. It would have made a nice place to sit and read or chat with a seatmate, but I felt like I needed more of a challenge, in terms of the designing and building process. After sketching, talking with my wife about some possibilities and “sitting” on this project for a while I was drawn to a round shape that allowed the user to lounge rather than sit, and mimicked more of a hammock than a chair or bench.
The only trouble with this design was, it was so different from anything else I’ve ever seen that I wasn’t sure of a number of things: how strong did the frame need to be to adequately support a person’s weight; how would the fabric be made so it could be attached to the frame; how would the fabric be attached to the frame, and how would it all be supported? The only way to answer all of these questions was to build it and find out. At that point, if it didn’t work well, I could make some adjustments and take another stab at it.
Build a round hammock
Making the fabric seat
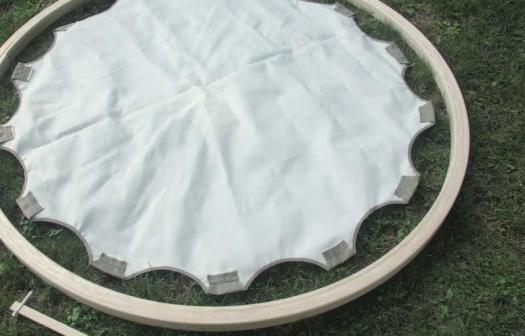
I wanted to figure out the size and shape of the fabric seat first, as material is only so wide, and the process of sewing and cutting the fabric would have to be respected. I would make the wooden frame around the fabric when I knew what size it was. Because I know nothing about either sewing or fabric, I took this portion of the project to a seamstress. All I asked for was a strong, round fabric surface as large as possible that could be attached somehow to a circular wooden frame. After a short discussion involving rudimentary sketches and vague ideas, I was assured this approach would work – blind optimism on both our parts. We agreed that the more points of attachment the better, and that the material had to be very strong; then she set to work. Once complete I picked it up and was really pleased with what she had made. One thing she stressed was that she reinforced whenever possible, so the seams would have a better chance of holding tight.
The circular frame – in theory
The only thing I knew for sure about the frame was that it needed to be quite strong to support the weight of a human, especially if that human was an energetic child, of which I have two. When dreaming up ways to make this frame, segmented laminations were the first to be rejected because they would add weak short grain to the frame, and the many joints would add weak links to the frame. Another similar option was to stack segmented laminations one on top of the other, similar to segmented turning blanks, but I still thought the resulting joints would be either too weak or far too bulky, visually.
I then had the idea of wrapping long, thin lengths of solid wood around the outside of a circular form, pulling each length taut and gluing one end as I proceeded. I was pretty sure the process would be very difficult, as the task of wrapping, gluing and clamping with only one set of hands would be challenging and would also leave a sloppy joint.
Then I thought of doing a similar thing with the long, thin lengths of wood, but using a form on the outside of the thin laminations, with a curved caul to apply pressure. The laminations would want to straighten, and the form would naturally contain them. I could glue the mating surfaces and add cauls and clamps as I went, locking the joint in place. In my mind this technique was virtually flawless.
Making the form
Working backwards from the dimensions of the fabric seat (55″ diameter) I determined the inside diameter of the frame should be 59″. That gave me a 2″ gap between the fabric and frame all around. It also gave me some crucial wiggle room. Knowing how strong white ash is, I was aiming for a frame thickness of at least 1-1/2″, meaning the inside radius of the form would need to be 62″.
Because large enough sheetgoods are not available, I had to piece the form together with multiple sections of 3/4″-thick material, then strengthen it with additional layers on the top and bottom. Both of these layers would eventually be flush trimmed to the same radius as the middle layer. I used particle board for the center layer, then added on upper and lower layers of plywood to the first layer, but you could also use either particle board or plywood for the entire form. Plywood will create a stronger form, though in hindsight I don’t think it’s necessary.
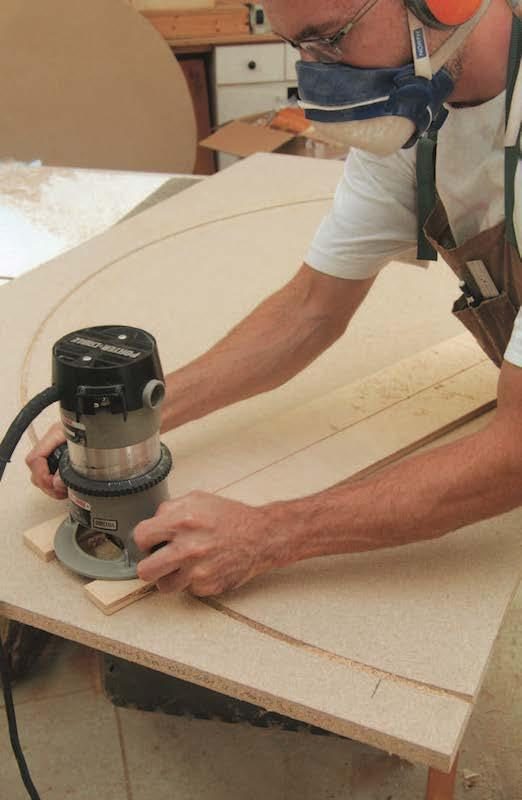
With my router and circle-cutting jig I started to machine enough parts to form an entire circle. Since the frame was going to be made up of laminations that totalled about 1-1/2″ in thickness, I used a 62″ inside radius for the inner curved edge of the jig. I made sure to machine one section so it was at least 180 degrees, and mark exactly 180 degrees on the form for reference. This piece would assist me in laying out a proper circle.
Once I had the parts ready to form the entire circle I attached a second layer on top of the first layer with glue and clamps, making sure the seams of the two layers were as far from each other as possible. When the first layer was dry, I flipped the entire assembly over and added a third layer. The jig was then 2-1/4″ thick.
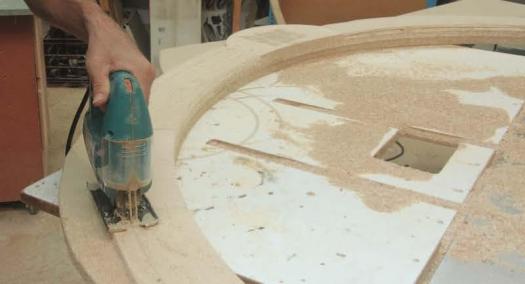
The parts that made up the two outer layers all overhung the 62″-radius inside edge, and needed to be flush trimmed with the middle layer. With all three layers even, I used my jigsaw to cut the outer edge of the form so it was about 4″ wide. The last step to ready the form was to screw (no glue) a bunch of scrap blocks to the underside of the form. These blocks would give the laminations an even surface to rest on during the gluing stage, keeping them as even as possible.
Making the cauls
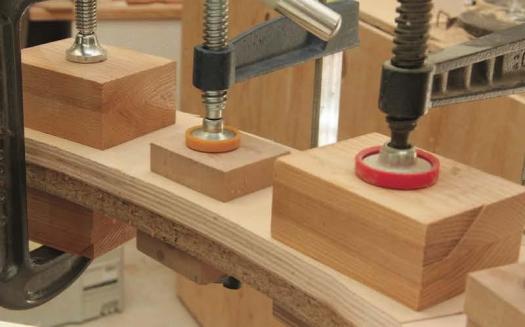
Curved cauls helped evenly disperse pressure to form an even, strong joint between the thin layers as I slowly built up the frame. They would also protect each layer from the clamps. I made the cauls in a similar fashion to the form – make the middle layer the proper radius, then glue additional layers to both sides of the initial caul and flush trim them with a router. As the inside radius of the frame would change ever so slightly with the addition of each layer, I opted for a diameter to approximately match the final layer that would be glued up – 59″. The cauls would be trimmed narrow enough so they would have a bit of flex to them, and a smaller diameter caul would also be easier to insert inside the frame during each use. Once the cauls were assembled and their outer surfaces were flush trimmed, I cut them to about 1-1/2″ wide.
The circular frame – in practice
I chose white ash for the frame, as it’s very strong and bends well. I used 8/4 material but may have selected something wider for this project if it was readily available, as I wanted to err on the stronger side of things. In hindsight, the frame I made was absolutely rock solid and didn’t need to be larger.
The length of the laminations was another stumbling block. The circumference of the inside of the form was about 16′. If I tried to laminate pieces that would form more than 360 degrees inside the form I would come up against a logistical problem when clamping the portion beyond 360 degrees, as the first portion of the lamination was already clamped. This approach wouldn’t be impossible, but it would be easier if I aimed for about 270 degrees, or 12′ lengths. This would also offset the joints, making the frame a bit stronger. I ripped them to just under 1/4″ thick and planned both surfaces to finish about 3/16″ thick. If you’re using a different species than white ash you will have to check that it won’t break if bent to this radius. I also trimmed the ends, to remove any checks and to have a straight edge on the end of every piece.
I added a small stop block (an offcut from one of the laminations’ ends) on the inside surface of the form to give me a stop to butt the first lamination against. I inserted the first lamination in the form. Starting nearest the stop block, I used the cauls and clamps to keep the lamination as tight to the form as possible. I inserted the second lamination and removed only the cauls that interfered with the joint between these first two laminations. I also made sure to keep pressure on the joint between the first and second caul so it would stay tight. I marked the area where the two laminations overlapped so I knew where to stop applying glue, then I bent the second lamination out of the way and temporarily clamped it away from the first lamination.
Once I covered the two surfaces to be joined with waterproof glue, I used cauls and clamps to bring the joint together. The process of gluing the first two layers was a bit slow and clunky, but it eventually came together nicely.
It got easier
Thankfully the rest of the layers went much quicker and easier than the first two. For the remaining layers it went like this:
- Manipulate the next lamination into the form, butted up against the previous layer
- Mark a pencil line where the new lamination ends on the previous, glued layer
- Check the end grain joint between this lamination and the last, and adjust the end grain of the new lamination with a sharp block plane if necessary
- Apply glue to both mating surfaces, stopping just before the pencil line that was just added
- Insert the lamination and make sure it butts up firmly against the previous layer
- Start adding clamps and cauls at that joint, quickly working towards the opposite end of the lamination
- Before I glued the final piece I sanded the visible surface
I wasn’t exactly sure when to stop adding layers and building up strength, so I erred on the safe side and added a bit more than what I thought was necessary. I stopped when the thickness of the lamination reached almost 1-5/8″. That thickness, coupled with the fact that the lamination was 2″ high, was enough to satisfy me. I also knew I could add a few more layers afterwards if absolutely necessary.
As I mentioned previously, with hindsight being 20/20, this frame was almost 2″ high and almost 1-5/8″ wide. It was bombproof. You could go a little thinner and narrower, but to be honest I really don’t know how much. If you want to be safe, stick with the measurements I went with.
Flush both surfaces
Using my router, a 3/4″ straight bit and a simple flat jig to reference off the upper and lower surfaces of the form, I trimmed the upper surface of the lamination flat. With the lamination still in the form, I turned everything over and routed the areas between the blocks smooth. I then used clamps to fix the lamination within the form and removed the scrap blocks on the underside of the form. I then trimmed the last small sections flush with a router.
While using my router I did my best not to cut into the form, as I wanted as much of the form left untouched to make more of these circular laminations down the road. To remove the frame from the form, I placed a few blocks under the outside edge of the form and pressed down on the lamination. To my surprise it came out pretty easily. With a hand plane I cleaned up both surfaces, then routed a 1/4″ roundover on all four edges.
Fit the fabric
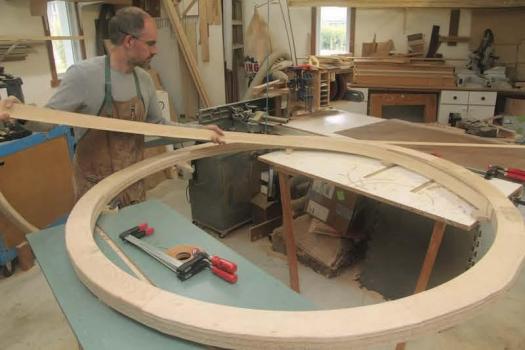
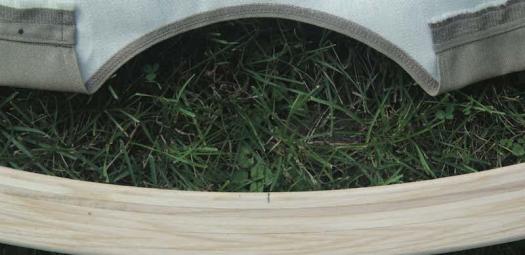
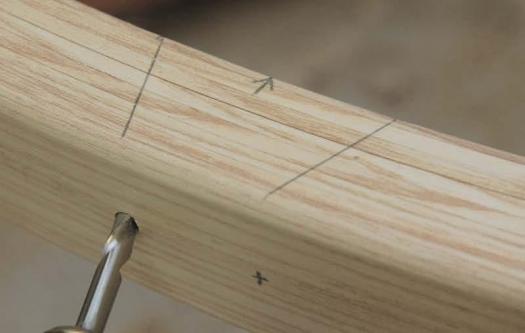
Because the fabric seat was not perfectly symmetrical, I laid the frame on the ground, placed the fabric seat in the middle of it, and marked where the rope holes needed to be drilled to secure the seat. I then marked the fabric seat and the frame with two small dots, so it could be re-oriented the same way. I needed two holes at each location for the rope to pass through. To reduce pressure on the rope, I wanted the holes to be angled slightly.
Working from the center of each location, I added two angled lines to help me visually guide my drill. I then marked crosshairs on the edge of the frame, where the holes were to be drilled. With a brad point bit that would allow the rope to pass through without much problem (I already had 50′ of 6-mm accessory cord from the local camping store) I drilled all 28 holes in the edge of the frame, and countersunk both ends of each hole. I also drilled four equally spaced holes in the frame so it could be suspended from above. I now test fit the seat to make sure all was well. Thankfully, after all that work, it was.
Finish it off
After a quick sanding, the frame was ready for a finish. I wanted a durable finish that would protect the pale white ash wood and keep it as close to its natural colour as possible. I went with three coats of Minwax Helmsman Spar varnish. I brushed it on, letting it dry thoroughly between coats, then rubbed the surface with #0000 steel wool and paste wax. The resulting finish was very smooth and protective – I’m even considering using this product on some indoor furniture pieces in the future, even though serious water protection won’t be needed.
Hang the hammock
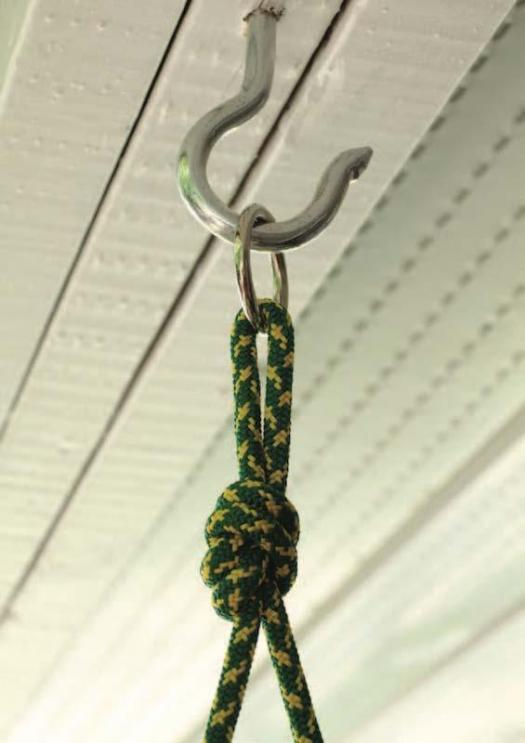
With the finish dry, I re-installed the seat. I then installed two heavy-duty hooks in the upper structure on our porch roof. The rope, hooks and the upper structure were more than strong enough to support the weight placed on them.
To suspend the hammock, I cut two lengths of rope just over double the height from the ground to the suspension point. I fed a small ring through both ropes to each rope’s midpoint. I then tied an overhand knot on a bight, capturing the ring at the center of the rope. The loose ends were fed through the appropriate holes in the frame and secured with a double overhand knot. Each ring then fits over the hook in the porch frame.
What did I learn?
When you set out to create a new design you learn a lot. The solid white ash frame I built was strong enough to stop a bullet, so that made me happy. I was very tentative getting into this round hammock for the first time as I thought I might rip right through the fabric and hit the ground. Thankfully that didn’t happen, but I was always a bit careful when in the hammock. My kids used this hammock quite a bit, and they really enjoyed it. The rope holding the fabric seat to the wood frame was also quite strong. When the seamstress made this seat she did her best to strengthen the joints around the perimeter, and they’re still holding strong.
The weakest point was the main center area of the fabric. With some weight on the hammock, smaller objects can damage the fabric more easily than if the fabric isn’t taut. After about five years, the fabric started to develop a few small tears, and they quickly grew, so it’s time to replace the fabric. The seamstress I worked with saved the pattern, so making a new one shouldn’t be too difficult.
I also learned that this hammock, like most hammocks, can be interesting to try and get into. My kids get onto it with ease, but I have to be more careful. Although the frame doesn’t want to tip right over, it does want to move around.
Experimentation
Photos by Rob Brown
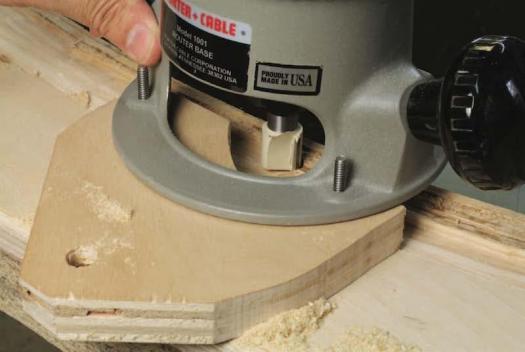
Center Form Layer
For the center section of the 3-layer bending form, Brown used particle board for the two equal-sized halves. Once routed to the exact diameter as the outside of the finished frame, he glued an upper and lower layer of plywood to this center section to complete the form. Notice the pencil mark at the quadrant of the circle. A matching line on the opposite side of the half circle helps Brown cut this layer to size so he finishes with exactly one full circle.
Add Another Layer
Brown rough cuts, and then glues, a layer of plywood to the initial particle board layer. This new layer overhangs the particle board layer and will be flush routed later. Cauls on both sides of the form help evenly distribute clamping pressure.
Trim Off the Waste
With the bending form now three layers thick, Brown adds a pencil line about 4" from the inside curved edge, then removes the waste with a jig saw. If there are sections that finish narrower than 4" it's not a problem.
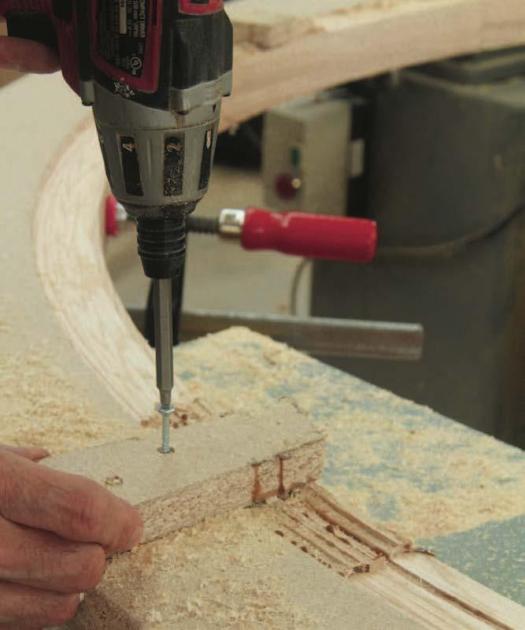
First Lamination
Brown attached a small block of wood to the inside of the form's curved face. This block kept the first few pieces from shifting during the initial stages of glue-up. Here, he's positioning the very first lamination in place. Blocks screwed to the underside of the form will help align the laminations as the hammock's frame is built up.
Start Adding Glue
Here, the first lamination is in place and covers about 270 degrees of the circle. The end of the second lamination is also positioned, though its other end is held away from the first lamination so Brown can apply glue to both mating faces.

Mark Where the Glue Ends
When Brown approaches the end of the second lamination he temporarily clamps it against the first piece and marks where it will end. He then unclamps the second piece, applies glue up to the line, and clamps the pieces together again.
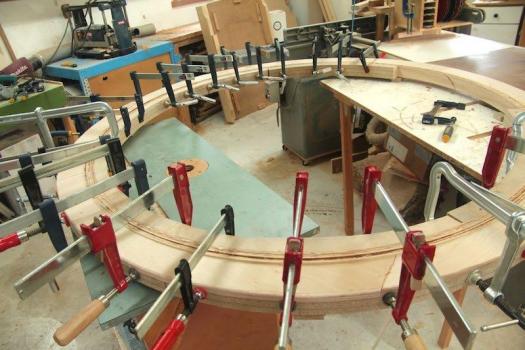
Round and Round
While clamping each lamination, start at the end that butts up to the previous piece, applying glue, clamps, and curved cauls as you work your way to the other end of the lamination. The same process is repeated many times until final frame thickness has been achieved.
Even Up the Edge
With all the layers glued in place, Brown installed a straight bit in his router, and mounted his router on a piece of 3/4" thick plywood. Just over half of the router, and all of the bit, overhangs the plywood. With the bottom of the bit set to the same plane as the underside of the plywood, the rough frame edge can be routed smooth. You may have to set the bit below the plywood to even up the frame’s edge.
Trim the Other Side
To trim the underside of the frame smooth, flip the form over and router between the support blocks. At this stage you can clamp the frame to the form, remove the support blocks, and trim the last short sections of the frame.
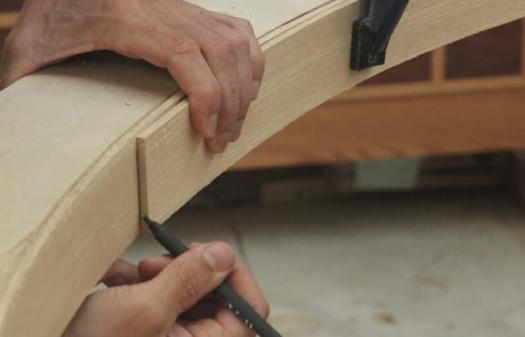
Layout Time
Brown positioned the fabric seat evenly inside the frame (above). At first he used a set of trammel points on a beam to mark out the locations for the holes, but he quickly realized the spacing of the holes needed to be offset slightly as the fabric had some small irregularities in it. The easy solution was to just add a line on the frame at the center of each fabric cutout. This mark will be the center of each mating pair of holes that will secure the fabric in place. (below)
Angled Holes
Lay out and drill the angled holes to secure the fabric seat to the frame. The starting points for these holes were about 1-1/2" apart and were drilled at about a 30-degree angle. These dimensions aren't crucial, though.
Hang it Up
A strong hook into a solid beam is what you're after. Brown found it valuable to be able to quickly remove the O-rings from the hooks so the hammock could be moved.


I am a member. Why can’t I see this project?
Hi Linda, did you log into our website (via the red Login button on the top right of your screen? If you have, and still cannot read the full article please let us know: support@canadianwoodworking.com