PROJECT
Dragon intarsia

Garnet Hall

Find more Intarsia, Inlay & Marquetry projects
This dragon (fierce as it is) is a project that any self respecting Hobbit woodworker would enjoy making and displaying.
If this project catches your eye, retire to your warren hole and chip away at a piece of timber. Bring forth a Dragon from where there was only wood.
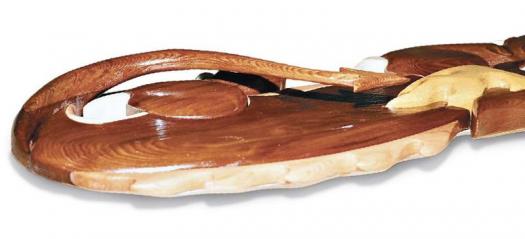
This basic intarsia project has one small twist. The dragon’s tail curves up and over the body. For the small effort it takes to accomplish the technique, the curved tail gives a remarkable depth to the piece.
Dragon intarsia
Choose Your Wood
Use the pattern and my suggested woods as a guide. Look for interesting woods. The wood that you choose makes a huge difference in the look of your final project.
Transfer The Pattern
Transfer the pattern to the wood, with whichever method you prefer: trace from the pattern onto the wood, make a template of the pattern and trace onto the wood, photocopy and cut and paste.
Cut The Pieces
Cut as carefully as you can and the pieces will fit much better. If you use the template method and you have good cutting skills, try to cut just inside the line. Otherwise cut on the line. It’s better to have a piece a bit too large than a bit too small.
Assemble
Fit the cut out pieces together and check for fit. You may have to sand down some spots to improve the fit. As long as the fit is within a saw kerf, it won’t be noticeable.
Raise And Lower
Raise and lower as the pattern, or your own imagination suggests. Raise and lower in increments of 1/8″. Use scrap plywood glued to the bottom to raise. Lower by re-sawing or sanding the pieces thinner.
Shape
Use whatever sanding tool or method you prefer. Always wear a dust mask, and have all of your tools hooked up to a dust collector. Try to achieve a smooth transition from one level to the next. The more you shape it the better it will look. This project is especially easy to make look good. All you have to do is sand away every thing that doesn’t look like a dragon.
Sand
Sand the pieces with a flap sander, or by hand. I don’t sand past 220, mainly for health reasons. I have found that if I track wood dust into the house it isn’t good for my health.
Prepare Backing
When you are determining the thickness of your backing, there is a general rule: for projects under 1 square foot, use 1/8″. Up to 3 square feet, use 1/4″. And up to 6 square feet, use 3/8″. Baltic birch is best, but ordinary plywood will work, as will 1/8″ or 1/4″ MDF. This project is on the borderline so I went with 1/4″.
Assemble the project onto the backing board.
Trace around the project, remove the pieces, and cut out.
Reassemble the project on top of the cut out backing, and start the glue- up. Glue on one piece at a time using ordinary carpenter’s glue.
Finish
Apply the finish of your choice. I most often go with a satin or matte finish. Apply three coats on the front and one on the back.
Sand between the 1st and 2nd with 120 grit, and between the 2nd and 3rd with 220 grit.
Attach a hanger and you’re done.
You now have a fierce dragon to lord over. Use your powers wisely! Oh yeah, it makes nice gifts for kids, too.
With your preferred sanding tools, carve and shape the dragon’s tail to curve up and over the body