PROJECT
Contemporary bookshelf: simple lines meet functional design

Rob Brown

Find more Bookcases & Shelving projects
This plywood and solid bookshelf keeps costs and build-time down, but will leave you with a clean, uncluttered area to showcase your book collection.
A bookcase can turn into a huge project if you let it. Cabinets housing adjustable or fixed shelves, lots of solid trim, possibly fluted columns, crown and base moulding, all with a nicely applied finish, is as serious as it sounds. Installation is also a major undertaking.
When we decided we needed a fairly large bookcase in our office, I knew this could go sideways if I let it. I had a couple of main worries when we talked about the project, especially knowing how many books we had to house. Material cost was first on my list. Lots of sheet stock, combined with some solid lumber, isn’t cheap. If we decided to add doors and drawers, door hinges and drawer slides would increase the cost even more. Next on my list of challenges was how much time this was going to take. A paying customer gets whatever design they’d like, but when I’m doing projects for us, I’d prefer not to spend forever on them.
Contemporary bookshelf: simple lines meet functional design
Overall design
For the reasons above, I wanted to design a simple, somewhat modern bookcase to minimize the expenditure of money and time. Clean lines and simple construction techniques were my goals. Over the past year I’d finished a kitchen made with Baltic birch plywood. Exposed plywood edges were the visual focus of the project, and it turned out really well. I ran that approach up the flagpole and my partner liked it.
Baltic birch makes up the shelves. There’s no need to apply solid wood edging or iron-on tape to its exposed edges. Now, how to make those shelves stay in place and support a collection of books? Solid wood cleats, or possibly metal L-brackets, would support the rear edge of the shelves, but obviously the fronts of the shelves needed support, too.
I considered using 3″ wide strips of Baltic birch plywood for the vertical sections. It would have been a simple approach, but I thought it might be too flimsy to comfortably support the kind of weight we’d be dealing with. Solid soft maple would blend in with the birch, and I had enough in the shop to make it happen. Obviously, solid birch would have also worked well in this situation.
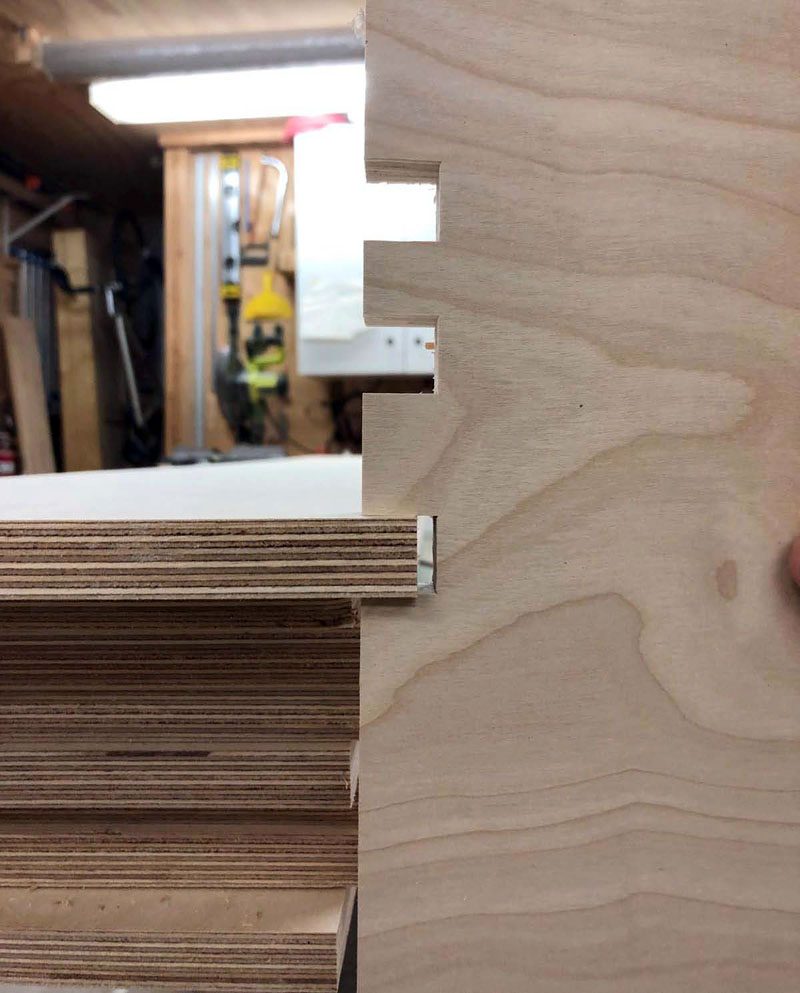
I played around with a few approaches for joining the shelves to the solid wood vertical supports. A simple, yet strong, joint was needed. Since the rear edge of the shelves would be fixed to the wall, the bookcase wasn’t going to rack and move sideways. These joints would mainly be stressed downward. The notch in the solid wood verticals would support the shelves and the notch in the shelves would provide a positive location for assembly.
This bookcase would be large; over 6′ high and 10′ long. The need for knockdown joints was critical. I decided to use a small L-bracket at each leg-to-shelf joint. These would be either tucked in just below the shelf (on the lower shelves) or just above the shelf (on the upper shelves) so they wouldn’t be visible.
Plan your cuts
Any shelf needs to be sized for the location where it will be installed, so this article will talk about the general approach to building a bookcase, rather than give too many specific dimensions.
When dealing with sheets I like to plan all of the cuts on a piece of paper. I draw a rectangle on the paper, mark where the cuts will be made, label each part and add a few basic dimensions. I do this in pencil, as there’s often some shifting to be done part way through the planning process.
I only needed two sheets for this bookcase. My “reduce material costs” approach was already paying off. I got the lumberyard to rip both sheets in half so I could fit them in my vehicle and be more maneuverable when I got them in the shop.
Get to work
One of the first things I did was to use a long, thin length of material to mark out the heights of the shelves. This gave me a layout stick to guide me.
Once I got the material in my shop, I further ripped the two sheets into 11-3/4″ wide shelves. Next was crosscutting them to length. As you can see, part of my bookcase is about 8′ wide, while the lower section is about 10′ wide, and fits under an electrical panel. The 8′ long upper section was easy, but I decided to glue the lower shelves together end-to-end to make the full width, as opposed to fixing those shelves together with metal hardware or wood cleats during installation. The resulting joint isn’t going to be bomb-proof, though it will be strong enough for what I’m asking it to do. If you want to try this approach, I’d suggest adding vertical supports fairly close to either side of the joint for added strength. I’d also suggest not loading the shelf near the joint too much.
Once the lower shelf parts were cut to length, I routed a 1/4″ wide slot in the mating edges. I would eventually cut spline material to insert and glue into these slots to help align and strengthen the joints. I glued these shelves together end-for-end later, as it would be easier to handle shorter boards.
Next, I broke out the solid verticals and cut them to final size. Although their exact thickness doesn’t matter, the thicker they are, the stronger they will be. I used 4/4 material and brought them down to about 7/8″. As long as they were all the same thickness the mating joints would be easy to machine so everything would fit together. I ripped these lengths to 2-1/4″ wide.
The joints aren’t complex
At this stage I had all the main parts cut to final size and could focus on the joinery. I made a test joint well before the project started to see if my partner liked it. It also allowed me to work out any machining details. I’d recommend using a piece of scrap plywood and a short length of the solid wood that’s the same size as the vertical supports you’re using in the bookcase to set up the machines to create a sample joint. It’s a lot cheaper to make a mistake on some scrap than on 8′ long pieces of Baltic birch plywood.
Notch the legs
I put a dado set in my table saw the same width as the plywood. I used shims to adjust the cut so the fit was just right; not too snug, or the parts would be very difficult to assemble, nor too loose to leave me with gaps and sloppy joints.
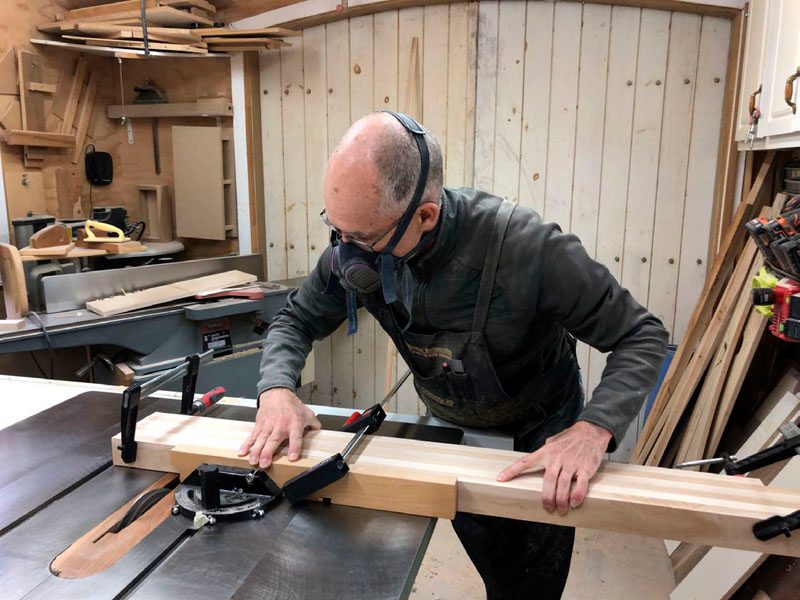
Using the long, thin strip with the shelf heights as a guide, I marked the locations onto one of the vertical pieces. I then ganged the uprights together with clamps, ensuring the piece with the shelf height marks was on the outer edge.
Long parts aren’t always easy to machine. I found waxing my table saw’s surface, and buffing it with a cloth to remove any excess wax, gave me a smooth surface for the workpieces to slide across easily. This was important for machining the notches in the uprights.
I aligned the location of the notches with the blade and clamped everything to the mitre gauge. I also clamped a scrap backer board to the rear of the parts, where the blade would exit the outer piece, to minimize tearout. One by one, the notches were made, and because the parts were all cut at once, all the notches matched. I also clamped the short upright to the group, so its lower end was flush with the other lower ends, so it would match the taller pieces.
Notch the shelves
The shelves were a lot more work, and the chance for misalignment of even one notch is relatively high, especially if you let your mind wander for a moment. All the notches have to be aligned or the shelves won’t accept all the uprights. I’m not saying having one notch 1/16″ off will ruin everything, but this is where accuracy, patience and attention to detail come in handy. Start off by having your shelf sections organized and labelled.
Make a router template
A simple router template will guide the bearing on a template bit so each of the notches in the shelves are not only equal, but cut at the correct width to accept the legs. I used a piece of plywood about 12″ × 12″, and ensured two opposing edges were parallel, then trimmed the other two edges square. On one of those edges cut a notch the same width as the legs. This is one of the places where accuracy matters. I used a block with a screw stop on my crosscut sled. I marked the thickness of the legs onto the centre of one edge of the template, then clamped the screw stop to the fence of my sled, being careful that the cut I would make would be within the line, not beyond it. After making the first pass, flipping the template end for end, and making the second cut, I checked it against the thickness of the legs to see how close I was. If it was still too narrow, I adjusted the screw to give me a wider notch and retested. When I was close, I tested the template on a piece of scrap and checked the leg for fit. In theory, the flush trim bit should cut a notch the same size as the notch in the template, but it’s always best to check this with a piece of scrap before settling on the width of the template notch. I removed a bit more material from the notch in the template by slightly driving in the screw and re-cutting both sides of the notch. Repeat this until the routed notch in the scrap accepts the legs nicely.
At this stage I ripped about 1/8″ off the notched edge of the template, but stopped about 3/4″ away from the notch, then flipped the template end-for-end and repeated. This gave me a portion of the template that protruded a bit past the plywood workpiece, so the bearing on the template router bit would come into contact with the template before it started to trim the workpiece.
Finally, mark the centre line of the notch onto the inner edge of the notch so you can align the jig with a centre line you’ll mark on the shelf.
Machine the shelf notches
Mark the centre lines of the legs onto the shelves. I then used a square to transfer these marks slightly past where the notches will be cut so aligning the routing template is easier. You don’t want to remove the waste in these notches, then not have a centre line to work with.
When it comes to the shelf parts that will eventually be glued end-to-end to make a 10′ long shelf, some planning is required. Butt the shelf parts end-to-end and lay out the shelf notches as if they’re one long shelf.
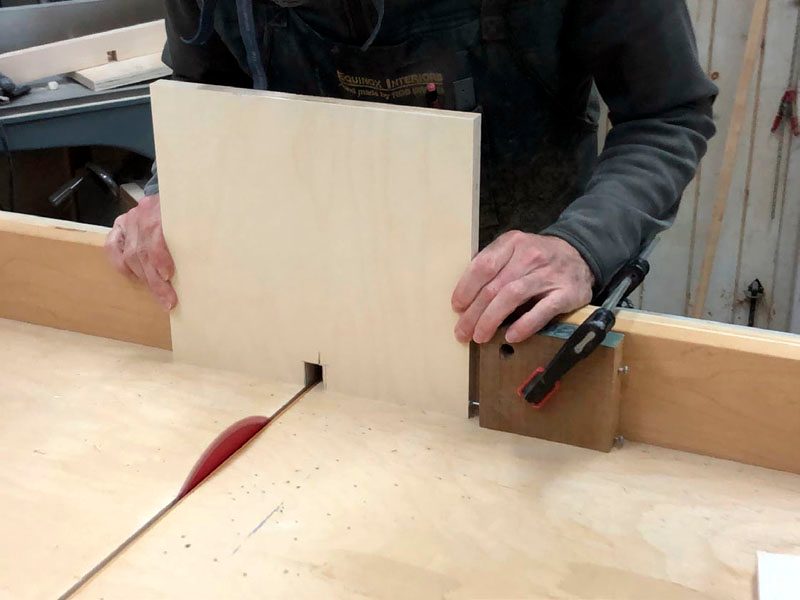
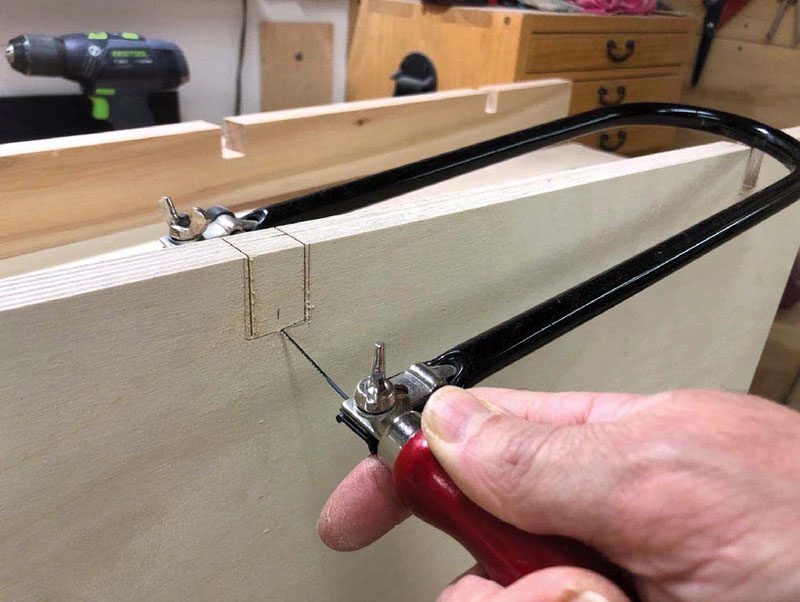
Position the template on the plywood workpiece so the front (notched) edge is flush with the front edge of the shelf. Adjust it left / right until the centre line mark on the template lines up with the line on the shelf, then trace the location of the notch onto the workpiece. I found the easiest approach to removing the bulk of the waste was to use a fine Japanese saw to create two kerfs down either side of the notch, then use a fret or scroll saw to cut the waste free from the workpiece. These cuts don’t need to be exact, though they must not go beyond the two lines that run perpendicular to the front edge of the shelf.
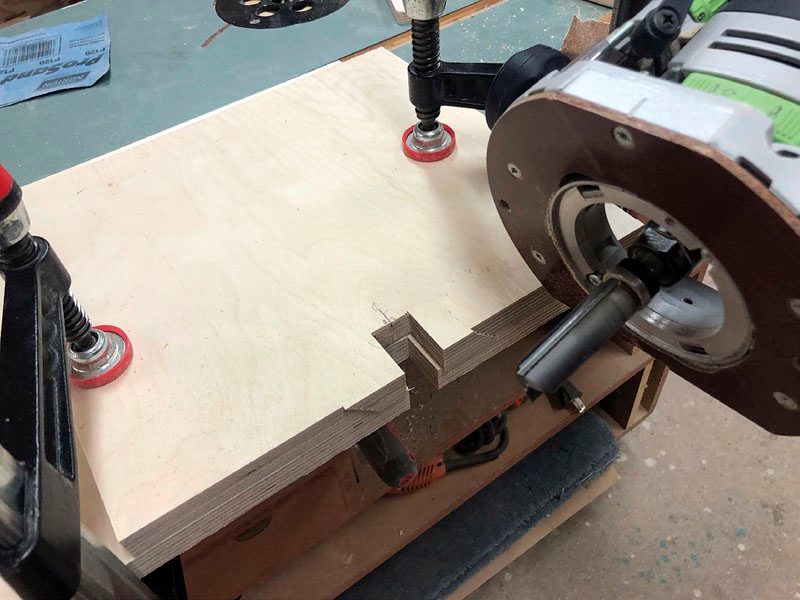
Return the template to the workpiece, aligning it carefully with the centre line on the workpiece, and clamp it in place. Rout the remaining waste in the workpiece. Repeat this process for all the shelf notches.
Round over the shelf notches
I added a 1/4″ radius round over to the inner edge of the shelf notches. Rather than do this one by one, I found it easiest and fastest to gang a bunch of like parts together accurately and rout the edge. I inserted a piece of scrap the exact same thickness as the vertical members into the notches, adjusted the shelves so they were all flush on their outer edges and clamped them in place. I also clamped a support block to the end of the edge, where the round over router bit would exit in order to eliminate blowout. After routing each edge, I repositioned the shelves and moved the support block before rounding over the next batch of edges. I found it easiest to sand the rounded edges before removing the clamps each time. The shelf notches are now complete.
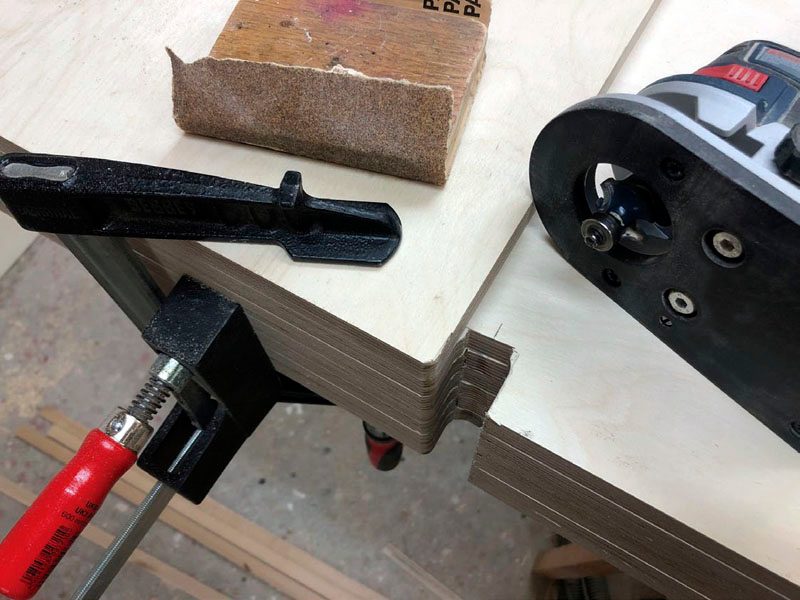
Round over the vertical supports
To further highlight the rounded appearance of the shelf-to-leg joint, I eased the front edges of each vertical leg. I installed a 3/8″ radius round over bit in my router table and set the fence flush with the bit’s bearing. I then shaped both front edges on all the legs to leave me with a bullnose look.
Finally, cut the upper ends of the vertical supports at a 20° angle to give a finished look.
Rounded corners
The ends of the shelves get a 3″ radius arc on the front edges. This further adds to the modern look and removes any sharp corners from the bookcase. I drew the arc on a piece of scrap about 12″ × 12″, cut it close to the line, then sanded the curve accurately. This template would allow me to mark the arc on the workpieces so I could trim off most of the waste. Then, the pattern could be clamped to the workpiece and a template bit used to cut the final arc into the workpiece.
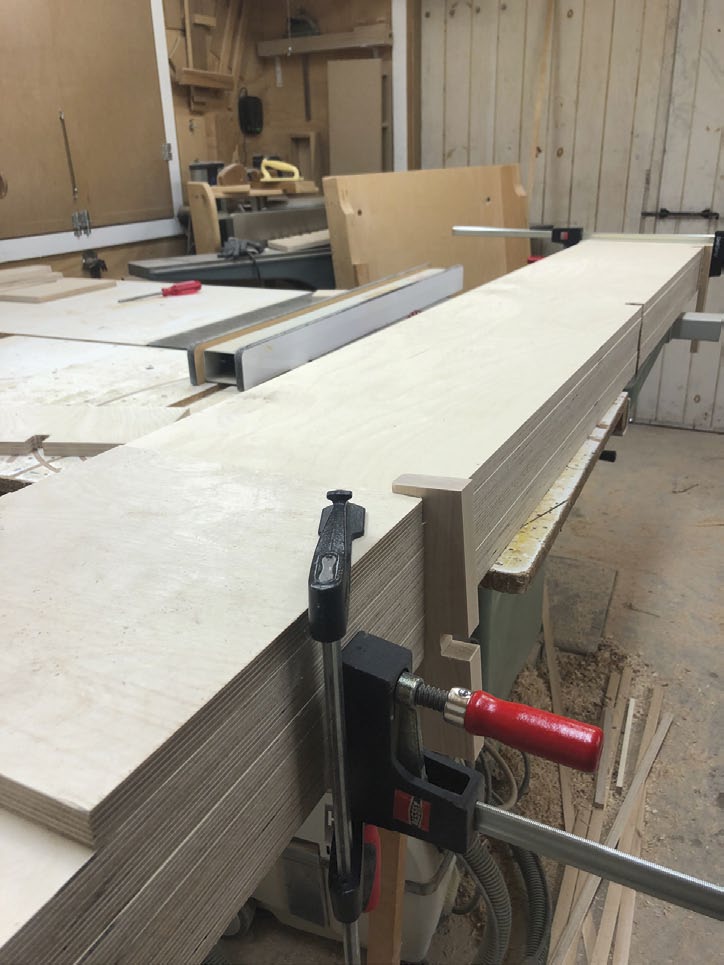
Glue the longer pieces
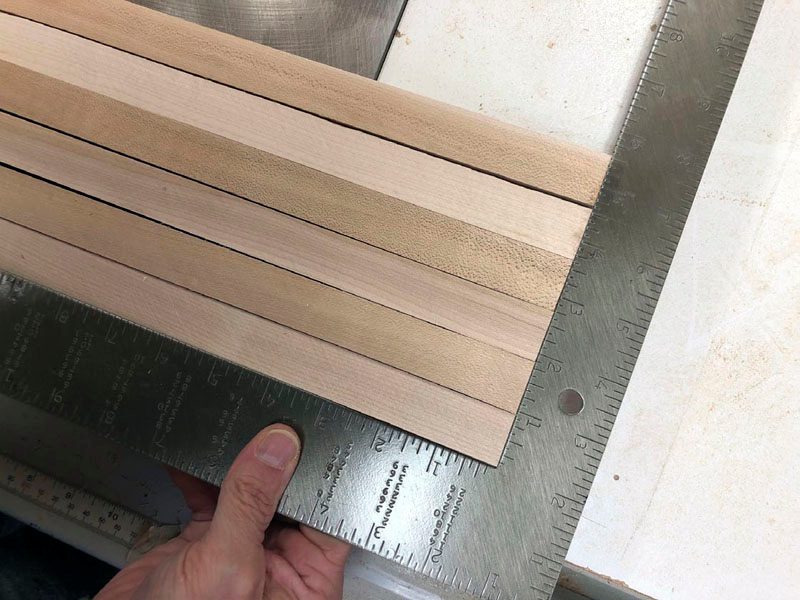
With all the machining complete, I cut the 1/4″ splines that assist with joining the parts that make up the 10′ long shelves. Ensure you can keep them parallel during glue-up and that you have clamps long enough to span their length. Add some glue to the joint and spline and bring them together. No need to overtighten as that will just cause the long shelf to curve and the joint to potentially be misaligned.
In my case, these were the three lowest shelves, which meant I could glue a 1/2″ thick × 4″ wide × 12″ long piece of plywood to their undersides, overlapping the joint 6″ on each side, to add extra strength. If you don’t have this option, just be sure to handle them with a bit of extra care until they’re installed and it also might be a good idea to not load the shelves with too much weight. Plywood is strong, but this end-to-end joint isn’t bombproof.
Installation supports
While in the shop, I cut some support lengths to assist in the installation. These were pieces of plywood (though solid wood would also work nicely) cut to match the distances between the notches on the legs. These pieces were used to prop up the shelves during installation, as only the fronts of the shelves will be fixed to the legs. Number them so it will be easy to identify their order during the install.
Sand everything
At this stage it’s not a bad idea to do a test fitting of all the parts to ensure they go together. The main challenge is that you machined the joints to a friction fit, but once they all need to go together at the same time the friction fit will seem a bit too tight. If it’s hard to assemble at this stage you might consider belt sanding the thickness of the legs slightly to ease assembly. On the other hand, if you think the notches in the rear edges of the legs are the sticking point, hitting the faces of the shelves, near the notches, with some extra sanding will loosen up those joints.
Once all the machining is done, ease all the edges.
Plywood, especially Baltic birch, has a tendency to splinter at its edges if they’re left sharp. I heavily ease them to avoid this. Next, sand the exposed plywood edges so they’re clean and smooth, and follow by sanding both faces of each piece. The solid wood vertical supports also need a good sanding.
If you’re going to use a wood cleat adhered to the underside of these shelves (towards their back edge) to attach them to the wall, this is the time to glue and screw them in place. You could even attach cleats to the upper face of the shelves above eye-level to make them less visible, though that might affect how books or other items sit on the shelf. A solid wood cleat around 7/8″ × 7/8″ will add strength to the shelves, as well as give you something to screw through when connecting with a stud in the wall. I used metal L-brackets, so didn’t attach cleats.
Apply a finish
Everyone will have their preferred approach when it comes to selecting a colour and topcoat to apply to this bookcase. Whatever you apply, you’ll need a large enough space to maneuver these long shelves. The nice thing about a bookcase is that it likely won’t get a lot of abuse, nor will it see a lot of liquid or chemical spills, so an extremely durable finish isn’t needed.
I applied a coat of Varathane’s Ultimate Wood Stain in Linen White to give a slightly pickled look. On top of that I applied a few coats of polyurethane, sanding between coats. I didn’t apply a heavy topcoat as I like the simpler look of a light coat. I also didn’t need a lot of protection.
The edges will soak up more finish than the faces, so you might want to consider an extra coat or two for them when applying the topcoat. Generally speaking, sand between topcoat layers for a smooth finish. Be sure to let the finish dry before loading up the shelves with your book collection.
Installation
I’ll be honest; it took some head scratching to figure out the best way to assemble and install this bookcase. It was about 10′ wide and heavy. I also had only a few inches of extra space between the walls on either end of the bookcase to play with.
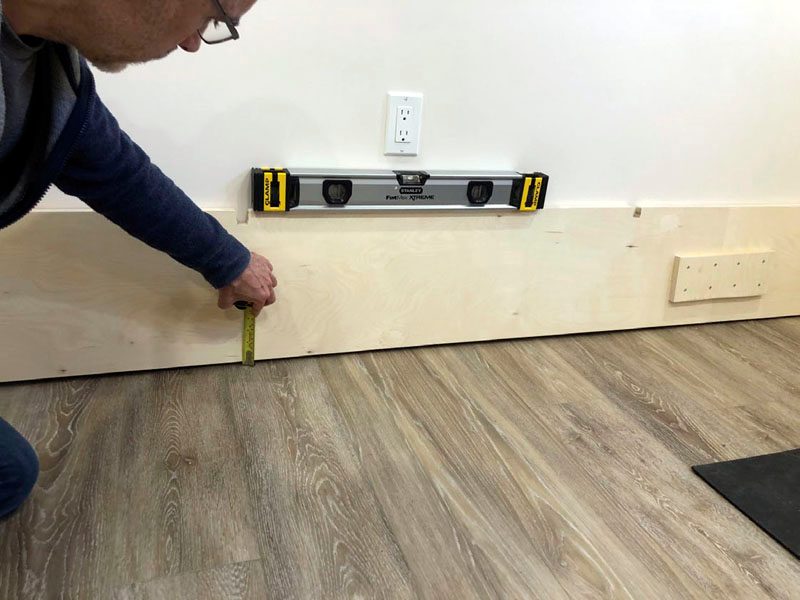
Floors and walls are rarely level and flat. I used one of the longest shelves to check for level and also measured how far out of level the floor is where the legs would rest on the floor. I left the leg that would be at the lowest level as-is, but marked and trimmed the other legs as needed, so the notches in the legs would all be at the same level.
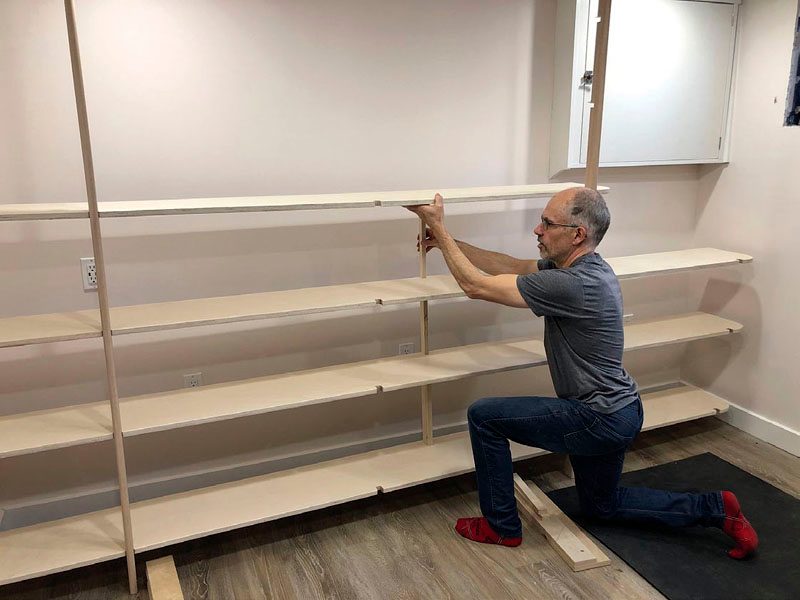
I started by placing two of the uprights on the floor and added the lowest four shelves, fitting the notched joints together. A few very light hammer taps seated the joints nicely. I then added the L-brackets to secure these joints together. In my case, any more than four shelves may have added too much weight to the assembly, not only causing it to be too heavy to carefully lift, but also causing the lowermost joint to be stressed enough that it might break at the notch in the legs.
To reduce stress on the lowermost leg notch, I used a few scraps to lift the lower end of the legs a few inches off the ground. With the help of a second set of hands, we tilted the bookcase up and positioned it a few inches away from the wall. I had the installation supports nearby and quickly put them between each of the shelves, including a short one under the bottom shelf, so the leg-to-shelf joints wouldn’t be stressed too much. If your leg-to-shelf joints are at all loose you’ll have a hard time with this. Adding them in between the shelves, as well as below the lowest shelf, before tilting the assembly upwards is highly recommended. One option is to use one of the remaining legs for this. Temporarily put the rear edges of the shelves into the notches on one of the legs. This will allow you to insert the installation supports and remove the leg as you won’t be able to assemble the bookcase with an additional leg there.
At this point I slid the bookcase against the wall and positioned it in its final resting place. Working from the bottom shelf upwards, I used a few L-brackets near the existing legs to secure the rear edges of the shelves to the wall studs. This ensured the unit as a whole didn’t go anywhere.
Next, I added the remaining legs, taping them into place and installing L-brackets to fit the legs to the front of the shelves. A few more L-brackets added even more strength to the unit. I checked for level front-to-back as I went.
At the corner joint, between the long bookcase section and the short section, I used butt joints to mate the shelves with each other and used a piece of 1/2″ thick plywood on the underside, screwed to both shelves, to keep them tight and level with each other.
After the fact
This isn’t a bookcase that can be counted on to hold thousands of pounds of books, but it’s certainly holding up well in our home. We loaded it with our book collection and it barely flexed. If you want to add some extra strength, using a solid wood cleat fixed to the studs along the rear edge of each shelf will go a long way. Adding more vertical support legs will also add more strength.
This is a modern bookcase that uses minimal materials. My aim was to create it with simple, clean lines so it wouldn’t overpower the small room it’s in and we’re pleased with how it looks and functions.
Photos by Rob Brown
Testing, Testing
The notches on the rear edges of the legs needed to accept the shelves nicely. Too narrow, and assembly would be virtually impossible. Too wide, and there would be gaps. Brown used some shims to fine tune the width of the dado set, but tape or paper could also be used.
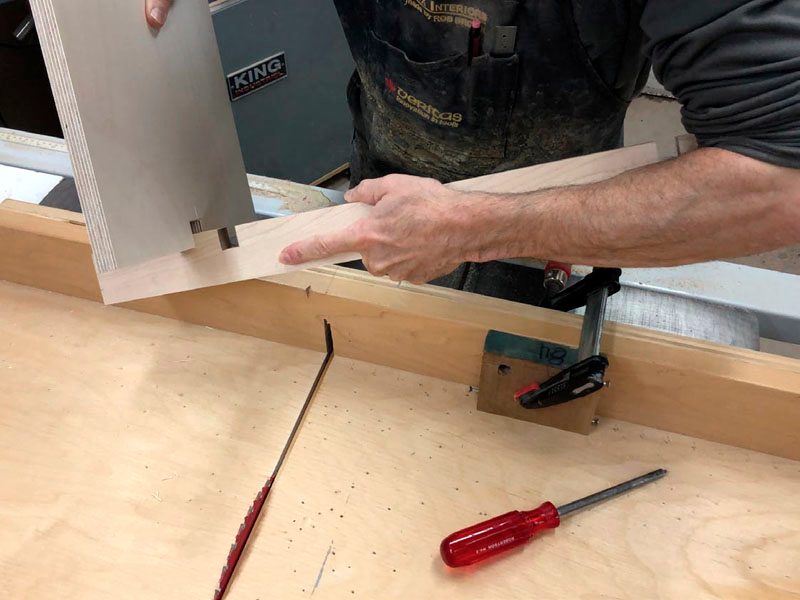
Square Up and Clamp
Brown ensures the legs are all aligned at their ends before clamping them together and machining the notches in them.
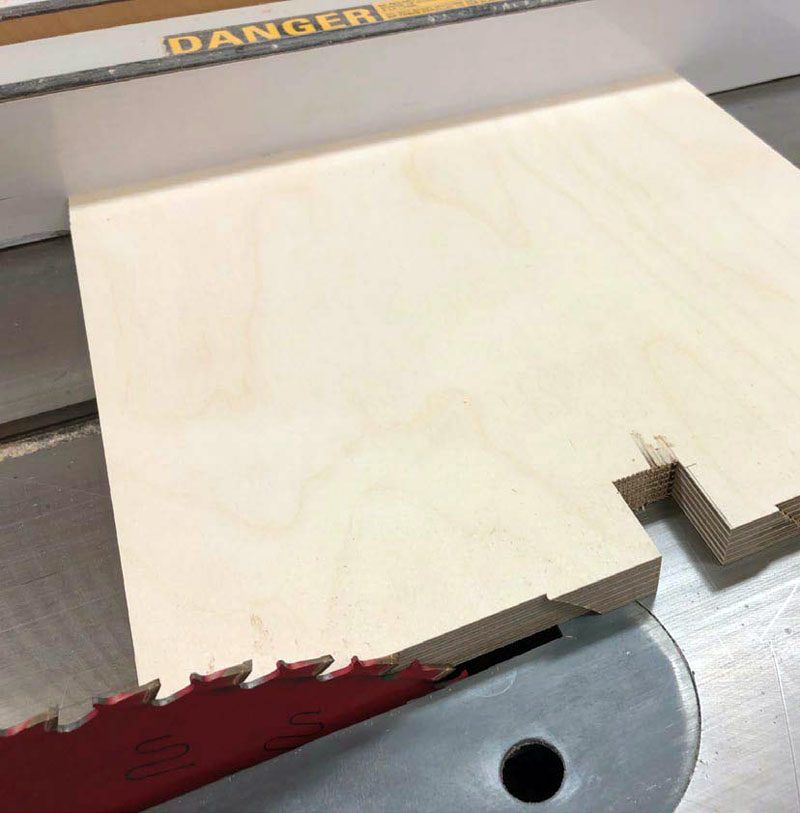
Nice Notches
With the legs ganged together, Brown cuts the notches in their rear edges to accept the plywood shelves.
Be Patient
Here, the notch in the router template is being machined. This notch will guide a template router bit to machine the notches, so this notch needs to be sized very carefully. Notice the screw stop on the stop block that Brown’s using. This screw can be driven in ever so slightly to sneak up on the perfect fit.
Double Check
You can check how well the notch in the template fits over a piece of plywood, but it’s best to then use this template to machine another notch in some scrap to determine if you have the right fit or not, as a template router bit sometimes doesn’t trim the edge of the workpiece to the exact same size as the notch in the template.
Choice Is Yours
Although it’s not completely necessary, Brown chose to remove about 1/8" from most of the front edge of the template, but to leave the material near the notch. This gives the bearing on the router bit something to run on shortly before the bit starts to machine the wood.
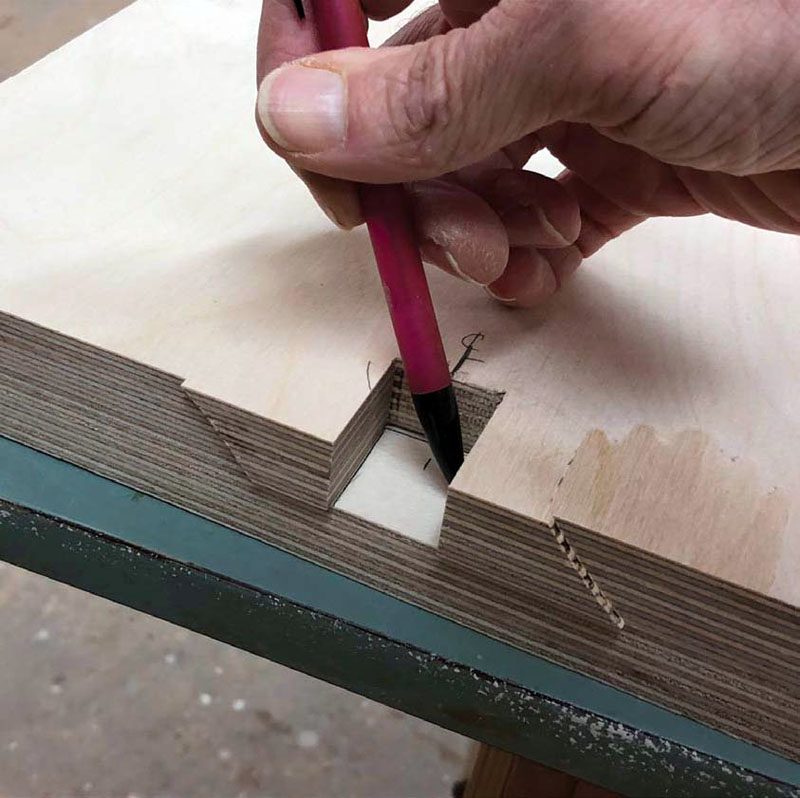
Mark the Notch
Brown uses the template to mark where the router will cut, then he can remove much of the waste. Notice the joint’s centre line marked on both the workpiece and the template. These lines can be aligned to locate each notch.
Two Crosscuts and a Rip
Although it’s possible to remove all the waste to create each notch with the router bit, the results are a lot better, and there’s much less wear on the router and the bit, if the bulk of the waste is removed beforehand. You definitely want to avoid tearing out any of the wood fibres when you cut across the grain. Tearout may be visible in the final project. A Japanese handsaw is great in this situation, though you can also stay a bit further from the line than Brown did. Scoring just inside the line will also work.
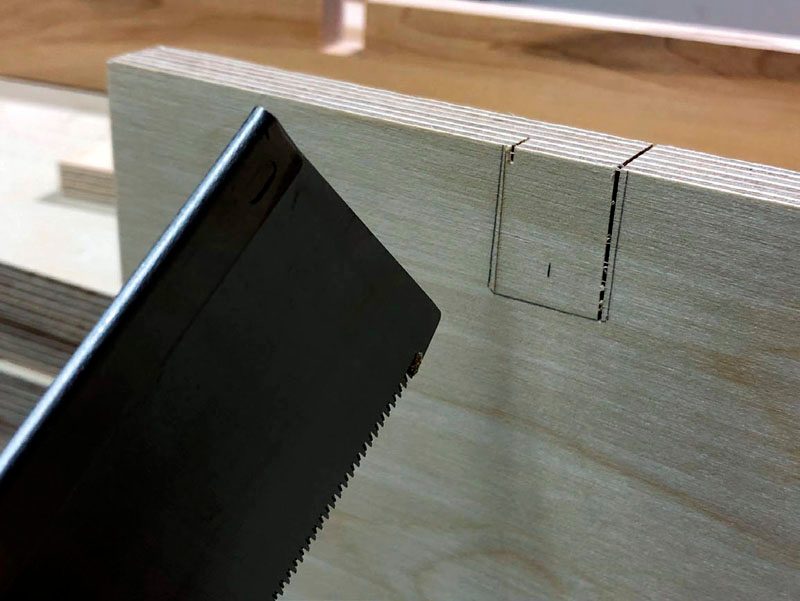
A coping or fret saw will remove the waste block.
Trim It Flush
With much of the waste removed, and the template bit in the router, it’s time to finish up these notches in the shelves.
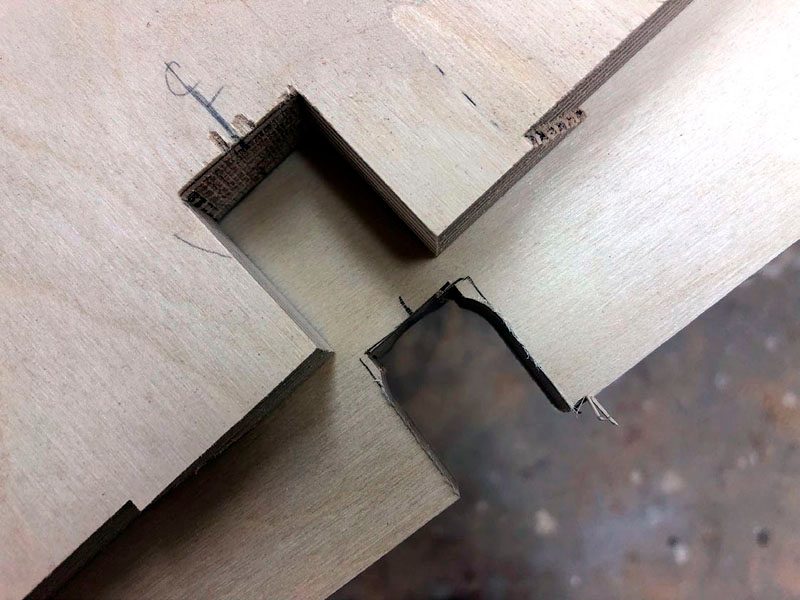
Finished Notch
A router bit will leave a rounded inside corner. Although it may not look good now, the assembled joint will cover all this. The inside corners of the leg will eventually come to a stop where the sides of the notch start to taper inward.
Lots of Round Overs
With all the notches complete, Brown uses a piece of scrap the same thickness as the legs to align a series of notches so he can round over their edges. Doing this router operation with all the shelves together means much less tearout as you exit each shelf. Notice the piece of scrap Brown added on top of the batch of shelves to eliminate tearout from the top shelf.
Nicely Rounded
With the first pass complete, Brown will clamp a piece of scrap to the underside of the opposite side of these notches when he routs the other side.
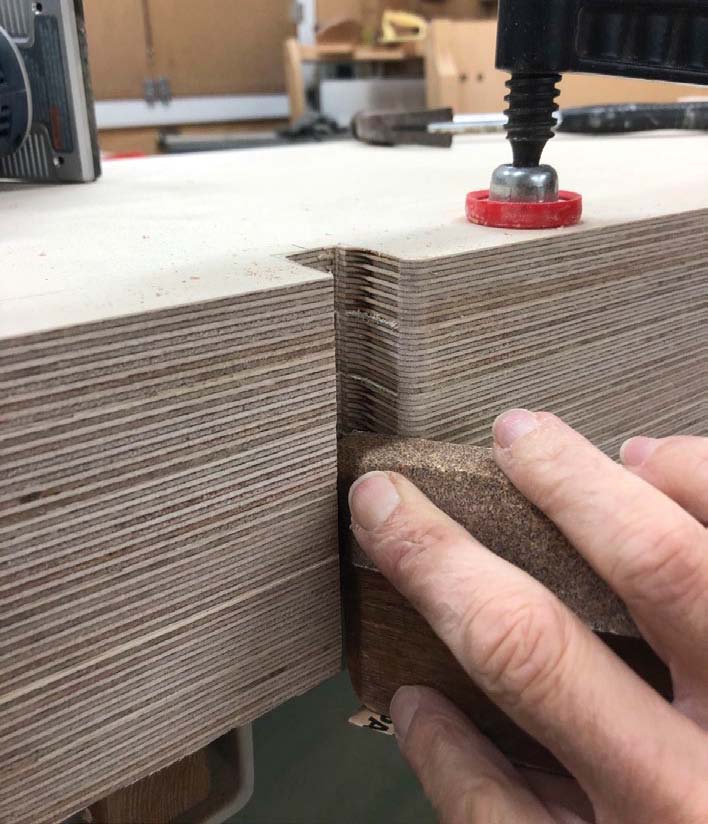
Time to Sand
While the notches are all aligned, Brown sands their rounded corners.
Slice the Fibres
Scoring just outside the arc with a sharp knife will snip the fibres of the wood and stop any tearout from the jigsaw as you trim most of the waste from the outer corners of the shelves.

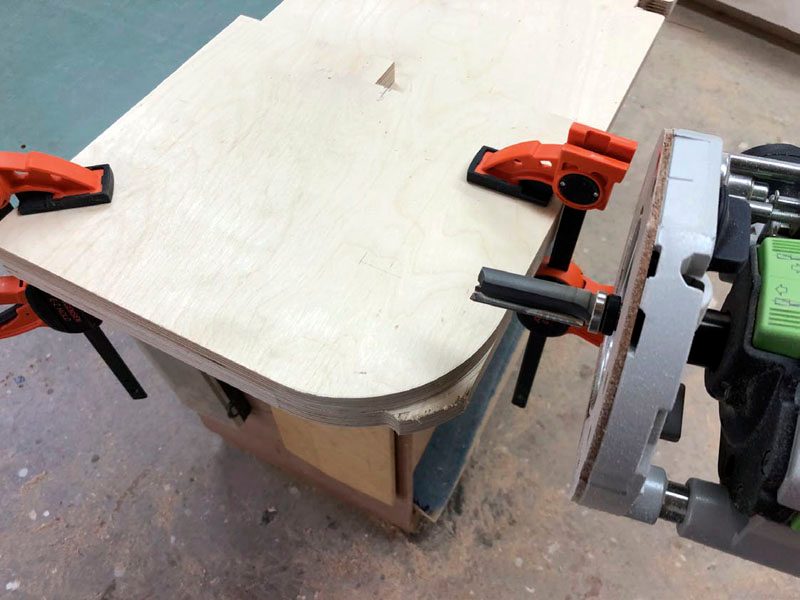
An Even Arc
With the arc template clamped to the workpiece, Brown routs the corners of the plywood flush.
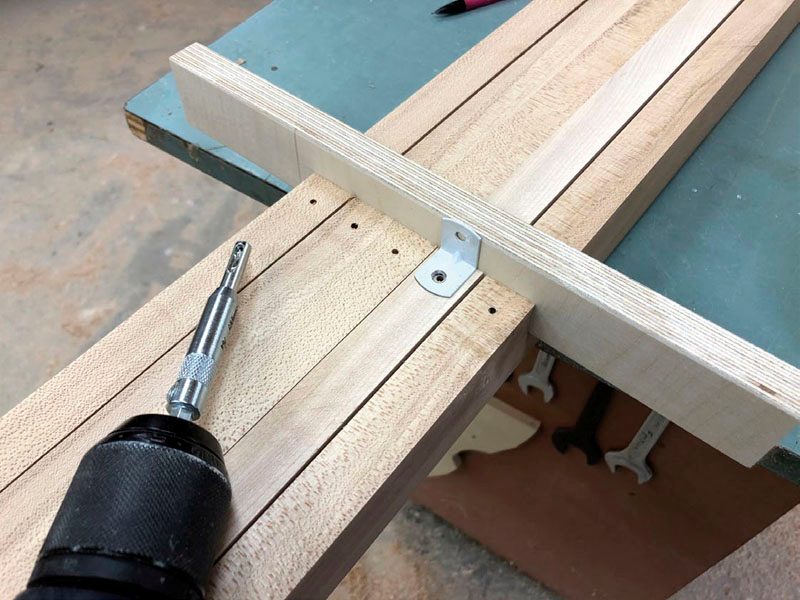
Pre-Drill for the Brackets
With a piece of scrap plywood in the aligned notches, Brown adds screw holes for the L-brackets he will use to secure all the leg-to-shelf joints. Ensure the brackets don’t overlap the notches at all as that creates challenges down the road. Aim for a gap of about 1/16" between the edge of the L-bracket and the edge of the notch.
On the Level
Brown used one of the long shelves to check how far out of level the floor was, then measured for the differences in height where the legs would be located. He was then able to trim a couple legs shorter so the notches in the legs would all line up.
Start the Assembly
With a couple legs laying front edge down on the floor, Brown started adding the shelves, starting with the lowest shelves. At this stage, the parts were located on the floor so they could be raised into the bookcase’s final location against the wall.
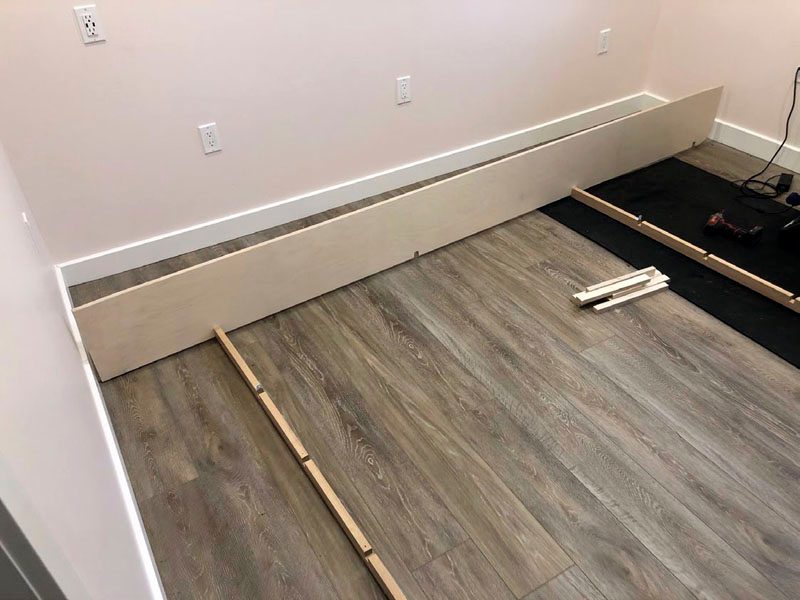
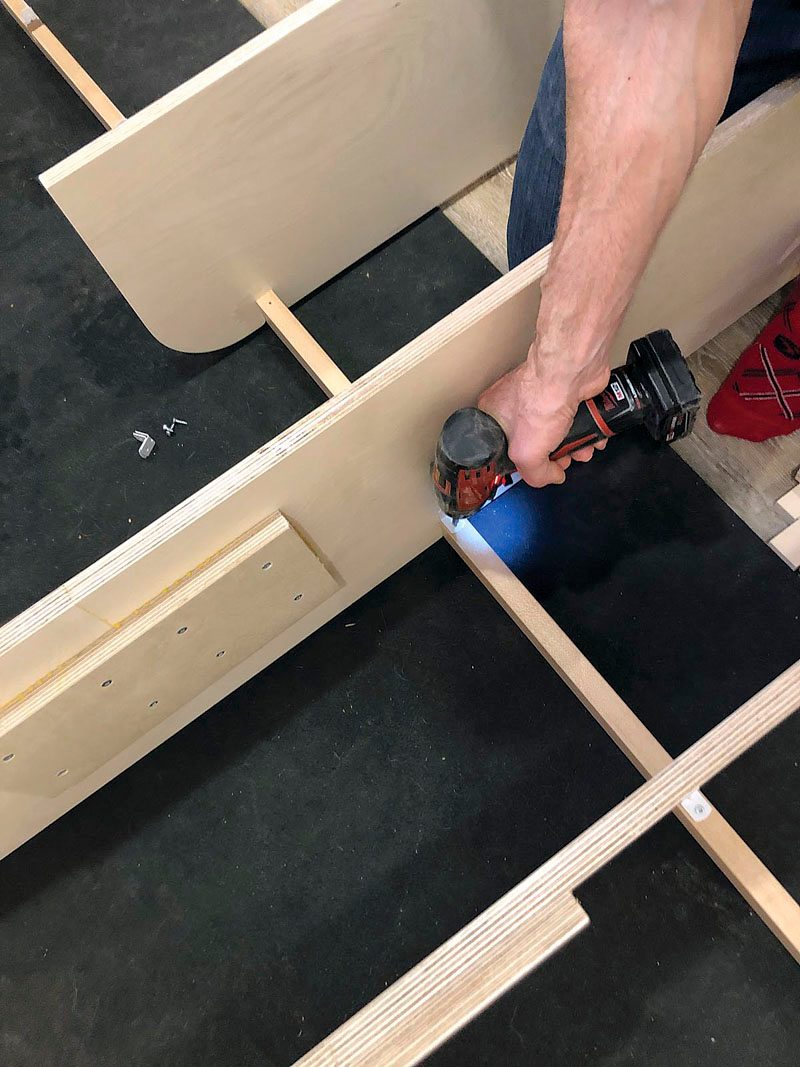
Add L-Brackets
Once the notches were seated, Brown used L-brackets to fix the joints together. You can see the pieces of plywood he used on the underside of the lower shelves to extend them to about 10' long and create a strong joint. Since they are lower shelves the plywood pieces will never be seen.
Ready to Raise
The lower few shelves are now fixed to the vertical uprights. Notice the scraps of plywood Brown placed under the lower, front corner of the bookcase. This will allow the unit to be more easily tilted upward and land on the front legs without stressing the notches in the legs too much.
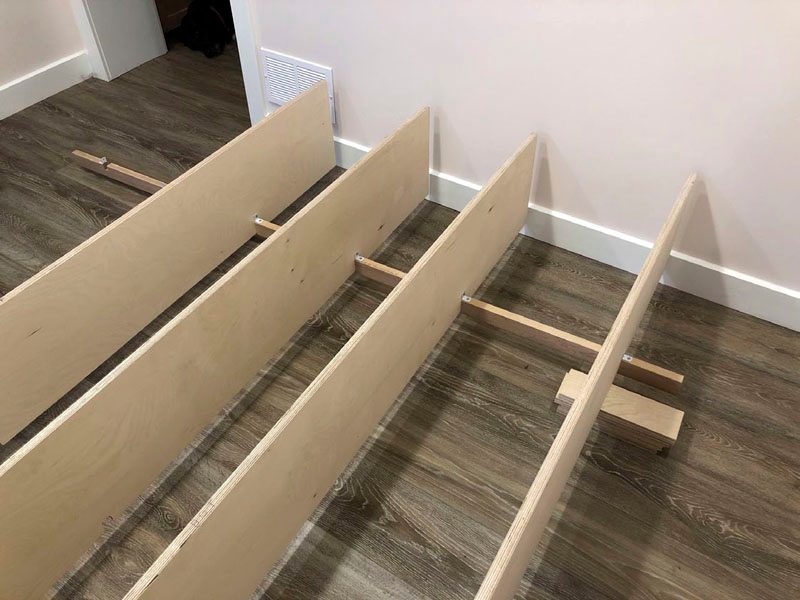
Solid Support
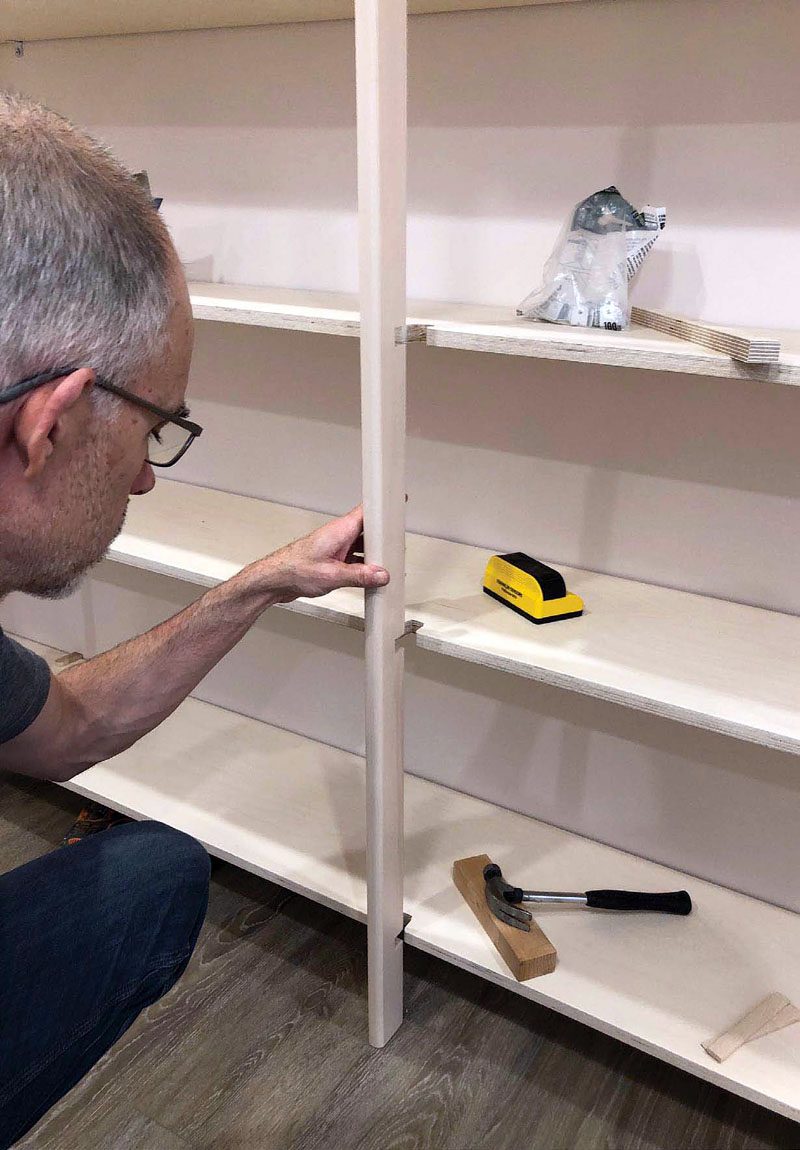
Because the leg-to-shelf joints are the only joints supporting the shelves during the first part of the installation, Brown cut strips of wood that go under each shelf to support their rear edges. Although you can’t see it in this photo, he cut a short strip for under the lowest shelf, too. You could use an extra vertical upright, but these strips can stay in until the rear edges of each shelf are fixed to the wall with L-brackets.
Last Leg
Brown adds the final vertical members and tapes them into place before securing them with L-brackets. You can see a few L-brackets holding the rear edges of the shelves to the wall in this photo, but he added many more shortly after this photo was taken.


Hi Aaron. With the rear edge of each shelf potentially fixed to a stud every 16” I think the shelves should be just fine. If you wanted more protection from sag you could use a plywood cleat along the rear edge to fully support the shelves.
Looks clean Rob but methinks that a few of those shelves will sag over time…