PROJECT
Chimney cupboard

Michael Kampen

Find more Cabinetry projects projects
Chimney cupboards have been with us for hundreds of years. Originally, they were found in kitchens, but in more recent times they have been used in bathrooms to store linens. It is a great way to increase your storage space, regardless of where you use it.
The easiest way to tackle this project is to break it down into separate sections and work through them in order. This allows you to adjust each step as you go. The first section is the main body, consisting of three framed panels and a face frame into which a three-panel glass door is set. I used red oak for this project.
Chimney cupboard
Panels and Face Frame
Begin by laying out the stock for all of the frame and door parts. Arranging for complimentary grain patterns now will reward you with a fine looking finished cabinet. Mill all the stock to the same thickness in one session. This ensures all frame members are exactly the same thickness. At this stage, use some chalk and place a mark on the face side. A simple white slash, face up on every part as it goes on the router table eliminates the chance that parts may not line up later if the router bit isn’t perfectly centered on the stock.
Rip and crosscut all the parts to the final dimensions. A technique that I use to ensure that all matching parts are the same length is to cut a blank to the correct length and then rip the two parts from this piece. When all of the frame parts are ready, rout a tongue on the ends of the rails. I used a router bit with a pair of ¼” cutters separated by a ¼” ball bearing in conjunction with a cross sled on my router table. When you have finished cutting all of the tongues, set up a ¼” grooving bit in the router and cut the grooves. I use a tongue and groove router bit set that cuts a ⅜” x ¼” tongue and corresponding groove. If your bit is different, you’ll have to adjust the measurements. You could also cut the tongues and grooves on the table saw.
In addition to machining the three frame-and-panel section and the face frame, there are additional tongues and grooves to machine, in order to assemble the four sections later.
Center Panels
Once you have prepared all the frame members, cut the three center panels from some ¼” MDF. Test fit the frame members and the center panel. The panels are finished with milk paint, and the oak frame is finished with oil and wax. For those who haven’t used milk paint before, it is a finish that came to Canada with the early settlers more than 250 years ago. (I order mine from Homestead House Paints in Toronto). Because of the nature of milk paint, you must finish the center panel before assembling the frame around it. It will take two coats to achieve complete coverage. After the first coat, rub the panel down with fine steel wool, and then apply a second coat. After rubbing the second coat down, use some Watco oil to seal and darken the painted surface. Glue up the back and side panels. You should also glue up the face frame at this point. Set the panels aside and move on to the door.
Door
Cut the rails and stiles for the door, and machine the tongues on the ends of the rails. There are four rails, with the center two being wider than the top and bottom. Set up the groove cutter in the router table and rout grooves on the stiles and the top and bottom rails. The wider center rails have a groove routed on both sides. There are two extra rails in this door without the benefits of a center panel to hold things square and flat, so I highly recommend going through the whole process once without glue, to be sure everything is perfect. When everything is square and flat, glue the door frame together.
Sand the oak frames for the front, back and sides. The best tool for this is a ¼ or ⅓-sheet finishing sander. Be sure not to sand the finish off the center panel. When the frames have been sanded, use compressed air or a cloth to clean away all traces of wood dust from the panels and from the oak. Apply Watco oil to all exposed surfaces, being careful not to get any in the tongues and grooves. This will make removing any glue after assembly much easier. Test fit the sides, back and face frame and then glue them together. Be sure that your assembly table is flat to help keep the glue-up square.
Top and Shelves
Prepare stock to glue up for the top and the three inner shelves. Try to choose the best-looking boards for the top. Glue up the four pieces and set them aside. Mill some stock for the ledger strips and for the top hold-down cleats. In order to allow for seasonal wood movement across the grain in the top, you will need to provide some elongated holes. The ledger strips that hold the bottom in place are attached to the carcass by #8 1¼” screws. Pre-drill and countersink these to avoid splitting such narrow pieces. With these strips installed, glue and screw the plywood bottom into place and install the levelling feet. Using these feet removes the weight of the cabinet from the base and transfers it directly to the cabinet. It also allows it to be levelled on an uneven floor. The strips that hold the top in place are attached by four #8 1¼” screws. To avoid splitting the stock, these should be pre-drilled and countersunk.
I used a ½” cove bit to machine the profile on the base moulding, and a Lee Valley large French Provincial bit to profile the crown. I didn’t raise the bit to its full height, which allowed for a slightly altered profile. The crown and base moulding are attached with two screws per side, from the inside. Pre-drill and countersink these as well. You’ll have to drill the holes for the side pieces of the crown upwards at a 45° angle to allow for the thickness of the top cleat.
Sand and finish the top and shelves with the same number of coats on both sides. Install the top from the underside, using six screws. If you choose to use glass panels in the doors, it’s best to have your shelves in fixed positions behind the middle rails. Make up a pair of ledger strips and screw them into place. I chose all black hardware, including the exposed screws.
Finish the Door
Using a ⅜” rabbeting bit in your router table, remove the inside lip in the three openings in the door. Use a sharp chisel to square the corners. If you are not cutting your own glass, take the entire door to your local glass shop and have them cut the pieces to fit. The glass panels are held in place with ¼” wooden strips that are attached with small black screws. It is much easier to hang the door before you mount the glass. I used no-mortise hinges from Lee Valley which meant that there was a 116″ gap around the entire door. As the door was slightly oversized by design, I trimmed off the excess with the table saw and a radial arm saw. Hang the door and install the glass. Fit the handle, and a door catch.
I like to use magnetic catches with a countersunk rare earth magnet installed in the door that lines up with a screw on the top shelf.
Sand any rough edges and apply a final coat of Watco oil to the entire piece followed with two or three coats of wax.
Crown moulding
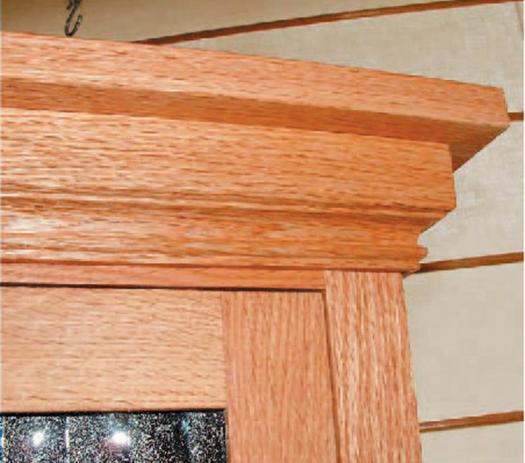
Bottom moulding

Magnetic catch
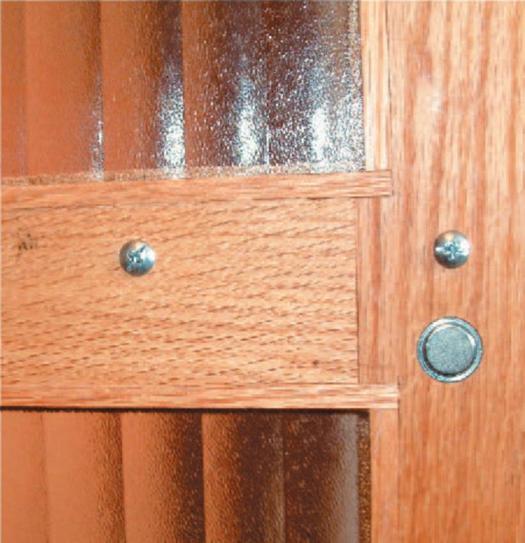
Illustration by Mike Del Rizzo