PROJECT
Build a triple router table

Chris Wong

Find more Shop projects projects
Router tables are useful tools to have around, but they don’t always need to be big and fancy. This bare-bones router table is quick to set up and takes care of a few standard profiles often used in your shop.
I own eight electric routers and of those, three are less user-friendly than the others so they are largely unused. To make better use of those routers, I decided to set up a profile bit in each router and leave it set up that way so if I wanted to rout a 1/4″ round-over, I could simply grab that router and rout the profile without having to install and precisely set the height. It didn’t really work, because quite often the workpieces I needed to rout were small and more suited for a table-mounted router.
Build a triple router table
The design
To be space-efficient, I decided to crowd my three rarely used routers – a fixed-base D-handle Makita router, a table-friendly Freud kit router and a Porter Cable trim router – into one benchtop router table that I could pull out when needed and stow away afterwards. When selecting routers, keep in mind that ones with removable motors, or above-table bit change capability, make installing and removing bits easier without needing to unbolt the entire router from the table.
Each router was set up with a specific router bit – two round-over bits and a chamfer bit. I planned to install a chamfer bit in the kit router because it allows easy height adjustments so I can adjust between small and large chamfers. The 1/16″ and 1/4″ round-over bits would be installed and precisely set in the other two routers, which are difficult to adjust when installed in a table. In use, I realized that a double-bearing flush trim bit was more useful to me than the chamfer bit. Everyone’s situation is different, so make your choice depending on the type of work you do and what routing operations you often require.
You could use more trim routers for a more compact router table, or more routers that are easy to adjust or change bits for a more versatile, but less convenient, table. Using more routers requires a larger table and results in less room to maneuver around each bit.
The table top
I started by figuring out what size to make the tabletop by crowding the three routers together, keeping in mind what adjustments and switches needed to be accessible. Then I estimated how much table space I wanted in front of and on either side of each router. I settled with a tabletop that was 20″ × 16″.
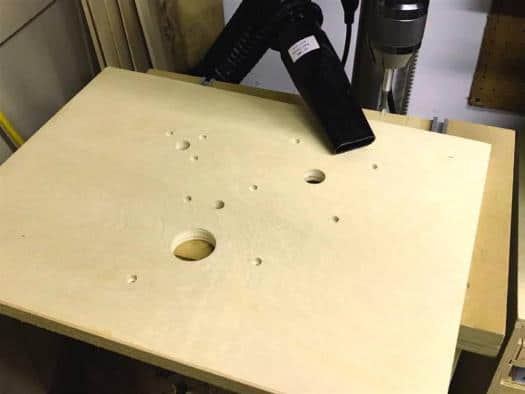
I selected a piece of 3/4″ plywood for my top and carefully laid out the position of the bolt holes and drilled and counterbored them. The bolts that came with the routers were not long enough to go through the table but purchasing the sizes I needed wasn’t hard. I also drilled a hole for the above-the-table-adjuster that the Freud router uses, and some 1/4″-20 threaded insert nuts to allow the addition of a starter pin.
To break the edges, I installed a 1/4″ round-over bit in my main router table for what may have been the last time.
I made the simple starter pin from a piece of scrap hardwood. First, I drilled a 1/4″ hole in the centre and slid a bolt through. I tightened a nut on the opposite side, then clamped the threaded end of the bolt in a three-jaw chuck installed in my lathe and turned the wood round. Finally, I removed the nut and secured the wood on the bolt with a bit of cyanoacrylate glue (epoxy would also be a good choice). My starter pin is about 5/8″ in diameter and it’s easy to install and remove without tools.
The base and on/off switches
The base needed to be large enough to provide stability, but small enough to allow a secure grip on the edges of the table when carrying. It also needed to be tall enough to keep the router motors and their cords off the bench top. I lowered the router motors to their lowest position and added a half inch and made my base that tall, which ended up 10″. My base consisted of two “U” shapes to allow access to the routers. I simply cut plywood to size and joined it with pocket screws. To permit safe, stable use, I cut 1″ notches in the base to fit over the top beams of my sawhorses. I used three pocket screws to attach each side of the base to the top.
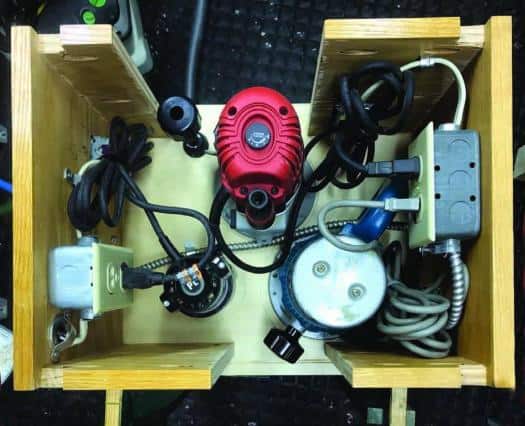
With multiple routers crammed under one table, a good system to get power to all and turn each on and off without confusion is vital. Heavy-duty power bars with individually switchable outlets are available, sold for DJ booths and computer server racks. If you use one of these, make sure you label the switches clearly so you know which router each switch operates. I elected to run separate switches for power outlets, with a switch in front of each router to avoid any confusion.
Still, I labelled each switch and outlet pair with a different colour of paint for future reference. It might be a good idea to mark the router each switch operates on the tabletop as well.
Once the routers were installed, I secured all the cords with cable ties so they were all contained within the router table. To further reduce cords, I recessed the male plug in the side of the router table base and simply bring an extension cord to it when I use the router table. In my shop, most portable power tools are energized by the ceiling-mounted cable reel in the centre of the shop.
Finishing and details
To store the tool to adjust the Freud router from above the table, I installed a 1/4″ diameter × 1/2″ long rare earth magnet in the underside of the table next to the router.
For most shop projects, I usually skip any sort of finish, but since the router table top will see significant usage, I elected to apply a finish. Any film finish, or even paste wax, would be helpful. I chose to apply four coats of thin CA glue as a finish. I suspect that this finish will be plenty durable for the use it will see. Another good option would be plastic laminate.
Chris Wong is a sculptural woodworker who appreciates a good edge profile but is often too impatient to make test cuts to dial in a setting. He now has his optimal router setup… or so he thinks.
Photos by Chris Wong
Careful Layout
If the routers are too close together, they may be hard to operate and use. But if they’re too far away, this portable router table may become too large and unwieldy to easily set up and store.
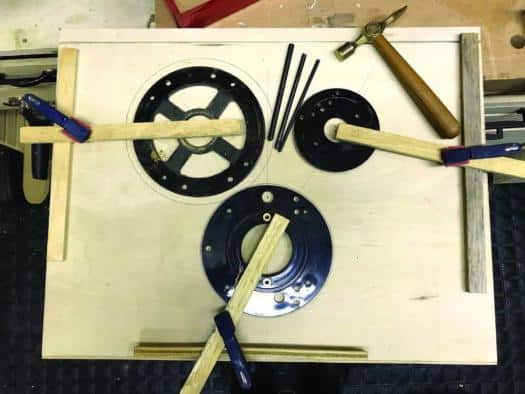
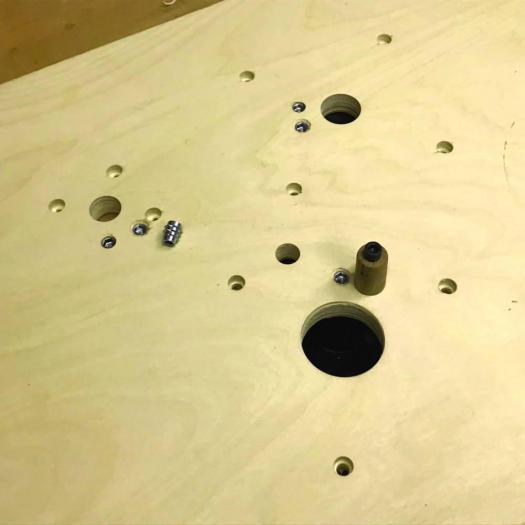
Accurate Holes
To hold all the routers in place, Wong drilled bolt clearance holes and countersunk them. You will likely have to purchase longer bolts to hold your routers in place, which are easy to find at most hardware stores.
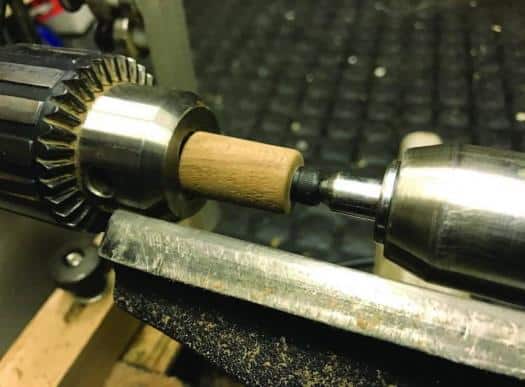
Starter Pin
Wong made a wood starter pin to assist him with starting cuts. He can press the workpiece against the pin, then slowly rotate it into the spinning bit to start a cut.
Threaded Insert Nuts
Holes for threaded insert nuts were drilled near the location of each of the three router bits. Wong can easily and quickly move the starter pin to whichever location he wants to work on.
Keep Things Steady
Although everyone must come up with an approach that will work for them, Wong cut notches into the underside of the base at the four corners. These four notches accepted the upper rails of his sawhorses and help keep the router table stable when in use.
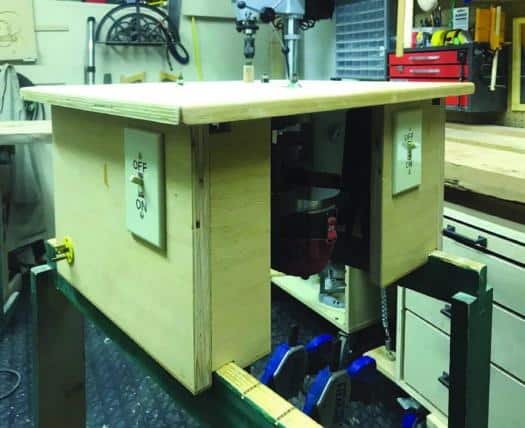
Under the Hood
Although it’s busy under the router table’s top, Wong kept cords neat and tidy. Notice the simple pocket hole screw joinery at the insides of the four corners.