PROJECT
Build a modern planter

Rob Brown

Find more Outdoor projects
The simple lines of this planter will suit just about any yard, though you can slightly modify the look depending on the finish you apply.
An attractive wooden planter for your yard can be a good way to highlight a combination of colourful flowers. A nice, simple planter is a great project for woodworkers of all skill levels and will allow you to display your work to your neighbours.
There are a few general approaches on how to use a wooden planter.
One option is to build it, fill it with soil, plant the flowers and enjoy. The problem with this approach is the soil may eventually seep out any cracks or gaps, and the wood will weather or rot quickly, making the planter look less “modern” and more “country” before you know it. If that’s the look you’re after, go for it.
A second approach is to purchase a rigid plastic liner and build your wooden planter around it. It’s best to aim to have the top of the wooden planter finish just above the top of the liner for aesthetic reasons. Soil and moisture will stay away from the wood and the planter will look newer for longer.
A third option is to place plastic or terra cotta pots directly in the planter. In this case, it’s also best to build the planter so its upper edge is just above the height of the pots.
A fourth option, and the one I chose, is to make the planter then line it with a layer of flexible plastic to keep soil in and moisture away from the wood. If you do it carefully, you could use anything from vapor barrier to a garbage bag to line the planter. As long as the gaps between the wood are narrow and the plastic doesn’t protrude above the top of the planter it will look great.
No matter what approach you take, ensure water has a way to drain out of the planter by lining up the holes in the base of the planter with the holes in whatever type of liner you choose.
With all of this in mind, you may want to adjust the size of this planter to fit the type of liner you decide on.
Build a modern planter
Start with a 2×4
I made two planters, both the same size. While they were both made from cedar 2×4 material, one length was knotty and one was mostly clear. Not surprisingly, the knotty one looks more rustic than the clear cedar planter. In both cases, the process to make the planter was identical. I added some milk paint to the knotty planter, which suited it.
I’ll talk more about that later.
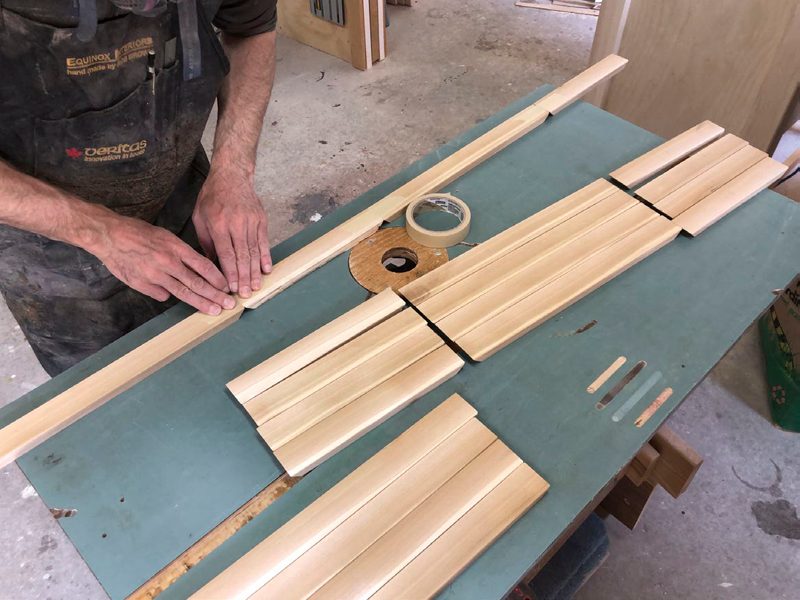
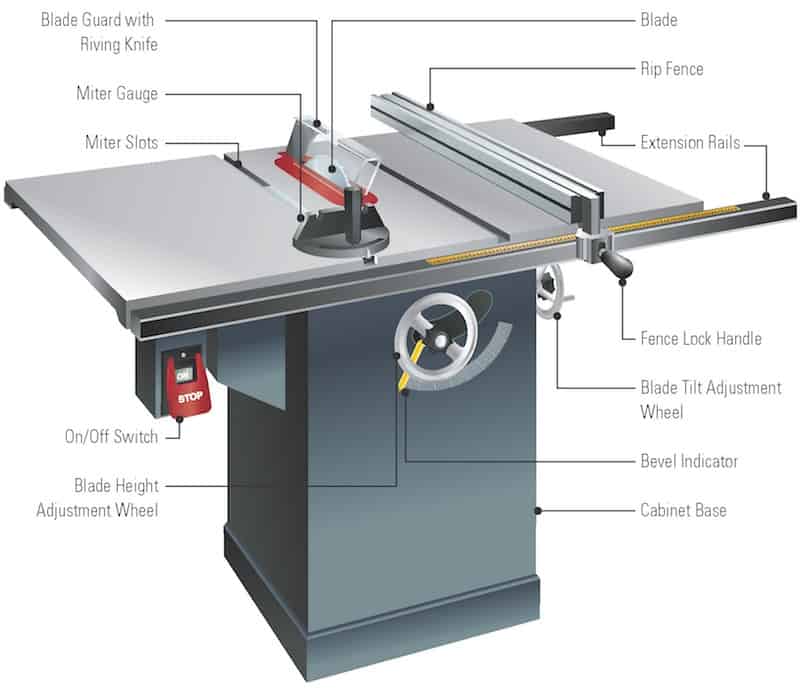
I set the rip fence to about 5/8″ and ripped off one strip of the 2×4. I then moved the rip fence in to make cuts at 1/2″ wide. Removing a first strip allowed me to rotate the piece end-for-end and remove the rounded edges on the first strip. I then ripped my lengths of 1/2″ wide material from the 2×4.
Because the pieces to make the planter are relatively short, I was able to find all the parts I needed while removing some of the smaller knots from the clearer blank. I then cut enough parts to rough length.
Mitre the ends
With my table saw blade tilted to 45°, I used my mitre gauge to crosscut the parts to length so they had mitres on both ends. Ten short pieces and 10 long pieces make up each planter.
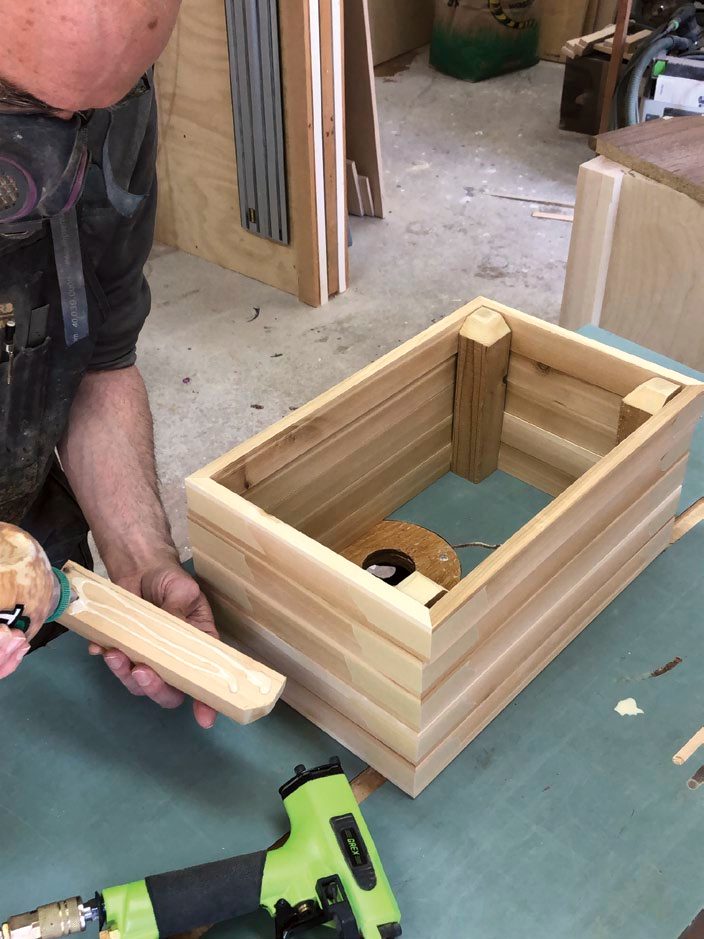
Corner blocks
Machine the four corner blocks to finished dimension then add a large chamfer to the two inner top edges. I used my mitre gauge and chamfered them on the table saw with the blade tilted at 45°.
Add tape and wrap them up
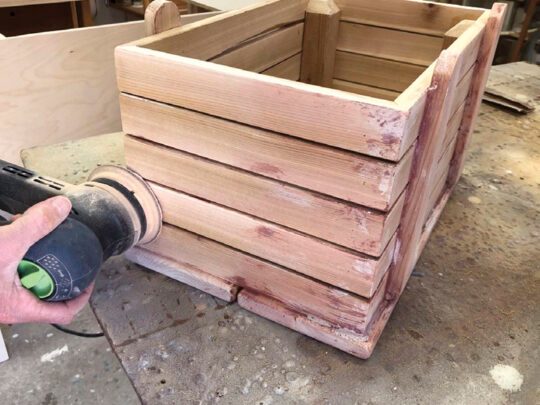
Ease the edges of each of the parts with a few passes of a block plane. I didn’t spend any time sanding the parts, as the visible faces and edges weren’t too rough, and I didn’t mind the surface they had from the saw. It’s also an exterior project that doesn’t need to look as fine as an interior project.
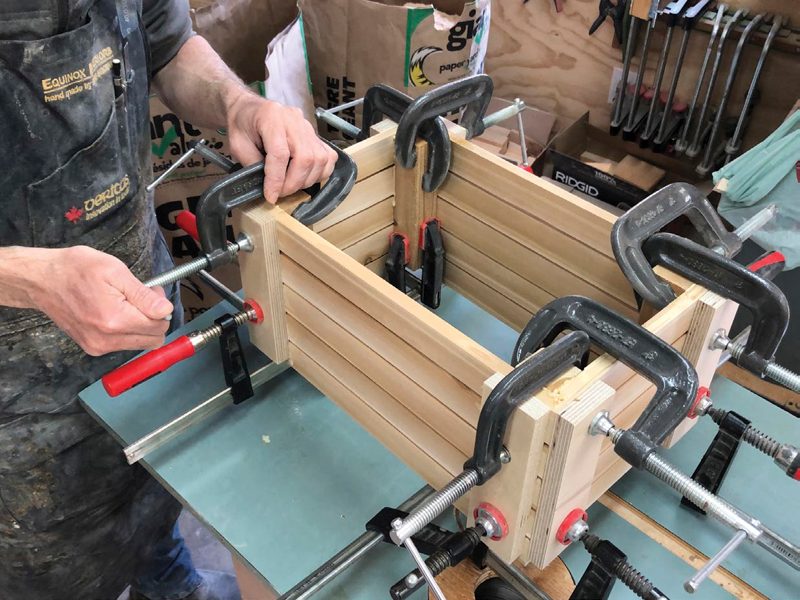
While assembling the first planter I laid the parts out end-for-end, so each group of four had a long-short-long-short pattern. Masking tape across the three mating joints keeps them together and acts as a hinge until the glue dries. With the five groups taped and ready for glue, I flipped them face down, applied glue to the first foursome, wrapped them together, taped their final end, and then brad nailed the four corner blocks in place. The trouble with this method is that after about three levels of slats were assembled and fixed to the four corner blocks it was obvious the corner blocks weren’t straight. I needed a new approach.
For the second planter box I got organized worked quickly and efficiently. The plan was to glue and tape the five layers, then lay them on top of each other like they would be when assembled, add some glue to the corner blocks and use a brad nailer to lightly secure everything in place. Because I wanted a gap of about 1/8″ between the layers I used #8 screws as spacers between each layer. Alternatively, you could use 1/8″ strips of wood between each layer.
Working quickly, I glued and wrapped together each of the five layers, brought the four glued corner blocks in place and added a brad nail in the lower layer, into the corner blocks. I then used a few screws to create the gaps between the lower and second layer and brad nailed the second layer in place. Working upwards, I added one brad nail in each of the four corners of each layer.
At this stage I used a few cauls and clamps to bring each corner together nicely. A little bit of glue squeeze-out on the inside of the planter let me know I had enough glue on each corner block. The entire assembly took me just over 10 minutes. Much longer than about 15 minutes and the glue would start to cure. Having said that, every glue is a bit different, so choosing a slower setting glue is advantageous here. Another option is using 24-hour epoxy, though that can get messy.
Time for a bottom
A few lengths of 1×6 cedar are used for the bottom. Leave a gap of about 1/4″ between the boards. The ends of the boards can be heavily eased before assembly. I did this with a block plane and some rough sandpaper.
After applying glue to the bottom edges of the lower mitred layer, add a few brad nails to position the bottom planks. Bore a pilot hole and countersink through each bottom plank, up into each corner block, then add screws.
Vertical slats
The vertical slats are mostly for decoration, though they do provide some added strength to the planters. Made of the same material used for the horizontal slats, they have a slight radius on their top ends and a small chamfer on their lower ends. Once cut to size, add glue and clamp them in place. A brad nail or two will help keep them from moving while setting the clamps in place. Just be sure to sand off any glue that seeped out of the mitred corner joints during assembly, as it will be harder to remove once the vertical slats are glued into place.
A few glue blocks on the inside, lower corner, between the horizontal slats and the bottom pieces, will help strengthen the whole assembly. Once the glue blocks are dry you can bore a few holes in the bottom panels to ensure excess water can drain away from the planter, and not damage plant roots or cause the wooden planter to rot.
Apply a finish
An exterior finish has to stand up to sun and moisture. There are many options, but I chose a penetrating oil. I find a film finish, like an exterior varnish or polyurethane, looks fantastic for the first year or two but eventually peels off if you don’t sand the wood and reapply the finish.
I wiped on two coats of tung oil, leaving it wet for about 10 minutes so it could soak in, then wiped off any excess. In the future I can just reapply a coat every year or so to keep the look fairly fresh. It will age, of course, but it won’t require sanding or stripping.
In order to keep the planter off the ground I added a 5mm press-in bumper to each corner. You could even glue a thin piece of wood near the four corners to keep the majority of the planter off the ground so it doesn’t soak up any extra water.
Finishing Your Planter for a Different Look
I enjoy working with milk paint as it brings a whole new level to the finish of a project. One of the things milk paint is great at is adding an aged appearance to a project. Unlike latex paint, milk paint can be removed with sandpaper to create a rustic look. You can even layer complementary colours of milk paint on top of one another so when you hit it with sandpaper all of the colours are visible. You can also put it on thinly and remove the majority of it, leaving the milk paint just in the recesses. The number of different approaches to applying milk paint for an aged look are endless. Play around to get the look you want.
I decided to use milk paint on both planters. I wanted to see what effect I could create by adding different colours.
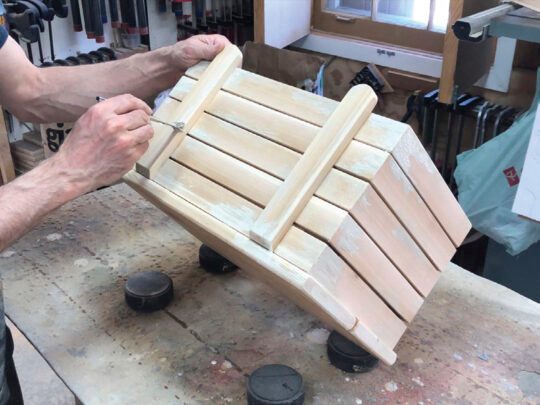
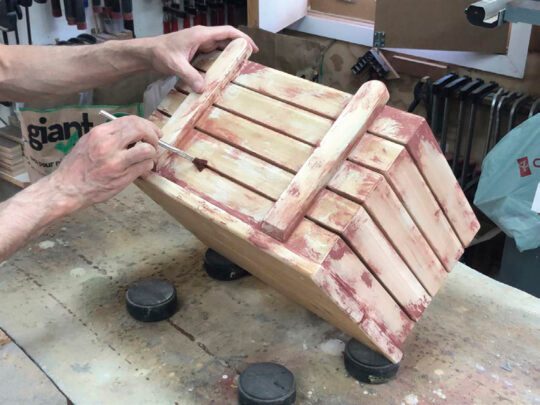
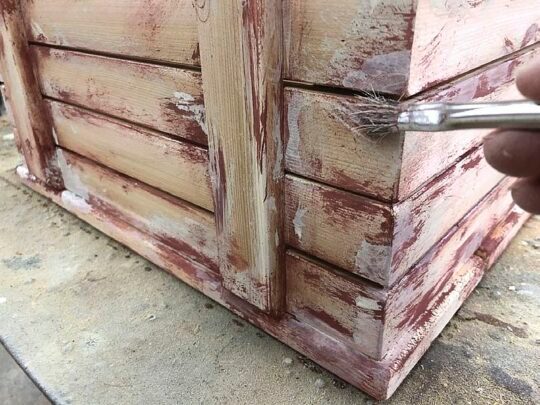
I started by applying a bit of white on some areas of the planters. Once it was dry, I applied a rusty brown over some of the white areas on the knotty planter. Once that was dry, I sanded the paint to see how the aged effect was coming along. I decided to apply just a bit more white over some of the rusty brown to give a more layered effect.
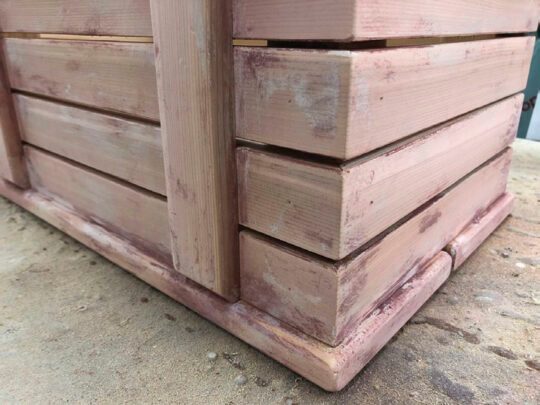
When the paint was dry, I used 120 grit sandpaper to smooth the edges of the milk paint and ease the overall look. In some areas I removed most of the paint I applied. I played around until I was happy with the look. At this point, I could even apply more paint if I wanted. Even introducing additional colours wouldn’t be a problem. Layer it on in any way you’d like.
The topcoat
I first applied a coat of tung oil to the knotty planter. The tung oil brings out the colours of the milk paint and makes the whole look pop a bit more.
After applying the first coat of milk paint on the clear cedar planter I tried to imagine what it would look like when it was finished. However, I liked the simpler, more modern look of the clear cedar, and found the milk paint competed with its simple form and grain. I decided to sand the milk paint off, then applied a couple coats of tung oil to it. Although I wasn’t able to get every last bit of milk paint off in some of the recesses, it was fine.
Now I had two distinctly different planters even though the construction process was identical. We placed the modern planter in the front yard, and the rustic planter in the backyard, as the home and front yard lend itself to a more modern look.
Both approaches resulted in great looking planter boxes.
Photos by Rob Brown
Remove the Knots
Brown used cedar that was nearly clear for one of his planters, and removed the knots when cutting the mitres on the ends of the slats. Leaving the knots in would provide you with a rustic planter and make better use of your material.

Masking Tape Is Magic
Masking tape applied across the mitred joints will hold the joints together once they're glued and wrapped together. Brown joined the five individual horizontal sections together with masking tape, then prepared to add the glue and assemble the planter box in an efficient manner.
Simple Spacers
Working quickly, Brown reached for some #8 screws to act as spacers. A few pieces of 1/8" thick wood might have been a better approach.

Almost There
Working quickly, Brown tapes up the final joint of the glued slat sections before bringing them together and attaching them all to the corner posts.

Glue the Corner Posts
The final corner post gets some glue before the five sections get pinned and clamped to them.
Clamp It All Up
Clamps and cauls bring the five slat sections and four corner posts together.
Vertical Pieces
After marking where the glue should be, Brown pins the vertical pieces in place and clamps them.
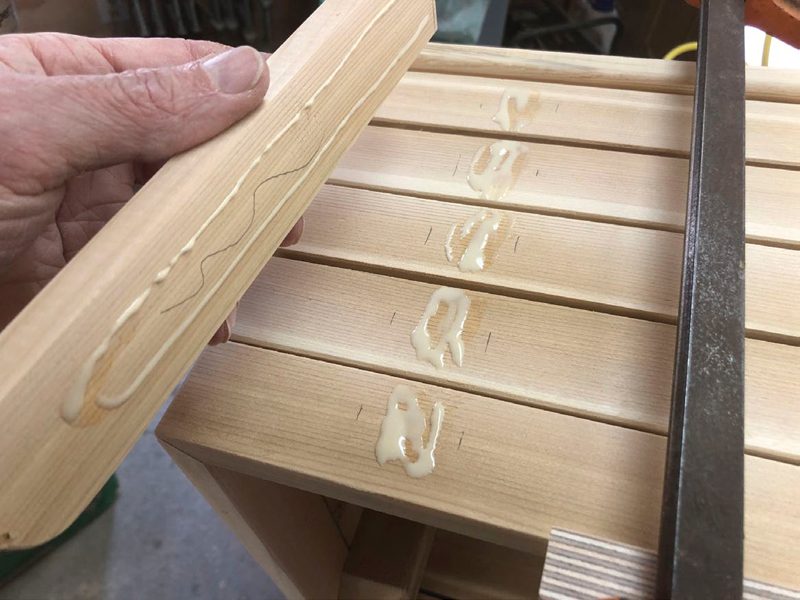
Illustration by Len Churchill


Hi! Rob: Given that cedar was used for the Planter, it should last for many years. One thing I’d like to mention is that Cedar particles can be hazardous to your lungs. Therefore, a mask should be worn during the cutting and sanding phases. Thanks!
Al MacInnis, Tremont, NS sends.