PROJECT
Auxiliary drill press table

Rick Campbell

Find more Shop projects projects
Adding an auxiliary table to expand the work surface and accommodate accessories can enhance the functionality of the drill press and make life in the shop more enjoyable.
The auxiliary table I created for my drill press is made primarily from inexpensive medium-density fibreboard (MDF), clad with a durable layer of plastic laminate, although plywood is also a good option. The table features disposable wood inserts that can be popped out and replaced when they become too riddled with holes. It also has an adjustable fence system that can accommodate a multitude of useful accessories, such as fence stops and hold-down clamps. After building this handy add-on for your drill press, you’re going to wonder how you ever got along without it.
Auxiliary drill press table
Table Talk
The dimensions provided for this project are based on the requirements for a standard 14″ drill press. The capacity listed for any drill press is determined by doubling the distance between the center of the chuck and the column; for me, it is 7″. If the throat of your drill press is a different size, you will need to compensate accordingly.
Cut out a 15″ wide by 23-1/2″ long MDF panel that will serve as the table substrate. Use a compass to lay out 1-1/2″-radius curves on all four corners, then fire up the jigsaw or bandsaw to make those cuts. A quick once-over with a sanding block or on an edge sander will take care of the rough edges left behind by the saw blade. In addition to giving the design a touch of pizzazz, these rounded corners will prevent unpleasant jabs in the side every time you pass by. Lay out and cut a curved recess on the back edge that will provide clearance for the drill press column.
Cover the top surface of the substrate with plastic laminate. I purchase my laminate from a local countertop manufacturer who sells his off-cuts for a bargain price. At one time you could purchase small laminate handy panels from the major lumber stores, but these are becoming harder to find. Begin by cutting out an oversized piece of laminate that will overhang the MDF panel by roughly 1/2″ on all four sides. The table-saw and a standard combination blade is all that’s required to cut this material to size. If you find the thin laminate slips beneath your fence, clamp a zero-clearance board in place to block the narrow gap.
The laminate is bonded to the substrate using contact cement. I prefer the water-soluble variety because it’s easier to spread, and clean-up is a breeze. After brushing on an even coat of adhesive to both mating surfaces, and allowing the glue to set up, lay the laminate in place on the MDF panel such that the edges overhang evenly on all sides. Take your time with the alignment because you’ll only have one opportunity to get it right. Press the laminate firmly into place with the palm of your hand, a wood block with rounded edge, or a J-roller if you happen to have one in the shop. Dust off your router and install a bearing-guided flush trim bit to remove the excess material from the edges.
Grooves
Now that the laminate has been applied, you can machine the parallel slots that will receive the T-tracks used to mount the adjustable fence system. These grooves are 3/4″ wide and are positioned 4″ from each end of the panel. Rather than relying on a ruler to set the height of the dado blade when you prepare for this procedure, use a piece of your T-track to serve as a precise gauge. After completing a test cut in scrap to check the width and depth, run the panel over the blade to mill the two slots. Now cut a couple of sections of T-track to length with a hacksaw and install the parts in the slots with a series of #5 screws.
Insert Pocket
You need to create a square recess in the middle of the table’s surface to accommodate the replaceable 1/2″ thick plywood drilling inserts. To take care of this task you will need a template and a hand-held router equipped with a guide collar and a 1/4″ diameter straight bit. Start by digging through the scrap pile to find a piece of 3/4″ thick MDF or plywood that can be used as template material. A panel about 15″ square should do the trick. Lay out a box in the center of the panel with a T-square and a pencil. The dimensions need to be 4″ square plus an offset allowance equal to the wall thickness of the guide bushing you will be using and whatever gap there is between the bushing and the router bit.
Two Options
There are two ways to create the cavity in the template: one is simple, but less precise, while the other is more complex, but much more accurate. The simple, less accurate method is to drill a hole inside the box to provide access for a jigsaw blade, then cut carefully along the layout lines. When you’re done, grab a sanding block or a file to make the edges as flat and smooth as possible. Take some extra time to get it just right because any imperfections will be faithfully reproduced on your workpiece.
The other option also starts by drilling a hole in the middle of the box, then using a jigsaw to remove all but the last 1/8 ” of material. Head over to the tablesaw, set the fence to remove the extra 1/8 ” of material on one side of the lines and lower the blade until it is completely under the table saw’s surface. Position the workpiece so the cavity of the template is over the blade and raise the blade until it exits the upper surface of the material. Make sure to hold the template securely while doing this. You could also clamp the workpiece in place, just to be sure. You can either raise the blade up until it cuts most of the length of the line, or move the workpiece forward, as you normally do on a table saw, until the cut has been made. Repeat the process until all four sides are cut accurately. If the corners aren’t perfect, you can remove any extra material with a flush-cut handsaw.
Rout the Recess
With the template complete, position it on the table panel. For my 14″ drill press, the correct location of the opening is 4-3/4″ from the front edge. Once you’re completely satisfied with the alignment, secure the template in place with clamps. After installing a 1/4″ diameter straight bit and a guide collar in your router, you’re ready to make some sawdust. To avoid over-burdening the router and bit, I recommend executing a series of progressively deeper passes – about 1/8 ” at a time. I always start by making a clockwise run with the bushing traveling directly against the side of the template, then move towards the center of the area, removing the rest of the material. After the first pass, continue to lower the bit in small increments until the recess matches the exact thickness of your insert material. When the template is finally removed, you should be left with a 4″ square pocket that has 1/8 ” radius curves in the corners. Before you attempt to fit an insert in the opening, drill a hole in the middle with a 1″ diameter spade bit. This will allow access from the bottom to tap the insert loose if the fit ends up being too tight. To make a stack of inserts, cut out 4″ squares from 1/2″ thick plywood and round the corners with your stationery sander.
Build a Base
Your next assignment is to make an MDF base that will connect the auxiliary table to the drill press. The purpose of the base is to add another layer of thickness to the bottom of the table panel. The extra material is needed to accommodate the mounting screws. I wanted my base to look good, so I cut out a 12″ diameter circle to match the shape of the metal table on my drill press. You may require a different configuration to correspond with the profile of your drill press table. Regardless of the geometry and dimensions you decide to go with, drill a 1″ diameter hole in the center to align with the passageway you created earlier in the table panel. Before installing the base, I wrapped the edges of both the base and table with narrow strips of plastic laminate to give them a finished look and add durability. If you do decide to apply the edging, start by setting your saw fence to cut a bunch of 3/4″ wide laminate strips. You may as well make a few extras to use later on when we build the fence and accessories. Depending on the length of your laminate sheet, it may be necessary to lay a couple of strips end to end to reach around the entire perimeter of your parts. Just like the panel top, the strips are installed using contact cement, but this time there will be no excess material to trim from the edges. All that’s required here is a light pass with a sanding block to form a slight bevel. The bevel will help prevent you from catching the edge when you’re working with the fixture. After you install the strips around the edge of the tabletop, use a sharp utility knife and file to remove the material that covers the ends of the T-tracks. Once the edging has been applied, spread some glue on the base and clamp it in position to the underside of the table panel. Verify that the access holes are aligned before leaving the assembly to dry.
The Fence
The fence is L-shaped in cross-section, with separate panels forming the front and base. Begin by cutting out blanks for these parts from 3/4″ MDF, then round the outer corners with 1-1/2″ radius curves to match the appearance of the table panel. You also need to prepare a curved recess on the rear edge of the base to correspond with the cutout you prepared earlier that provides clearance for the drill press column. The easiest way to lay out this opening is to use the edge of the table panel as a template and rout it.
Now you can cover the front and rear surfaces of the face panel and the top surface of the base with plastic laminate. Like before, you will start with oversized pieces and trim the edges flush after the material is glued in place. When you cover the top of the base, set the laminate back 1/8 ” from the front edge to provide clearance for a rabbet joint that will make the connection between the base and face panel.
Once the surfaces are covered, you can mill a 3/4″ wide slot starting 3/4″ from the bottom edge to receive a section of T-track. The T-track will be used to mount the fence accessories. This is also the time to prepare the 1/8 ” deep x 3/4″ wide rabbet on the back of the face panel that will complete the connection with the base. The rabbet will add strength to the joint and will help with alignment during final assembly.
After you cut and install a section of T-track for the face panel, you will discover that the top corners protrude slightly from the curved ends of the fence. A few swipes with a metal file are all that’s required to bring the corners flush. Just be sure to do this before covering the edges with laminate to avoid scuffing the finished surfaces with the file.
When all this work is done, you’re finally ready to assemble the fence with glue and clamps. After the clamps are removed, wrap the edges with some of those spare laminate strips you cut earlier. You’re also ready to drill 1/4″ diameter holes in the base to receive the threaded knobs that will fasten the fence to the table. Mark the drilling locations with the fence situated on the tabletop to ensure the holes are aligned with the channel in the tracks. Insert the threaded shaft of a plastic knob in the holes and loosely secure T-nuts on the ends. Slide the T-nuts into the end of the channels to position the fence, then tighten the knobs to secure the assembly in place.
Accessorize
The variety of accessories you can create for the fence system is limited only by your ingenuity and imagination, but I’ll get you started with a pair of adjustable stops. You probably already guessed that these will be made from MDF and will be covered with plastic laminate. Cut a pair of 2-1/2″ wide by 5″ long blanks to size, then round one corner on each piece to match the fence profile. Apply a layer of plastic laminate to both sides and wrap the edges with more of your narrow laminate strips. Position the stops in front of the fence to mark the locations for the knob shafts, then drill away. Secure the stops to the fence with the same combination of knobs and T-nuts as before.
Installation
Your existing metal drill press tables will most likely have a configuration of holes or slots that can be used to mount accessories. Position the auxiliary table base on your drill press table and drill pilot holes for screws wherever you have access. Washers or wood shims on the ends of the screws will help ensure that you have a solid connection with the underside of the metal drill press table. After putting your new auxiliary table through its paces, begin thinking about other accessories you can add that will take the functionality of your drill press to the next level.
Photos by Mark Spowart
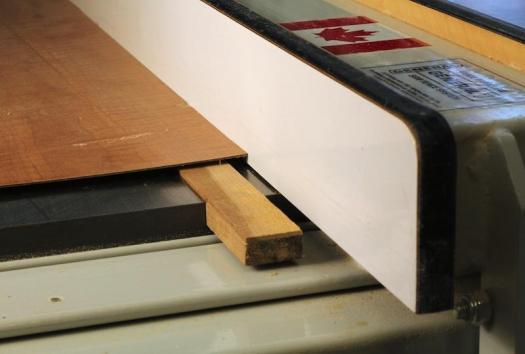
Working With Thin Material
Use a simple strip of wood with a small block glued to it to lift the reference edge of the plastic laminate so it doesn’t go underneath your table saw’s fence. (Photo by Rob Brown)
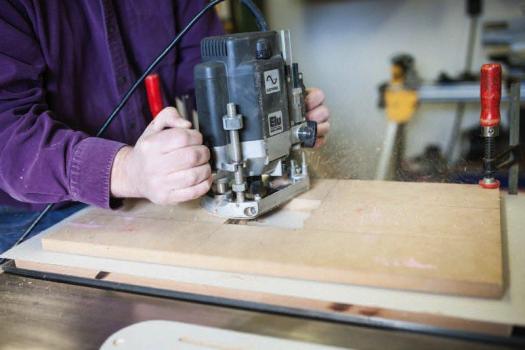
Rout the Recess
With the template secured to the table, use a router equipped with a guide bushing and straight bit to slowly create the cavity for the insert.
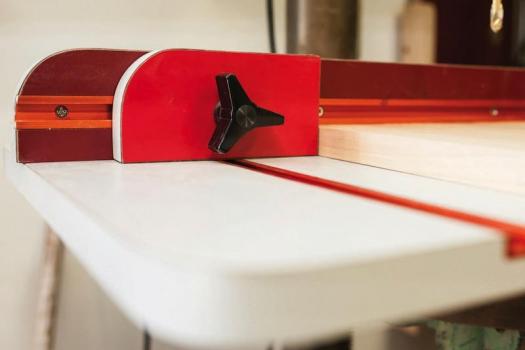
Adjustable Stops
Great for accurate, repeatable work, these stops are easy to make and use.
Ready for Drilling
Once the table has been secured to your drill press, add an insert and you’re ready for action.
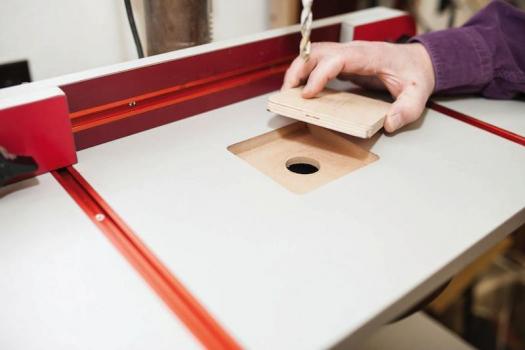
Illustration by Len Churchill


Hello Rick
I have just come home from hospital and while I was in there I purchased a new benchtop drill press. I am now looking around for plans for a table with fence and I like yours because of its simplicity.
One thing I have noticed on all the plans I have looked at is that no one includes a facility for measuring. I like the idea of having two rulers attached to the top of the fence measuring from the centre point out. That way you can slide your piece of wood either way to get a quick measure for drilling. What do you think of this as an addition to your plan?
regards
Daryl