FROM ROB'S BENCH
Marilyn Campbell: A Canadian epoxy wizard

Rob Brown

Blog for July 6, 2021
Last week I talked about epoxy and where it will take us in the coming years. Epoxy river tables and cutting boards are huge right now, and likely won’t disappear from your Instagram feed anytime soon. In the coming years I have a feeling epoxy will start to be used in many other ways, though.
Although epoxy currently plays a largely structural role in river tables, it might very well take on a more decorative role in the future. It could be shaped into some elaborate door / drawer pulls or maybe used as an inset into a door panel. Both of these options could be pierced and carved, or have texture added to them with a rotary tool or other carving tool. The sky is the limit with epoxy. Its pros are numerous: it has lots of structural strength; it can be formed into curves with the use of forms; it can be shaped with standard woodworking tools; and it’s available in many colours.
Marilyn Campbell
One of the most incredible Canadian makers I’m aware of is Marilyn Campbell, from Kincardine, Ontario. She’s a turner who uses wood and epoxy to make incredible vessels and other pieces of art. Generally speaking, she mostly uses woodworking techniques to complete her work, though I find her approach to dealing with epoxy fascinating, so that’s what I’m sharing with you here.
Last week I showed you one of Marilyn’s epoxy and holly vessels. Between the overall use of line and the pierced and textured epoxy, her work really stands out. I hadn’t a clue how she made these vessels, so I contacted her. She took the time to send me some images, take me through the process she uses to make these vessels and answer a bunch of my questions.
Start with a design
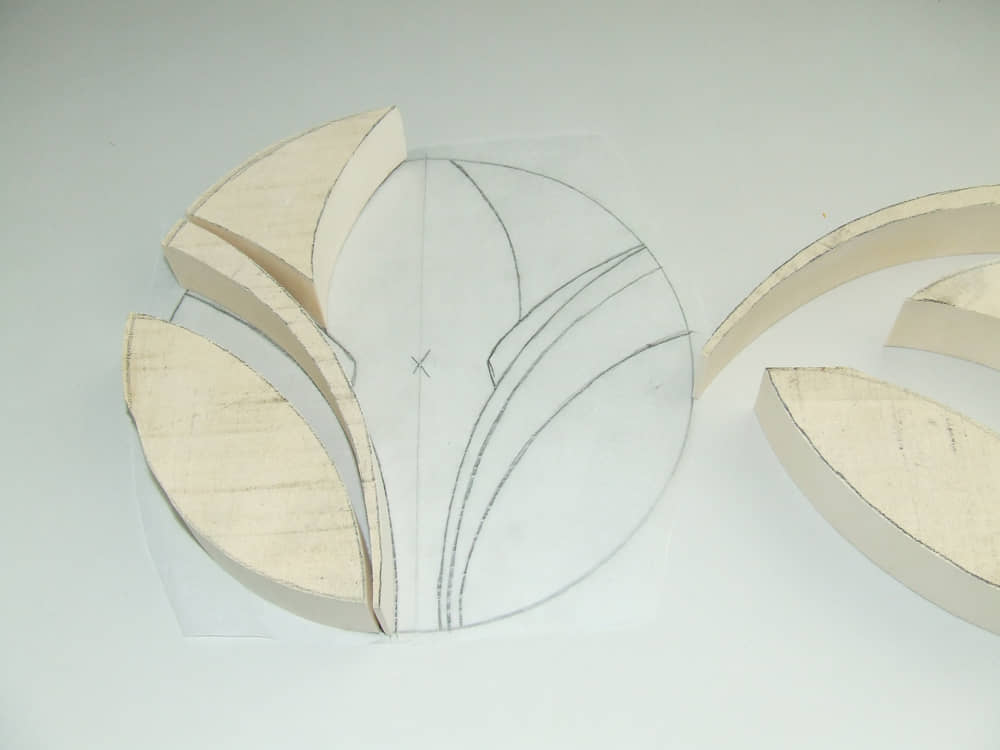
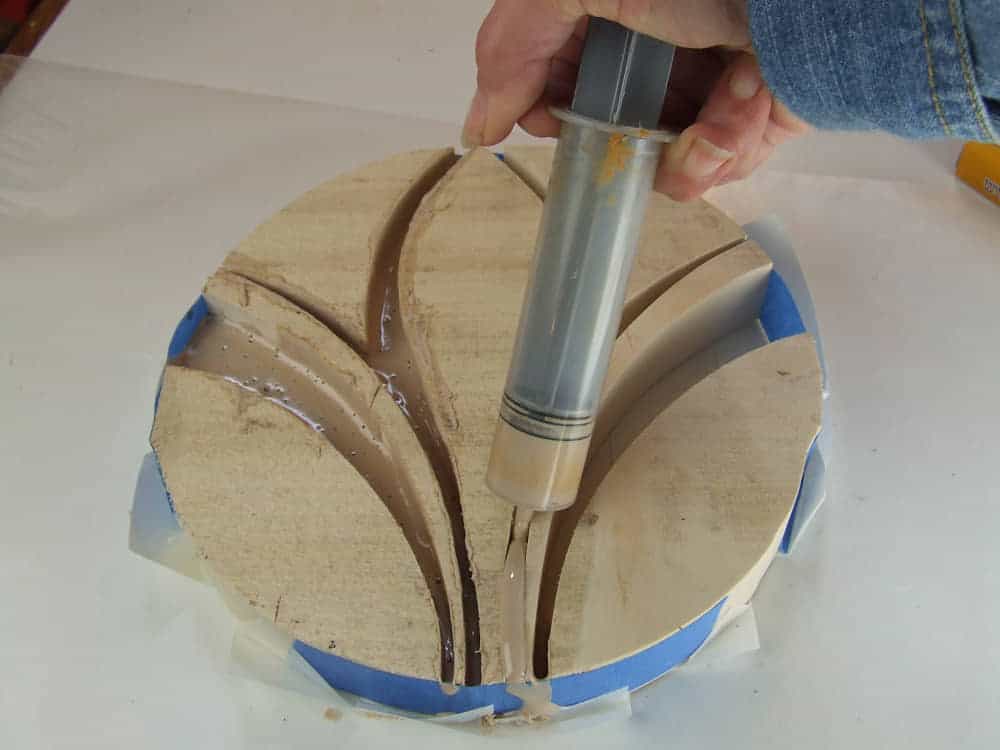
Marilyn starts by making a to-scale drawing of the vessel on paper. She then transfers these lines to a piece of wood (in this case, holly) and cuts the parts on a bandsaw. Some of these pieces will become part of the finished piece, while the areas she will fill with epoxy get discarded. She shapes these pieces of wood and smooths their edges so they match the template nicely. At this point she tapes the wood parts together, covers the bottom of them with double-sided tape and fills the voids with epoxy.
To the lathe
Once hardened, Marilyn turns the blank so it has a smooth double-curve on its face. I’m guessing the curve she uses has been refined with lots of experience over the years, as when the two halves of the vessel are cut from this blank they need to look attractive and form a natural-looking vessel.
If Marilyn’s going to add an overlay to the design, this is when she covers the blank in plastic food wrap and applies a thin layer of epoxy over the face of the blank. The food wrap acts as a release when the epoxy is dry. The next step is filed under the “don’t try this at home” section. With the thin layer of epoxy dry and held to the main blank mostly by cling wrap and a bit of tape, Marilyn uses a scraper to even out the outer surface of the thin overlay layer and trues up the outer edge. Eventually the overlay is removed, and a pair of grooves are added to the overlay. These grooves allow Marilyn to judge the thickness of the overlay as she further turns it. The overlay is now attached with just blue tape, and extreme care is taken. This piece doesn’t need to be perfect, as it’s only a relatively small percentage of this overlay that will actually be used in the finished piece. With the overlay complete and removed, Marilyn flips the main blank over and secures it in a vacuum chuck so she can turn the inner face of the vessel.
In order to turn the inner side of the main blank to final thickness, Marilyn drills a series of holes along the center of the blank, all to a similar, shallow depth. She then fills the holes with a different colour of epoxy so whenever she uncovers these holes she knows she’s very close to turning the piece to its final thickness.
With both the main section of the vessel, as well as the overlay, complete Marilyn heads to the bandsaw to cut the two halves of the vessel from the main section. The waste in the middle section gets discarded.
Adding details
Next, the edges of the two halves get fine-tuned. At this stage, the texture and pierced carving takes place. A selection of tools is used for these tasks. If any parts of the vessel are going to be painted, that’s completed now. On this piece, black acrylic paint was used to create a bold contrast with the nearly white holly. Black epoxy could be used, but Marilyn quickly realized the sanding dust from black epoxy works its way into the light-coloured holly, ruining the strong contrast. Assembly is next. Epoxy is used to fix the different parts together. A base is then made for the vessel.
If this process all sounds pretty complex, that’s because it is. I’m sure Marilyn could make these vessels in her sleep by now, but that doesn’t mean they’re easy. She came up with this approach to making these stunning vessels, and surely fine-tuned the process over time. Check out more of her work at MarilynCampbell.ca.
Have you seen any other unique or artistic ways to use epoxy? If so, please send me an email or comment at the bottom of this column. I’d love to hear about what Canadian makers (or international makers, for that matter) are doing with epoxy.
“Three Boats”
This series shows a lot of what Marilyn Campbell is known for — contrast, refined lines and texture in a split vessel turning. These pieces are made from wood and epoxy.
“Devil Within”
A purpleheart base supports a holly and epoxy resin vessel. The epoxy was painted.
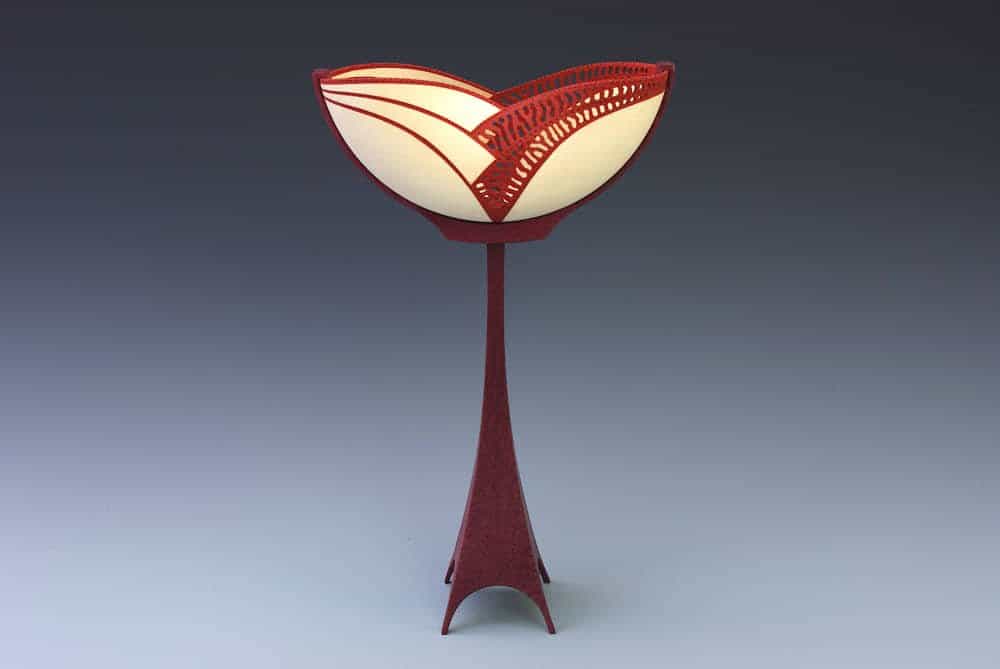
“The White Queen”
At almost 12″ tall, this is one of the taller pieces Marilyn has made. It’s made of holly, epoxy resin and black acrylic paint.
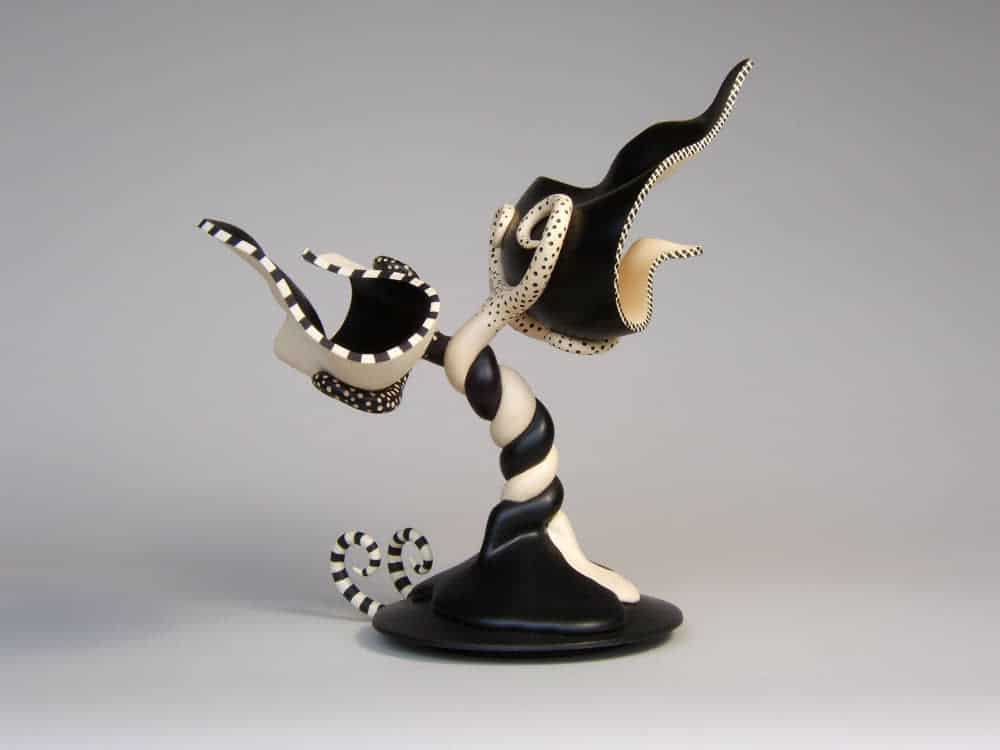
“I Have a Feeling We’re Not in Kansas”
I honestly don’t know how Marilyn made this piece. I couldn’t even guess, really!
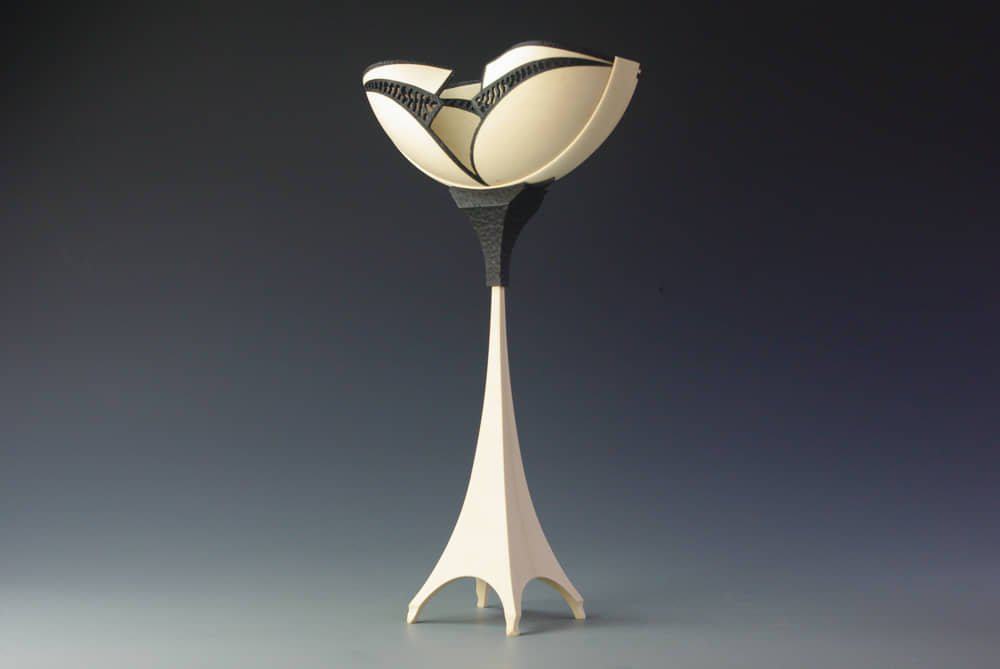
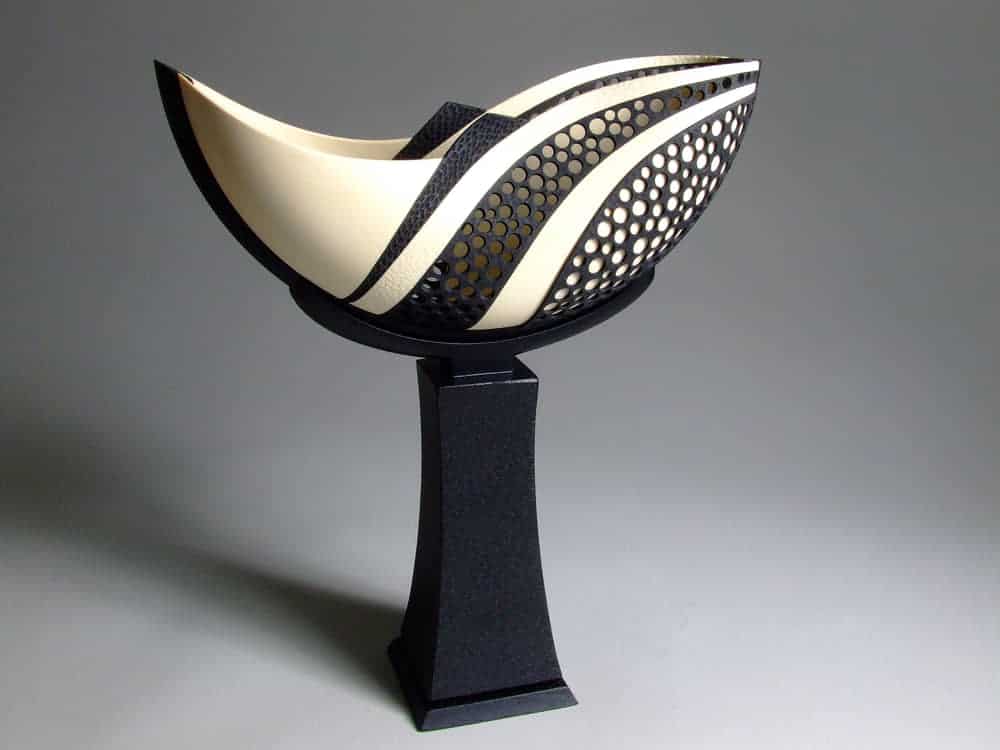
“Veiled Lady”
Marilyn sent me a series of photos that detail how she made this work of art that stands 9″ tall.
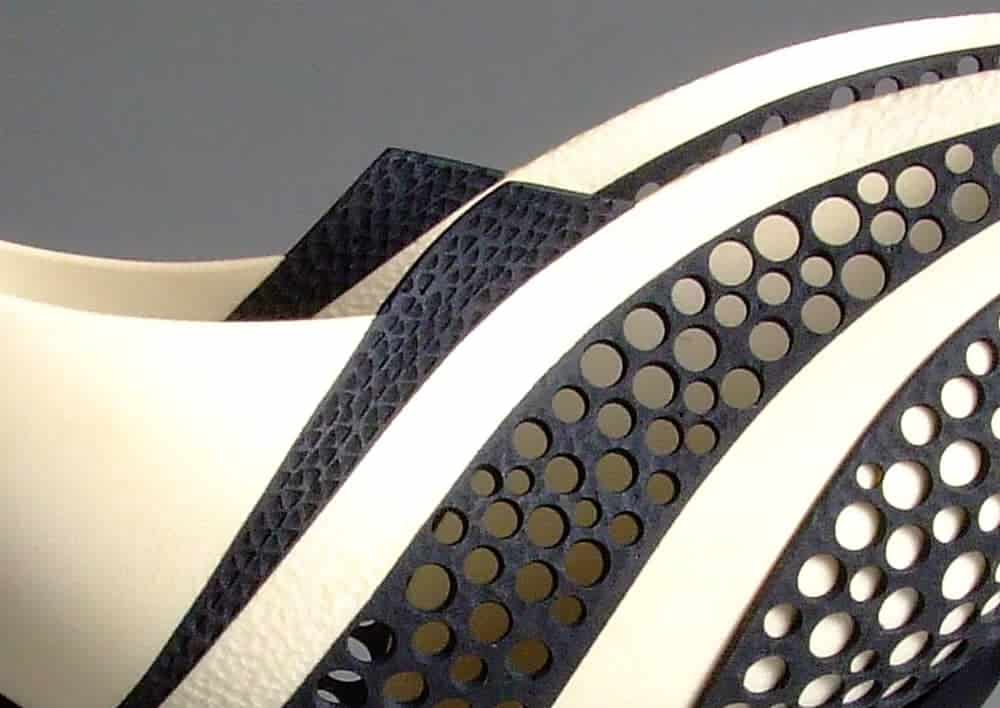
Take a Closer Look
Texture, pierced carving and so much more.
Start Cutting
Once the design is complete, Marilyn cuts the wood parts to size and shapes them.
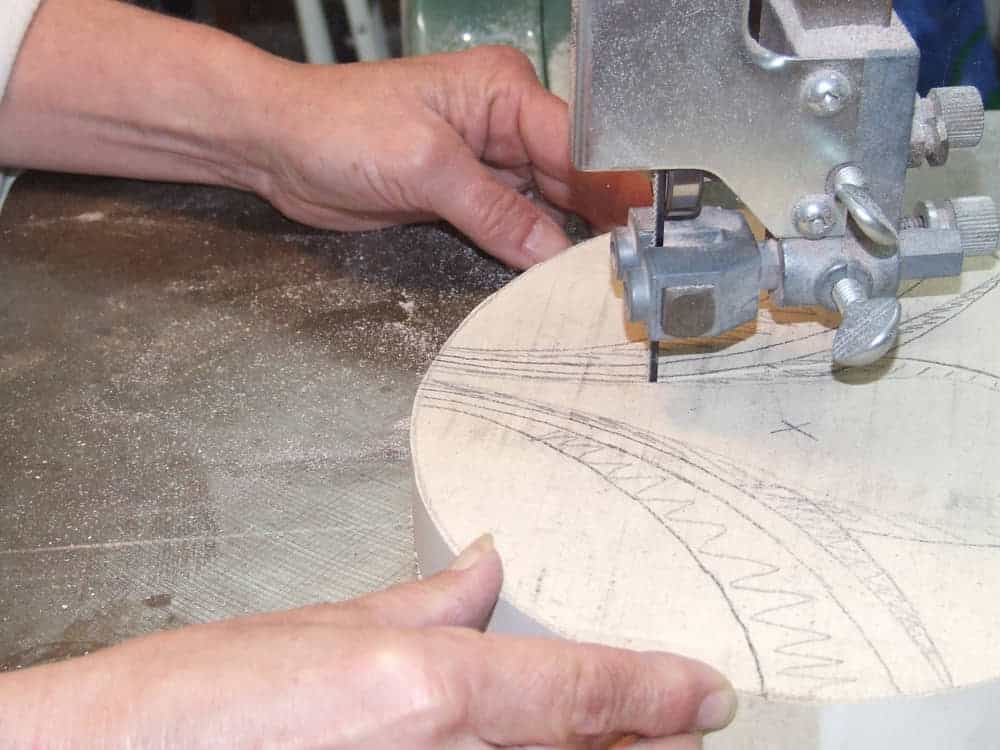
Match the Drawing –
The edges of the parts get sanded smoothed and placed on the drawing.
Add the Epoxy
When the wood parts are done and the parts are secured together with tape, Marilyn adds the epoxy resin.
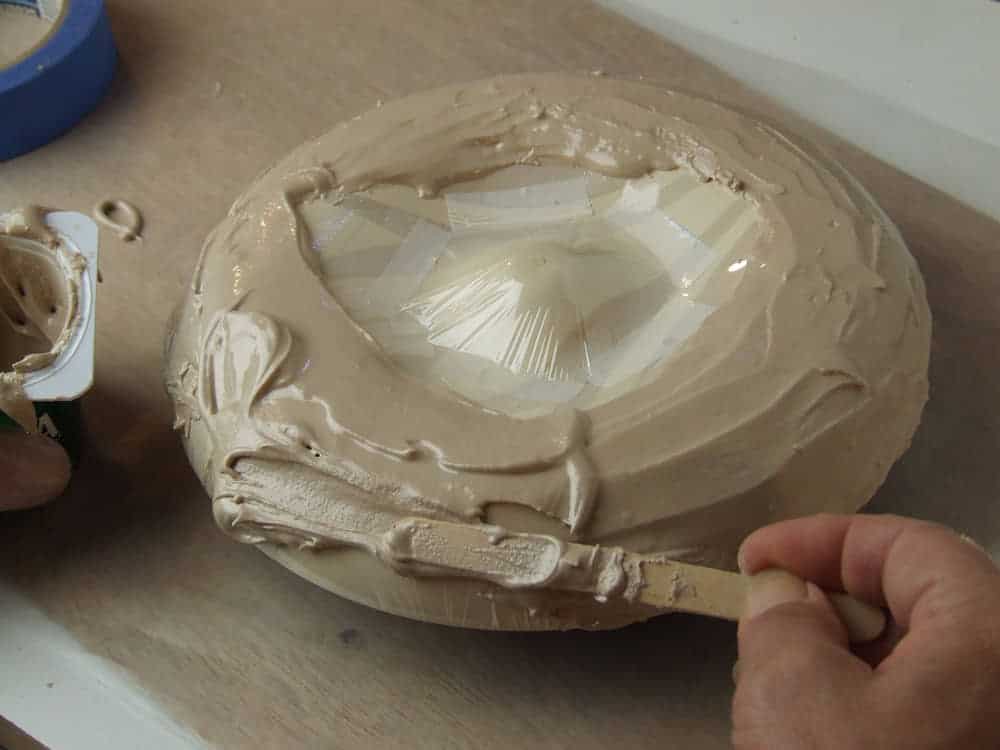
Make the Overlay
After turning the initial main blank, she removes the blank, covers it with plastic food wrap and applies thick epoxy over the blank. This creates the overlay the exact same shape as the main section of the piece. Marilyn doesn’t use an overlay in all of her vessels.
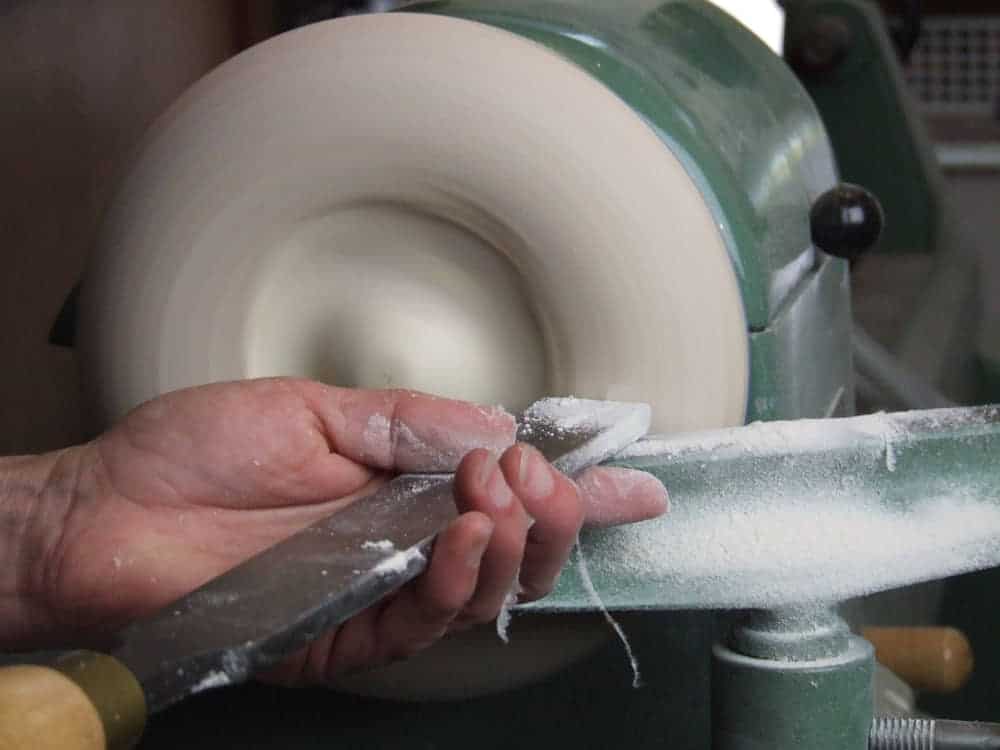
Turn the Overlay Smooth
Once it’s dry, the next step to shaping the overlay is to carefully scrape its face smooth. The thin overlay is only barely attached to the main section of the piece at this point and has to be worked carefully.
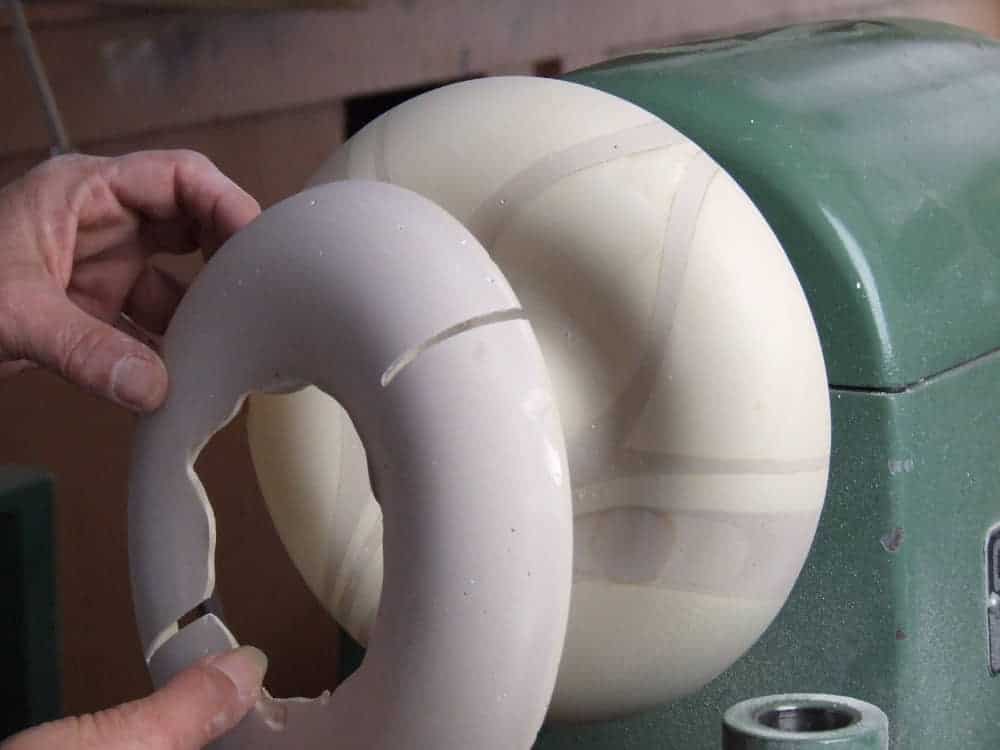
Two Slots
Marilyn removes the overlay, then adds a slot in either side of the overlay. This is so she can see how thick the overlay is while she turns it to its finished thickness. Notice how she cut one groove toward the outer diameter of the overlay and the other toward the inner diameter of the overlay. This will allow her to check the width of the entire overlay, while still keeping it strong.
Re-Attach the Overlay
By taping it back onto the main workpiece, Marilyn can further refine the overlay piece.
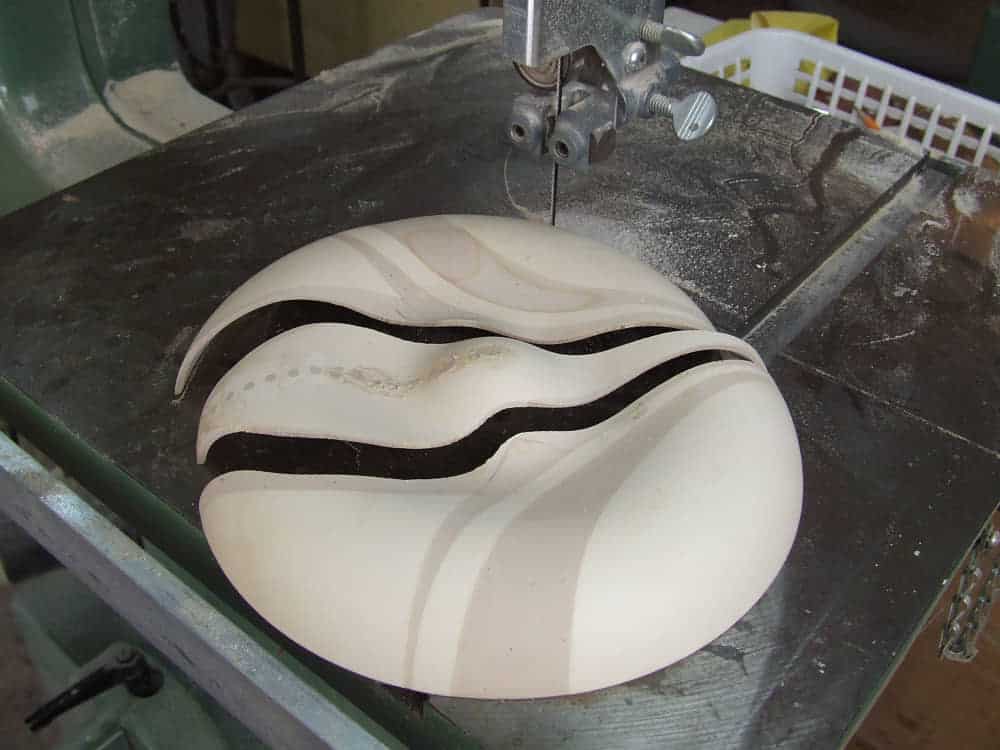
Cut it Into Pieces
Once the overlay is complete, Marilyn turns the main section of the piece around and secures it in a vacuum chuck to turn the inside of the vessel. Here, the main section of the vessel has been removed from the center strip. Notice the shallow holes in the center section. They were added so she can judge the thickness of the piece while turning it to final thickness.
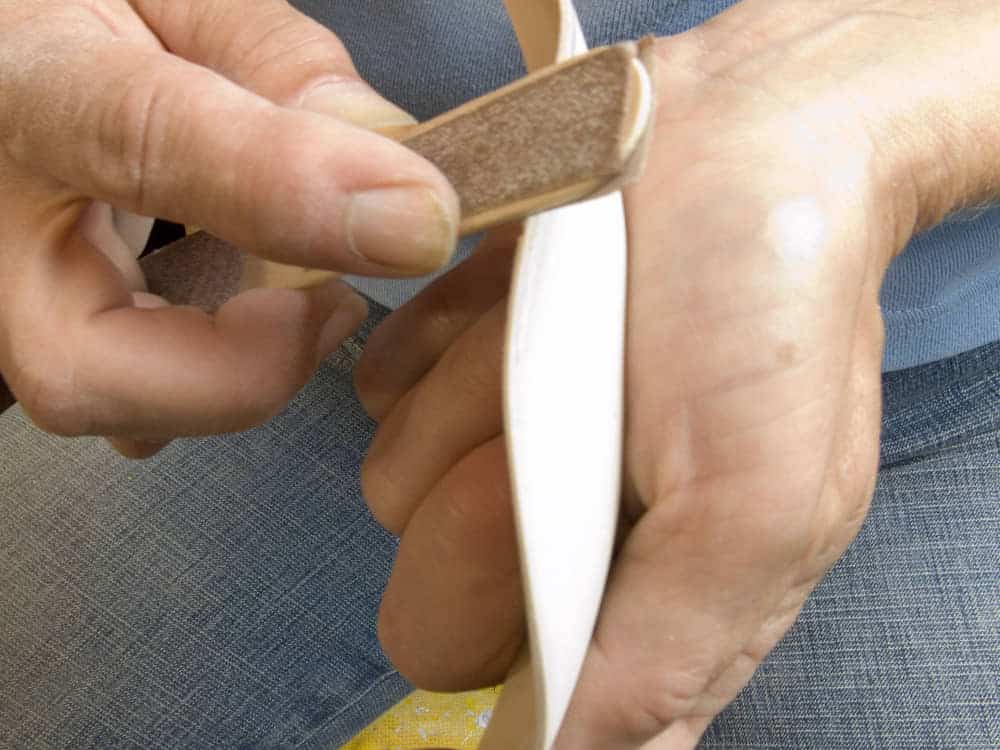
Sand and Shape the Edges
The edges of the epoxy turnings are smoothed and fine-tuned.
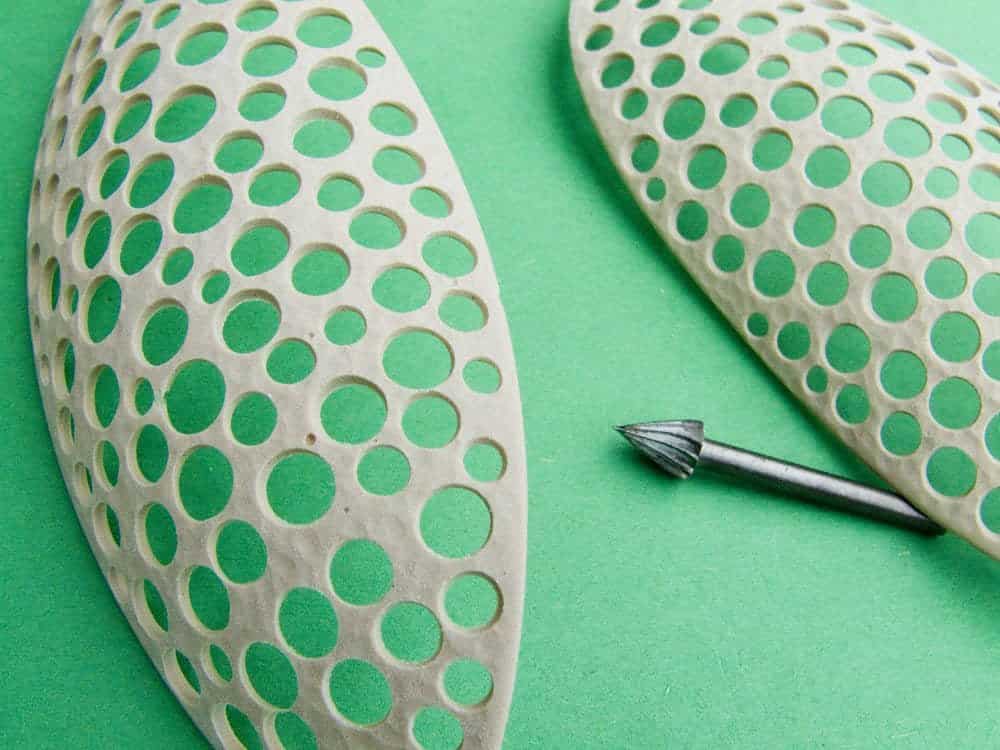
Add Texture
A range of woodworking tools are used to add texture to the different pieces she makes before they get assembled.
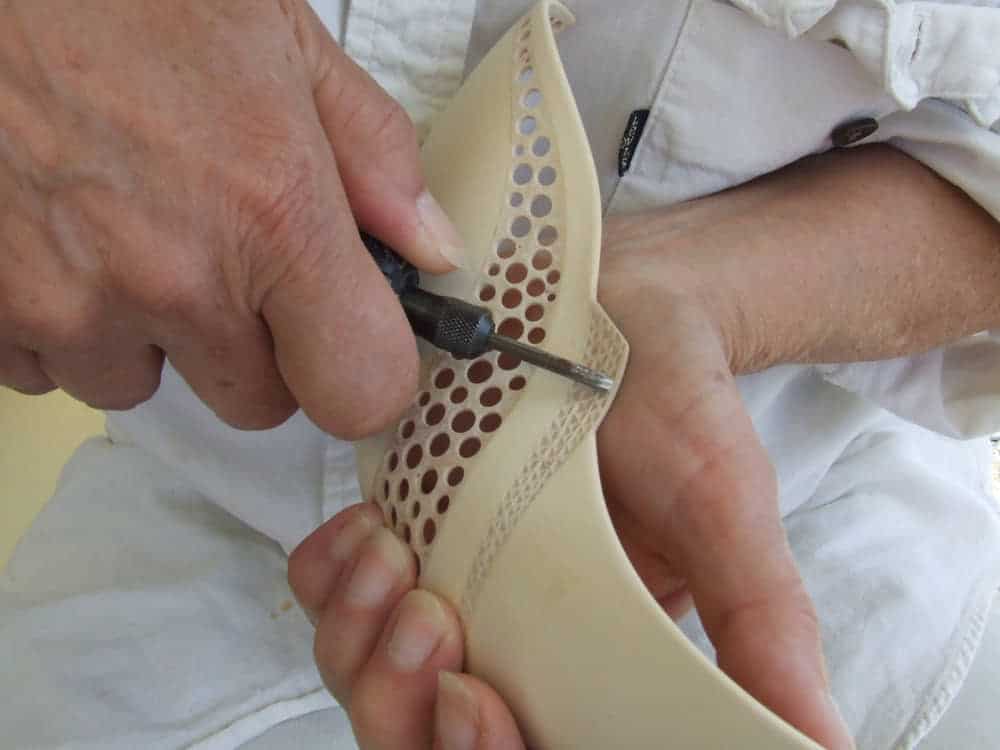
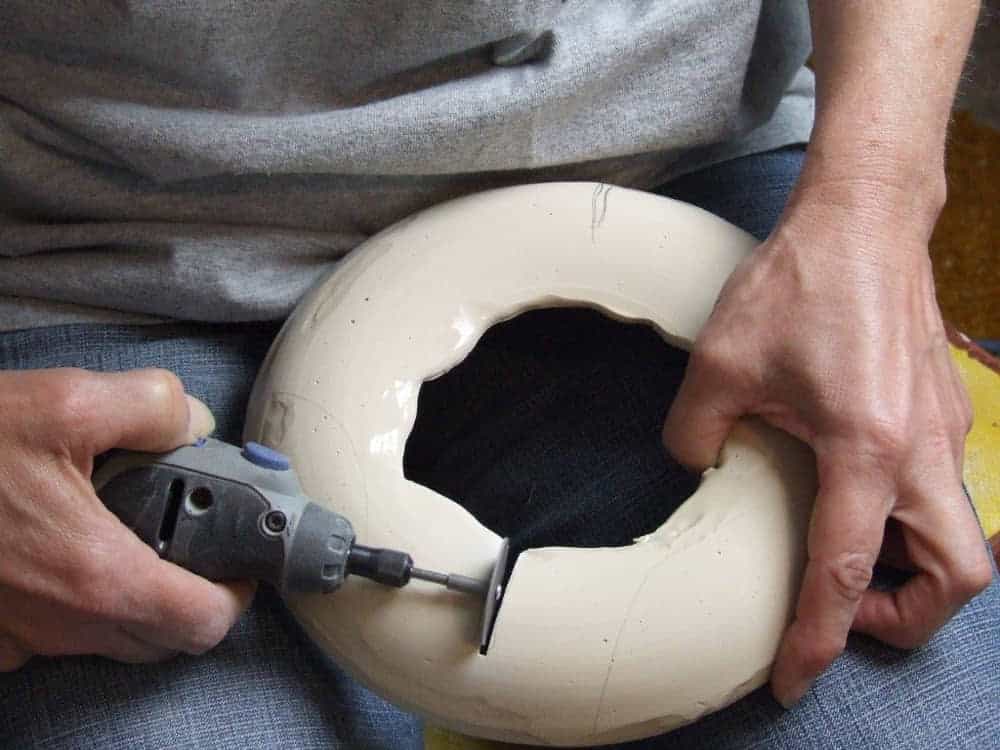
Pierced Carving
Rotary tools make quick work of thin epoxy.
Nearly Done
With the parts ready for assembly, Marilyn takes one final look at the parts to make sure they fit together properly.

“Veiled Lady”
The finished piece. The overlay is on the lower, right-hand side of the piece in this picture.