TIPS & HOW TO
Gluing techniques

Hendrik Varju

In this article we give you shop proven techniques to glue like a pro.
Gluing is critical to a project’s success. Sloppy gluing can lead to open joints, out-of-square corners, and lots more. At the very least, it will lead to poor staining and finishing results – so learning proper gluing techniques is sure to pay off.
In his first article on gluing (“Glues“, issue #40, Feb/Mar ’06) Hendrik profiled some of the more common types of woodworking glues; in his second article (“Easy Steps to Gluing“, issue #42, Jun/July 06) he outlined some basic gluing tips and techniques to help you make the task of gluing quicker and easier. In this article Hendrik talks about three of the most common types of glue-ups in the shop.
If I could offer only one suggestion, it would be to prepare well for every glue-up. That means gathering up all your supplies in advance, such as clamps, glue, glue brush, rags, clamping cauls, dowels and so on. You might even run through the entire glue-up without glue to be sure you have everything you need and know what you’re doing. You don’t want to be half way through glue-up and realize that you don’t even own enough clamps, let alone have them at your finger tips.
Let’s take a look at three of the most common types of glue-ups.
Edge-Gluing a Solid Wood Panel
To make a solid wood panel (for example, a table top), you need to edge-glue several boards together. Mill the boards and joint the edges. Then mill up several hardwood clamping cauls between which you’ll sandwich the boards to keep them flush. Make the cauls out of oak, maple, beech or any dense hardwood. They should be about 1″ or more thick, 2″ or more wide, and long enough to stretch across the panel. You’ll place them on edge over your boards in pairs: one on top and one on the bottom. One pair on each end of the panel is critical, but a third pair in the middle is wise for longer panels. In order to avoid gluing the cauls to your panel, coat the cauls with packing or duct tape.
First, apply glue to the edges of your boards. Putting glue on just one side of each joint is sufficient if you bring the mating parts together quickly. If you have only three or four boards, you may want to apply the glue with a small brush or roller. If you have eight or ten boards, you can stack them together and apply glue on all edges at the same time.
As soon as you’ve applied the glue, push the boards together into their final arrangement. Then immediately place your pairs of clamping cauls across the panel. Force the cauls tightly onto the panel using F-clamps or C-clamps. Your panel should be sitting on sawhorses, or a couple of thick boards on a gluing table, so you can easily place the cauls and the clamps into position.
Tighten the clamps as tightly as you can before you clamp the boards together. For that job, I use #50 Pony clamps (pipe clamps). You can also use parallel jaw clamps, such as the Bessy K-body clamps. These are so strong that they easily overpower the cauls and F-clamps and draw the boards tightly together. In most cases, use clamps every eight inches or so for edge-gluing. If the boards are only 2″ wide (or less), use even more.
It is important to place clamps in the middle of the panel first, and fully tighten them before adding clamps out towards the ends. I’ll start off with one clamp to the left of the center clamps, then another to the right, slowly adding clamps until I’ve reached both ends of the panel. I will also alternate which side of the panel the pipe clamp is placed on. One is placed with the pipe above the panel and the next below, and so on.
It is also important to remember that each pipe clamp provides the most direct pressure centered on the threaded rod in the crank handle. Placing the pipes directly on the panel often puts the most clamping pressure away from the center of the panel’s edges, leading to a tight joint on one side only, and a slightly open joint on the other. While alternating clamps from one side of the panel to the other helps resolve this problem, I prefer to position the clamps with their pipes raised from the panel in order to center the pressure on the edges. This is easily done ‘by eye’ with a little practice.
The next step is to remove excess glue by picking it up onto a putty knife and wiping it on a rag. Do not wipe excess glue off with a rag. Doing so causes staining and finishing problems.
Allow the panel to dry overnight if possible.
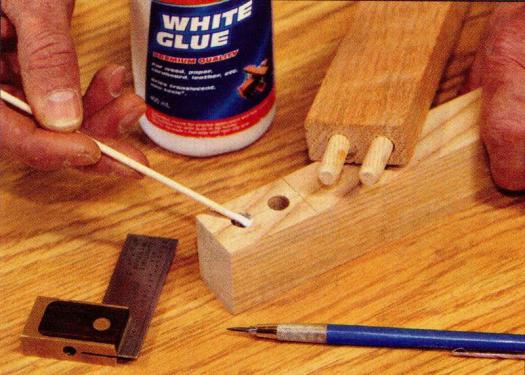
Gluing Dowel Joinery
Dowel joints are an absolute joy to glue up, because the joint’s design only allows it to move in one direction – together. Unlike biscuits, dowels won’t allow the mating parts to move vertically or laterally during the glue-up. Provided that you drilled your dowel holes accurately, there is no need for ‘wiggle room’, which is often discussed in articles about biscuit joinery.
Drill your dowel holes deeper than the length of the dowels by at least 1⁄16″ on each side. This space is required for excess glue. Because you can’t compress a liquid, too much glue, with no space to go, will either prevent the joint from closing, or cause an absolute mess when the glue spills out around the joint.
If the dowels fit their holes snugly, as they should, then any glue placed on the dowels themselves will be scraped outwards along the dowels when you insert them. For this reason, you should apply glue only in the dowel holes. I like to squeeze glue directly out of the tip of my glue bottle (a round tip is essential) onto the inside perimeter of each hole. The glue will slowly seep down the walls of the hole in an irregular pattern. I then use a thin rod, and swirl the glue around the entire inside of the hole. If I’ve applied too much glue I’ll pull some back out on the rod, wiping it on a rag. Then insert the dowels one by one.
If by some chance the dowel holes aren’t of equal depth on the two mating pieces, be sure to tap the dowels in just far enough to leave 1⁄16″ of space (and glue) at the bottom. Hammering the dowels down all the way will force excess glue out of the joint while reducing the amount of dowel length for the other side of the joint.
Close the joint by hand if possible, or use a rubber mallet to coax it home. On wider joints where you might easily have four or five closely spaced dowels, be sure to close the joint evenly. Tapping on one side of the joint ahead of the other will cause a wedging action that makes the joint tighter than it should be.
There are too many possible dowel joints to mention specifically, but for most standard joints like rail-to-leg or rail-tostile, you’ll likely need only a single clamp. Once again, a pipe clamp has much more power than most other clamp types. Use a pipe clamp, as long as the clamp’s threaded rod can be centered over the joint. If the pipe clamp doesn’t have enough reach for a particular situation, you may need a clamp with a greater throat depth, such as an F-clamp or parallel jaw clamp. Don’t forget about clamp pads to protect the wood, as this kind of joinery glue-up is generally done after final sanding. The techniques outlined above will result in no squeeze-out of any kind.
Gluing Mortise and Tenon Joinery
In many ways, gluing a mortise and tenon joint is not much different from gluing a dowel joint. Make the mortise at least 1⁄16″ deeper than the length of the tenon. If it’s a loose tenon joint, then you need that amount of space in both mortises, just like a dowel joint.
Remember that the tenon is supposed to fit the mortise almost perfectly, especially if you’re using white or yellow carpenter’s glue (which requires a zero thickness glue-line for maximum strength). The tenon should fit into the mortise under nothing but firm hand pressure, not requiring even a rubber mallet.
At the very least, a proper fit would mean that you can pick up the mortised piece and not have the tenoned piece fall out when turned upside down. Normally, it is tight enough to require a rubber mallet for removal, even if you didn’t need it for assembly.
If you are at all fearful that you might apply too much glue and have a mess on your hands, you can chisel a tiny chamfer around the perimeter of the mortise. This offers a tiny reservoir area should excess glue squeeze up the tenon to the shoulder area. The same can be done with a dowel joint by using a countersink bit to create a small chamfer at the entry of each hole. You really shouldn’t have to use these tricks though, if you make your holes or mortises 1⁄16″ deeper than the length of the tenon. Doing so is plenty of insurance against squeeze-out. If you’re still making a mess, you might want to use less glue.
As with dowel joinery, I apply glue on the walls of the mortise only, not on the tenon. I use the tip of my after-market glue bottle to apply a bead of glue around the inside perimeter of the mortise. As it drips down the walls, I can use a rod or a thin piece of wood to coat the walls more evenly. Any glue on the bottom of the mortise can be scraped away, as it would be completely wasted.
There is no need for glue between the end of the tenon and the bottom of the mortise (although this will always happen) because there is so little gluing strength between end grain and long grain. Similarly, adding glue under the tenon shoulders is only going to create a finishing nightmare, without any corresponding strength advantage.
Notice that I didn’t mention spreading any glue on the end grain of one of the parts in the dowel joinery example above. That is because all of the strength of a dowel joint comes from dowel-to-dowel hole contact, not from end grain contact of the parts.
As with dowel joinery, often a single clamp is all you need, with its main pressure point centered on the joint. Once tenon shoulders are tightly mated with the mortised piece, there is no point in cranking up the clamping pressure only to see your tenoned piece start to bend. When the joint is closed, it’s closed. Any weakness in the joint will be caused by a sloppy fit between tenon and mortise, not by too little clamping pressure.
Other Situations
Without getting into specifics, you’ll come across all kinds of other joinery types, each requiring the proper amount of glue. Once again, use common sense to analyze where glue travels when two parts are pushed together in a certain way. The goal is to coat the mating parts with no squeeze-out at all. It is quite easy to achieve this with some types of joinery, such as dado joints, but much harder with rabbets or other open-faced joinery.
One of the hardest gluing tasks is controlling the inevitable squeeze-out that occurs with joinery like hand-cut dovetails, finger joints and mitre joints. In time, though, you’ll realize that even when zero squeeze-out is not possible, it is usually possible to apply the glue and close the joint in such a way that squeeze-out occurs in a particular direction. It is better to have squeeze-out on the outside of a box, where you need to trim the joinery anyway, than on the inside where you can hardly get a chisel into tight quarters. Think hard, analyze why things happen and teach yourself how to prevent, or at least control, issues involving glue squeeze-out.
Caul
A piece of wood about 1½” by 2½” and as long as required, with a slight crown on one edge, used in pairs for applying even pressure across wide work pieces during clamping and gluing operations.
F-Clamp (Fast Action Clamp)
Similar to the bar clamp, but can be adjusted and applied with one hand.
Correction: The photo and text reference to Bessey clamps was inadvertently placed in this article. Hendrik wishes to stress that he uses only #50 Pony clamps for edge-gluing, as he has found that they work best.
Dowel glue-up
Mortise and tenon glue-up