PROJECT
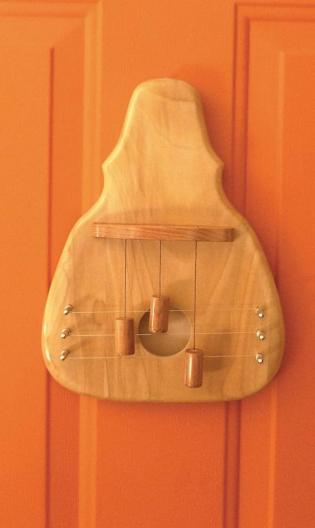
Wavy Bar Stool

Trish McCulloch

Find more Chairs and benches projects
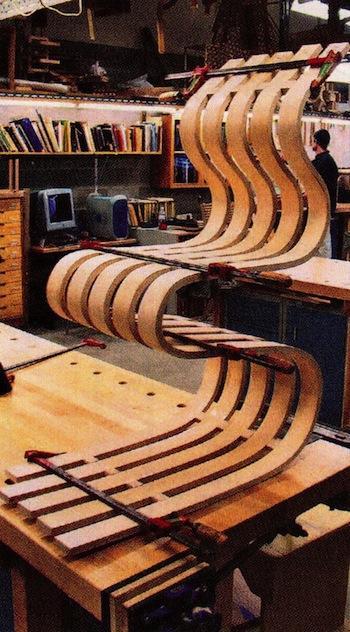
This project is comprised of five identical laminations joined and mounted on walnut legs. The legs raise the seat to bar height and prevent the chair from rolling backwards.
This is a good exercise in bent lamination, as it consists predominately in making a jig and laminating 1⁄16″ strips of maple veneer to form the bent parts for the stool. Using veneer as opposed to milling solid stock saves time and eliminates a lot of waste.
Wavy Bar Stool
Build the Form
See “Making the Bent Lamination Form” below.
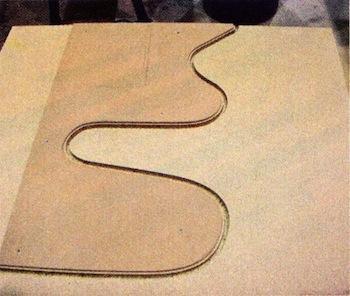
• Cut a piece of ¼” MDF to size for template (A).
• Draw the curved seat profile on the template. You can draw the curve freehand, scale it to the appropriate size, or photo enlarge it.
• Using a band saw cut out the profile of the curve on the template.
• Sand the profile smooth, as every bump will transfer into the form and consequently into the lamination. The template needs to be offset ¼” from the curve so the router bit is cutting the same line as the curve.
• Cut three pieces of particle board, one for the top of the jig (B), the other two for the bottom of the jig (C).
• Screw the template (A) in the approximate middle of the top jig board (B), aligning the top of the template with the edge of the board.
• Install a ½” straight bit with a 1″ guide bushing on your router. Carefully following the template, rout the template profile on the top board (B). Be careful not to drift away from the template, as this will damage the form. You are cutting both sides of the form at the same time. Label both halves as the top, B1 and B2. (Note: there is only one piece on the materials list because in this step you are cutting it in half.)
• Install a ¼” straight router bit and cut the bottom two layers (C) of the form. The ¼” bit will leave excess material to be flush trimmed once the form is glued together.
• Glue the templates together making sure that the first pieces you cut (B) are on top with the other two pieces (C) protruding past.
• When dry, trim the bottom panels flush with the top using a flush trim bit.
• Line the inside of the form with packing tape to prevent the laminations from adhering to the form.
• Cut the guide pieces (D) from scrap hardwood.
• Attach guides to the top and bottom to ensure the form lines up. Each guide consists of three pieces with two guides per side. Each piece is chamfered or rounded on the end so the corners will not conflict when using the form.
• Cover the guides with packing tape, and then screw them onto the form. Ensure that the guides are aligned properly so that the form can be easily pulled apart. To ensure that the guides are adequately tight, clamp up the form with the unglued material inside, and screw in the guides.
Laminate the Veneer
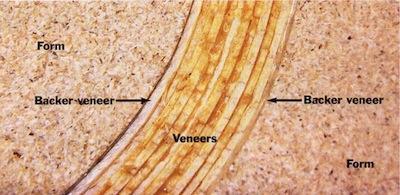
• The stool consists of five laminations. Each lamination is made from ten pieces of veneer. However, the form accommodates twelve pieces of veneer, leaving room for an extra piece of veneer on each side of the veneer sandwich to act as a backer, and to absorb any imperfections. It is best to have two or three people assisting you during the gluing up stage.
• Cut the veneer (E) into 2 ¼” strips. You will need 52 pieces – five sets of 10 veneers and two extra pieces.
• Cover both sides of the two extra pieces of veneer with packing tape.
• Place the form on a large table or bench. You will need space for the form to be separated so the laminations will fit inside the guides. Use blocks under the form to allow clamping from the top and bottom.
• Lay out the veneer in strips on waste paper.
• Have water, a mixing bucket, plastic resin glue, a roller and tray ready. Plastic resin glue contains a lot of moisture and has a long open time. If you have not used this product before read the instructions that come with the product before using it.
• Do a dry run of the clamp-up.
• Mix the glue following manufacturer’s instructions.
• Glue both sides of eight veneer pieces, and one side of the two outside pieces, stacking them together as you glue.
• Add the taped pieces of veneer to the outsides of this sandwich, and place the stack in the middle of the form.
• Pull the laminates down into the large curve slowly until they touch the bottom of the curve. Holding the laminates in place, have helpers gently bend the ends enough that you can slide the form together using the guides for alignment.
• Place clamps alternately, starting in the middle and working your way outward. Re-adjust the clamps until the form is completely closed. Make sure the laminations are closed tightly. You may need to clamp perpendicular to the form to close up the straight end.
• Let the lamination dry as per glue directions.
• Repeat this process for the remaining four sets of veneers.
Trim the Laminations
• Remove the guides from the form.
• Cut small pieces of wood ⅛” thick for spacers that will go underneath the lamination.
• Lay the form flat on a bench and put the lamination inside with spacers beneath. Insert backer pieces to achieve the proper thickness, but ensure they are flat on the bench.
• Clamp the form together using a few clamps. You will need to move these clamps around as you trim.
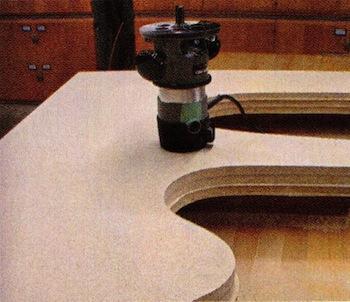
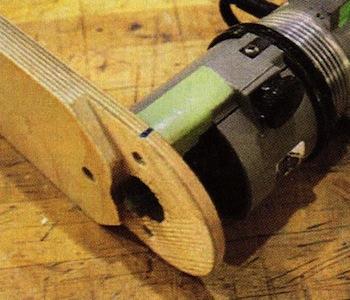
• Using a laminate trim router and a straight bit, trim the ⅛” that is protruding out of the form, level with the form. To do this I mounted my trim router on an off-set base. Use the same half of the form to do all the trimming.
• Repeat this process on the remaining four laminations.
• Flip the form over, and using ¼” spacers, trim the other side of each lamination.
Cut the Mortises and Tenons
• Mortise and tenons are used to join the laminations together. To rout the tenons I made three jigs, two jigs for routing laminations and one for routing spacers. (See illustration).
• Mill the spacers (F) from hard maple. Use a mitre fence and a block to cut the 1″ wide strips into 1″ squares with a table saw. You will need extra strips because you cannot cut right to the end of the strip for safety reasons.
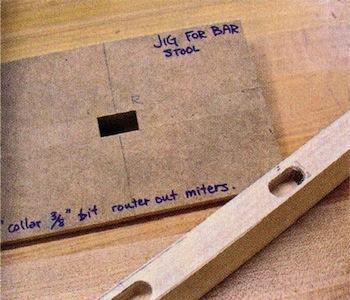
• Make the three jigs using scraps from around the shop. The tops of the two lamination jigs (Jig A, Jig B) are the same. The goal is to make a square hole that is 1″ x ⅝” in the center of a surface. This is achieved by sandwiching two ⅝” pieces of MDF 1″ apart between two larger pieces of MDF. Be sure to mark a centerline on the top and sides before gluing. The difference between these two jigs is the stop block on the bottom. The first jig (Jig A) has a straight stop, the second (Jig B) a curved stop. Both stops are located at the edge of the hole off the centerline and parallel to the hole. The curved stop allows the jig to be clamped near the curves of the lamination.
• Mark on one lamination the centerline of each spacer. The spacers locate the legs of the stool and are determined by the seat. The centerline for the first spacer is 3 ½” back from the front curve of the seat and the other two are 3″ on center.
• On the edge of the same lamination, lay a straight edge from the centerline at a 3º angle (towards the front edge) and draw a line on the other two curves. From the back centerline, draw a line at a 20º angle (towards the back edge). These also locate the legs. The top spacers are 2″ from the apex of the back curve.
• Assemble the laminations in relation to seat surface and front curve. (It’s okay if the ends do not line up). Clamp the laminations together in this position and transfer all the centerlines using a square. Mark the edges of the outside two laminations with a note not to rout them.
• The third jig (Jig C) is to hold the 1″ squares in place when mortising them. Using three off-cuts from the spacer stock (F), lay them side by side on a scrap of MDF, lining up the tops of all pieces. Move the middle piece down 1 ¼” and brad-nail all three pieces in place. Add another scrap of MDF to the other side lining it up with the top so you can drop the squares into the jig, end-grain up, to router.
• Using a router with a ⅝” bushing and a ⅜” bit, rout all mortises in the laminations using the Jig A on the straight parts, and Jig B on the curved parts. Rout the mortises in the laminations ½” deep. Using Jig C rout the mortises in the spacers all the way through.
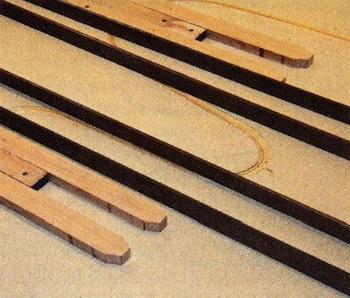
• Mill two strips of hard maple ⅜” x ¾” x 40″ for the tenons (G). Before cutting the individual tenons to finished length (115⁄16″) on the table saw use a hand plane or edge sander to round over the edges until the tenons fit snugly into the mortises. (You can also round the edges on a router table if you have an appropriately sized round over bit).
• Using a band saw, notch each tenon on its rounded edge. This will help reduce glue run-out during clamping.
Glue the Seat
• To make gluing up manageable, use epoxy glue with a half hour open time.
• Lay the bottom lamination, mortise side up, onto a block so it can be clamped from the underside. You will need eight clamps at least 14″ long. Have spacers, tenons, clamps and laminations ready for assembly.
• Time a dry run before you mix the glue. You may need help or need to glue in two stages in order to glue and clamp the stool in time.
• Apply glue to the inside of the mortises on the bottom lamination and in the mortises of the next lamination. Apply glue to the inside of eight spacers. Slip tenons through the spacers and into the mortises. Line up and stack the next lamination. Repeat until all the laminations are glued and stacked with spacers between. Clamp together at the location of the spacers.
Trim the Ends
• Once the glue has cured, plane spacers flush with the laminations using a block plane or chisel.
• Mark ½” above the top spacers and 1 ½” below the bottom spacers.
• Place the seat on a scrap of sheet goods with parallel sides, lining the marked edge with the end. Screw a scrap down between the laminations to sandwich the seat flat to the board. Running the straight edge of the scrap along the table saw fence, trim off the ends of the laminations.
• Repeat with the top edge. You will need to prop up the seat for the surface to lay flat.
Attach the Legs
• Mill walnut stock for the legs (H, I) to 1″ thick and cut into four strips 1″ wide and 25 ½” long.
• Trim the ends of all four strips with a 12º angle. This is the bottom; label it with a ‘B’ to avoid confusion. Cut two of the legs at 23″ with the same angle and set aside. These are the back legs.
• From the bottom of one of the two longer legs, measure up 12 ½” from the farthest edge. Cut a notch on the inside, 6º up from the bottom and ½” deep. Keep notching up the leg until the space is big enough for the lamination to slide in tight (⅝”). Lining up the notch with the maple spacers, mark the top notch, and cut it. Cut identical notches on the opposite side of the other leg.
• With the 23″ long legs, measure up 11″ from the farthest edge. Cut a 9º notch and repeat notching as above, until all four legs fit into the seat.
Finishing Touches
• Hand sand the seat to 120 or 220 grit, depending on the finish you will be applying. Sand the legs, making sure to break the edges.
• Glue legs to seat.
• Smooth the edges on the seat.
• Apply your chosen finish. I used wipe-on polyurethane to decrease the amber colour caused by an oil finish. I recommend two coats, then a wax polish. Upon completion of this project, you can repeat the process and make enough stools for a bar to entertain company.
This piece was originally entitled: Undulation: A Study of Linear Form and Movement. It was designed and built by Trish as part of her three-year Crafts and Design Program at Sheridan College.
Photos by Trish McCulloch
Form A attached to template piece B
Two sets of forms B1, C1 and B2, C2
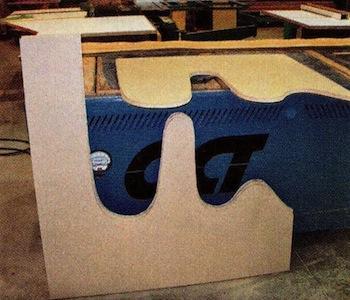
Trim the form B2, C2 flush
The form will accommodate 12 pieces of veneer
Router with off-set base
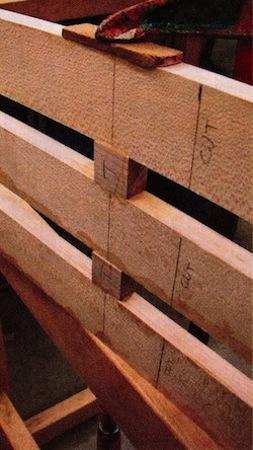
Mortises cut with jig A
Clamped form showing guides D
Dry run assembly
Laminations with spacers F installed
Legs glued and clamped in place
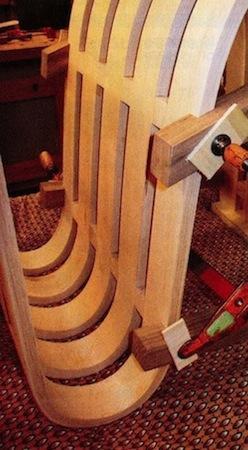
Illustration by Mike Del Rizzo