PROJECT
Outdoor storage bench

Danny Proulx

Find more Outdoor projects
This multi-use storage bench may be a partial solution to your storage problems. With its lift-up lid, this bench will store a lot of those items that need to be available, but don't need to be seen.
If you’re like me, you always have things lying around your backyard or deck. Cushions, barbeque equipment, and various other items seem to always clutter the deck or yard. Poolsides too are continuously cluttered with such things as balls, floats, swimming gear, and cleaning equipment.
The lid on this project has a three-sided guardrail designed to help keep a cushion in place. If you add a couple of Velcro strips, the cushion will remain in place even when the top is lifted.
This particular design is adapted from the old style, built-in-place kitchen cabinets, which consisted of wood attached to a simple frame. I didn’t want to spend a lot of money on this project because I knew it would be taking a great deal of abuse. However, I wanted a reasonably strong structure with wood that could withstand moisture. Cedar was my choice, but many other species would be just as suitable (i.e. painted pressure treated lumber).
The hardware I used was all exterior rated and the piano hinge I used was brass. I also decided on polyurethane exterior glue because of its water-resistant properties.
The project is simple to build with minimal wood joinery. A standard half lap joint was used to secure the upper and lower frame, but you could just as easily use butt joints with dowels.
This multi-use bench can be built in an afternoon. Then, with a couple of coats of exterior stain, it will be ready for use. The only thing left to do is to convince the young ones to put their equipment away!
Outdoor storage bench
Building the Outdoor Storage Bench
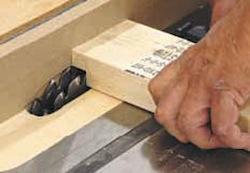
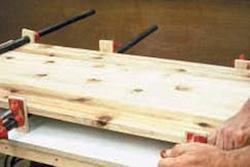
Build the upper and lower support frame. The joinery is a half lap and requires a notch that’s 3/4″ deep by 1 1/2″ long on both ends of the eight frame pieces.
The notches can be cut with a jig saw, router table, or on a table saw. If you are using a table saw with a dado blade, make a 3/4″ deep cut across the face of each piece that’s 1 1/2″ long. You can also prepare 2 by 4’s, and rip them to 1 1/2″ wide after the dadoes are formed.
Join the Rails
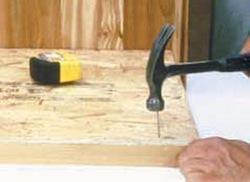
Use polyurethane glue and 1 1/4″ finishing nails. Each frame should be 18″ deep by 48″ wide.
Cut the Panels to Size
My 1 by 6 tongue and groove boards are cut to a finished “exposed” width of 5 1/8″. Your supplier may dress to a different finished size, so the number of panels required may be slightly different.
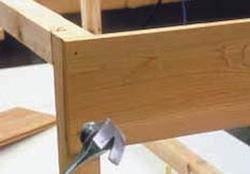
Install Panels and Join Frame
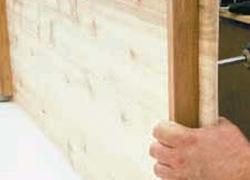
Two of the panels are installed to join the upper and lower frame. They are attached at the end of the shorter frame edges. However, before attaching these first two side panels, cut the tongue off each board so they will both be flat facing the front. Use glue and 1 1/2″ galvanized finishing nails to secure the boards. One frame is at the top edge and the other at the bottom of each panel.
Cut Tongue and Groove
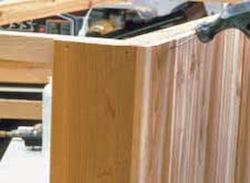
The outside panels are tongue and groove stock lumberyard cedar. They will interlock as they are attached to the box frame. However, you don’t want a tongue and groove at each corner so the tongue of one is cut off and the groove of another is cut. These two square edges (after the tongue is cut off one and the groove off the other) butt to form a square corner.
Start the first front panel by covering the side panel’s edge. One becomes the first front panel and the other is the last front panel. Before gluing and nailing, dry fit all the front panels to verify the correct width. The two cut outside boards on the front should overlap the side board edges. If this isn’t the case with your panels, trim each one equally until the fit is correct.
Attach Bottom Board
Before installing the remaining side and back panels cut and attach the bottom board. Use glue and 1 1/4″ finishing nails. Install the remaining side and back panels.
Attach Strips
The box needs to be kept off the ground to minimize any chance of ground water wicking up the panels. If that were to happen the bench would quickly rot.
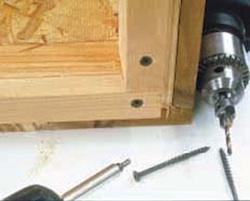
Cut the base strips and attach them to the bottom frame, flush with the back face of the panels. Use screws only so the strips can be replaced if necessary.
Attach Trim
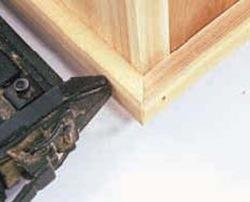
Attach the trim on the upper and lower edges to add a little visual interest to the bench. Secure it with glue and finishing nails. All the corners are mitered at 45- degrees. The trim pieces are 3/8″ thick by 3/4″ high strips of wood that I ripped on the table saw and installed flush with the bottom and top edges of the panels.
Glue-up the Seat
The bench seat is made by gluing up four lengths of 1 by 6 stock. Make your panel a little oversized, and then trim to the finished size. Edge glue the boards with exterior adhesive and clamp until set.
Tip: Successful edge gluing can be achieved by ripping straight edges on each board with a well-tuned table saw. You don’t need a jointer for this procedure if your table saw is equipped with a good blade and is correctly aligned.
Round over Edges
After the top is correctly sized, round over the two front corners with a belt sander to prevent injuries if someone bumps into the bench. Use a 1/4″ round over bit in a router, or sand paper, to round over the top and bottom edges of the front and two sides. Leave the back edge square.
Attach Cushion Rails
The cushion rail boards should be cut and installed at this point. I’ve rounded the front edge of the two side rails to remove the sharp corners. Use glue and 1 1/2″ screws from the underside to secure the rail. Start by centering the back rail making sure its back edge is flush with the back edge of the bench top.
Attach Hinge
The top can be hinged with any style of hardware. I’ve opted for a 48″ long brass piano hinge.
Finish
Fill all nail head holes with waterproof filler, sand, and apply an exterior finish. I used Sikkens Cetol 1 #005 Natural Oak.
Construction Notes
There are many applications for this versatile project. It is an ideal outdoor storage bench, but it could just as easily be used inside your home. Do you need a firewood storage box in the basement? This would be the ideal solution. Do your children need a toy box or do you need a bench storage seat in the mudroom to sit and change clothes?
The dimensions can also be altered to suit your requirements. Make it wider or longer so that it will hold all the pool cleaning equipment or the children’s outdoor toys.
If security is an issue, or if you want to safely store those pool or garden chemicals, add a lock and hasp. And, if you really want safe storage, bolt the box to your deck through the bottom board and install a lock latch.
Although I used construction grade cedar to build my storage bench, your selection of wood species is strictly a matter of budget and choice.
A fellow woodworker suggested that a lift out tray, supported by cleats inside the box, might be a handy addition. I hadn’t thought of that, but if you have a lot of small items (such as garden hand tools, seed packets, or pool equipment), it might be a desirable feature.
To really finish off this project, add a seat cushion. It can be made with a couple of yards of material and a piece of foam. When the cushion is not being used, store it inside the box to protect it from the weather.

Notch half-lap joint on both sides of the frame
Join upper and lower frames with side panels
First front panel covers side panel's edge
Cut and attach bottom board
Cut base strips and attach to bottom frame
Attach top and bottom trim flush with panel edges
Edge glue seat boards and clamp
Glue and screw cushion rail from underside
Attach brass piano hinge
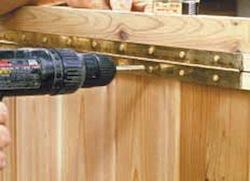
Illustration by Mike Del Rizzo