PROJECT
Make a set of clamping cauls

Rob Brown

Find more Shop projects projects
This simple project will go a long way to improving the furniture you create.
Most woodworkers think of exotic little projects when they look at their stack of offcuts. Not me. I think of clamping cauls in different shapes and sizes. These little gems assist me in countless ways. I don’t use a caul every time I use a clamp, but close to it.
The main use for cauls is to ensure clamping force is distributed across a larger area than just the head of the clamp. If you’re clamping up oversized, rough boards for a large tabletop cauls probably aren’t necessary, but if you’re working with thin edge trim, or other delicate parts, cauls are the difference between nice, tight fitting joints, and having to start over. And with the higher surface area provided by the cauls you are less likely to crush the workpiece you’re clamping. This is a great reason to make cauls from hardwoods.
My caul collection is dynamic. When glue sticks to the cauls I tend to replace them, rather than risk imprinting the hardened glue drop into my next finished surface. Applying packing tape to the surfaces will help, but I find this more hassle than it’s worth. Offcuts are plentiful and brand new cauls are quickly made.
Make a set of clamping cauls
Other uses for cauls
I will often position long, thin cauls on the upper surface of a panel if I’m using bar or parallel clamps to secure solid edges. They ensure the clamps don’t touch the surface of the panel, and leave marks. This is especially important when working with veneered panels.
In a pinch I will use a pair of cauls on either side of a bent lamination. Secured on either side by a small clamp, the cauls help keep the many strips aligned while I apply clamps to bring the laminations in contact with the bending form.
A medium-sized caul will also protect a surface from a mallet blow. And speaking of assembly, a caul, or a few cauls taped together, work wonders in supporting a wide range of shop projects during assembly, sanding or finishing.
How large, and how many?
A good set of cauls (yes, I do treat my cauls like a collection) will run the gamut in size and quantity. I usually make them in batches of between six and 12, but sometimes make many more. I would break them down into six categories:
| Small | Solid wood no bigger than 1″×3″×1/2″ thick |
| Medium | Plywood around 2″×4″×3/4″ thick |
| Large | Solid wood about 2″×8″×1-1/4″ thick |
| Long | Solid or plywood around 2″×3/4″ thick, and between 12″ and 60″ long |
| Curved | Typically offcuts from curved, veneered laminations, about 1″ square, they work great for clamping up small, curved work |
| Angled | 1-1/2″×1-1/2″×2″ long blanks with notches cut into their faces before they’re cut to length |
The exact dimensions of your cauls can be dictated more by the offcuts you have. Rather than wait until you need some cauls I would suggest making at least four or five different types right now, then add to your prized collection as needed. Ensure all the surfaces are smooth and square, and the edges have all been eased. Once you get into the habit of making and using cauls you’ll find it’s a hard one to break.
Photos by Rob Brown
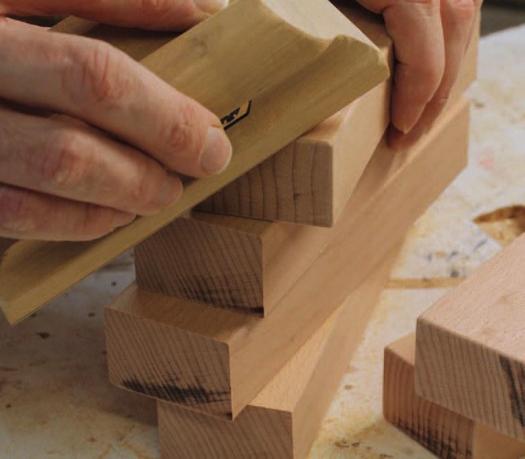
Ease Edges
Soften all the edges of the cauls so they don’t leave marks on the finished surfaces.