PROJECT
Inside-Outside Ornament

Allan Cusworth

Find more Woodturning projects
You don’t have to tell your guests this delicate ornament was easier to make than Christmas dinner.
By using the inside-out turning technique, you will be able to create a Christmas ornament with a visible decoration inside. The ornament in this project will be approximately 3″ high with a little Christmas tree inside a 2″ teardrop-shaped oval opening. I suggest you try the techniques on some scrap pieces of construction lumber before you start cutting into a piece of expensive wood. The learning curve can be steep but the results are certainly worth it.
I like to plan a project before placing any wood in the lathe because many design problems can be foreseen and solved ahead of time. I suggest that you at least make a sketch of your finished ornament showing the overall and detail dimensions for the outside and the inside.
The decoration for the inside can be a Christmas tree, snowman, candle or anything you can turn small. However, you must make sure that it is sized correctly to fit inside your finished ornament. There will be a chance to tweak that fit when you make the Christmas tree decoration later.
Inside-Outside Ornament
Preparing the Main Ornament Blank
The project requires a blank of dry wood, 2″ x 2″ x 6″ long, that is perfectly square on the ends and true; not twisted. It should also be clear of any knots or inclusions. This will make a 3″ long ornament and will allow ½” at each end for the top and bottom embellishing, and 1″ at each end for mounting in the lathe. If you are not concerned about the grain matching you can use four square pieces of equal size cut from a board instead of cutting all the pieces from one piece of wood.
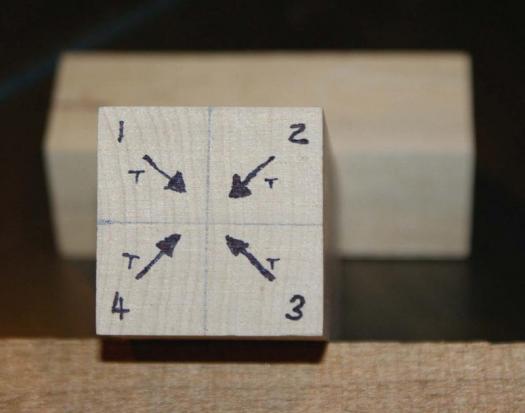
Decide which end of the blank will be the top of the ornament and mark it. I placed a “T” on each of the sections. Number the outside corners and draw an arrow towards the inside corners so the grain configuration can be matched later in the reassembly process.
Cut the blank lengthways into four equal square pieces on a bandsaw or tablesaw using a fine-tooth blade to provide a smooth surface for gluing. Make sure the saw is set accurately at a 90° angle so the pieces will fit together accurately later. I always place the assembled blank in the lathe the same way: ornament bottom towards the chuck in the headstock, ornament top towards the live center in the tailstock.
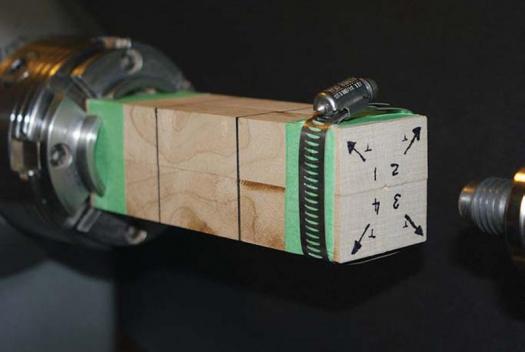
Assemble the pieces so the four numbered outside corners are on the inside with the arrows pointing to the outside corners of the block. The blank is now oriented “inside-out”. A small rubber band helps hold the pieces in place while the tape is applied. I use a thick one that held a head of broccoli from the supermarket. Wrap the top and bottom ends with painter’s masking tape, making sure that the four ends are flush. Use a hose clamp to hold the “top” end of the blank. A size 32 works well for a 2″ square block, and leaves only a small bit of the end sticking out. The hose clamp flap needs to be facing away from you when the assembly is in the lathe. After the hose clamp has been fitted on the piece, you can wrap it with some masking or filament tape for added safety.
There are a number of other methods that can be used to fasten the four sections together for the first turning step. They can be glued together using PVA yellow glue with paper in between the sections to absorb some of the glue making it easier to separate them later or the ends can be wrapped with filament tape or strong rubber bands. Some turners make a special disk-type jam chuck with a tapered square recess to clamp the tailstock end of the assembly when tailstock pressure is applied. I have experimented with some of these mounting methods and feel that the chuck-and-hose clamp method is the quickest and most secure way to do the first turning step, and is safe when used carefully.
Place the assembly in the 2″ (50mm) jaws of a four-jaw chuck with the taped up “bottom” end towards the headstock with a cup-type live center in the tailstock. Be careful not to use a long sharp point that will increase the chance of spreading the four sections apart when applying tailstock pressure to the assembly.
For a 3″ long ornament with 1/2″ on each end for embellishment, the inside oval teardrop-shaped cut-out will be 2″. Mark the location of the cut-out on the block and use a square to continue the marks on all four sides.
Turn the Inside Cavity First
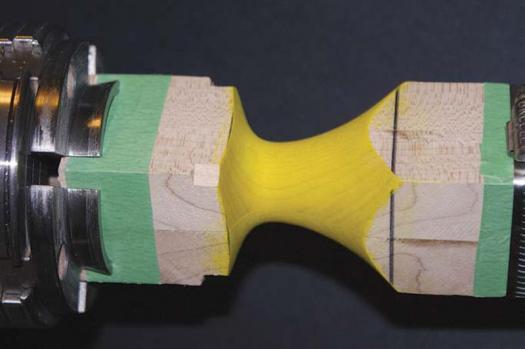
With a 1/2″ spindle gouge, cut out the teardrop oval shape of the inside cut-out profile. I like the lathe speed to be around 1500 RPM. A rule of thumb for cutting this shape is to cut about halfway through the elements when looking from the flat side. If the shape is cut out too shallow, the ornament walls will be too thick. If it is cut too deep, there will not be enough wood left for the wall of the ornament. It is a good idea to experiment with these cuts during your practice sessions with construction lumber. Hand spin the lathe before you turn it on to make sure the hose clamp turnbuckle does not hit the tool rest. Always be aware that there are square corners and a hose clamp turnbuckle ready to take a bite out of your fingers when the lathe is spinning.
The inside surface has to be completed now since it will not be accessible after the ornament has been reassembled. Slow the lathe down to about 800 RPM and sand the “inside” surface, starting with a grit size that will remove all the tool marks and progress to 320 grit. Note that each grit size in the progression should not be more than 50 percent finer that the previous one or you will leave scratch marks.
Finish the inside surface as desired. I used yellow craft paint, which is available from most hobby or craft supplies stores. I want a flat, non-shiny interior surface for my finished ornament. You can also use a dye, a stain or any other finish you like. I have used leather dye for a flat black finish. Note that dyes and stains can bleed through the thin walls to what will be the outside surfaces. In that case you will probably need to paint the outside surfaces. Always test finishes on a scrap piece of the same wood first.
We need to prepare the ornament for the installation of the Christmas tree decoration inside. To do this, make 1/8″ deep x 1/4″ chamfer on the inside corners, at the bottom end. This is the corner with the arrow pointing to it. This will create a 1/4″ x 1/4″ deep square opening. The hole will be square but it will fill with glue and hold the decoration in quite well when we glue it in later.
Reassembly
Take the piece out of the chuck and remove the hose clamp and tape from both ends. Make a 1/16″ chamfer on the inside corner of the “top” part of each section by rubbing it on a piece of sandpaper on a flat surface. The arrows are pointing to the inside corners. This will create a small hole for centering the blank in the live center and will guide the installation of the ornament hanger loop later. If you sand the chamfer along the whole blank, there will be hole in the bottom of your finished ornament.
If the face sides of the two flat sections are not perfectly flat, touch them up on a piece of 150 grit sandpaper on a flat surface. Assemble the pieces so that the arrows are pointing towards the center. The block will now be back in its original position with the grain closely lined up. Permanently glue and clamp sections 1 and 2 together, and then 3 and 4 together to make two flat sections with PVA yellow glue. Allow these two sections to cure. Before gluing these two flat sections to each other, we need to make the Christmas tree decoration.
Making the Decoration for the Inside
Clamp a piece of scrap wood 1″ x 1″ x 3/4″ long into the 1″ (25mm) chuck jaws to make the Christmas tree decoration. There are many cutting techniques for making Christmas trees. I like to make mine using a skew to cut uneven layers of branches. I place one of the half sections close by so I can take some measurements with a vernier calliper to make sure that its outside dimensions will fit in the area at the bottom of the teardrop oval created in the first turning step. The last step in completing the decoration is to make a ¼” tenon at the base that will fit into the 1/4″ chamfered square hole. Use a vernier calliper to verify the fit. If you made the chamfer too large you can adjust the diameter of the tenon to fit.
Part off the Christmas tree and wrap its tenon with painters’ masking tape. Colour the decoration. The colour should contrast the finish on the inside surface oval area of the ornament. I used green craft paint. You can add some coloured balls by using 3D Fabric Paint or, if you really want to be “cool”, make some garland using silver or gold Glitter Glue. These supplies are available at most hobby and craft stores.
After the Christmas tree’s paint is dry, remove the masking tape and glue the two flat pieces together using PVA yellow glue with the decoration glued into the chamfered hole. A little extra glue in the corners of the hole will fasten it in. Make sure that you get glue all the way to the inside edges of the inside teardrop oval cavity but do not over-glue since glue squeeze-out will be very difficult to remove from the inside of the finished ornament. Clamp it up and let the glue dry completely before proceeding.
Now Turn the Outside Surface
Place the glued-up assembly in the 2″ (50 mm) jaws in a four-jaw chuck with the ornament bottom towards the headstock using the same tailstock cup-type live center configuration as before. Do not apply too much tailstock pressure as it may split the glue joint.
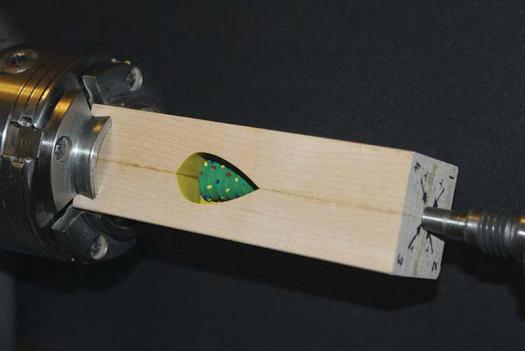
Turn the outside profile of the top section according to your sketch. Set the lathe speed at around 1500 RPM and take light cuts. Use the ghost image of the inside surface profile as a guide when the lathe is spinning and stop the lathe frequently to check your progress. Make the finial at the top with a large diameter so the glue joint will remain strong and there will be some wood available for drilling a hole for the ornament hanger loop. When you create the icicle at the bottom of the ornament (at the headstock end) it is a good idea to make it large enough for a strong glue joint where the decoration was glued in.
Sand the outside surfaces very carefully since you will be sanding a lot of air. Sand through the grits as before to 400 grit if you want to get a smooth finish on the outside surface. Stop the lathe after each grit size and sand with the grain to help reduce scratches. I have left some of the sanding marks on the ornament to give it a spun-type textured finish.
Slow the lathe speed to around 250 RPM and separate the top end of the ornament away at the tailstock end with a skew. Support it lightly with your hand to prevent whipping and sand the end carefully. Using the skew, pare down the bottom end of the ornament at the headstock end and let the ornament fall into your hand. Sand the bottom tip by hand.
Complete the top end by hand drilling a small hole to fit the ornament hanger loop. Use the little chamfered hole at the center as a guide. I used a 1/16″ drill bit with the shank held in a pin vise. Work slowly so the top of the ornament does not split apart.
My hanger loops are made by twisting 24 gauge brass wire with beading pliers to make an end to glue in the hole. However, the hanger loop can be a small brass screw eye, the loop end of a fish hook or any other type of ornament hanger loop you desire. You can also drill the hole right through to the inside and use a piece of fancy string with a large knot at the end.
Finishing the Outside
The outside of the ornament can be painted or finished naturally.
If paint is to be used, I suggest that it be a gloss type to create a contrast with the flat inside colour. The colour should also be a contrasting colour. I have brushed on gold lacquer based paints with great success. If a clear lacquer finish is desired, place some pieces of facial tissues in the four oval holes to cover the decoration. You can use tweezers to help the tissue cover the inside edges. Fasten a fishing tackle swivel to the ornament hanger loop, hang the ornament in a well-ventilated area, and lightly spray it a few times with it spinning. Lacquer dries very quickly, so quite a few coats can be applied a short period of time.
After the finish has dried completely, you will have a Christmas ornament that you have turned inside-out. Your friends, relatives and just about everyone else who is not a woodturner will wonder how you carved out the inside of this beautiful piece of work. Make a number of them using different cutting depths and shapes, blank sizes, ornament styles, colours and finishes. The design opportunities are almost endless.
Photos by Allan Cusworth; Lead photo by Rob Brown
Get Organized
Number outside corners, add arrows pointing towards the inside corners and a “T” marking the top end of the ornament.
Inside "Out"
Assemble the blank with the inside corners on the outside and dimensions for the inside oval cut-out marked.
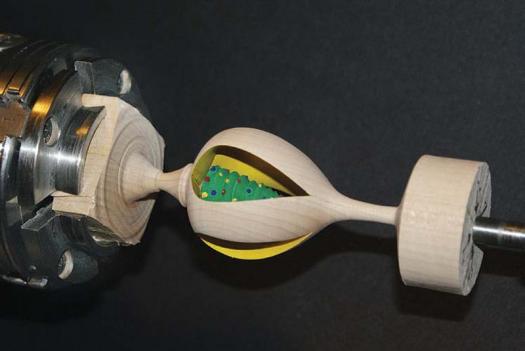
Create a Colourful Cavity
Turn the inside oval cut out and finish the surface. Notice the chamfer for installing the centerpiece
Turn the Centerpiece
Turn the Christmas tree decoration or whatever you want to have in the center of the ornament.

Outside “Out”
The glued-up assembly is ready to turn the outside profile.
Parting Ways Can Be Difficult
Carefully part off the ornament into your waiting hand.
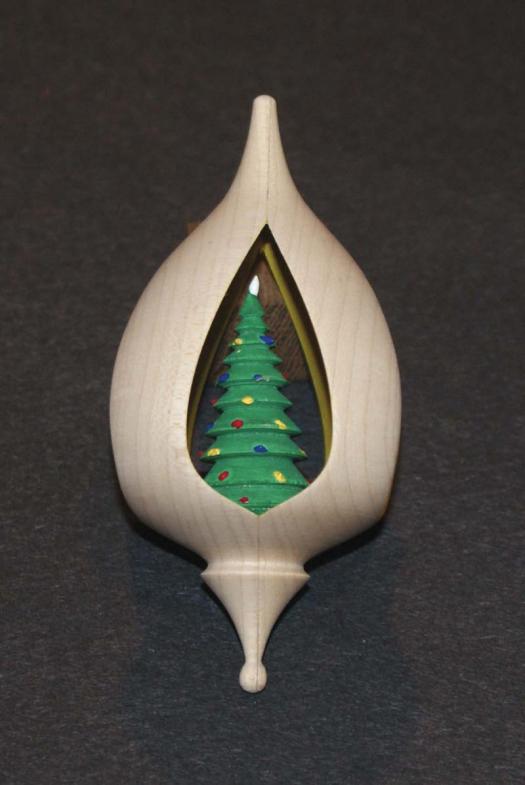
Finish the Outside
Now you’re ready to finish the outside with a contrasting finish.
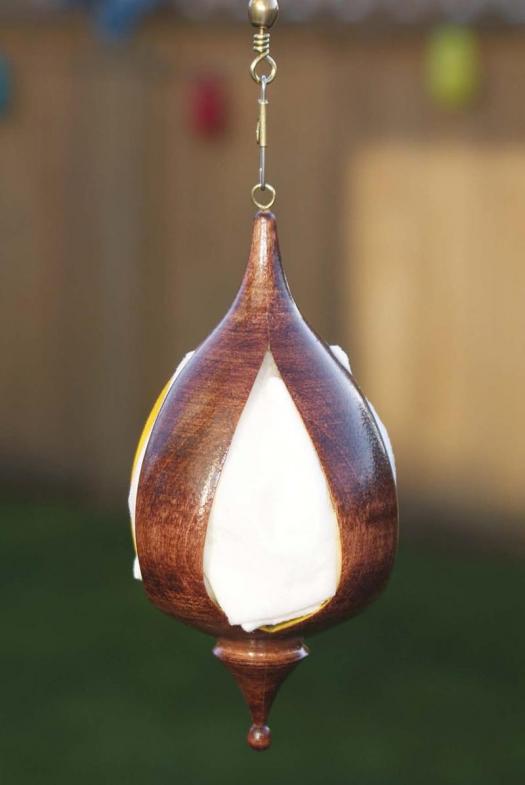
Use Protection
Use facial tissue to protect the centerpiece from the exterior finish. A lacquer spray can works well on this delicate ornament.


I just wish that there would be how to make books on the net . These inside out ornaments would great in the book. Plus any other ornaments!
Looks great , I will give it a try , only difference will be a little electric tea light
Brilliant and with proper instructions, off to the workshop now