PROJECT
High and Dry: A Simple, Folding Laundry Rack

Rob Brown

Find more Home Decor projects
There’s no cheaper way to dry your family’s laundry than to simply hang it up. If you live in an apartment or condo, or don’t want to contend with changing weather and seasons, this indoor rack is your solution.
When it comes to drying our laundry I almost always hang everything to dry. It’s a little harder in the winter – not because wet laundry won’t dry outside, but because handling wet clothes outdoors during the winter is too cold for me. I have a different problem drying laundry indoors though. I’ve been known to hang wet laundry anywhere that will hold it, and my wife doesn’t appreciate my eclectic approach as much as I do. The solution was to build a nice looking laundry rack for indoors, that’s easy to fold up and store when we didn’t need it.
This rack looks small, but it has 81′ of hanging length – more than my outdoor clothesline. I can easily dry a huge load of laundry, and have room to spare.
High and Dry: A Simple, Folding Laundry Rack
Engineering
A rack like this is large enough to get in the way when it isn’t in use. Even if I want to put it away one day, knowing I’ll use it the next day, I want the process to be simple. Within about two minutes this rack will fold up and store in a closet. All you have to do is loosen the four wing nuts on the front of the rack, spin off the four wing nuts on the back, remove the two back braces, replace the rear wing-nuts and fold the rack up. When folded up the rack measures about 90″ high, 21″ wide and 4″ deep. When completely disassembled the rack will measure about 54″ × 21″ × 2-1/2″.
Sizing a rack
The dimensions of this rack fit a specific area in our home nicely, but it may not fit your home quite as well. Adjust the depth, and most importantly, the length of the rack you make to fit an area in your home. The height of my rack works well, as I can first load up the lower level, then move onto the upper level, with minimal bending. A third level is an option, though it will make the overall height quite high when the unit is folded up for storage.
I spaced the rungs 1-13/16″ apart from one another. I wouldn’t want to go any closer, and it might be an option to go 2″ wide, if you want the clothes to be a bit easier to hang.
Breakout the material
I started with the blanks for the rungs, and machined two boards to final length, 5″ wide and 3/4″ thick. Next I broke out the blank that would give me the six supports. This blank was cut to final length, 5″ wide and 3/4″ thick.
Machine some dadoes
Start with machining the long rungs, that make up the majority of the rack. The supports will finish at 5/8″ wide, so a 5/8″ wide dado must be cut in the underside of the rungs, where they will join the supports. Mark the location of the supports on the two rung blanks, and, with the help of your mitre gauge, machine a 1/8″ deep dado at the three locations in both of the rung blanks. The exact depth of these dadoes isn’t crucial. I chose to machine the outer dadoes 12″ from the ends, while the middle dado was centered on the blank.
Mark one end of each rung blank with a couple of lines so you’ll know how they go back together, as the rungs will eventually be ripped from the blanks. For grain, colour and precision reasons you’ll want to be able to assemble the parts how they came out of the blank. Now onto the supports. Change the dado to a 3/8″ wide setup, mark the locations of the rungs on the supports blank and machine the series of 1/8″ deep dadoes. Just make sure to lay out the dadoes evenly, as I had to breakout a second blank because I made a mistake on my first attempt. Again, mark the end grain of this blank so the parts can be reassembled properly.
Cut pieces to width
With a rip blade in your table saw, rip the rungs and supports to 1/16″ over their final width, then dress them to final width with your planer, ensuring each face is smooth. Sneak up on the final width of both parts, as each part should fit nicely in the mating dado. You’ll want a fit that comes together easily, but with no movement between the rungs and supports once they’re together.
Round-over top edges of rungs
Though a smaller radius will also work fine, I used a 3/16″ radius bit in my router table to apply a bullnose to the upper face of all of the rungs. This will reduce creases being left on the clothes after they’ve been drying on the rack. A featherboard attached to the router table’s surface presses each rung into the fence during machining, while another featherboard is attached to the fence, in order to apply downward pressure. The two featherboards allow the user to keep their hands away from the bit, and also produce a much more even cut. Sand all the rungs and supports and ensure there are no sharp corners or edges that will catch clothes while the rack is being used. A little extra work now will go a long way to making your rack work well for years to come.
Assemble the rungs
Starting with three supports for one level, and three rungs, apply a bit of glue to the dadoes and bring the parts together. Use one small clamp at each joint to ensure the joints are seated nicely. Also make sure the assembly is square before leaving the first few parts to dry. After 30 minutes remove the clamps, apply glue to some joints and bring the parts together with clamps. Repeat this process until both levels are assembled.
Add the hanger bolts
I used 2-1/2″ long 1/4-20 hanger bolts installed in the ends of the supports to attach the legs to both of the rung assemblies. Drill 3/16″ pilot holes in the ends of each of the outer supports. I made sure the holes were in the middle of the supports so they were less likely to split. I also tested drilling a hole into a piece of scrap first, then installing a hanger bolt into the material I was using, so I wouldn’t ruin the nearly completed assembly by cracking a support.
Use a pair of nuts, threaded against each other, to drive each hanger bolt into the hole. The front hanger bolts should protrude from the wood by about 1″, while the rear hanger bolts should protrude an extra 1/4″, as the back braces will fit over the rear bolts.
Legs
Break out the legs and cut them to final size. Drill a 9/32″ clearance hole about 3/4″ away from the top of each leg. Drill a second hole 16″ away from the top end of each leg. Sand the faces of each leg, heavily ease each sharp edge and the legs are complete. These might be the simplest four furniture legs you’ve ever created.
Assemble and measure
Place the two front legs facedown on the floor. Insert the front hanger bolts on the middle rung assembly into the appropriate holes in the two legs. The middle rung assembly should stand perpendicular to the ground now. Add the upper rung assembly to the top holes in the legs. The final two legs fit into place over the hanger bolts, followed by four wing nuts on the visible hanger bolts. Ensure the assembly is square before tightening down the four wing nuts.
You can now measure the length of back braces that are needed. You can obtain exact measurements of the center-to-center distances of the two sets of opposing hanger bolts. Take these two measurements, add 2″ to both figures and cut the back braces to final dimensions. Next, drill 9/32″ holes in the back braces at the exact center-to-center distance of the hanger bolts. Sand the back braces, and then ease their edges, before removing the four wing nuts and installing the back braces in place. Add the four front wing nuts, stand the rack up and you’re ready for laundry day.
I opted to leave this rack unfinished, as it doesn’t need any protection, and I was worried that any colour may leach into the clothes on the rack during use. Water also might weaken a finish a bit quicker than normal.
Storing your laundry rack
To break the rack down to size quickly, remove the rear wing nuts and back braces, replace the rear wing nuts loosely, then loosen the four front wing nuts while supporting the rack with a hand. You can now lift one side of the rack upwards and it will fold together. This approach is perfect if you’re going to be using the rack again in the next little while, and you have somewhere to store it in the mean time, as it only takes a few minutes to hide the rack out of sight.
When spring comes, and you want to store this rack in a smaller space, you can remove all the wing nuts, back braces and legs and it will be easier to carry and store for the season.
Photos by Rob Brown
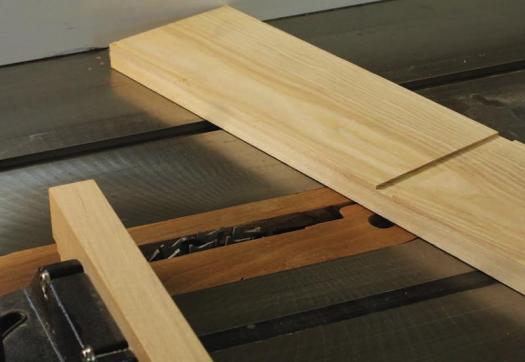
Dado the Rungs
Brown machined a dado 12" away from both ends, as well as one centered on the blank. The 5/8" wide dadoes were cut into the underside of the rungs.
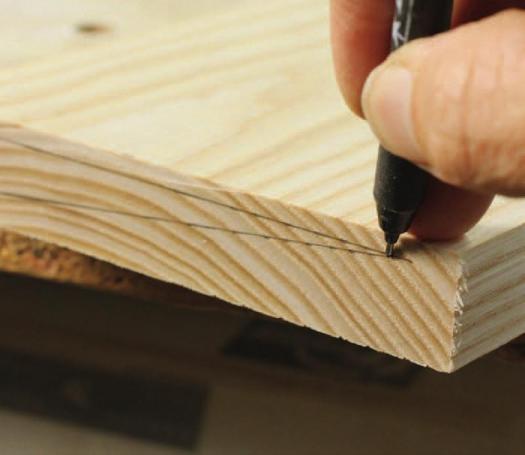
Make Your Mark
Adding some pencil lines on the end grain of the blank will help you realign the parts once they’re cut from the blank.
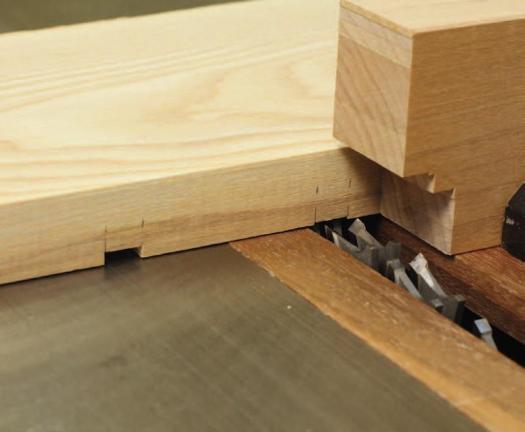
Dado the Supports
If you had many blanks to cut dadoes in it would make sense to set up stops to help speed the process, but with only one blank to machine Brown added pencil marks to the blank and cut these 3/8" wide dadoes.
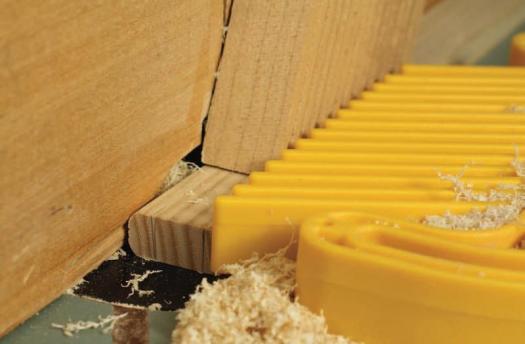
Bullnosed Edge
Two passes past a router bit and the top edge of the rungs will be rounded. Featherboards help with keeping the operation smooth and safe.
One Step at a Time
Rather than trying to glue the entire level of rungs up at one time, break the process into stages. First, grab the three supports and a few rungs, and glue them together. Clamps at each joint keep the assembly strong.

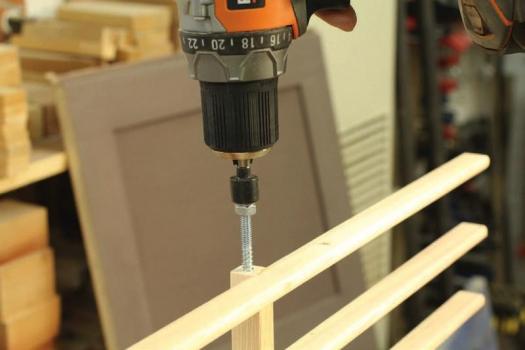
Properly Sized Pilot Holes
Once you’ve tested this with some scrap to ensure the pilot hole is sized properly for the material you’re using, drill the hole into the end grain of the outer supports and install the hanger bolts.
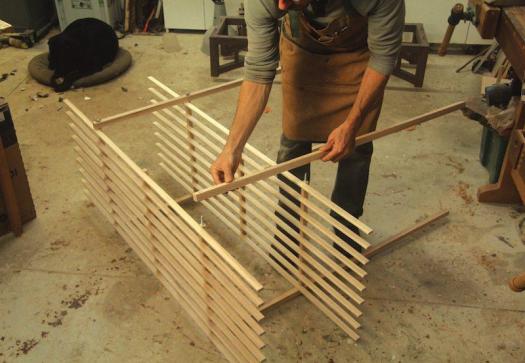
Bring it Together
With the unit face down you can bring all the parts together in order to measure for the two back braces. Precision when measuring center-to-center distances is crucial here.
Final Few Turns
Once the back braces are cut and drilled they can be secured with the wing nuts. The rack is now ready for action.
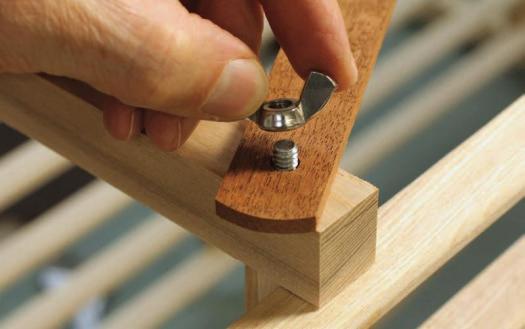
Illustration by Len Churchill


