PROJECT
Carving a Haida-Influenced Panel

Frank Pellow

Find more Carving projects
With a nice design, some sharp tools and a little know-how you can carve a Haida-influenced panel that can become wall art.
For many years I have admired the carvings of the First Nations people on the west coast of Canada and the USA and, in particular, the carvings of the Haida people. The Haida have a rich history of carving wood, and other materials, into totem poles and other smaller decorative and functional items.
Carving a Haida-Influenced Panel
Material selection
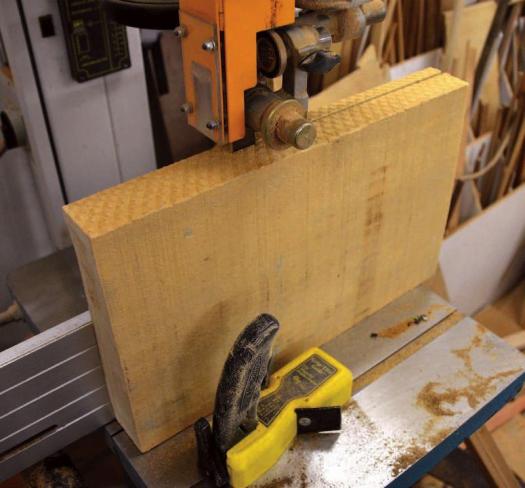
Knot-free red and yellow cedar, balsa, basswood and knot-free pine are all good woods to carve, though I’m lucky in that a few years ago I purchased four long, thick planks of avodire, which is great for carving. Avodire is a threatened South American species that should be used with great respect. I used my bandsaw to resaw a 3/8″ thick panel. A piece of plywood was glued to the back of this panel to prevent it from warping. Used this way, my avodire supply will last me the rest of my life.
Haida designs
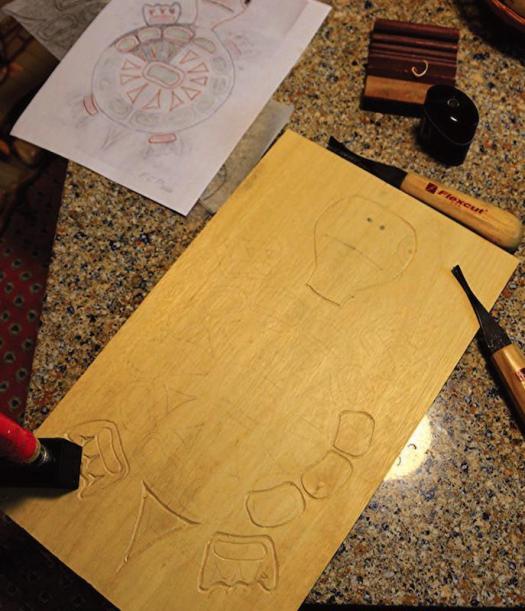
Because I have only rudimentary drawing skills, the fact that this style is quite abstract, coupled with the fact that almost all the details are carved using variations of five basic shapes, it’s possible for me to do the necessary design needed for this project.
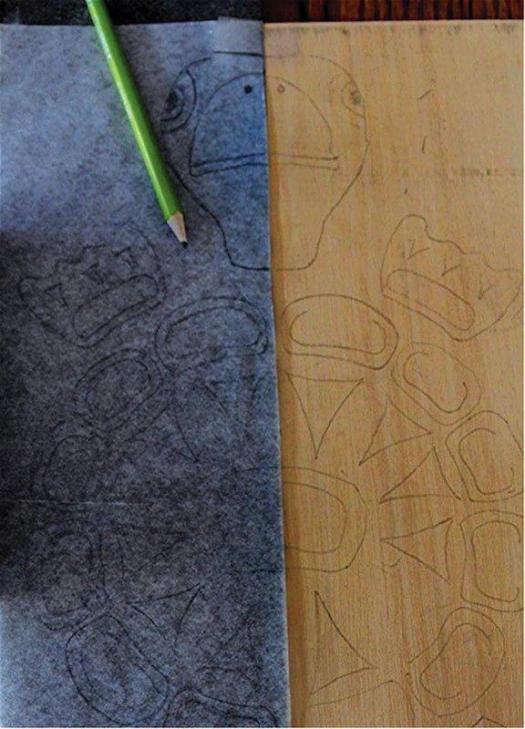
I’m not an expert carver, as I’ve only worked on a few carvings over the last four years. This project is great for getting into carving, and the design can be modified depending on the specific style you are interested in. Since this turtle was symmetrical, I only had to draw half of it, then I could mirror the design. I drew it on see-through parchment paper. If you don’t want to do your own design work you can search the internet or books for inspiration. The frog, bear and raven are very common Haida motifs.
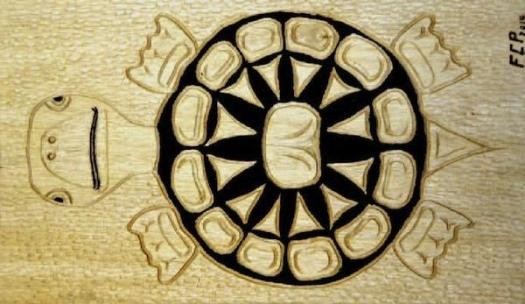
With the exception of the turtle’s head, my design adheres closely to the native traditions of representing body parts with abstract symbols. I did break tradition by carving a true to life head, though notice the head is turned to face towards the viewer, even though this would be impossible in real life. This sort of anomaly is acceptable in Haida art.
Using carbon paper, the pattern was traced onto the wood, first on one side, then the pattern was flipped and its mirror image was traced onto the other side. Actually, I carved two very slightly different turtles from this pattern and photos of both appear in the remainder of this article.
Carving tools
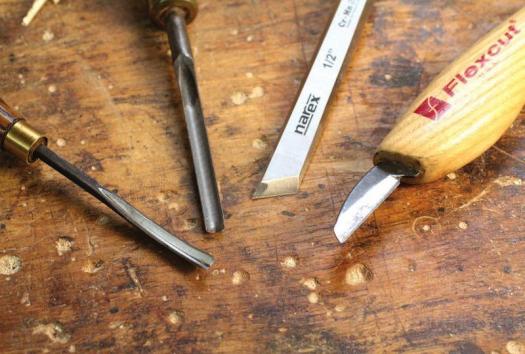
There are many knives, chisels, and gouges available but I find that only a very few are needed on this type of simple panel. The ones I used for this panel are all of the Flexcut brand, though many other manufacturers also produce quality carving tools. The vast majority of the lines traced on this carving were cut using the 6mm 70º parting tool.
With the panel clamped to a work surface, in this case a kitchen table, I got to work. With the right wood, and a sharp carving tool, it really is just as simple as following the lines with the tool. In case you missed it…a sharp tool is crucial, and makes the project safer and easier. I find the best technique is to push the tool with my right hand while directing it with my left hand, but practise with the carving tools to find your most comfortable technique. It’s generally best to keep the heel of your forward hand, in my case my left, on the wood while carving.
When pushing the parting tool or gouge it’s important to keep both of the upper edges of the blade’s sides above the surface of the wood, or tearout will be excessive. If you want a deep cut you may have to purchase a deeper tool.
A skew chisel was used to remove some wood on the larger, flat area between the nostrils and the mouth. A straight carving knife was used to cut a narrow slit for the turtle’s mouth, as well as to clean up some other cuts.
A somewhat different technique was used to carve the background that surrounds the turtle. Rather than following a drawn line, I just scooped out adjacent indents of random size and location with a small, round gouge. I find the exit portion of the cut is slightly jagged, and that I often need to clean it up. I then burned my initials and the year near the bottom right of the panel.
Finishing
After completing the carving, I coated the panel with tung oil sealer. The panel was then painted using acrylic paints. These paints can be found at any craft store and they are not expensive. I find that a very little paint goes a long way. I purchased my favourite brush for this work for about $1.
The colours black, brownish-red, white, and somewhere in the bluegreen range are traditional. I kept to three of these colours but used tan rather than white.
Another tradition is that the uncarved surfaces are usually painted black and/ or brownish-red. The carved surfaces are painted white and/or blue-green, or are sometimes left unpainted.
I started by painting much of the black areas of the turtle, followed by the green and tan portion on many of the uncarved surfaces. All of the carved surfaces were left unpainted.
Often (in fact, so far, always), after I finish the painting, I find it’s necessary to go back and recarve some of the grooves because I have slopped some paint into them. Usually, I also need to repaint some spots where I’ve dripped one colour onto another. I find the acrylic paint has good covering qualities, therefore this is not a big deal.
After painting the appropriate surfaces I applied another coat of polymerized tung oil sealer, followed by two coats of polymerized tung oil, leaving a day between each coat. I then encased the panel in a simple custom built frame so I could hang the piece on a wall.
Carving with my grandson
My 11-year-old grandson Ethan had a school project to write a mythical essay accompanied by a drawing. The legend that Ethan concocted was about the origin of a pike fish. In that rather convoluted legend, lightning struck a deadhead (Northern Ontario term for a submerged log) and turned it into a pike. Ethan obtained permission from his teacher to submit a carving, rather than a drawing, with his project.
The design, which was about 80% Ethan’s and 20% mine, is more realistic than in the Haida tradition. Several aspects of their carving styles are incorporated, and the same carving tools and techniques were used. Of course, Ethan obtained an A on the project, his teacher displayed the carving for the rest of the school year and I’m one proud grandfather.
Carving is a great introduction to woodworking for kids. As long as they are respectful of the dangers, and sharp tools are used, the results are often surprising. Keep the projects simple, especially with younger kids, as their attention is limited. It’s better to have a good experience on a small project, than to muscle your way through a large project and have a poor experience.
Photos by Frank Pellow (Lead Photo by Rob Brown)
Respect the Materials
To use his valuable stock of avodire respectfully and carefully Pellow resaws pieces for his projects, and glues them to a plywood backer.
Symmetry is Easy
Once the design has been determined Pellow uses carbon paper to transfer it to one half of the project, then flips it to create a symmetrical design.
Lots of Tool Options
From left to right, a parting tool, gouge, skew and carving knife are great to have for this project, but you can get away without all of them. Carving tools come in a wide range of sizes, and can be sized to the typical scale of work you do. (Photo by Rob Brown)
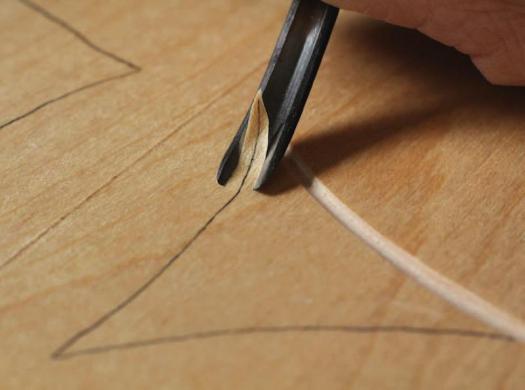
Get to Work
With the workpiece clamped to a stationary surface Pellow starts working on the carving. Simply following the lines, and using different carving tools as needed, is all that’s necessary.
Simple Gouges
To create an appealing background use a small gouge to create a series of random, shallow cuts in the wood.
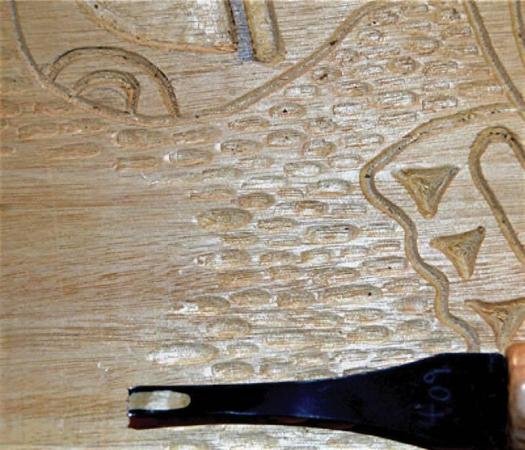
Not Too Deep
When using smaller carving tools ensure their upper edges don’t sink below the surface while cutting, as tearout will be excessive. (Photo by Rob Brown)
Time to Paint
With the carving done, and one coat of tung oil sealer on the project, Pellow colours much of the uncarved portion of the turtle black. This approach is typical of Haida art.
Kids Enjoy Carving
A simple carving, based on some Haida-inspired art, is a great way to introduce kids to woodworking. The designs they create can be theirs, and can have meaning to them, increasing the chances of success and long-term enjoyment.

Finished Pike
This pike carving was designed and created by Pellow’s grandson Ethan. It was a part of a school assignment.
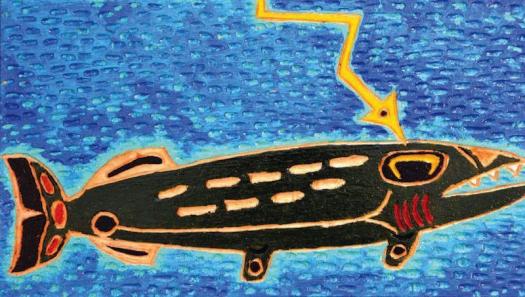
Illustration by Len Churchill


Quote: “Respect the Materials – To use his valuable stock of avodire respectfully and carefully Pellow resaws pieces for his projects”
Question: How far back was avodire available to Haida woodcarvers?
I have a frontlet panel that appears to be mahogany and looks old. Pretty sure is is not a counterfeit from Asia. My research got me here…thank you in advance.