PROJECT
Build a wall cabinet with a sliding door

Rob Brown

Find more Cabinetry projects projects
This simple wall cabinet is easy to build, and the single sliding door offers a good opportunity to add colour, texture or another decorative touch.
My kids read a lot, and they wanted somewhere to store a few books. As they’re not paying customers, I didn’t want to spend forever on this project, but I did want to be able to add a unique detail to each cabinet and make them a piece of furniture they would be proud to have for the rest of their lives. I let each kid decide on the colour, and type and pattern of texture they would like to give them a bit of a say in what their cabinet would look like.
Build a wall cabinet with a sliding door
Materials
Plywood is super strong, and can be very easy to work with. Some people much prefer to work only with solid wood, but I think plywood is especially great for casework. I will often use solid wood to protect the edges of plywood cabinetry, door frames and other structural and decorative parts.
As is typical for sheet goods, plywood is usually available in 4′ x 8′ panels. As you can imagine, these dimensions make transporting and working plywood difficult. I opted to order the plywood for this project online from Home Depot. They offer Columbia Forest Products sheet goods in 2′ x 4′ panels, making machining much easier. They even delivered it to my front door, which was super handy. It’s available in many face and back veneer species, and also a few different core types. I chose a Baltic birch core with maple face and back veneer. I used solid maple to cap each cabinet’s four front edges and sliding door.
Design
Since I knew the plywood was going to be 4′ long and 2′ wide, I designed the cabinets to work within these dimensions. The overall width was going to be just under 4′, the depth and height were both just under 12″. I wasn’t concerned with the exact finished dimensions of the case, which made it easier. Between kerfs and trimming the perimeter of the plywood to create a perfectly smooth finished edge, the finished cabinets measure about 47-3/4″ long by 11-3/4″ deep and high.
I like the visual simplicity of a bevel joint, so I opted for that approach for the four corners of the case. Sliding dovetails, which are exceptionally strong, secure the divider to the top and bottom. A simple glued bevel joint can be slightly on the weaker side, but the divider provides a lot of strength, so even if the cabinets are full of books there will be enough strength to hold things together. The 3/4″ thick back provides some strength to support the books and provides a solid way to secure the cabinets to the wall.
Start with the case
I ripped the panels in half to break out the top, bottom and gables. I then rotated them 180° to made a trim cut on the other edge to create two perfectly clean edges. This used up 2-1/2 sheets. I used half of the remaining half sheet for the dividers. Another sheet was ripped in half to provide me with the two backs.
In hindsight I should have glued the 1/4″ solid edging to the front edges of the top, bottom and gables at this point. The solid edges could have been trimmed to length and bevelled at the same time as the plywood panels. I applied it after.
There are many approaches to cut the four bevel joints to secure the four corners of the case. Use whatever method you have tooling for and are comfortable with. I used a method I’ve written about before in CW&HI that involves cutting the parts to be bevelled to size, then tilting the table saw blade to 45° and setting up a sacrificial fence to guide the workpieces. See the information at the end of the article to find more information.
I cut the tops, bottoms and gables to finished length, then used the technique to bevel the ends of these parts.
Apply solid edges
As I mentioned, I should have applied the solid edges before bevelling the case parts, but my approach wasn’t overly difficult. I machined the edges, cut them to rough length and applied them. For the short gables I just used masking tape to clamp them in place while the glue dried. For the longer top and bottom panels, I used a few strips of masking tape to hold the solid edges in place, then brought two parts together, solid edge to solid edge, and clamped them. This uses a lot less tape and was slightly faster.
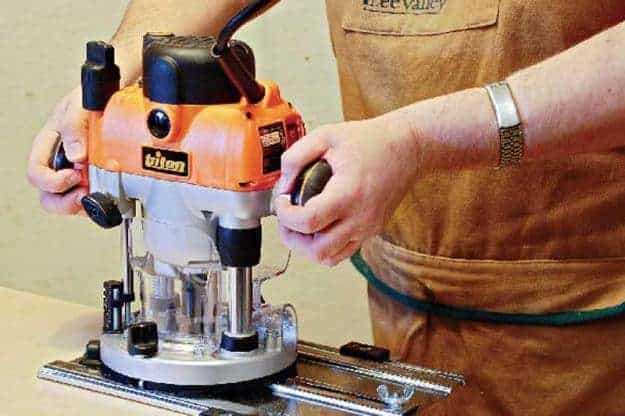
When dry, I removed the tape, scraped the glue and used my router to trim the solid edges flush with the faces of the workpieces. To do this I installed a 3/4″ straight router bit in my router, then attached a simple plywood jig that covered just under half of the router’s base. Once the base height was adjusted so the bottom of the bit was perfectly flush with the underside of the plywood base, I was able to run the base on the workpiece while the bit machined the solid edging flush with each workpiece’s face. The most important detail was to ensure the router didn’t tip while flushing the solid edges. If it even tips a few degrees it will dig into the plywood face, causing a mark that will likely be impossible to sand out without going through a layer of plywood.
Using a Japanese flush-cut hand saw, I trimmed the solid edges flush with the bevelled ends of the plywood workpieces. I made sure to press the saw into the bevel in order to keep the cut in line with the bevelled edge. If any solid wood remained proud of the bevelled plywood edge, a sharp chisel would save the day.
Edge profiles
Although there’s nothing wrong with leaving the solid edges square, I thought a partial round over was the most visually appealing approach. I set up a 1-1/2″ diameter round over bit in my router, adjusted the height and machined the solid wood edging on the tops, bottoms and gables.
Add some grooves
The sliding door in each cabinet slides in a pair of grooves; one shallower groove in the bottom and one deeper groove in the top. These grooves should be machined now. Their exact width and depth aren’t critical, but I machined them both 3/8″ wide. The depth of the groove in the bottom is 3/16″, while the depth of the upper groove is 3/8″. The upper groove must be deeper, because the tenon in the upper edge of the door will fit into it and slide upward, allowing the lower door tenon to be positioned over the lower groove, then the entire door can be lowered into position. Because the upper tenon is longer, it will still be engaged in the upper groove when the door is in position.
Rabbets to accept the back can now be machined in the top, bottom and gables.
I made the depth of these rabbets just over half the thickness of the material. The width of these rabbets fits the thickness of the backs.
Divide and conquer
Sliding dovetails are very strong and not overly hard to machine as long as you take your time with the dovetail tenon setup. I used a simple right-angle jig to machine the dovetail grooves, and a router table for the dovetail tenons. Start with the dovetail grooves in the tops and bottoms, then fit the tenons to the groove.
The grooves go in the center of the top and bottom, and are about 5/16″ deep, though the exact depth doesn’t matter much. Too deep and the entire workpiece will be weakened. Too shallow and the mechanical aspect of a dovetail won’t be realized. Generally, I would aim for a bit less than half the depth of the material you’re working with. The dovetail bit you chuck into your router also can’t be wider than the thickness of your workpiece. I used a 1/2″ wide bit.
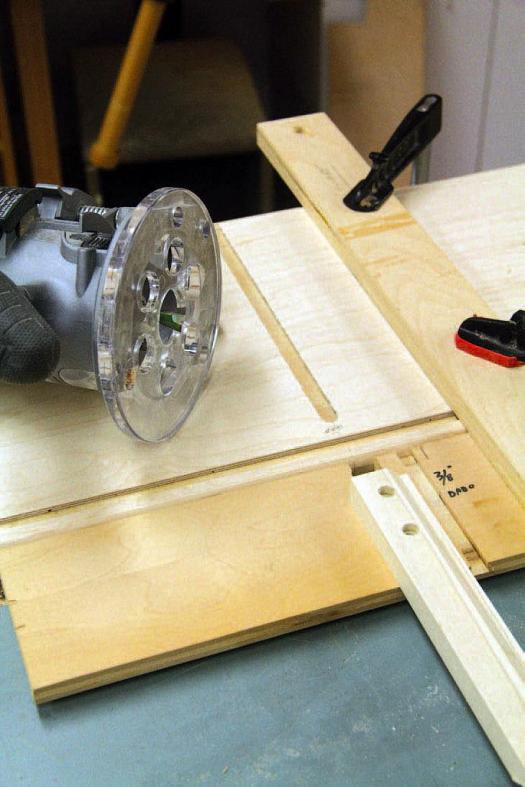
I marked a very light line in the center of the length of the tops and bottoms, then measured the width of my router’s base. I then offset the line by half of that amount, and added a more visible line that distance away from the first line. This line is what I used to align the right-angle jig with.
Next was to position and clamp my right-angle jig to the workpiece in line with the darker line I just added. The dovetail groove was stopped, meaning it only exits one side of the workpiece – the rear. And since the rotation of the router bit will cause the router to push one way while machining the joint, ensure the right-angle jig is on the left side of the router while it’s being pushed.
The final thing to consider when using the jig is that the alignment half of the jig (the arm registering off the edge of the workpiece) is registering off the front edge of the workpiece, not the back edge. This allows you to screw a stop block to this arm to stop the dovetail groove at the correct spot.
You might even have to make another one of these simple right-angle jigs with the alignment arm on the opposite side of the guide arm. Not a big deal, as they’re easy to make, and once you realize how useful they are you will need multiples down the road. Different situations require different jigs. Lay out the location of the door, then leave a 1/4″ gap between the door and the front edge of the divider. Stop the dovetail groove about 1/4″ away from the front of the divider. Finally, ensure your router (especially the handles) will clear the clamps and jig while it’s running along the edge of the jig. Rout the dovetail grooves in the workpieces.
Dovetail tenons
Move the same dovetail bit you machined the grooves with into your router table and set the height so it’s a good 1/32″ lower than when it machined the grooves. At this point some math will tell you how long to cut the dividers. The formula is the distance between the inner bevels on the ends of the gables, plus twice the height of the router bit in your router table.
My first pass on all the parts was only about 1/8″ deep, and was just to score the outer edge of the joint. This reduces tear-out. I then gave the faces near the joints a slight sanding to remove any burrs. From here, I moved the fence in slightly, made another pass on one of the workpieces, and snuck up on the perfect fit.
Don’t cut too far or you will need to glue a piece of solid wood to either side of the dovetail tenon and re-machine it. A perfect fit will slide together with very little force. I find when the joint is glued it goes together a fair bit tighter, and the last thing you want is a joint that won’t go together during glue-up. Machine the front ends of the dividers, too, so you have an edge to cut to when fine tuning the front edge of the joint with a hand saw and chisel.
Assembly
Sand the interior faces of the top, bottom, gables and dividers. Best to smooth the front edge profile now, too. In hindsight, I should have also applied a thin layer of finish to the inner faces of the four outer parts, as well as the divider at this stage. It would have been easier to apply a smooth coat right into the corners before assembly. Just be sure to not get any finish on the joints, as that will weaken the glue bond. I’d recommend a few light coats of shellac. It’s easy to apply, dries quickly, provides enough protection for an inner surface like this, and is also easy to keep off from surfaces that will be glued. Pad it on, then when dry, hit it with some #0000 steel wool and wax.
Setting aside the divider for now, place the outer case parts face down on a flat surface in the order they will need to be joined (for example, top, gable, bottom, gable). Although it’s hard, try to keep all four parts on one plane. Butt the bevelled edges up against each other so they’re touching and stretch several pieces of masking tape across each of the joints.
Turning these four parts over at the same time is a bit of a magic trick. I clamped a piece of scrap across the parts so they would all move in unison. It still wasn’t easy to do without pulling some strips of tape off, though. If only a few pieces fall off, you can add them back on shortly. If an entire edge falls off or breaks, start over.
Apply glue to the bevelled edges. Too much and the joints will be harder to close, and there will be squeeze-out everywhere. Carefully wrap the four parts together, adding strips across the final joint when you’re done. Insert the divider while the assembly dries to ensure it will fit. Set aside to dry, ensuring it’s square. When dry, apply glue to the dovetail grooves and tenons and slide the divider into place. A mallet and block will likely be needed. Next, cut and install the back panel, ensuring it’s properly glued and clamped in place. It will take all of the weight, as it’s what will be attached to the wall.
Sliding door
There are many options for the style of door you can add to this cabinet. A standard frame and panel door will work wonderfully. A veneered panel door works well, too, and will allow you to feature exotic or figured wood on its outer face. I opted for a solid wood door. There’s nothing wrong with hinging a door, but because I like the look of a sliding door, and enjoy the function, that’s what I went with. It also allowed me to add some decoration to its face.
I could have edge-glued flat sawn boards together to form the sliding panel, but the grain wouldn’t be harmonious. I ripped 1″ wide strips of dressed 6/4 lumber, rotated them 90° and glued them into a panel. The finished look is very simple and will show off the texture and colour I planned to add.
Once the panel was dry, I cut it to size. The height of the door needed some consideration, as stub tenons will be machined into the top and bottom edges, and the door had to fit the grooves properly to work. The height was equal to the distance from the upper face of the bottom to the top of the upper groove. This would allow for quite a snug friction fit, so I removed another 1/16″ to allow the door to be installed more easily. I left the door panel wide until the tenons were machined.
Sliding door tenons
I centered both tenons on the thickness of the door. The lower tenon was easy. The length of the tenon should be equal to the depth of lower groove, plus 1/16″. The extra 1/16″ is to provide a visual gap between the bottom of the door and the case bottom. That can be machined now.
The upper tenon isn’t difficult, but you should test the fit as you go. The distance between the bottom edge of the lower tenon and the upper tenon shoulder should be about 1/32″ less than the distance between the case bottom and the case top. This will allow the upper tenon to slide into the upper groove, while the lower edge of the tenon can be moved into position over the groove, then lowered into place.
If this all sounds confusing, use a piece of scrap plywood or particleboard to machine the tenons and test the fit. Even using a piece of scrap solid wood a few inches wide and cutting tenons on its ends will work well as a test piece.
The tenons should move freely in the grooves, otherwise the door will be difficult to slide. The door will also move with seasonal changes over the course of a year, so this is one time when erring on the loose side might be a good idea.
At this point I cut the door to width, and ensured both edges of the door were parallel to the respective gables. I also added a chamfer to the sides of the door to match the gap at the bottom of the door.
Handles
Creating a finger-pull cavity in the face of the door, installing hidden hardware on both edges of the door and attaching a wood or metal peg or small pull on both ends of the doors, then machining the gable to allow the pull to disappear into it are all options. I opted for one of the most concealed and simplest approaches: machining a rounded finger notch in the back of either side of the door so the user can grasp the door to slide it. Without the notch the user can’t fit their finger between the edge of the divider and the back of the door.
I accomplished this with a core box router bit chucked into my router, a long straight edge to guide my router and a piece of wood to act as a stop. Once completed, I added a bit of texture with a rotary tool to the finger notch to aid in grip.
Textured and coloured doors
You don’t need to add this detail to your project, though you can also modify it dozens of ways. Texture is a great addition to a piece of furniture, and colour also provides a certain level of energy. I let my kids choose the colours, so please…go easy on me! For what it’s worth, I love the hit of colour on these otherwise fairly simple cabinets.
After testing out a few techniques to see how the final approach would work, I decided I needed to apply a few coats of clear finish to the wood before carving, as that would help prevent the colour from bleeding into the grain of the wood on the doors, causing a less than appealing look.
I applied a few coats of Watco aerosol lacquer to the area of the face of the door where the carving was going to be. This sealed the wood from the colour bleeding into the grain after carving. Next, I used a V-gouge to add grooves across the door face. A sharp gouge is the key here. With the grooves complete, I applied a coat of Rustoleum Painter’s Touch 2X Ultra Cover in a colour called “Seaside” over the carving, making sure to not get any colour on the areas of the door that weren’t sealed with Watco lacquer.
To prevent the colour coat from bleeding into the wood fibres, I applied one very thin sealer coat first, let it dry and then applied a regular coat for full coverage. When that was dry, I scraped off most of the colour, and then used my belt sander to remove the final bits of colour on the outer face of the door, leaving it only in the carved grooves. At this stage the doors were ready to be finished with lacquer clear coats. Practising this technique on scrap wood before you start work on the doors would be a great idea.
Add a finish
It’s really four finishes, as the front edges of the case get a coat of the blue, then a light coat of shellac is wiped on the blue edges to seal in the colour and help with compatibility between the blue and the lacquer. For the third finish, the entire case gets about four coats of lacquer. The fourth finish is a coat of shellac, as I didn’t apply one to the inner surfaces of the case when I should have, right before assembling the case.
After making sure the surfaces were sanded, and all edges were eased, I applied the colour to the edges. This was a bit tricky, as I didn’t want any overspray to get on the rest of the project. I masked both the inner and outer areas immediately around the edges with masking tape to help with containing the colour. I applied paper to the cabinet’s interior to further contain the spray. To spray a coat only took a minute. Rather than flood the surface of the edge, I applied two light coats as I thought that might better stop any bleeding. Pleased with the results, I’d recommend this approach. Coverage with this product is really great.
When dry, I removed the tape and paper. Because I wasn’t positive the lacquer would properly adhere to the sprayed coats of colour, I padded on a few thin coats of shellac over the coloured edges. When this was dry I applied the lacquer to the exterior of the cabinet. Coats of lacquer were applied to both faces and edges of the door. Even the tenons got full coats of lacquer to help create a door that slides easily.
A bit of wax on the door tenons and inside the grooves, and the door was sliding smoothly. I also used #0000 steel wool and wax to buff the entire cabinet smooth.
I used three #10 × 4″ screws to fix the cabinets to studs, then let my kids put some books inside their cabinets and a few other things on top of the cabinets. They were both very happy with their new additions, and really liked the small but strong hit of colour their rooms had.
Sketches
You can download two SketchUp files prepared by Len Churchill. The download is a zip file of a folder that has the two files in the .skp format. You need the program to use the files.
Photos by James Dobson
Careful Setup
Brown cuts the parts to finished size, then bevels the ends of the gables, top and bottom. Set-up takes a few tries to dial in properly. The bevelled portion should extend out of the workpiece at exactly the same point where the 3/4" wide edge and the outer face of the workpiece meet.

Time to Bevel
Once set up, the gap below the sacrificial fence provides a space for the offcut to go. The parts can now all be bevelled with this single set-up.

Trim the Solid Edges
With the solid wood edging adhered to the front edges of the workpieces, Brown uses a router equipped with a straight bit and a very simple plywood jig covering just under half of the footprint of his router to help trim the solid edges flush with the face of the workpiece. The critical part is setting the bottom of the bit flush with the bottom of the plywood jig.

Flush on All Sides
With the edges flush with the faces of the workpieces, Brown uses a flush-cut hand saw to trim the ends of the edging flush with the bevelled edges. If he had applied the edges before bevelling the parts, this step would have been done automatically at that stage.

Edge Profile
Though no edge profile needs to be added, Brown opted to add a portion of a large diameter round over to the front of the four outer case parts.

Some Math
A pocket layout square assists Brown in marking the location of the sliding door groove. It’s important to keep in mind both where the front edge of the cabinet is, and how far forward the divider comes, as the door should be between both of those points.

Dovetail Grooves
With a simple L-jig and a screwed-on piece of wood to act as a stop, Brown routed the sliding dovetail grooves in the top and bottom to accept the dividers.
Dovetail Tenons
When the sliding dovetail grooves are complete, chuck the same bit into your router table. Set the height so the dovetail groove is about 1/32" deeper than the tenon is long. This eases assembly and ensures the joint seats properly. Sneak up on the proper fence position when setting the tenon thickness.

Trim the Tenon
Although you could adjust the router table fence to make a deeper cut, Brown prefers using a hand saw to trim off a bit more of the dovetail tenon. The more you remove, the further forward the divider will slide during installation.

Tricky Maneuver
The four outer case parts are positioned end-to-end, face down, on a long, flat surface, and then taped together. The tricky part is flipping them all inside-face-up in unison. Brown clamps them together with a few long, thin cauls before carefully flipping them. If a bit of the masking tape breaks, you can add a few more strips over a joint afterwards.

Two-Step Door Glue-Up
Though it’s not necessary, Brown likes the simple visual look of thin strips of quarter cut material on the face of the door. To do this he first rips strips from a 6/4 plank, rotates them 90° and glues them together (top). When dry, he trims the two edges, crosscuts the sections to length and re-glues them to form the wider door panel (bottom).


Two Finger Notches
Rather than visually clutter the sliding door with hardware, Brown routed a notch in either end of the rear face of the door. A long straight piece of sheet stock guided the router straight, while a second piece of wood clamped between the notches stopped the travel of the router. The notch farthest from the camera in this photo has to be started with a plunge cut to avoid climb cutting.

Sealer Coat
To stop the blue from bleeding into the grain around the carved area of the door, Brown applied a few coats of the finish he was eventually going to use to coat the entire cabinet. It was applied to the area where the hand-cut grooves were to be carved.

Getting Groovy
Brown added a set of pencil lines to guide him, then used a sharp V-gouge to carve the grooves. The grooves needed to be slightly on the deep side, as down the road the entire face of the door was going to be heavily sanded to remove all the clear finish.

A Bold Edge
After masking the interior edge and cutting a piece of scrap to contain the overspray, Brown applied a couple light coats of Rustoleum aerosol finish to the four edges of the cabinet.

Scrape It Off
A sharp scraper removes most of the blue spray paint around the grooves that would have otherwise clogged the belt sander belts. Next, a belt sander removes the final bit of finish.

Illustration by Len Churchill