FROM ROB'S BENCH
Carvings and curvy doors

Rob Brown

Blog for October 13, 2022
No sooner had I shared the link from the U.K. contest last week than I got an email from Craft Ontario that included some nice work, especially wood carving projects.
Carvings closer to home
Craft Ontario has just released the winners of their 2022 Craft Awards, and although all the makers are extremely skilled, one wood carver’s work naturally caught my eye. Dan Driscoll, who’s been carving for over 25 years, carves basswood into incredibly life-like objects. Coats, jeans, hats and other items inspire Dan to create carvings of everyday items. Check out his work at DanDriscollWoodCarver.com.
Dan usually carves basswood, shaping it to mimic everyday objects. He often uses bleach to lighten the colour of the wood. As you can see, some parts of his carvings have been finished differently to further trick the viewer into seeing the everyday objects, even though they aren’t there.
Shrouded Anxiety
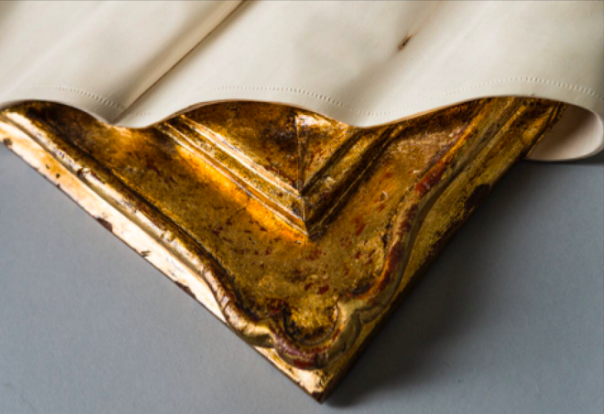
Although it appears to be carved in multiple pieces, it was carved from a single piece of wood. The cloth portion of the carving was undercut over the frame, then the frame was painted gold.

Shrouded Anxiety Detail
The frame portion of the carving was covered with 24K gold leaf once the carving was complete.
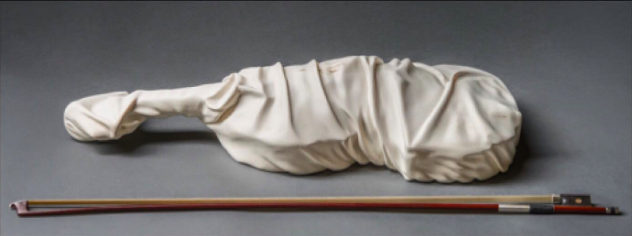
A Shrouded Violin
It’s hard not to try and imagine what the violin under the cloth looks like, even though there is no violin underneath.
Dinner. 8pm
This carving is 37" high, 19" wide and 8" deep.

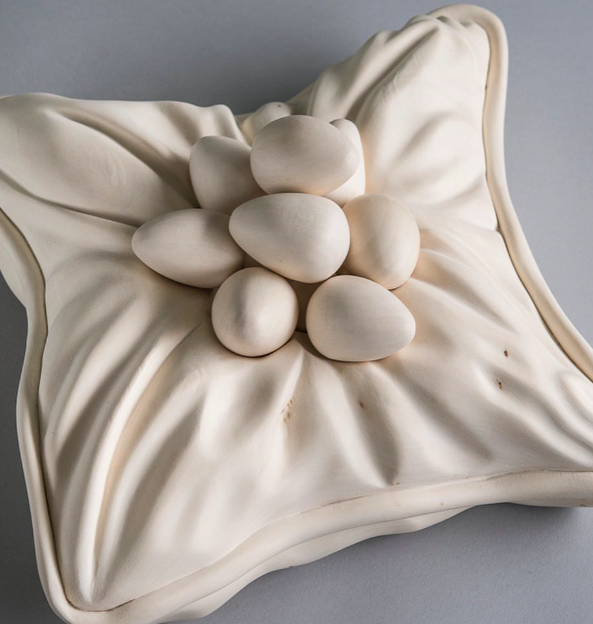
8 Eggs
Bleached wood, 12" x 12" x 5".
Curvy doors
Although the roughest part of our basement renovation is well behind us, I’m still picking away at the remaining bits and pieces. More trim (does it ever end?!), some painting, a few built-ins and a host of other miscellaneous odds and ends and we’ll be done.
The small bathroom is 99% complete. A toilet paper holder needs hanging, a couple of towel hooks have to be installed and I have to make and install three small inset shelves. Last on the list, the mirror frame is ready to go as soon as I have the mirror back from the glass supplier. The mirror frame screws are already installed in the wall, and the mirror frame was test fit, so all I need to do is clean the mirror, install it with a few glass clips and hang the frame on the screws. It’s easygoing at this point.
The floating vanity I made is now completely installed and in working order. It’s a simple cube design with beveled corners and no bells and whistles. I did, however, add a bit of flair to the two doors. Rather than leave them as slab doors, I cut a few curves in them, added a tiny bit of blue milk paint to some edges and fit them in the cabinet. It’s nothing major, but I think the effect is striking. I’ll be writing an article about how I made the vanity cabinet and created these two doors, but until then here’s a sneak peek of the nearly finished curvy doors in my shop.
Curvy Parts – This is how everything looked after I cut out the curvy parts from the blank. The next steps were to colour the visible edges and reassemble the parts. The centre joint would be the gap between the two hinged doors.
Test Fitting – With the doors reassembled it was time to hang them. After they were hung and cut to size so the gaps around each door would be even, I applied a finish to the doors.


Wow!