FROM ROB'S BENCH
Another leaf table

Rob Brown

Blog for January 25, 2024
It seems weird to be talking about tree leaves in the middle of a Canadian winter, but here we are.
Last week I mentioned how I had installed a small maple shelf shaped like a maple leaf that I figured would never find a home. I also mentioned a black cherry leaf coffee table I made years ago and a ginkgo hall table I made about 12 years ago, though I was brief on details about the later table.
Stack it up
At the time, I was fascinated with the general shape of leaves, and could only see them as a template for a tabletop or other piece of furniture. I’ve always liked the unique shape of the ginkgo leaf and decided that would be my inspiration for my next piece. I had just gotten into power carving and needed something to practice my skills on. The match was perfect.
I started by cutting about 10 wedge-shaped pieces of black cherry, then gluing them together one at a time to form the semi-circular blank for the top. Remembering back to my little maple leaf shelf, and the fact that I wanted to work in three dimensions rather than just two (width and depth), I knew the material I was working with wasn’t thick enough to give me what I wanted in terms of depth. I glued on some extra pieces where the shape of the leaf would flow above and below the existing top and bottom surfaces. This technique is known as “stack laminating,” and produces a workpiece of more than one layer of material stacked upon the previous layer. At this point I had the overall design and shape pretty much set in stone, and just had to power carve the waste away.
Start power carving
At this stage, I had the basic blank, with extra segments glued on its upper and lower surfaces, as well as a clear line on the end grain of the blank that would help guide me when power carving the ginkgo leaf shape.
I worked my way across the upper surface first, taking some material off here, some material off there, working evenly. I didn’t get too close to the line at first. After working on the top for a bit, I flipped the blank over and removed some of the waste from the underside.
I eventually made a few cuts into the front edge of the blank to create some negative space in the front edge of the leaf tabletop and create a more organic-looking shape.
Bit by bit, I power carved more of the waste away, taking lots of breaks to turn off the grinder, take a step back and look at my progress from about 5′ to 10′ away. When you’re working so closely with a workpiece it’s often a good idea to eventually step back now and then and take in the big picture to see how the different sections relate to each other.
Hand tools are next
Once I felt I had removed enough material with my power carving equipment, I turned my attention to fine-tuning the surface with hand tools. A mix of smaller hand planes, rasps, spokeshaves and chisels were my main weapons. The power carving tooling leaves surfaces that aren’t overly smooth, so hand tools help even up these surfaces.
Part of this process included ensuring the outer few inches of the tabletop weren’t overly thick. I thought it would look more natural if the outer few inches of the leaf top tapered evenly to a point.
Once the main surfaces were more or less even and tapering naturally towards the extreme outer / front edge, I started to take a much closer look at the very front edge of the tabletop. It ranged from about 3/8″ thick to about 1/8″ thick, though my goal was to have the upper and lower faces taper together and meet at the same point, without a short flat section between the two surfaces.
Not much material needed to be removed at this stage. It was mainly rasps and files that helped me bring the upper and lower surfaces to one common meeting point along the front edge of the tabletop.
Once this was complete, it was time to sand. A few different sanders helped me get into the curved faces to smooth out all the curves. I trimmed the rear edge of the table to straight, then added the curve to the point where all the wedge-shaped laminations met. Another approach I considered was adding a stem to the tabletop, though that would have added a lot of challenges, both from an aesthetic and technical standpoint, so I eventually dropped that idea and settled on the final design.
A foot to stand on
Although not nearly as exciting as the tabletop, a base was necessary. Rather than make something that pulled too much attention from the top, and create a table that was overly busy and complex, I opted for some curved bent laminations extending upwards from a half-round base.
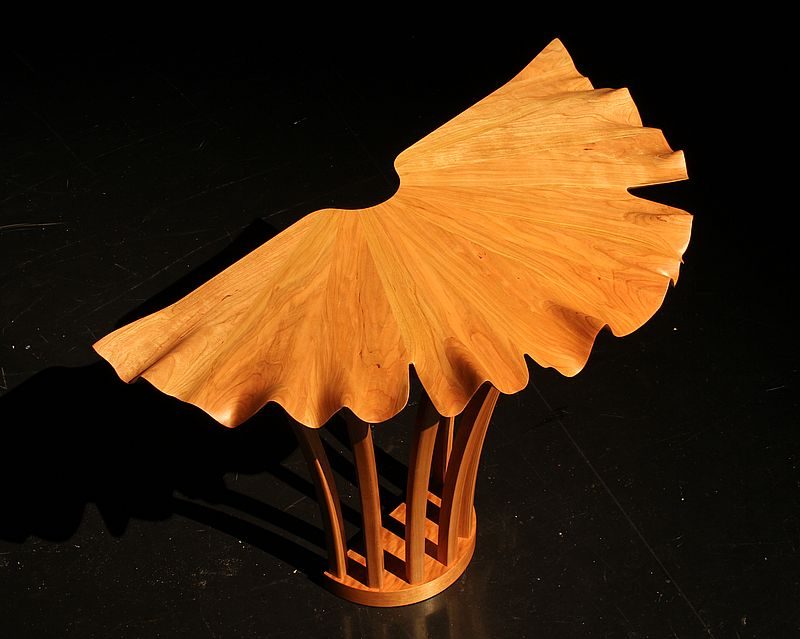
The base alone wouldn’t safely keep the table upright. There are a pair of cleats on the underside of the top that allow the owner to secure it to the wall so it won’t topple over.
It was a lot of fun to design and build. It was one of those projects that I really didn’t have a good idea of the final design when I started the project. It evolved a lot along the way, which is how I like to work. I sometimes get into trouble with this approach, but more often than not, I end up with a piece I would have never been able to come up with in my mind beforehand.
All this talk about the natural shape of leaves makes me want to get out the power carving equipment and see where it takes me.
Simple Stack Laminations
Once the main section of the top was laminated, I determined where more thickness was needed, then glued other smaller blocks in place. You can see the dark line on the front edge of the tabletop blank I was working towards.
Rough Shape Is Taking Form
At this stage I had removed a bit of material from both the upper and lower surfaces of the top and the overall shape was starting to take shape.
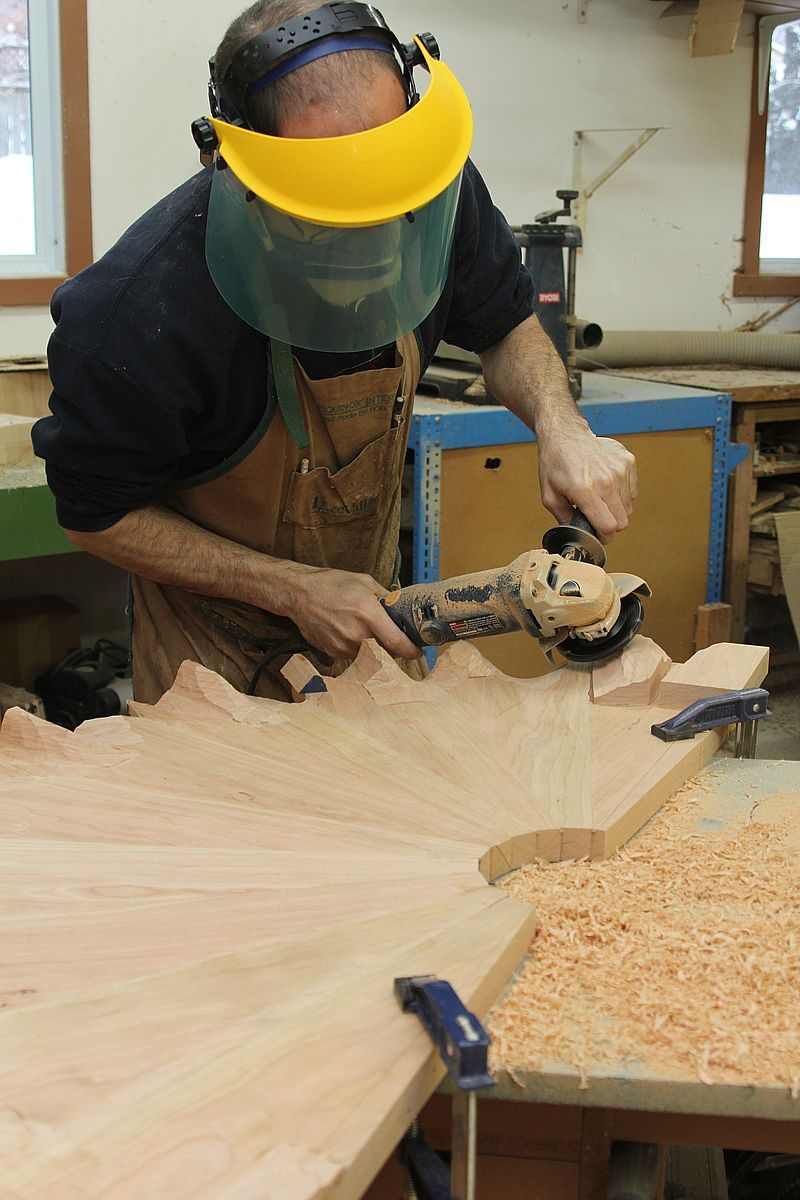
Protect Yourself
Tapering the stacked blocking is a big part of creating an organic-looking leaf shape. Take your time, step back to check on progress, and enjoy the ride.
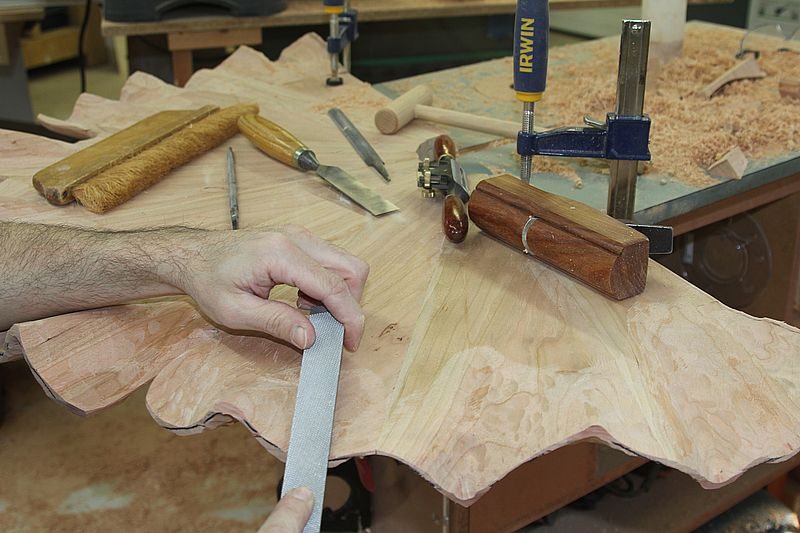
Smooth Operator
At this stage I was mostly using hand tools to fair the transitions between the curved surfaces and ensure the surfaces were fairly smooth and didn’t have machine marks from the power carving.
To a Point
Here, the process of reducing the front edge from a small, flat surface to nothing at all, requires care. My goal was to end up with a knife edge at the front perimeter of the tabletop.

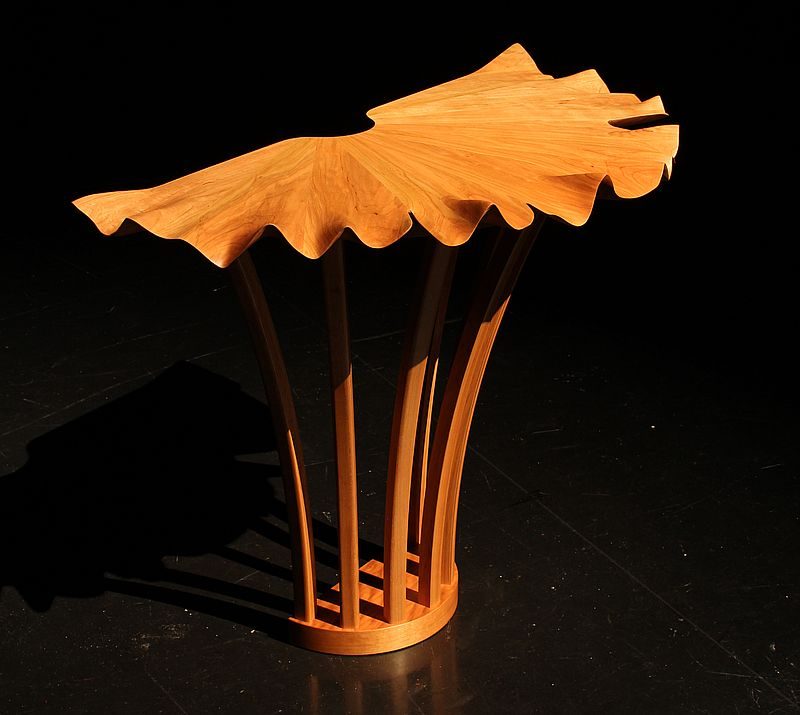
Front View
The power carved tabletop is supported by seven bent laminations that extend upward from a semi-circular base.

Almost Freestanding
Although this piece is standing by itself in these studio photos, I wouldn’t trust it to stand up to day-to-day use without falling over. It will get attached to a wall at the owner’s home.
Laminated Top
Here you can see the wedge-shaped parts that make up the tabletop.
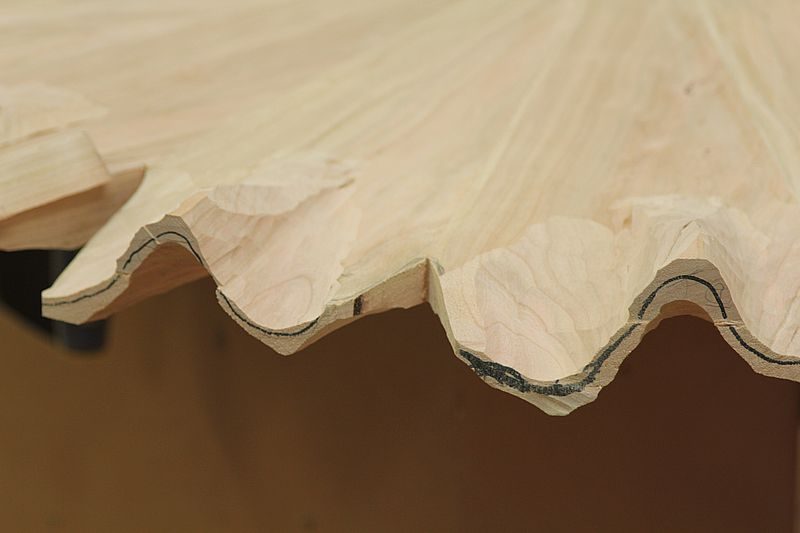
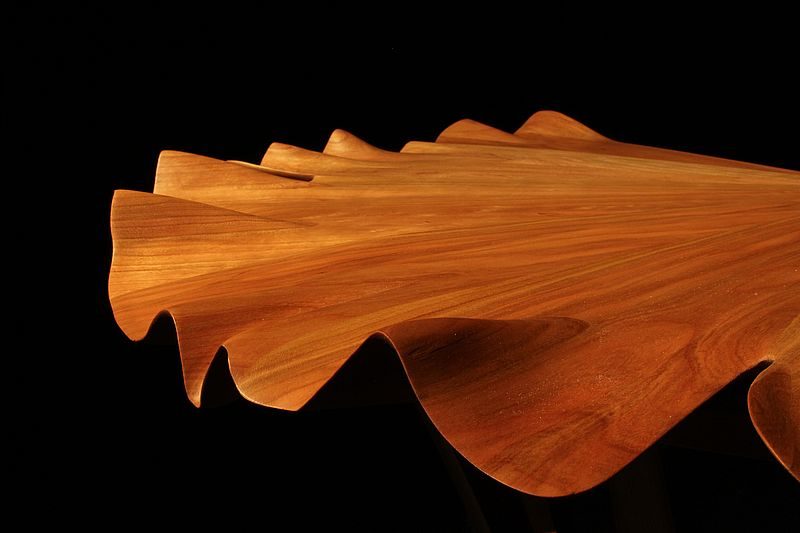
Wooden Waves
A closeup of the power carved and smoothed edge, showing what reminds me of waves in an ocean or lake.


It looks like a water lily leaf floating on a pond. Beautiful work Rob!
Lovely! That edge makes the whole top look as thin as, well, a leaf.
Very, very nice and refined shape !
Looks great Rob!