PROJECT
Build a night table

Craig Kosonen

Find more Tables projects
A host of joinery brings this night table together. It’s a project that’s as fun to build as it is to use.
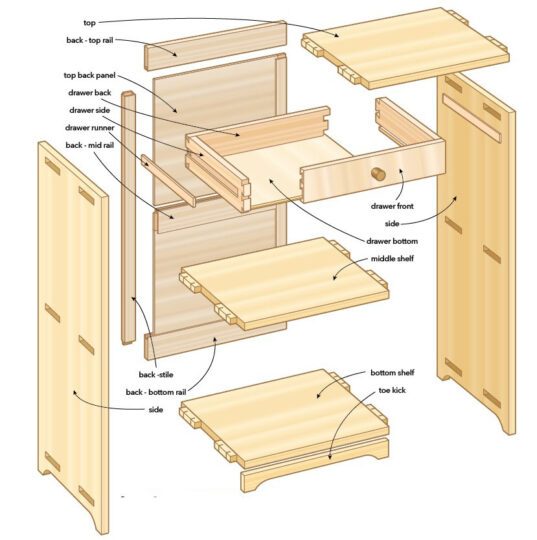
I designed this night table, which doubles as a bookshelf with two shelves, for my daughter. A lip around the top keeps things where they belong. Wedged-through tenons provide strength to the top and shelves while breaking up the plain flat surface of the sides. The back is frame and panel to provide visual interest as well as strengthen the whole structure. To prevent this tall, narrow piece from looking too top heavy, the stock is on the thinner side, 5/8″. The drawer is also side hung on wood runners so a rail below the drawer can be eliminated.
Build a night table
Stock preparation
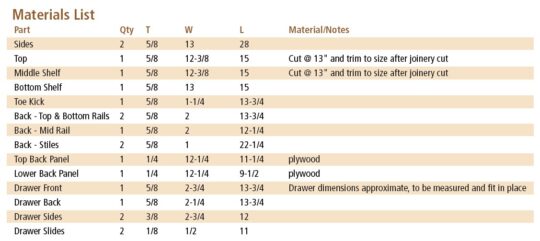
Take care in buying and selecting lumber for this project. The sides and shelves are all solid panels, so you want them to look like a single board and not glued up. Unfortunately, finding 13″ wide stock is unlikely, and having the tools to mill 13″ stock might also be unlikely, so chances are you’ll be gluing up your stock. Aim to glue up each component from the same board, which will keep the colour and grain consistent in the glue-ups. I was able to get both sides from a single 7-1/2″ wide by 10′ long board. The extra width and length on each piece gave me a bit of room to play with to ensure the grain flowed nicely across the glue lines.
The top and one shelf came from another board, with the second shelf, front stretcher and back pieces from a third board. Getting the perfect grain match on the shelves is of lesser importance, compared to the sides and top, as they will likely be obscured by objects.
Once your shelves and sides are milled and glued up slightly oversize, it’s time to trim them for joinery. Rip them all to the same width. The top and shelves will eventually be trimmed again, but to keep the joinery simple they stay the same width as the sides for now. Next, crosscut the sides to final length at this stage, and cut the top and shelves 1/8″ long. Use stop blocks while crosscutting to ensure the parts remain the same. Save some offcuts from this stage to help you lay out the mortises later.
The frame for the back, drawer parts and front stretcher stock can also be milled up at this stage. All the pieces can get cut to width, but the length should be left a bit long, as they will be cut to length once the case joinery is completed.
Joinery layout
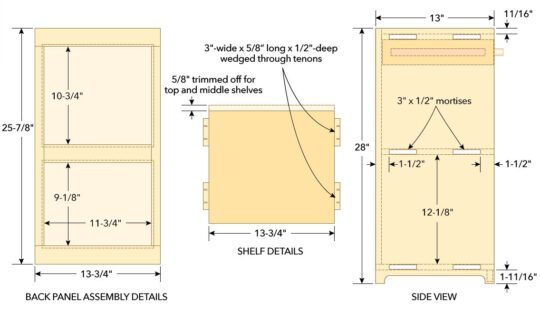
Before the joinery gets laid out, remove a small amount of material from both faces of the top and shelves to form the final thickness of the tenons. This can be done using a dado stack, though you could also use a router table. Ensure you don’t cut beyond the shoulder-to-shoulder width of the nightstand (13-3/4″). The exact thickness of the tenons isn’t important. I aimed for 1/2″, which means setting the dado depth to 1/16″. The tenon will be centred on the workpiece, because once one side is cut, the board gets flipped and the second side is cut. Using the offcuts from the previous step, create a 4″ wide tenon which can be used to help lay out the joinery. You can also forgo the spacer and just use layout tools to lay out the mortises.
Now the joinery can be laid out. Mark out the tenon side cheeks and mortise side walls using two marking gauge settings. Reference off the front edge, then the back edge, to create two symmetrical mortise and tenons. If you’re using a bandsaw to cut tenons, you can skip marking them, as a fence can be used to maintain proper dimensions while trimming them.
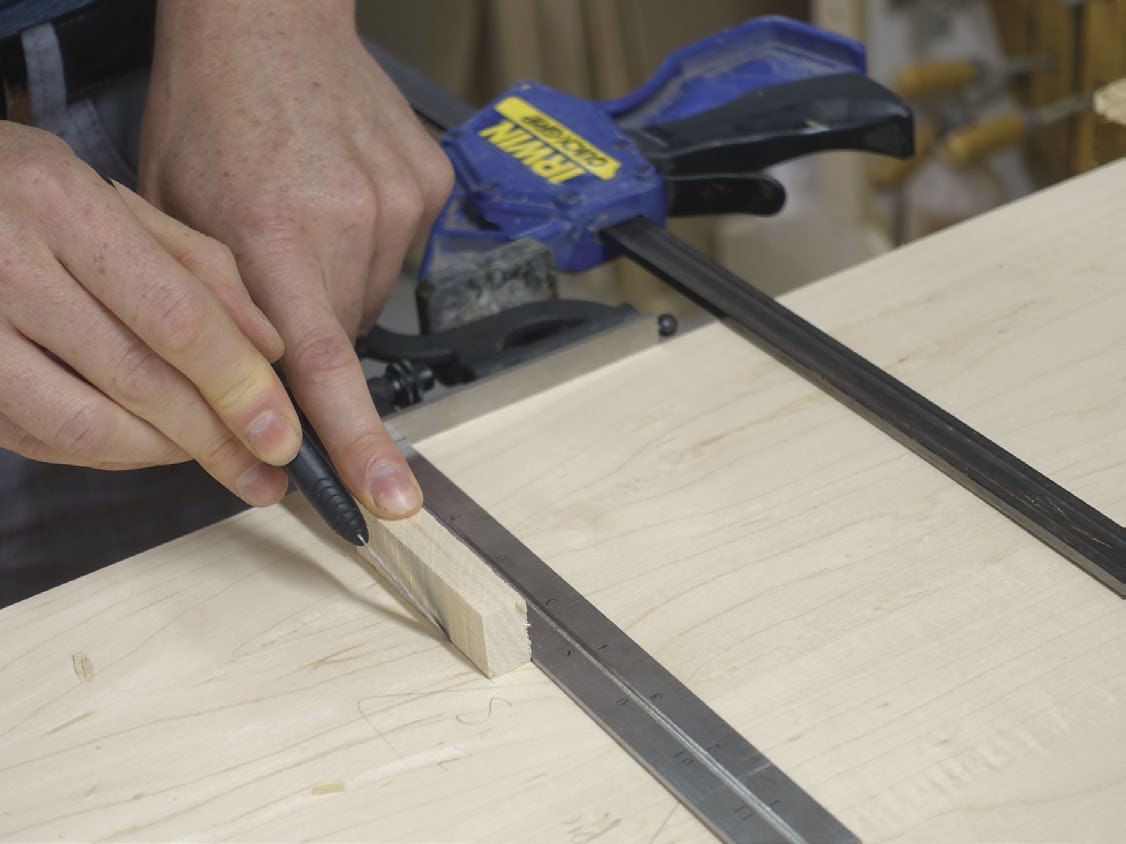
The long edges of the mortises are marked by using the spacer blocks created previously. Set the marking gauge fence for the far edge of the mortise, then use the spacer block between the marking gauge and end grain edge of the workpiece to mark the near face. This ensures that whatever setting you have on your marking gauge, you’ll end up with a thickness equal to the thickness of the tenons. Mark the pair of centre mortises using a combo square or other straight and square straightedge.
Position it for the top of the mortise and then use the spacer block for the bottom edge of the mortise. This can be a three-handed operation to hold the square, spacer block and marking knife; use a clamp so nothing shifts. Mark the mortises on both sides of the workpiece.
Tenons two ways
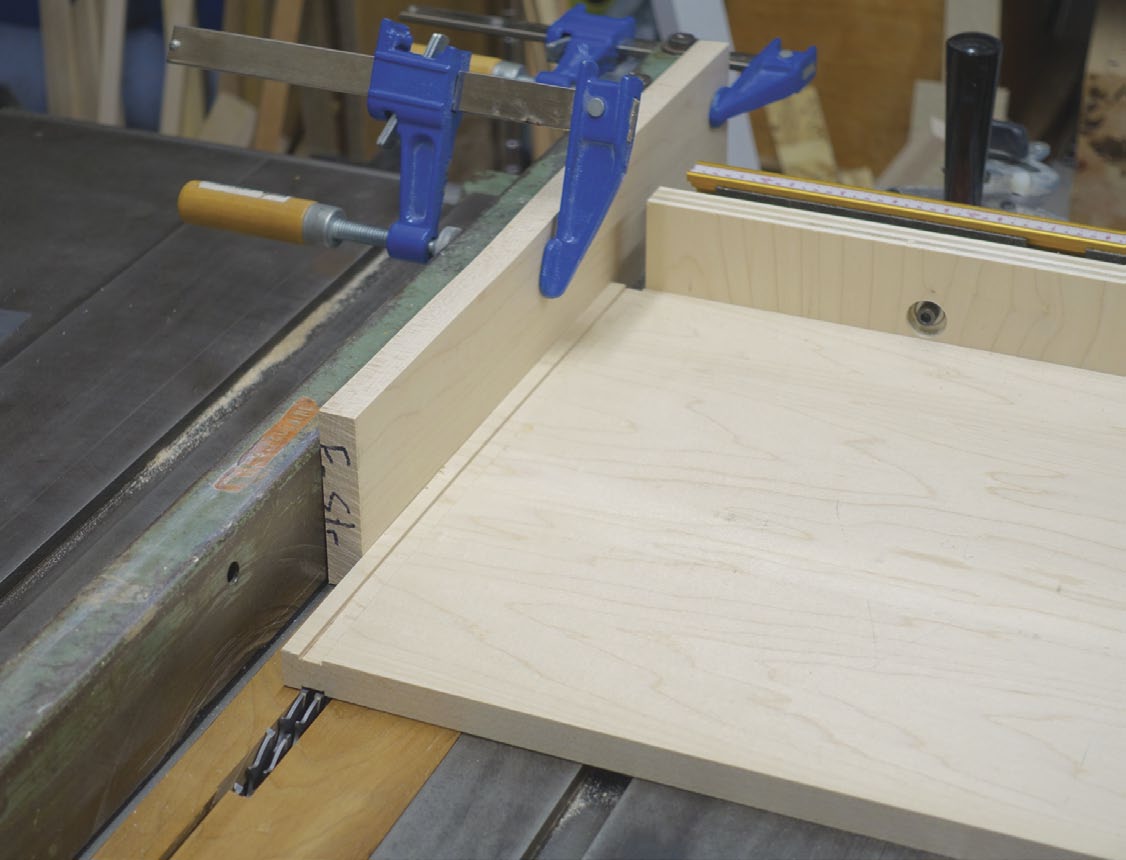
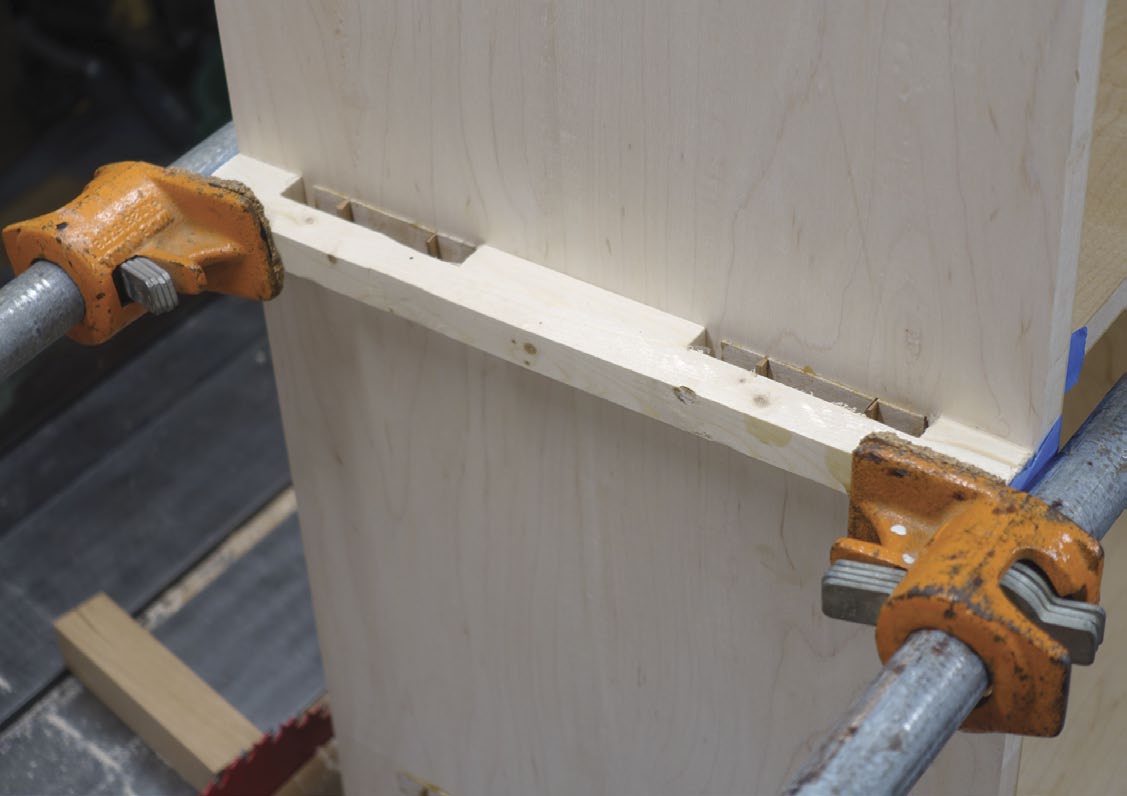
A bandsaw makes quick work of cutting these tenons, and only two set-ups are needed, just like when you marked the tenon side cheeks with a marking gauge. Use the bandsaw fence and set it to one of the side cheek marks. Cut a couple of test pieces to ensure your fence is set up properly. The shoulder that was cut with the dado stack will obscure this cut, making it easy to overshoot and cut into the shelf. To protect against this, set a stop block on the fence to stop the piece before it goes too far. Repeat the process using the second setting to cut all the tenons.
A handsaw would also make quick work of these tenons. There is no bandsaw fence to rely on, so go the extra mile and fully mark all sides of the cut so you have a clear visual when sawing.
While the tenons are being cut, it’s a good time to cut the kerfs on the tenons for the wedges. This can be done at the bandsaw using the fence and stop block, or by hand. Aim to cut these kerfs only 1/2″ deep. The wedging action is across the grain, so there’s a risk of splitting the sides or shelves. Keep the kerf shallow to reduce that risk. Also keep in mind that these wedges are only meant to add slight outward pressure to the edges of the mortises. They are also partially aesthetic.
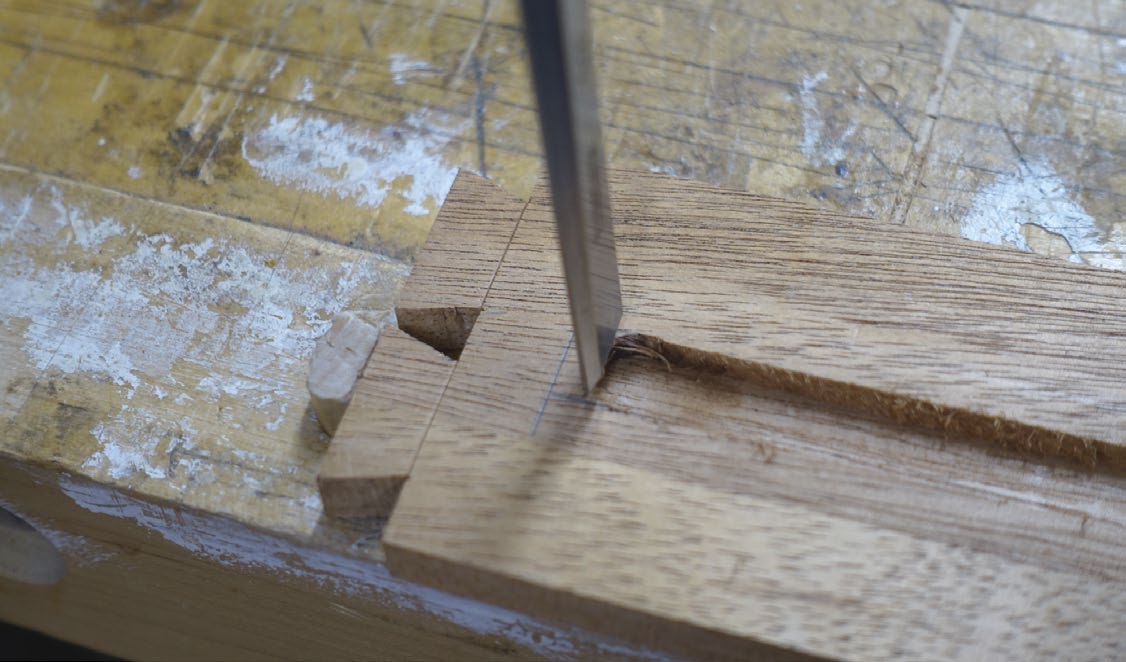
A coping saw cuts out the waste and then some chisel work cleans up the baseline. The shoulder cut by the dado stack makes a nice reference for the chisel. Angle the chisel to undercut it slightly to make fitting a bit easier.
Cutting mortises
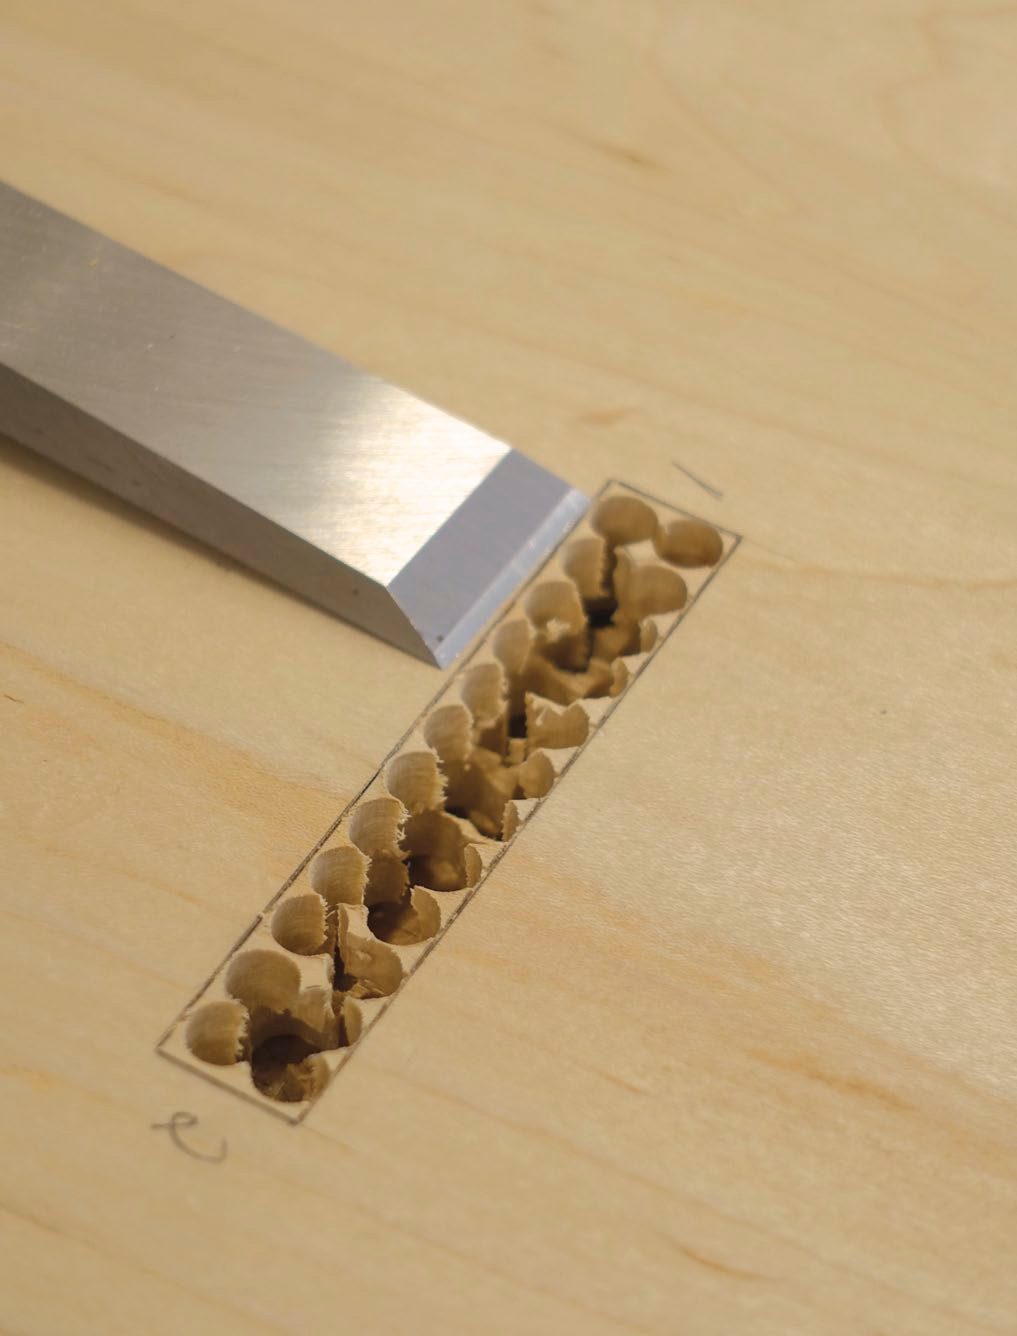
Start the mortises at the drill press using a Forstner bit, then clean them up with a chisel. Come in from both sides with the drill press and the chisel. Trying to go all the way through from one side can lead to going past the layout lines if things are not perfectly square. It can also lead to tear-out. Using a smaller bit in the drill press is better; it will leave less material in the corners to clean up with the chisel.
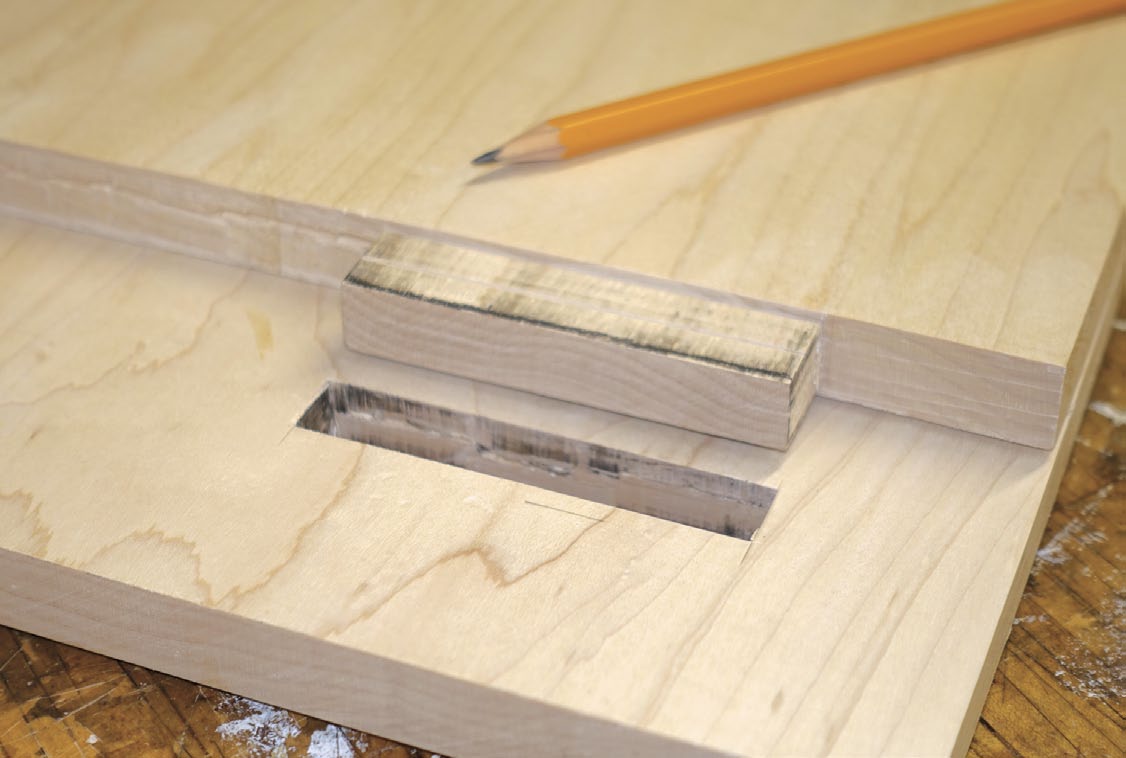
Test-fit the tenons to the mortise. They might fit all the way through or they might jam up part way. If they jam, pull them out, use a pencil to colour the ends of the tenon cheeks, then put them in again and remove. The pencil mark will transfer from the tenons to the mortise walls where material needs to be removed. Use a chisel and carefully remove the pencil marks from the mortise walls. This may need to be repeated several times until the tenons fully seat.
A few details
Now that the bulk of the joinery is completed, rip the top and shelves to their final size at the table saw. Make sure the orientation is correct when ripping and that the material is being removed from the back edge. Cut the arches in the side on the bandsaw. Clean up and finesse the cut using a rasp, block plane, spoke shave or chisel. It’s not a show surface, so it doesn’t need to be perfect; just smooth enough to look good from above.
The front stretcher can also be cross-cut to size and the arch cut. Dry-fit the case and use the case itself to mark the length of the front stretcher to ensure a perfect fit. Cut and clean up the arch the same way the sides were made.
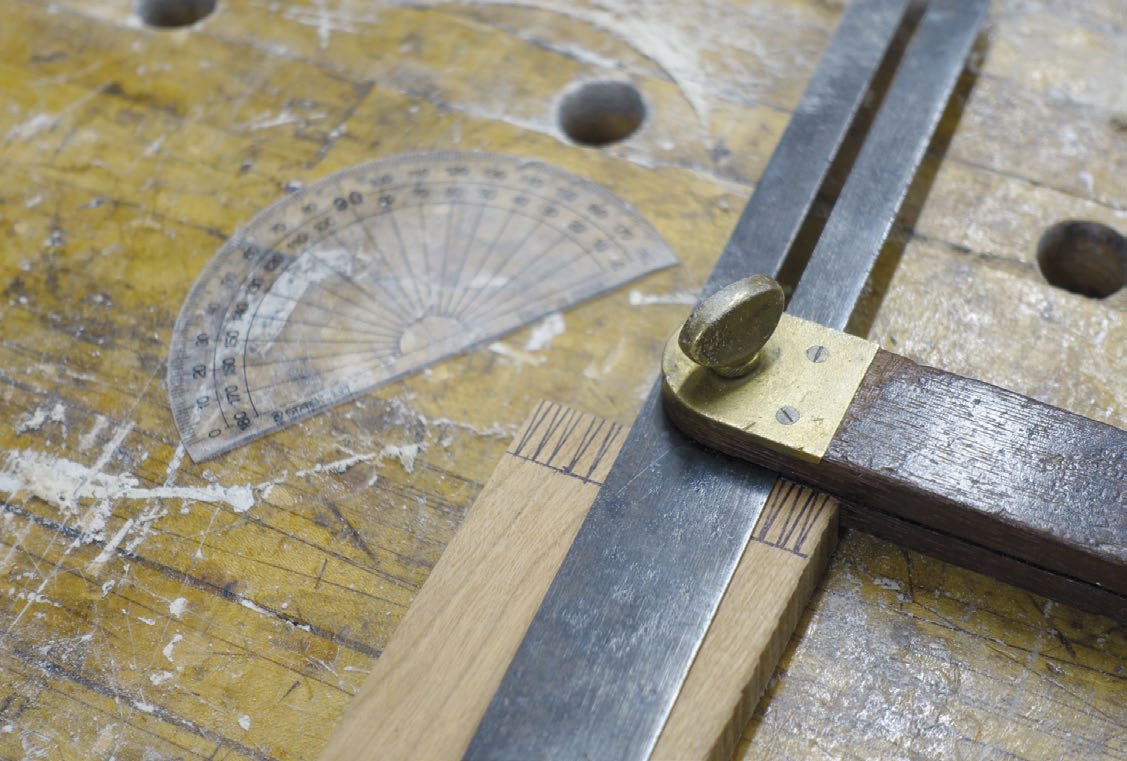
Make wedges by hand or at the bandsaw. Use a protractor to set a bevel gauge to about 92°. Pick a contrasting wood and ensure the wedge runs with the grain. I used cherry for the wedges.
Assemble the case
Sand or scrape the shelves, top, sides and front stretcher smooth. A finish can be applied to the interior now or after assembly. Get ready to glue up the case. Having clamps set up and doing a dry fit will save potential headaches once the glue is applied. If the sides are bowing a bit, make some purpose-built cauls using scrap wood to ensure the sides are fully seated on the tenons.
Apply glue into the mortises and assemble. Apply glue onto the wedges and tap them home. Take care when tapping them home as you don’t want the case sides to split. Apply clamps and check for square. A long clamp across the diagonal can pull the case into square if needed. Once the glue dries, use a low-angle block plane to flush the end grain tenons with the case sides.
Drawer construction
The drawer is easier to fit and hang once the case is assembled, but before the back is attached. The drawer runs on a wooden runner attached to the case side. The runner slides in a stopped groove on the drawer sides. The drawer itself is a standard dovetailed drawer, half blinds in the front, with through dovetails in the back. A groove on the inside houses a plywood drawer bottom. I built it 1/16″ narrower than the case width and 3/4″ shallower than the case depth.
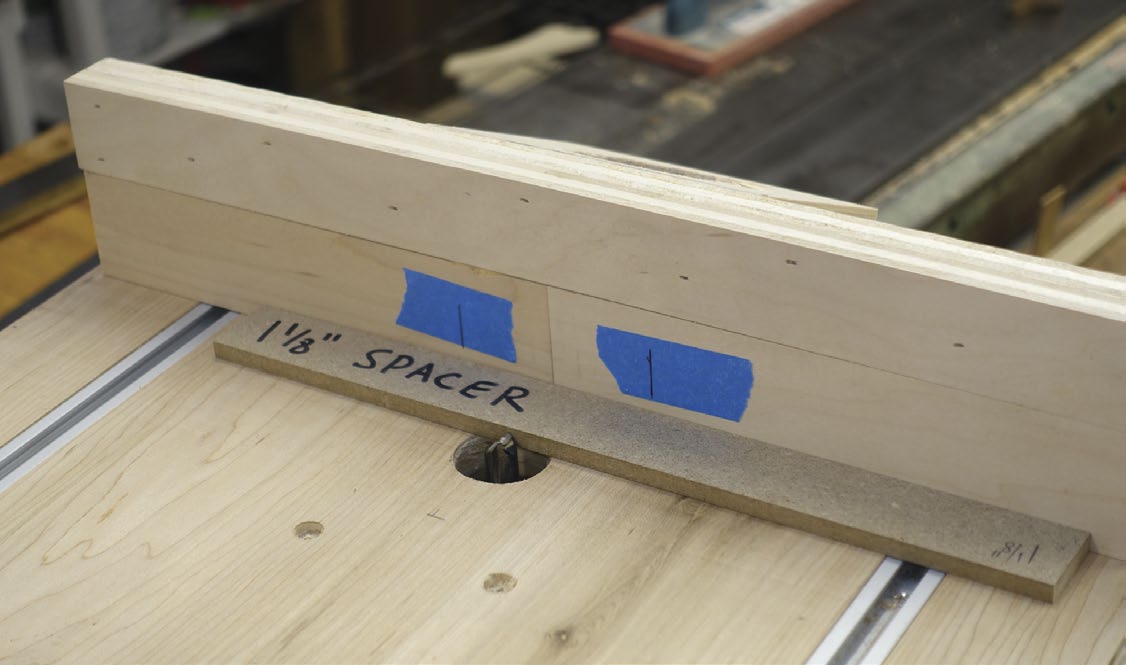
A spacer is used to hang the drawers and set up the router table to groove the drawer sides. The spacer should be half the drawer height minus half the groove width. In my case the spacer was 1-1/8″ to centre the groove on the drawer sides. Cut the spacer out of scrap wood at the table saw. Use the spacer to set up the router table fence. The router bit should cut into the drawer sides by about half the thickness of the sides, and stop 1″ from the side front and run out through the back. Set up a stop block or use a pencil to mark the stop locations on the fence so you know when to stop. Use a chisel to square up the front of the groove and ensure the groove terminates at the same spot
on both sides.
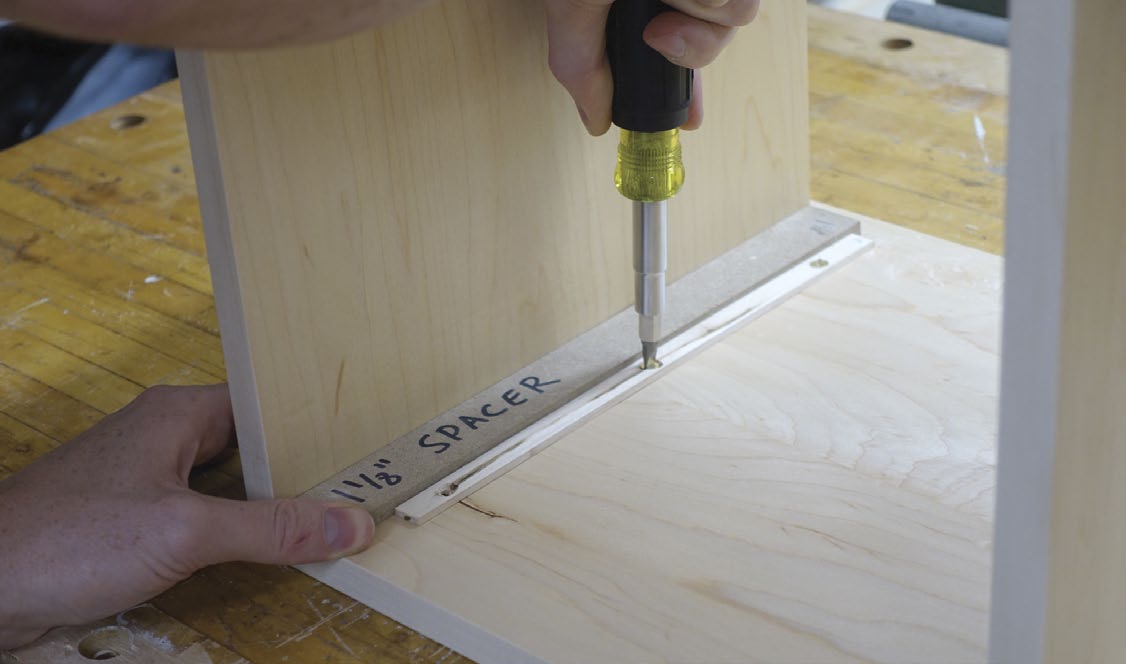
Mill some wood for the runners. Run the piece through the planer, taking small passes. Test the fit on the drawer side grooves after each pass until it fits and slides smoothly. Rip two pieces 3/16″ wide from this piece to use as runners. Drill and countersink holes into it and mount it onto the case sides. Use the spacer between the top and the runner to set the distance. Attach it initially using the middle and back screw holes which are elongated. This will give a bit of wiggle room to test and ensure the drawer front is flush (it also allows for seasonal movement of the case sides once fully installed). Lock the runner in place by screwing in the front screw. This is only a small drawer, so a lot of strength isn’t needed. If these drawers were larger and carried heavier loads, I might machine a shallow dado in the sides to capture the runners and help support them.
The drawer will likely need a bit of fitting after the runners are installed. A couple swipes with a sharp hand plane off the top edges of the drawer should allow it to move smoothly. Glue up the drawer and check again to make sure everything slides smoothly.
Frame and panel back
A frame and panel back looks very nice on a piece of furniture where the back will be visible. The panels I’m using are 1/4″ MDF veneered with curly maple. By using sheetgoods, wood movement won’t be a concern, so the panel can get glued in place, adding a lot of strength to the back. Because of this, stub tenons can be used. They’ll be glued into the grooves that the panel sits in. If solid wood panels will be used, wood movement should be taken into account. The panels should not be glued in place, and it would be best to do full mortise and tenons for the joinery.
Start by cutting the frame pieces to size. Next, cut the grooves for the panel. My panel is an oddball thickness—1/4″ MDF plus two sheets of veneer 1/50″ thick—so I couldn’t use a standard 1/4″ router bit or dado blade for the grooves. Use a test piece to figure out the fence setting on the tables using a regular table saw blade. Make the first groove, then flip the piece so the opposite face is against the face and make another cut. This will cut a centred groove on the workpiece. It’s best to start with the blade closer to the centre and move the fence a small amount each time to sneak up on the panel thickness, testing the panel after each pair of passes. Once the panel fits the test piece, run all the back pieces through. Depending on the kerf thickness of your table saw blade, there may be a little bit of wood left in the centre that can be removed by adjusting the fence and making one more pass with all the pieces.
The tenons can now be cut. Mark them to the thickness and height of the grooves. These tenons are very stubby so this can be done quickly by hand, possibly quicker than it would take to set up a machine.
Check to make sure everything fits together, then sand and glue it together. Apply glue to all the grooves and clamp it. It’s important the panel is glued flat. The stub tenons can make it easy for the clamps to pull it out of flat. To combat this, clamp it down to the flattest surface in your shop; a table saw surface works great. Once the glue has dried, the back can be fit to the case and glued in. I apply a few cut nails through the back rails into the shelves and top.
Final details
All that’s left is a drawer pull and to apply the finish of your choice. I made a gem-shaped cherry knob to match the tenon wedges, though a turned or metal knob would also look good on this piece.
Apply some wax into the drawer groove and runner to ensure the drawer slides smoothly. I like to incorporate a bit of marquetry into my work so I inlaid a frog into the top. It serves as a nice incentive for my daughter to keep the top free of clutter so it stays visible.
Photos by Len Churchill
Tenons on the Dado Stack
Cut the tenon face cheeks before laying out all the joinery. Use a stop block and a mitre gauge to ensure the shelf shoulders are the same. Flipping the piece over ensures the tenon will be centred on the thickness of the sides.
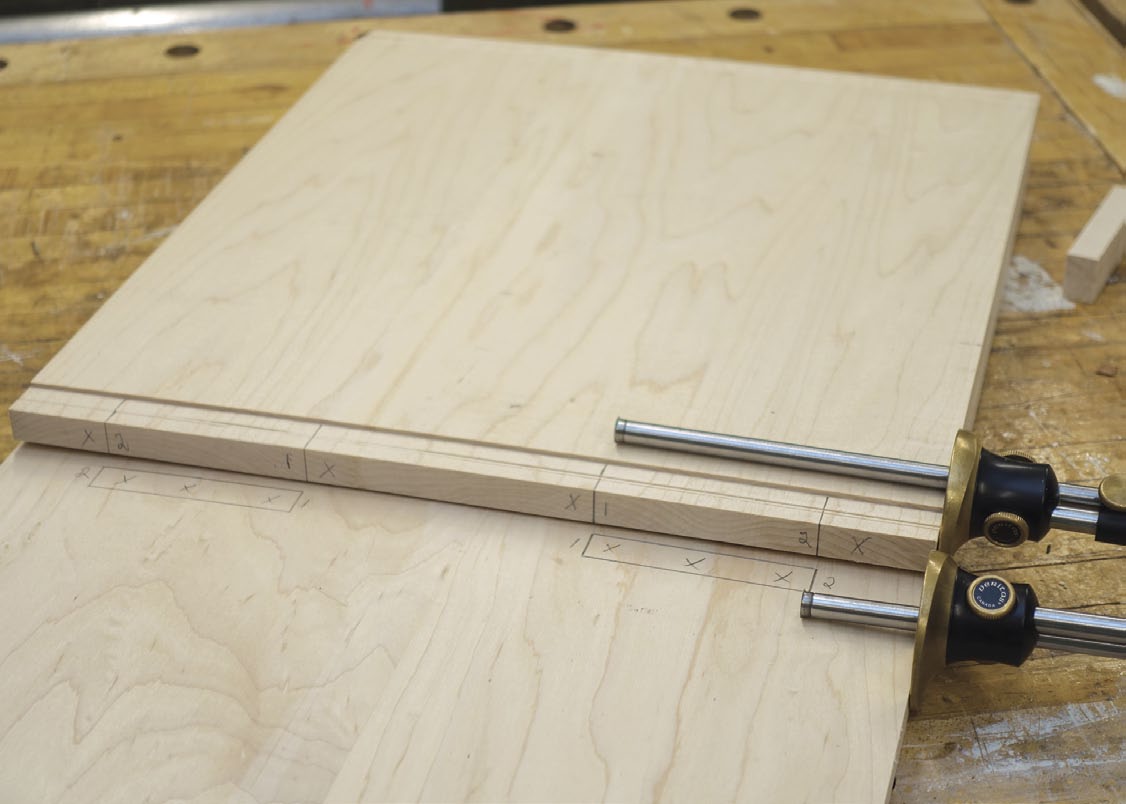
Two Marking Set-Ups
Two marking gauge settings accurately mark the mortise and tenon sides. A combination square and marking knife can be substituted.
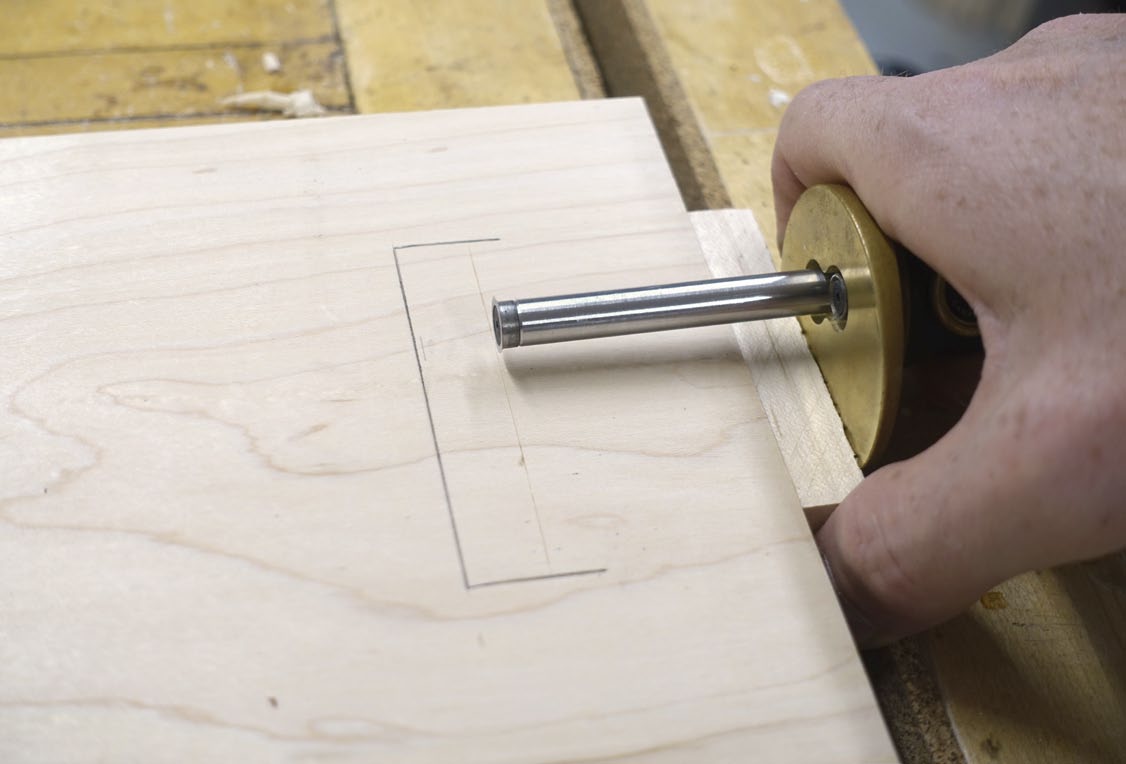
Spacer Block for Top/Bottom Mortises
Using a test tenon cut from an off-cut ensures the tenon thickness is marked out perfectly for the mortises.
Mark the Centre Mortises
The same test tenon is used to mark the centre shelf mortises, but a different approach must be taken as the marking gauge will not reach the centre shelf location.
A Chisel Cleans Up the Baseline
After using a coping saw to cut out the waste between tenons, a chisel can be used to remove the rest. The baseline cut by the dado stack serves as a nice reference for the chisel. Angle the chisel slightly inward to undercut the edge.

Hybrid Approach
Use a drill press or hand drill to remove most of the mortise waste and clean it up with a sharp chisel. Using a smaller bit and drilling two rows of holes makes cleaning up the mortise corners easier.
Fitting the Tenons
A pencil line at the front edge of the tenon will rub on any tight spots in the mortise. Remove the pencil smudges in the mortise with a chisel and repeat the process until the tenons fully seat.
Small Wedges
Use a bevel gauge to mark out the wedges. The wedges are short and steep so they don’t put too much pressure on the case and split it.
Cauls Put Pressure Where It’s Needed
Cauls, with the tenon area removed, put pressure where it’s needed during the glue-up. These are especially helpful if the case sides are bowed.
Router Table Set-Up
Mill a spacer to set the distance between the router fence and bit. Mark lines on blue tape to denote starting and stopping points for the workpieces. Ensure the same edges (the drawer tops) reference against the fence.
Chisel Clean-Up
Use a chisel to square the front of the grooves in the drawer side and ensure they’re even.
Drawer Runners
The spacer used to set up the router table gets used again to place the runners at the correct height.
Grooves for the Back Panel
Using a regular table saw blade, and flipping the workpiece after each pass, ensures the groove will be centred. It may take a few tries to get the groove the proper width of the panel, so use a test piece and test the fit on the panel after every two passes.
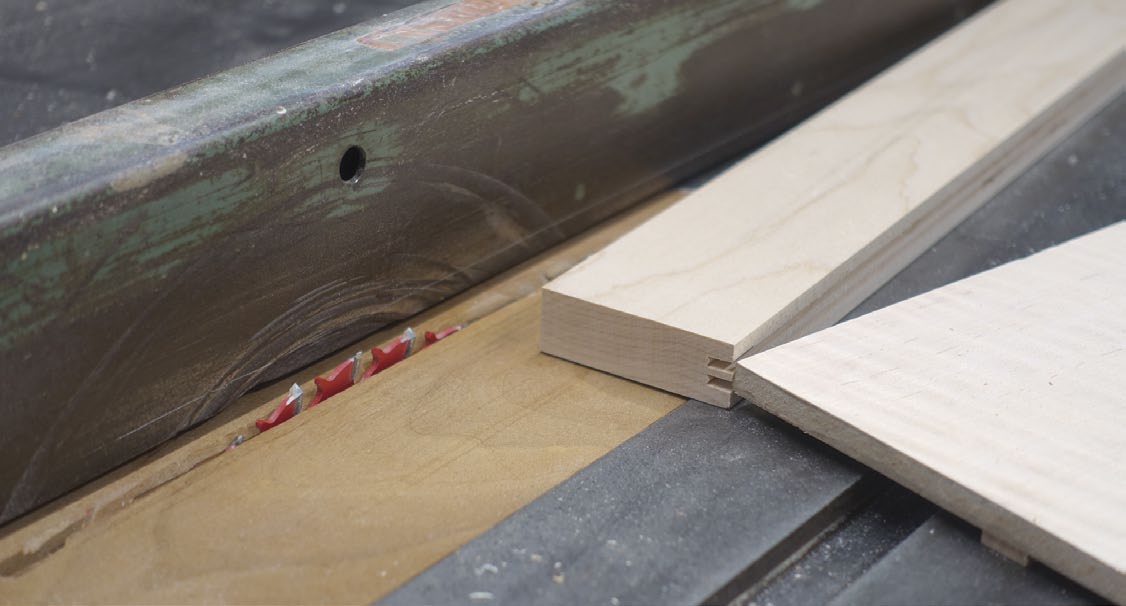
Illustration by Len Churchill