FROM ROB'S BENCH
When the final 5% feels like 95: the art of finishing

Rob Brown

Blog for October 9, 2025
The large pine dining table I've been working on for the past couple weeks is ready to go out the door.
It started off simple, as I stumbled across exactly what I needed at the lumberyard. The base was also quite simple to make, though it had to be a bit stronger than normal, as the top it was going to support was quite large. The tabletop wasn’t rocket science either, though handling those 11′ long x 8″ wide x 1-1/2″ thick planks wasn’t necessarily enjoyable. Gluing up the planks for the top also went quite well, even if laminating long, thick boards has its challenges. Cutting an arc in either end of the large top was also quite simple.
Even creating the patina on the piece wasn’t overly difficult, though it took a lot longer than I anticipated. When we talked about the level of distressing the designer wanted in the table, she said she wanted it to “feel like an old, primitive piece from Europe.” I think I did a pretty good job making this table feel old and well-loved. I likely spent about four hours total adding cross grain hand plane marks, using the edge of a half round file to leave what would look like checks and cracks in the wood (mainly near the end grain), using a spokeshave and block plane to mimic wear at the edges of the tabletop and outer corners of the legs and an awl to leave tiny dots or elongated scratches, to further emulate natural wear. I also used a wire wheel to provide some depth to some areas of the top, especially near the end grain areas.
Almost there
At this stage it would be understandable if you thought the first 95% of the job went great, and with just a finish to apply, this job would go through the shop quite nicely. As I was building this table, I knew the trickiest part was going to be the finish. The designer had a strong sense of what the colour should be, though getting that across to someone else (me) isn’t always easy. On top of that, even if I knew exactly what the designer wanted, it’s not necessarily simple to just make that happen.
While I didn’t know the exact colour we were aiming for, I did know a few things. I knew we were going to go with a very earthy colour that would complement the rest of the house. I also knew we were going to go with a hard wax oil finish that would leave us with no film and a very low sheen. The finish was also going to complement the floor, of which I had a piece of in my shop.
What approach should I take?
I have a local supplier that carries a wide selection of Rubio Monocoat colours. One option was to grab a bunch of sample-sized containers and start mixing. I was confident that approach would eventually work, though I knew it would take some fairly serious time, which I didn’t have. Thanksgiving weekend was only a week away, which is when the table needed to be ready.
I decided to get in touch with a guy I’ve worked with before, Darryl Ainey. He’s very familiar with Rubio Monocoat and now stocks a very wide range of Tover products. He’s always been super helpful when it comes to mixing finishes to come up with something that can’t be found on the shelf. I sent him eight 4″ x 10″ pine panels so he could play around with some finishes, then he sent me a video with what he experimented with, so we could further refine our approach. A few more back-and-forths over the next couple of days and we were pretty close.
Time was still ticking, so he agreed to meet me half way between Toronto and Peterborough, which was very kind of him. We met just off the highway, in an otherwise deserted area north of Oshawa. In fact, it seemed to me any passersby would likely have thought we were dealing drugs on that rainy day. Nope, not drugs. Better. The finish recipe to this dining table challenge of mine.
Darryl is the kind of guy who is incredibly knowledgeable about the products he sells, which can sometimes be overwhelming. He talks to me like I already have a vast amount of knowledge about these products, which I don’t. I’m familiar with a wide variety of finishes, but have used Tover products only a few times. There were several times where I needed to ask him to clarify what he was talking about. Layering, mixing, darks vs. lights, water-based vs. oil-based, hardeners, dry times, buffing, wiping, spatulas, pads and on and on.
I took in all I could, then blasted off to the shop to make a few samples to share with the designer. Now I had only three days to go, which worried me. At least I had a plan now, and knew how to refine the colour to give me what the designer wanted. Over the evening I mixed up two different base stain colours and about five different colours of top coat, then set forth to mix and match my way to success. I sent off a bunch of different photos to the designer, who replied with her thoughts. Each time I’d adjust the ratios to suit.
The problem started to become the amount of finish product I had on hand. I knew these hardwax oils have very high coverage rates, though, so I was only slightly worried. When I finally left the shop at about 8 p.m. I knew I was close.
The next day
The undercoat was a water-based finish that added a slightly golden colour to the wood. Thankfully, it was a breeze to apply. I used a dense foam roller to roll on the finish, then wiped it even with a rag. Even though this was a water-based stain on a softwood, there were virtually no lap marks and the overall look was quite even, aside from the distressing marks I added, of course. With the first coat on, I went home and waited until it dried, which was only a couple of hours.
When I returned, I mixed up that batch of topcoat, then got to work applying it to the base and tabletop. That’s when I remembered these types of finishes aren’t quick to apply. Using a piece of plastic laminate, I squeegeed the finish around the surface, then used a mixture of white buffing pads and disposable workshop towels to further spread out the finishing material, even it out and leave no streaks on the surface.
The base was first. Although it only has somewhere around 15 square feet of area that needed to be finished, there were a lot of nooks and crannies that slowed me down. It likely took me well over half an hour to apply a finish to the base.
Next, it was time to apply the topcoat the top. It had over three times the surface area, at over 11′ long and 5′ wide, though the fact that it was fairly flat made it easier to finish. There were, however, a lot of grooves, divots and dimples I made in the distressing process that sure slowed applying the finish. It took me about an hour and a half to work the finish into the tabletop. That might not sound like a lot, but I was honestly very tired from the whole process. Since I didn’t want to run out of finish, I spread it out as much as possible, which required an incredible amount of elbow grease.
D-Day
Tomorrow is delivery day, so my fingers are crossed both the designer and the client like the finish. It’s weird, as the finish is only a small portion of this project as a whole, but a finish can make or break a project. The dimensions and design details in a project like this were also worked out beforehand, so there really won’t be any surprises on that front. The finish, on the other hand, leaves a bit of room for interpretation. The designer initially had just a few words to describe the finish colour and style she wanted. I hope I nailed it.
The moral of this story is even though the project is technically 95% complete, it doesn’t mean the easy part is over. Applying a finish is very often the most important aspect of a project, as it’s the first thing the client sees and touches. It’s also an aspect of the project that isn’t as easy to pin down early in the process, short of making some finishing sample panels.
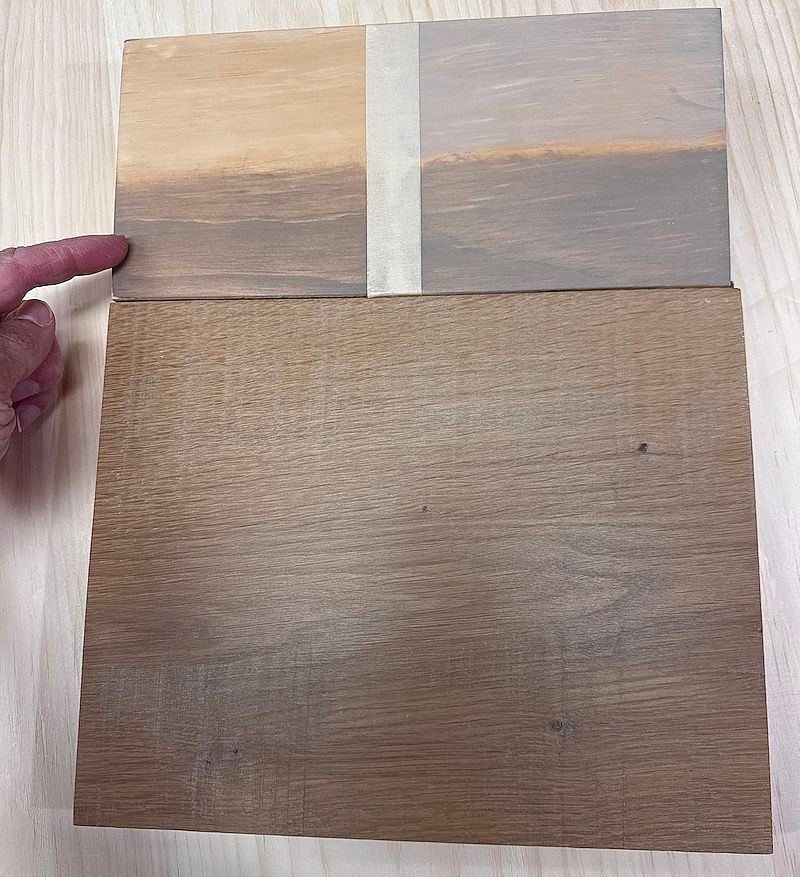
Sample Panel
This is one of the samples I made when determining the right ratios for the finish. This sample panel was coated with the light golden stain (that you can still see in the upper left corner), then I played around with the oil-based topcoat. The large panel at the bottom of this photo is the piece of flooring I was using as a guide. I wasn't trying to match the floor, just complement it.
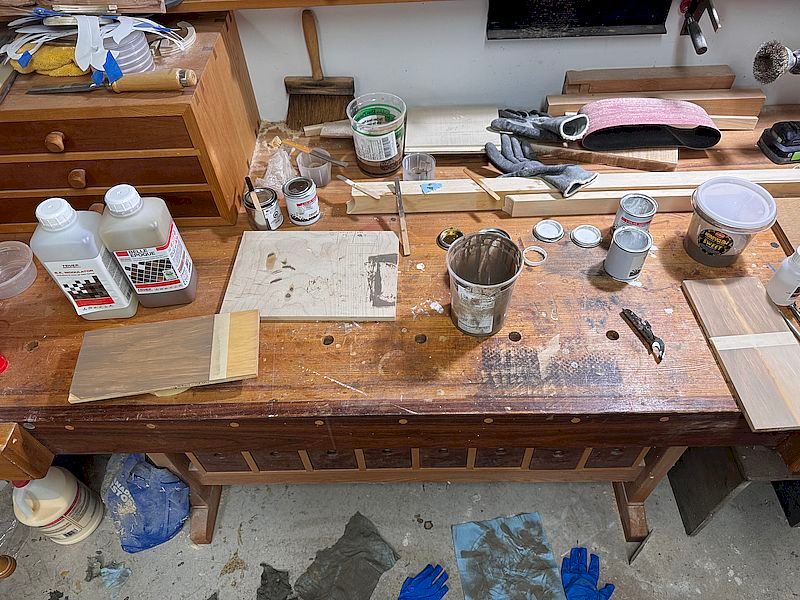
Mix it Up
My workbench got a bit colourful this week. White, dark walnut, Sahara and neutral all came together in different ratios to give me what I needed.
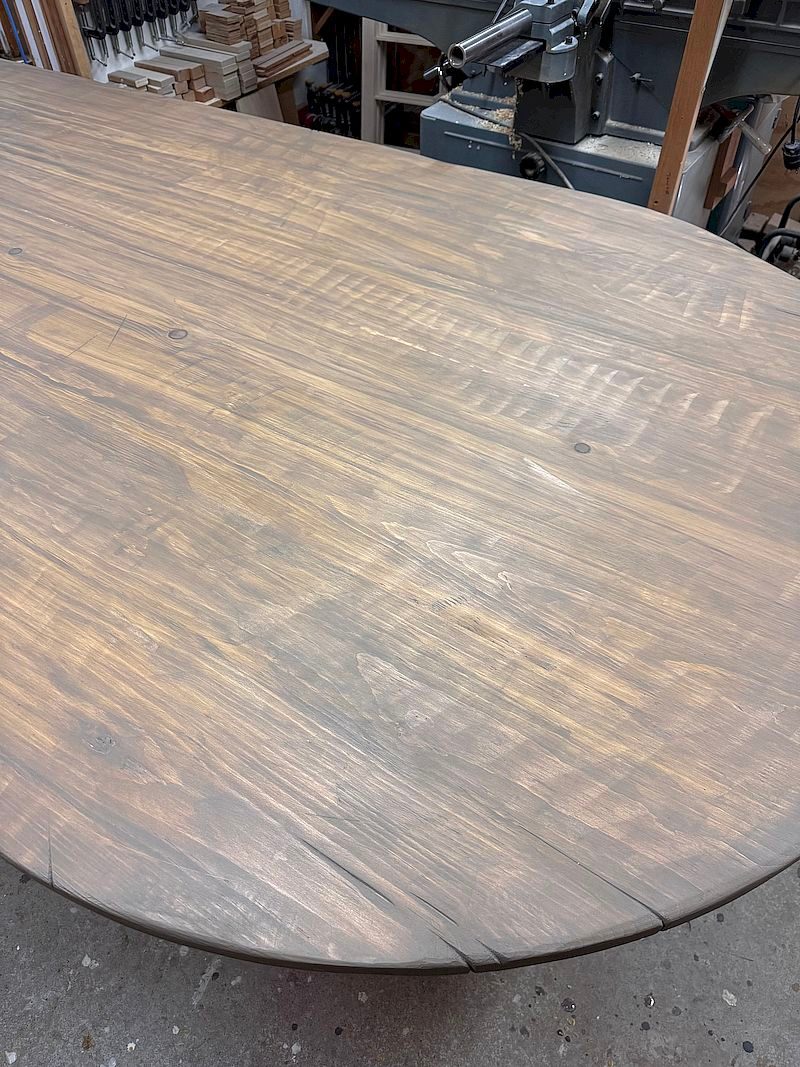
Coat #1
Here, I'm rolling on the light golden base colour.
The Finished Top
Here's the final look. You can easily see many of the cross grain hand plane marks I deliberately left in the tabletop, not to mention some of the scratches, dents and checks. Does it look 150 years old?


Impressive piece!
Rob, I have a question off the topic here, but I noticed the you wearing a respirator in the photo. I find my respirator (half-mask similar to yours) interferes with my prescription glasses. Have you found a style/brand that works without that problem?
Thanks!
That looks amazing, the top definitely looks like it’s been well used over the years. Excellent job.
Lovely, lovely.
Nicely done.
KJE
You have a lot of good finds. How many showed up to help you deliver that big table?
My 14-year old so helped me move it into the van (thankfully it was a P.A. day at school!) and the homeowner bragged about how strong she was, and was more than happy to help me bring the large top inside (thankfully it was pine!).