PROJECT
Router bit cabinet

Michael Kampen

Find more Cabinetry projects , Shop projects projects
Without them your router is an expensive paperweight, so protect your investment in high quality bits by storing them in this elegant wall cabinet.
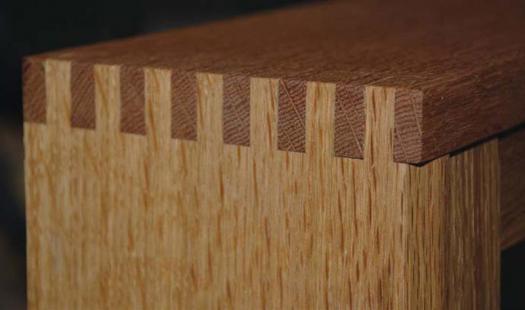
This cabinet uses finger joints to join the case. A finger joint is very similar in construction to a dovetail joint, which makes it perfect for this project. The primary difference is that with dovetails, the sides of the fingers are angled, while with the finger joint the sides of the fingers are parallel to each other. Essentially, a finger joint is a series of equally sized and equally spaced fingers cut on the end of each of two boards, which then fit together to create an interlocking finished joint.
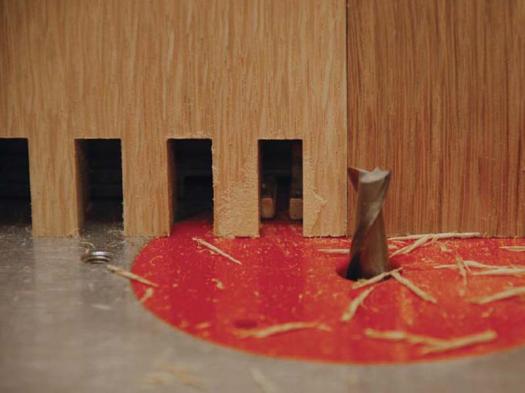
Set your board against the fence and bring the edge into contact with the indexing pin. Advance the material through the cutter to cut the first finger and then return it to the start position. In this case the bit need only penetrate into the body of the jig far enough to cut the full width through the entire cut. If you prefer to remove the board before returning the jig to the start position then run the bit through the jig until it is in the clear, remove the board and return the jig to the start position. This can sometimes be an advantage when the wood has shown a tendency to tear out easily during a cut.
Router bit cabinet
Build the Case
Begin by laying out the parts on your stock. Use a band saw to cut the slightly oversized side pieces (A) and the top and bottom (B) from the stock and then dress them to the thickness and width using a jointer and a thickness planer. Cut these pieces to length and cut finger joints into the two sides and the top and bottom pieces.
Cutting Finger Joints
When designing the appearance of the corner joints, there are several things to consider. The width of the fingers is determined by the size of the cutter you are using. The width of the piece you are cutting will be limited by the router table and size and style of your jig, but will also need to be divisible by the width of the cutter without a remainder. In this case I used a ⅜” carbide spiral bit to cut the fingers, which meant that the depth of the cabinet has to be a multiple of ⅜”. As I wanted the sides to fit between the top and bottom, I opted to have a full finger on each edge of the top and bottom. After adding in all of the other requirements for the back and inset door, I determined that a width of 5 ⅝” would allow for 15 fingers, including a full one on each end of the top and bottom, while providing enough depth to accommodate my largest bit, a Freud panel raiser.
Set-up
The secret to achieving a good fit with a finger joint is to set the correct bit height and to fine tune your jig using a couple of test pieces, milled to the same thickness as your project material. Using the simple jig described in the side bar, it is possible to cut perfect finger joints on the router table using a spiral bit. Follow the following simple steps to set up your jig.
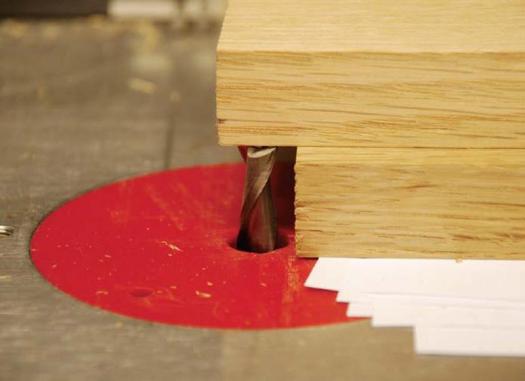
Set the height of your bit to be just slightly greater than the thickness of your material. If you set the bit too high, you will need to sand a great deal of end grain, and if you set it too low, the fingers will be too short. Set five sheets of paper on your router table and place one of your test pieces on them. Place the second piece on top and cantilever it out over the bit. Move the pieces back and forth slightly and raise the bit until you feel it start to catch on the upper piece. Lock the router in place before making adjustments to the jig.
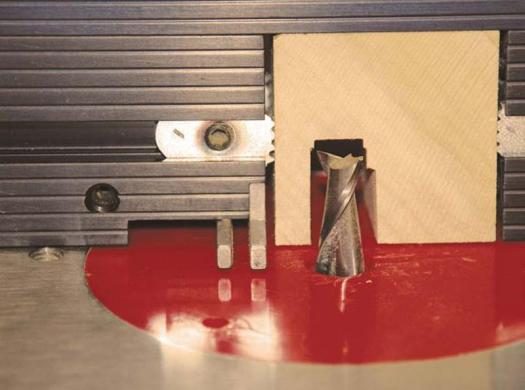
The indexing pin you use must match the diameter of the spiral bit exactly. With shop-made jigs as well as some commercial jigs, you need a separate face for each different bit size you plan on using. The Veritas Right Angle Sled has an innovative indexing pin that is adjustable and can accommodate a wide variety of bit sizes.
To fine tune the spacing of the fingers, adjust the jig so that the distance from the edge of the bit to the edge of the indexing pin is exactly the same as the bit diameter. If you are using a spiral bit this can be a little tricky so mill some stock that fits exactly into a groove made by the cutter. Set a short length of this set-up material next to the bit and adjust the jig so that the indexing pin is set against the side of set-up material and fasten it in place.
Place the first notch that you just cut over the indexing pin and cut the next finger. Keep doing this until you come to the end of the material.
To ensure the proper offset between the two adjoining pieces, after cutting the last notch in the first piece, set it over the indexing pin and then place the next piece up against it and cut the first notch in the second board. After the notch has been cut, set the first piece aside and continue cutting the remaining fingers for this corner. Repeat the above steps for the remaining corners. When the finger joints have been cut, tilt the fence on your jointer over to 72 degrees and bevel the outer front edges.
Jigs
Jigs will vary in their design and use. The three systems I have used, a shop-made jig, the Woodline system and the Veritas Cross Sled, all work equally well. With the Woodline Spacer Fence, the material is run along the index key, which is mounted to the table. In the case of the Veritas Cross Sled, the index pin moves with the wood you are routing. If you are using a commercial jig, always read and understand the instructions that came with your jig.
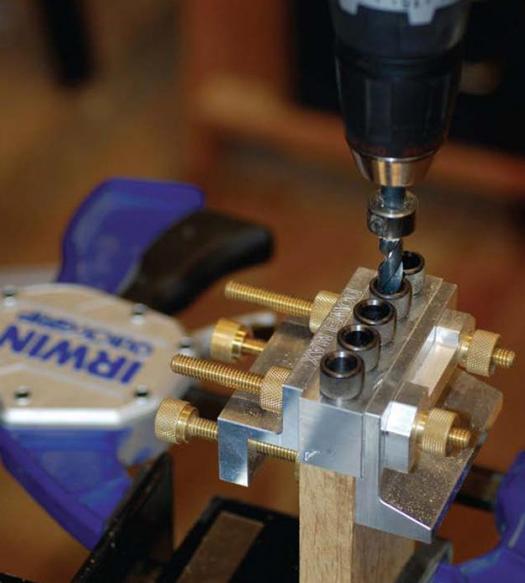
With the finger joints cut, assemble the four outer pieces and dry clamp them to confirm the fit of the joints and measure the actual length of the shelves. Clamp them firmly enough to close any gaps, but not so tightly as to distort and bow the sides, as this will give you a false measurement of the length of the shelves. Don’t cut any of the shelf and door pieces until you have assembled the outer pieces. Measuring the actual project under construction will provide you with the exact dimensions you need. Use the material list as a rough guide only once you have begun construction. Mill the material for the shelves (C) to the correct cross sectional dimension and cut the pieces to length. I used a dowel jig to drill the dowel holes that hold the shelves in place.
Cut the rabbet for the back using a hand-held router and a rabbeting bit. With the case dry clamped, place it on your workbench or the floor and then rout a 3/8″ by ⅞” rabbet around the back edge in several passes using a piloted rabbeting bit. Before disassembling the case, measure the opening for the back (D) and cut it to size on the table saw. The rabbeting bit will have left a rabbet with round corners and these will have to be squared with a chisel if the plywood is to fit. A much easier option, and the method I use, is to round the corners of the plywood back using a sander so it fits the round corners left by the router bit.
Before disassembling the case, mark the location for the hinge mortises on the side piece, 4 ⅜” in from the top and bottom pieces. Use a guide and a trim router with a ¼” carbide spiral to cut the mortise for the hinge before assembling the piece. After assembly, the shelves will only allow you to rout half the mortise; the rest would then need to be done with a chisel.
Break up the finishing
I prefer to finish most of my projects before assembly as this ensures that I never have any problems with excess glue or poor sanding ruining a finish. With most projects that use dowels or mortise and tenon joinery it is a simple matter; mask off the joinery, apply the finish and assemble the project. In this case, the finger joints need to be sanded after gluing so it isn’t possible to finish the pieces beforehand. On the other hand, when the finger joints are assembled, the glue will tend to be pushed into the inside corner where it will squeeze out into the interior surfaces. These corners would make it very difficult to clean up excess glue afterwards and to sand the surface for a perfect finish. In order to avoid potential finishing problems, some parts of this project must be finished before assembly and the rest afterwards. Sand and finish the inside surfaces and the front edges of the sides, top and bottom before beginning assembly. I used a couple of coats of Watco Danish oil followed by a couple of coats of Les Anciens Ébénistes Natural Liquid Wax (waxine.com). This finish can be easily renewed to keep the piece looking new and fresh forever.
Gather all of your clamps, glue and dowels and go through a dry run without the glue to ensure that there will be no surprises when the glue hits the wood. With the piece assembled, apply some wax to the inside corners where the glue will inevitably be forced out of the joint to prevent any squeeze-out from adhering to the wood. Because I used the maximum number of dowels for each shelf, five at each end, I broke the assembly into two stages to make it more manageable. To begin the process I glued all of the dowels into the ends of the shelves ahead of time. When doing this, be sure that the dowels are seated completely and that they don’t gradually raise out of the holes before the glue locks them in place. Even with the dowels inserted in the shelves, there is still no time to waste during the final assembly. The wood glue I use has an open time of five minutes, which requires an organized, efficient approach. You can reduce stress by selecting glue with a longer open time. Deposit a small amount of glue in each of the dowel holes on the sides and then use a glue spreader or plumber’s flux brush to apply glue to the finger joints.
Assemble the pieces and clamp the cabinet up. Check the diagonals to be sure that the assembly is square. After 30-45 minutes, use a scraper to gently remove the semi-hardened glue from the waxed corners. It should pop off cleanly without any residue. Set the cabinet aside and allow the glue to fully cure.
Cabinet Back
The back panel of the cabinet is made of ¼” Baltic birch plywood and is finished with milk paint. You won’t find this paint in stores, you’ll have to order it from the only Canadian manufacturer, Homestead House Paint Company in Toronto (homesteadhouse.ca). Milk paint is a finish that has been used for hundreds of years and is a natural combination of lime, casein (milk protein) and vegetable or mineral dyes (Read more about milk paint). To protect the surface from water, apply a couple of coats of the liquid wax on top of the milk paint.
When the glue has cured, unclamp the cabinet and sand the outside edges. The hardness of the end grain of the finger joints will be somewhat difficult to sand evenly with a random orbit sander but the new small belt sander from Porter Cable (Model #371) makes it possible to level the finger joints quickly with maximum control. After levelling the finger joints, use a random orbit sander to finish-sand the outer surfaces. Apply a couple of coats of oil to the cabinet and follow this up with a couple of coats of wax for the entire cabinet.
To mount the back, turn the cabinet over onto a blanket and place the back in the rabbet. Use a small drill bit to drill pilot holes for the #6 screws and screw the back in place. Mill a piece of material for the French cleat (E) and cut it to length. Tilt your table saw blade over to 45 degrees and rip the piece in half. Fit one of the pieces to the top of the back of the cabinet with the point facing down and away from the back of the cabinet. Fasten it in place with glue and some screws or use a finish nailer. Mount the other piece to the wall and hang the cabinet.
Make the Doors
With the cabinet finished, cut the rough stock for the door rails (F) and stiles (G) (Read more about raised panel door construction). If you use mortise and tenon construction or a rail and stile set, be sure to adjust the length of the pieces as required. Because this is a large door and the rails and stiles are rather small in cross section, be sure to choose straight grained wood without any knots, as they will likely cause the pieces to bow slightly, making it difficult to get an even fit with the door. With the rails and stiles cut to length, I used a dowel jig to drill a couple of dowel holes in each of the four corners.
To cut the rabbet on the router table, install a ⅜” spiral bit in the router table with a fence. Rout the rabbet the full length of the rails and then dry assemble the door. Mark the length of the rabbet in the stiles on the face with a pencil line and place a line on the fence at either edge of the spiral bit. Line the first mark up with the start of the cut and run the stile along the fence until the mark at the other end lines up with the line on the fence and then pull the piece away from the fence. With the rabbet cut, assemble the door with glue and clamp it up.
Check the diagonals to be sure the door is square and also check to see that it is sitting level within the clamps, or the door will be twisted. After the glue has set, sand and finish the door the same way as the cabinet. Shim the door into the opening so there is an even gap all the way around it and mark the location of the hinge mortises. Use the router table to cut the mortises and then drill the holes for the hinge mounting screws to avoid the soft brass screws snapping off in the hard white oak. Take the door to a glass shop and have them cut the glass for it. They can easily sand the corners to match the routed rabbet. You have two options to mount the glass; either run a bead of clear silicone around the inside edge of the rabbet or mill some material and use three #4 flat-head wood screws to hold each piece in place. Drill pilot and clearance holes to avoid splitting the material.
Mount the knob so that the screw at the rear of the door lines up with the edge of the middle shelf. Recess a rare earth magnet into the face of the shelf using a rare earth magnet cup and washer set (#99K33.15, leevalley.com) to act as a catch to keep the door closed.
Keeping your router bits close at hand and organized will only improve your efficiency in the shop. Why keep your prized collection in a plywood box when you can give them a luxurious home that dresses up your shop?
SHOP MADE JIG
Use Baltic birch plywood to build an ‘L’ or box-shaped fence. If your router table has slots in it, attach some runners and use these to guide the fence; otherwise, attach guides that will run along the edge of the router table. Be sure that the jig moves freely on the router table and use wax to reduce any friction. Mount a couple of ¼ x 20 TPI threaded inserts into the face of the fence to receive the mounting bolts for the individual faces. Cut some plywood for the faces and use a pair of router bits to cut a stepped through mortise for the two large head bolts that will hold the faces to the fence. Use the router bit for which the face is to be sized to cut a groove in the bottom edge, just to the left of the center. Use a set of digital callipers to measure the opening and then use a thickness planer to mill a piece of hardwood for the indexing pin in order to fit it exactly.
The thickness of the index pin must match the width of the cutter exactly. Glue a section into the opening cut in the face. Mount the face to the fence with the large head bolts and use them to adjust the gap between the bit and the indexing pin. You will need to make a separate face for each cutter or finger size that you will need and then attach it to the fence on this jig.
Illustration

Box joints

Shop made jig

Photos by Michael Kampen
Super strong
Finger joints provide a very strong corner connection for cabinets and boxes.
Make it proud
Using sheets of office paper, boost up the set-up height to ensure the fingers finish slightly proud.
Adjustability is key
Veritas provides an adjustable pin for cutting finger joints.
Move on down
For subsequent cuts, place the gap over the pin to register the board.

Butt up
Keep the first board in place in order to ensure proper registration of the next board.
Set the bevel
Tilt the fence of your jointer to 72 degrees to bevel the case sides.

Simple yet strong
Using dowels to locate the shelves is a strong and convenient way to attach them.
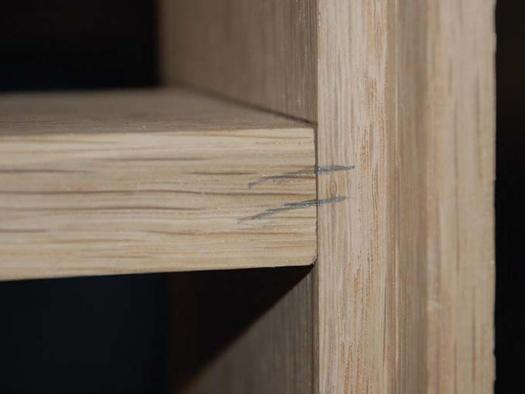
Keep track
Mark the locations of your shelves so there will be no confusion when it comes time to assemble.
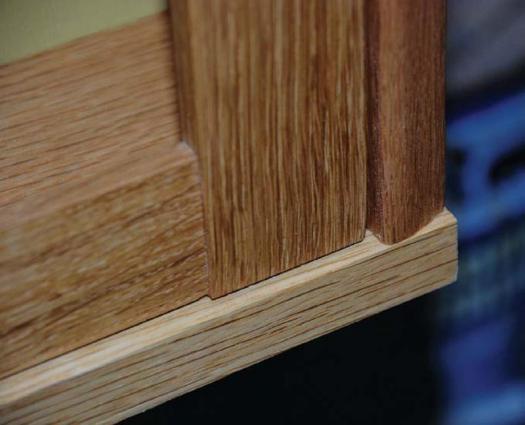
It’s all in the details
The bevel on the case side provides a point of interest on the cabinet.
Completed cabinet
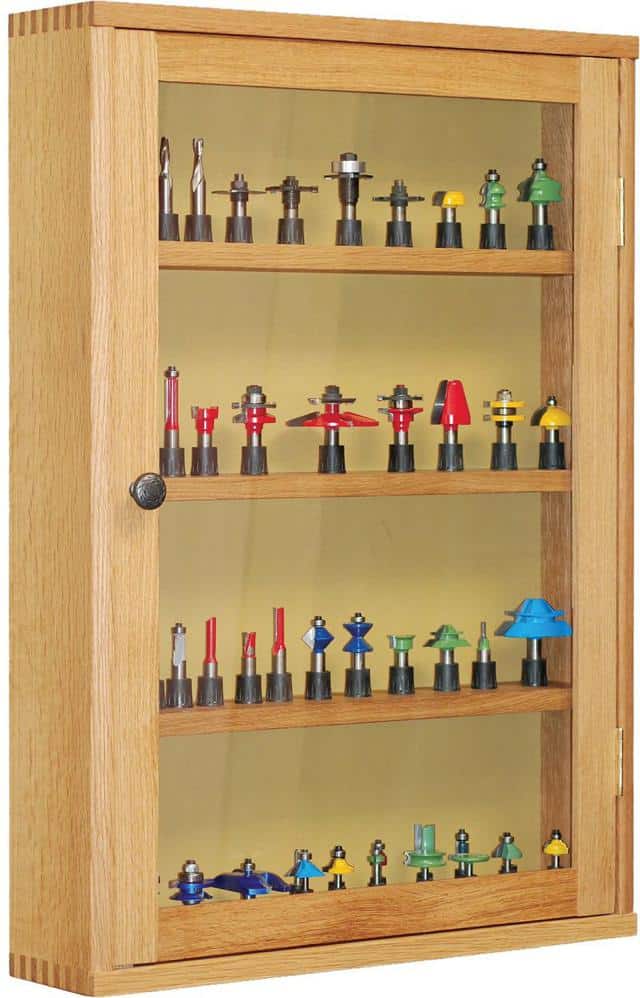
Illustration by James Provost


Great article Michael,
I will definetely be implementing this router bit cabinet in my tools room at my woodworking shop, very creative.
All the best !
-Lad
https://cutritewoodworking.com/
Are the router bits standing loose on the shelves? I drilled ¼”, 3/8″ and ½” holes in my sliding shelf to hold the bits so they don’t fall over or slide around when I pull out the sliding shelf. It is in the lower cabinet of my router table.
Michael used the router bit holders supplied by Lee Valley. They’re screwed into the shelves.