TIPS & HOW TO
Polishing and buffing a finish

Marty Schlosser

With the right tools and a systematic approach, it’s not hard to get that gleaming finish of your dreams.
As with all fine finishes, preparation is key. You simply cannot achieve a deep shine without the underlying surface being smooth and completely free of surface glue. You have two tools to select from: a well-tuned scraper or sand paper. If you sand, you need to progressively work your way to 320 grit before the wood is ready to accept your finish. That is, unless you’re planning to stain the wood before applying the top coat, in which case you need to stop at 180 grit. Anything finer than that and the ability of the stain to effectively colour the wood is going to be limited. Then, ensure the stain is fully dry – at least overnight – before applying the top coat of your choice. My final guidance on sanding is this: when sanding with machinery, regardless of whether you’re staining, always do a final hand-sanding with the grain to ensure there’ll be no sanding swirls to contend with.
The Correct Top-Coat
You can’t achieve your desired mirror-like finish with an oiled or waxed surface. What is called for here is a film-forming finish that dries hard: lacquer, urethane or shellac. And of those, the ones that leave no witness lines (those telltale lines left as polishing cuts through successive finish layers) are best. You’ll hear terms such as “burn-in” bandied about by suppliers and finish manufacturers to describe finishes whose successive layers bond together to form one unified thicker layer. To be perfectly honest, I’ve had very few finishes show witness lines, and of those that did, I believe it had more to do with having waited beyond the manufacturer’s recommended waiting time between coats than the finish’s lack of burn-in characteristics. Polyurethanes are most particular in this regard; don’t wait until you need to sand between coats but reapply the next coat as soon as the manufacturer indicates you may proceed, as long as the previous coat really is dry.
You need to apply enough coats to ensure there is enough finish for the polishing and buffing stages to work with, and if you’re dealing with a porous wood like oak you will have to fill the grain beforehand. Before you start the buffing process, the surface must be flat, with no visible grain. As you’ll find out, the buffing process removes a certain amount of finish; if there’s not enough, you’ll go through the finish to the bare wood and have to start all over again. As is the case with virtually all finishes, several thin coats are preferable to fewer thick coats. Because thicker coats require more time to dry, more airborne dust will settle on their drying surface. Those minute dust “nibs” need to be cut down before you move onto applying successive layers of finish, so deal with them once they are dry by using sandpaper one grit level finer than what had been used on the bare wood. Better yet, deal with dust “nibs” by heeding my advice about applying thin coats – “an ounce of prevention is worth a pound of cure” – and there should be almost none to deal with. Allow your topcoat to cure for a few days; a full week or more is even better or else the finish will be still too soft to take an effective sheen.
Waterborne or oil-based topcoat?
I may as well deal with this question right away, as more and more woodworkers are turning to waterborne finishes. The fact of the matter is that I have had equal luck in polishing and buffing both waterborne and oil-based topcoats alike, and the application of them is similar. So, your choice of one over the other needs to be based on other issues. Once you’ve selected your topcoat, go ahead and apply it using spray, brush or rag depending on the manufacturer’s recommendations and what you feel most comfortable with. If brushes are your applicator of choice and you’re applying a waterborne topcoat, I’ve found that going over the area one last time with a slightly finish-dampened (not fully wet) foam brush removes any trace of bristle brush marks.
Dealing with Finishing Errors
You can’t expect your finish to take on a piano-like shine if you’ve got drips and runs all over the place. If you have any, then cut them off using a sharp chisel or take out your trusty scraper and scrape them off, being careful not to take off any more finish than is absolutely necessary. If you find there are several to deal with, you’ll probably need to apply another final top coat before proceeding with the polishing.
Proper Polishing – From Coarse to Fine
At its simplest level, polishing is merely sanding with progressively finer abrasives. My polishing system calls for dry, water-free products and I am especially impressed with the Abralon sanding pads. Mount a 1000 grit polishing pad on your sander or polisher and set the speed to low and turn your machine on before touching down on the surface. Start your first pass at the left end, bottom corner and work your way to the right, keeping the machine moving at all times. When you get there, continue moving your machine to the next row, overlapping the first by approximately 50 percent, then work your way back to the left end. Continue this way until you’ve covered the entire surface. Depending on the machine, you may wish to increase the speed to medium. Be especially careful at the edges and ensure you keep the machine level or you may cut through the finish. Don’t be too particular about getting rid of all swirl marks at this stage unless they’re pronounced, in which case you may need to go over the area of concern a second time. Vacuum the entire surface, being careful not to scratch the surface with the wand; using a brush attachment helps in this regard. If you find that the 1000 grit wasn’t coarse enough to level the top, you may elect to do your second pass using a 500 grit pad and then move back to 1000 grit. The objective here is to establish a completely smooth surface.
Polishing the Edge Profile
If it’s a chamfer or square edge, depending on your experience and level of control over your machine, you should be able to do this and all successive polishing with your machine. However, if the profile has a radius to it, you’ll need to make a custom-shaped sanding block that matches the profile so you can polish with this and successively finer grits, by hand. To help contour the abrasive surface to the wooden edge profile, you may want to use a piece of thin cloth or paper towel between the abrasive paper and the block. As with any machine polishing, hand polishing calls for careful attention and a steady hand; move the block only with the grain and check your progress frequently. Stop as soon as the finish feels the same on the edge as it does on the flat surface.
Once you’re happy with the 1000 grit polished surface, replace the polishing pad with the 2000 grit pad and go over the entire surface, then again deal with the edging as before. Repeat this process through the 5000 grit pad and you should be seeing reflections showing.
Buffing Comes Next
This is where the magic begins. Replace your polishing pad with a new buffing pad. I like to label my buffing pads, ensuring I don’t get them mixed up and contaminated with dissimilar buffing material. Using a kitchen knife, lightly dip into the medium-coarse polishing compound as you would a butter dish and pick up a very small amount then smear it onto and all around your pad. Set your machine to its low-speed setting and go over the entire surface just as you did when polishing. Friction will cause the pad to heat up and become sticky, causing resistance as you move along. At this point, you may increase the rotation speed slightly; however, it is very possible to burn the finish, so don’t turn it to high speed or you’ll run into trouble. You should be able to cover the entire surface for all but a large table without applying any more buffing compound. If a shine does not begin to appear, you need to smear on some more compound. With this first pass under your belt, look after buffing the edges. If dealing with a complicated (that is, a non-square or simple chamfer) edge, in most cases you should be able to use the buffing pad’s edge by turning the machine speed down to its lowest rotation speed. Of course, load up the edge with compound before doing this, or you’ll surely burn through the finish in no time flat. Take a good look at the results you’ve achieved thus far; if you feel more gloss is called for, then replace the buffing pad with a new one and apply your finer polishing compound and give it another go. Again, be very careful not to get caught up in the process and buff right through the finish, as it can become quite intoxicating to see the deep, mirror-like finish appear. More doesn’t always translate to better when it comes to buffing.
After you’ve completed this second round of buffing, again take a good look at your handiwork. If the finish appears too reflective, you may wish to revert to your first pad and “buff down” the finish to a lower gloss level. That’s a unique feature with buffing: it can be played around with until you’re fully satisfied.
Waxing – The Finishing Touch
As with most finishes I use, I like to apply a protective layer of wax. My all-time favourite is beeswax. Whatever wax you elect to use, choose one free of polishing grit and one that dries hard. Apply it sparingly with a clean cloth, allow it to dry until hard, then polish it using either a fresh cloth or a fresh buffing pad designated for this specific purpose. As the weeks turn into months and small scratches appear, a fresh waxing may be all that is required to renew the surface.
It’s been said, and rightfully so, that the correct finish on a piece of furniture, properly applied, will enhance its value. When a deep gloss and mirror-like finish is called for, by following the advice outlined here you should be able to achieve professional-level results, with a minimum amount of effort. Please pass the buffing pads and wax!
What You'll Need
- Wet/dry sandpaper in grits 220 and 320
- Automotive-style polishing pads in grits 500, 1000, 2000, and 5000
- Buffing pad, suitable for mounting on polisher, or variable-speed, random orbit sander
- Buffing compound, available at most automotive supply houses
Photos credit: Marty Schlosser
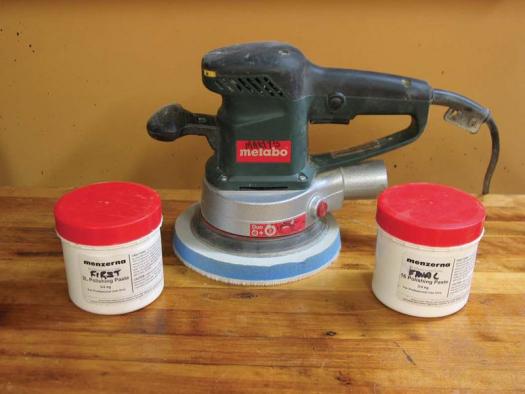
Polishing Pads
To polish the surface you will need to use very fine abrasives – 500 grit to 5000 grit – for the first step of the process.

Opposing Edges
To polish a more intricate edge you will need to use a wood block with the mating edge to get into all the corners and curved areas.

Buffing Pads and Compound
For the second step, pads and compound are necessary to bring out and fine-tune that high-gloss look.
Bring the Gloss Up
Starting in one corner, use overlapping passes to buff the entire surface.

Like A Mirror
After the two stages and a coat of wax, the surface should be glossy enough to see your reflection in.


Check any automotive supply store and ask to see their selection.
I assume this comment goes to Marty. I “stumbled” on your comments about polishing and want to thank you for your writings. It gave me motivation to keep on trying/experimenting. I started last year with wooden jewels and tried a lot of ways with sanding sealer, CA and clear lacquer. I am after a year’s trying still not happy with the last stages with finishing. My biggest problem is to find stuff you people recommend. I am in South Africa and can only use what I find here. At the moment I am experimenting with pendants and ear rings on which I use marquetry to put on the big five that is a big attraction for tourists. Again, thank you for the tips. I wrote it down and are definately going to use it, starting with thin CA up to beeswax. Regards, Johan
Would you please email me a copy also. Same printing problem
Subscribers to our magazine can download all the articles freely (or can request copies via email). If you wish to subscribe you can do so here
Is it possible to obtain a copy of this entire article with all details? This page only allows me to print out one page. Thanks. David
I’ve emailed you a copy John.
Hey Thomas, there are as many different buffing pads as there are lakes in Ontario! All joking aside, the brand I use is Surbuf. Check them out: surbuf.com
Please don’t hesitate to comment further. I’m here for you!
When waxing you said buffing pad and that’s very vague should I use wool cotton microfiber what kind of pad