SITE MAINTENANCE IN PROGRESS
Secretary desk – part 2 (gallery & finish)
Rob Brown
Mike Del Rizzo
June July 2007
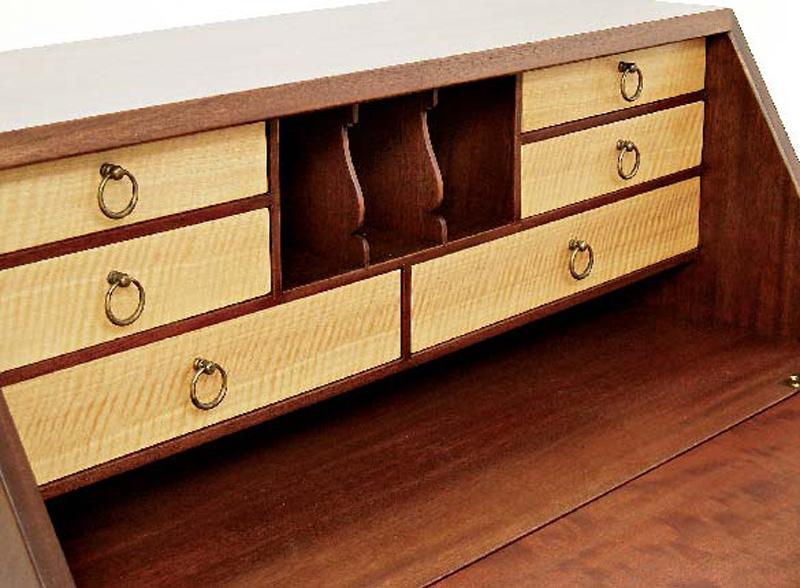
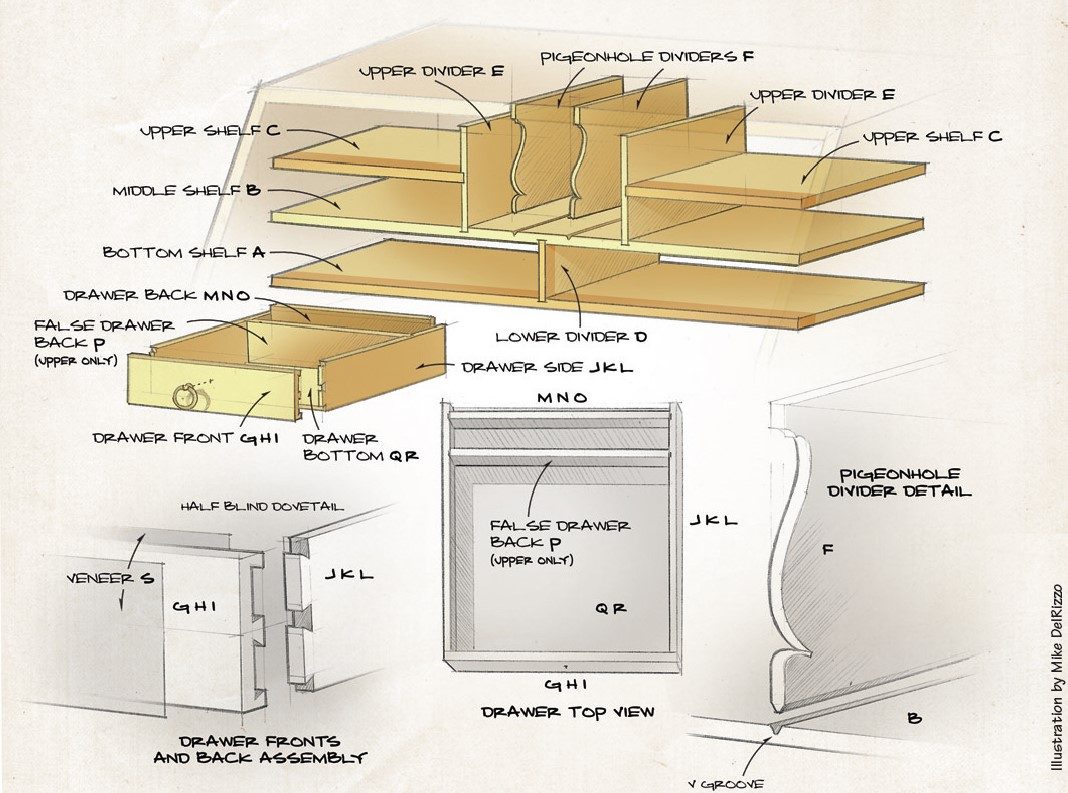
The gallery of a secretary desk helps keep smaller items organized. Mail, pens, and notes as well as other often-used items are conveniently stored and easily accessible.
Advertisement
When the slant top is open one’s eyes are drawn to the contrasting small drawers and pigeonholes. From the woodworkers standpoint the gallery provides many options for showing off some finer joinery methods. It will also give you a chance to use some of those highly prized figured woods that you have been protecting at the back of your lumber rack.
The drawers are constructed with dovetail and dado joints, and feature curly anigre on the faces (anigre is an African wood that looks somewhat like butternut but has a figure like curly cherry). The majority of the gallery framework uses dados and V-grooves and is made of mahogany, the primary wood used in the desk.
In the last issue Rob described the process of making this secretary desk. In this issue he will complete the desk with a gallery and show you how to finish the entire piece.
Round over edge of front trim
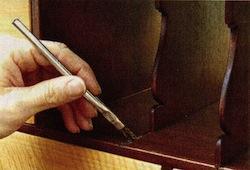
Glue pigeonhole dividers in place
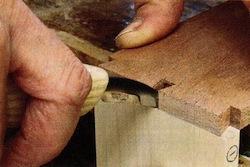
Mark out dovetails for drawers
Apply a shellac finish to drawers

Wet surface to raise the grain
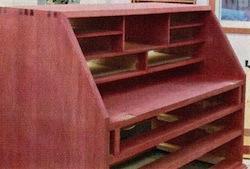
First coat of stain applied to desk
Design Comes First
Before I started building the gallery I looked through all the furniture books and back issues of magazines I had. With so many options for designs I wanted to re-familiarize myself with them. The design of a gallery should be both beautiful and functional. It can be customized depending on how its owner will be using it. My client was to use this desk as an office while working at home. A number of mid-sized drawers were needed for stationary and the like, but the most important design consideration was that a laptop would be used on a regular basis. When the slant top was closed there needed to be enough room to house the computer. This necessitated incorporating a 3″ space below the gallery and an access hole in the back of the desk to accommodate the necessary wiring.
A full-scale drawing is essential for a small project like this. See “Other Options to Consider When Designing a Gallery”.
The Gallery Framework
• Start with the larger pieces and work towards the smaller, shorter ones when building a gallery.
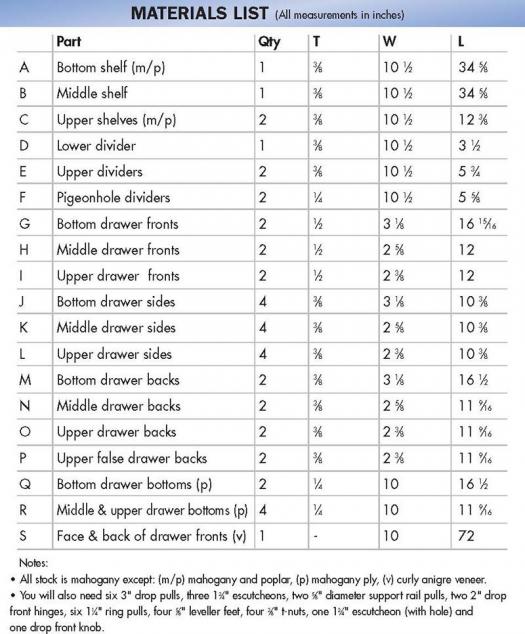
• Glue up oversized panels that will make up the two larger shelves (A, B), two smaller shelves (C), two upper dividers (E), one lower divider (D) and the two pigeonhole dividers (F). Panels can be glued up so that a number of parts can be obtained from one glued up panel. The pieces that will be seen should be made entirely of mahogany. The pieces that will be hidden (bottom shelf, upper shelves and the lower divider) can be made of mahogany for the front 2″ and poplar for the back portion. This reduces the use of expensive stock where it will not be seen.
• Plane the boards to final thickness.
• Rout the appropriate dados and V-grooves into the top and sides of the desk. The dados are ⅜” wide and 3⁄16″ deep and the V-grooves finished at ¼” wide at their opening. As a general rule of thumb use dados for the main structural parts of the gallery and V-grooves for the smaller, thinner pieces. To machine these grooves squarely and accurately I made a wooden square that I clamped to the desk. This square is what I ran the router against. You can also use spacer panels that reference off the inside of the desk. It’s a good idea to have two routers for this job. One is set up with the dado bit and one has a V bit. That will reduce setups and give you consistent results.
• Cut the bottom (A) and middle (B) shelves to length. Machine the dados in these parts to accept the lower (D) and upper (E) dividers.
• Now you can obtain the final dimensions for the shelves (A, B) followed by the upper shelves (C). Cut these parts to length.
• The front edges of the parts that are attached to the desk will have to be rounded to seat properly into the round front of the routed dado.
• Cut pigeonhole dividers (F) to final length. With a block plane chamfer the ends to fit into the V-grooves. Cut the pattern on the fronts of these dividers with a coping saw or scroll saw.
• During the process of machining and fitting these parts you will have to remove and reinstall them many times. Patience is important and will pay off with a snug final fit.
• Once all of the pieces are fitting properly you can rip them to final width.
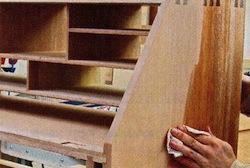
• Sand the pieces. Be careful not to sand too much. The more they are sanded, the thinner they become creating a loose fit with their mating dados.
• Once the parts all fit nicely you’re ready to install them. As you did when machining all these parts start with the larger parts – in this case the bottom and middle shelves (A, B). A bit of glue on both the shelf ends and the dado is all that’s needed. Excessive squeeze out will hinder even stain absorption.
• Once dry continue with the other dividers (E, F) and shelves (C) in the appropriate order. I finished the two pigeonhole dividers before gluing them in place.
Other options to consider when designing a gallery
A gallery should be customized to the person who is using it. Whether it will be used for storing 8 ½” x 11″ paper, mail or a laptop computer, the layout must be both functional and beautiful.
A door in the center of the gallery has always been a very popular feature in secretary desks. It can be paneled or left as a single piece of wood – either way it’s often figured or rare wood. These doors are often flanked by fluted pilasters or turned columns.
Drawer fronts and the framework surrounding it can be curved in one of many ways to add ornamentation.
Serpentine curves and blocked fronts are common options.
Another way of adding ornamentation to drawers and other parts of a gallery is by adding inlay or string bandings. If you’re really up for a challenge you can try making your own bandings.
Many secretary desks of high quality have some hidden compartment or drawers. They can be fairly simple additions to a piece or they can involve very complex tricks to camouflage the location and the way to obtain access to the compartment.
Machine and Fit the Drawers
• Although we need a slight gap – about 1⁄32″ on all four sides – between the drawer and the drawer cavity I start by making the drawers the exact size of the openings and plane or sand them to fit perfectly after they are assembled.
• The drawer fronts (G, H, I) will finish at ½” thick while I brought the sides (J, K, L) and backs (M. N, O) down to ⅜”. I plane a long board down to final thickness before cutting the parts to length. This way sending short parts through the planer isn’t an issue.
• Cut the fronts to final size – the exact size of the opening. At the same time rip the sides to final width.
• I used curly anigre veneer (S) to accentuate the drawer fronts and introduce some contrast to the rich colour of the mahogany. Apply veneer to both faces of each front sandwiching them between small cauls and letting them dry. Trim the overhanging veneer to size. Make sure to cut and apply the veneer so when the drawers are installed the grain lines up with the drawer next to it. This creates a harmonious look that is more appealing.
• The sides join the fronts with a half-blind dovetail. Cut the sides to rough length and start cutting this joint. I am a ‘tails first’ kind of guy, but cut the dovetails with whatever method you are most comfortable with.
• Once the dovetail joints are all cut the sides can be cut to final length.
• A dado joint will join the drawer back to the sides. Machine the dado groove in the sides at least ½” away from the back of the parts. Cut the drawer backs to length and machine the mating joint on their ends.
• I also ran another dado joint a few inches from the back of the sides on the two topmost drawers. A false back (P) will be fixed in this groove to create a hidden compartment in the back of the drawers. The drawers will need to be pulled out of their cavity to access this compartment.
• Run a groove in the fronts and sides to accept the drawer bottoms (Q, R). Rip the backs narrower so the bottoms can be slid in after they are glued up.
• Glue up the drawers making sure they are square.
• When the drawers are dry start the task of fitting them into the appropriate openings. This can be done with a sharp hand plane or sander. Aim for a nice even fit that doesn’t grab the drawer when it’s opened. A little wax on the sides will go a long way to helping the drawer slide smoothly.
Apply a Durable, Beautiful Finish
• The finish should not only protect the piece of furniture from day-to-day abuse, it should be chosen to compliment the species of wood that was used and provide a pleasing surface to see and touch. Because secretary desks were traditionally made of either mahogany or walnut, it’s rare to see one that isn’t finished with a combination of browns and reds. This desk is no different. I wanted to use a finish that was in keeping with the traditional aesthetic.
• A finish that has multiple layers of colour is always deeper and richer looking than a single layer of colour. This is a multi-colour finish system that can be customized for the look you want – one that I have discussed a couple of times before (see Step Tansu, August/September 2005, Issue #37, and Chrysanthemum Coffee Table, October/November 2005, Issue #38).
Enhance the Colour
• Apply multiple layers of colour to highlight wood intricacies.
• Every wood has a specific tone and colour that can be highlighted. With African mahogany it’s a warm red. In order to accentuate that colour I mixed up a water based stain. After some experimenting I found the colour I was looking for. Because water based dyes raise the wood grain I wiped down the entire piece with water before applying the stain. After it dried I sanded the desk with 220 grit paper to remove any of the raised grain. The grain will not raise after the water based dye is applied.
• Apply a washcoat layer – a diluted coat of varnish that seals the wood slightly. I do this because the next coat – an oil based glaze – is a very dark brown and I don’t want it to overwhelm the wood with dark brown colour. I applied it about ⅓ of full strength. When dry, sand lightly.
• The dark brown glaze is next. It wipes on as thick as paint but can be manipulated well to highlight the grain pattern. It can also be left thicker in crevices or on mouldings to give a slightly aged look. Let dry overnight or longer, and don’t forget to dispose of oily rags properly.
• Three coats of oil based varnish are applied over the glaze. Sand between coats to remove any imperfections and to give the following coat some ‘tooth’ to adhere to.
• After the varnish has dried for a number of days I use #0000 steel wool and wax to rub the finish out. This leaves the surface water and scratch resistant as well as removes any imperfections.
• The finish on the desk drawers as well as the gallery drawers is shellac. I apply thin coats to seal the wood but I don’t build up a thick finish. If you apply an oil based product on interior parts like drawers they may not dry properly and can produce a strong smell.
Final Touches
• To have the drawers sliding smoothly wax the sides and bottoms of each drawer as well as the cavity that surrounds the drawer.
• Install handles and escutcheons on the three main drawers and just handles on the six gallery drawers in keeping with the style of the piece.
• A handle or lock will need to be installed so the drop front can be opened easily. I used an escutcheon and a knob pull.
• A small pull on the end of each support rail will also need to be installed.

Rob Brown - rbrown@canadianwoodworking.com
Rob is the editor at Canadian Woodworking & Home Improvement and a studio furniture maker.
More Furniture projects to consider