Dowel joinery: simple, strong and accurate
Using dowels for joinery can be a very strong and accurate method. It’s also generally a very simple technique to master. I think woodworkers tend to avoid dowels for a number of reasons, even though they are perfectly capable of making you a better woodworker, and your furniture stronger as well.


There is no doubt a mortise and tenon assembly is strong, but there are times when they’re just not practical or necessary. I bought a biscuit joiner years ago when it was all about power tools for me. A few years later some- one borrowed it and I’ve never seen it since. I’m not too concerned, but I do wish I had been paid in dowels before it disappeared.
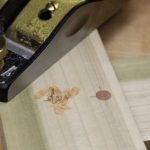
Flush it Up
Once the pinned joint has been assembled and is dry, flush the pin to the surface.

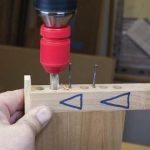
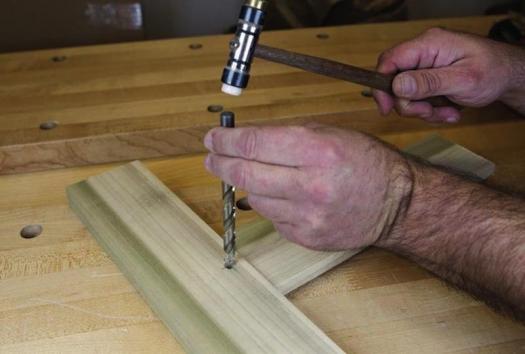
Mark the Center
Once the initial hole has been drilled in the mortised piece, assemble the joint and use a brad-point bit the same size as the hole and lightly mark the tenon (Above). Disassemble the joint then drill the second hole offset 1/16" towards the shoulder of the tenon (below).
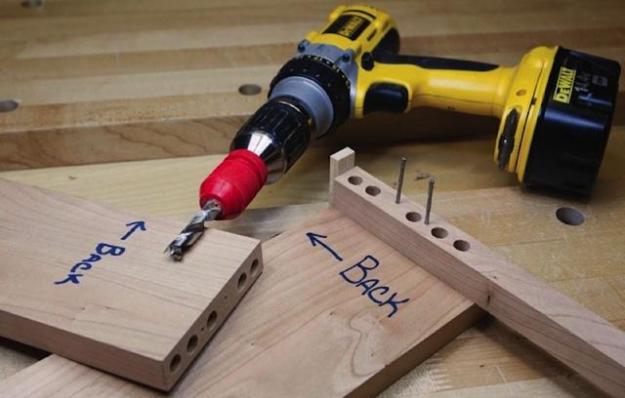
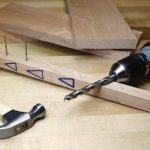
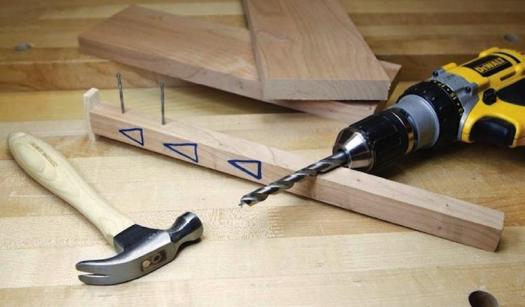
Customized Dowel Jig
Starting with a piece the same width and a bit longer than your workpiece, attach a simple stop to one end. Then drill a few nail pilot holes in the jig and mark it so you know which is the back.
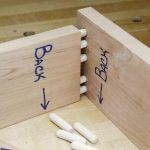
Dowel Centers
Drill holes in one workpiece, then insert the dowel centers (top). When the two parts are pressed together, the centers will leave small indents where the next dowel holes should be drilled. Drill those holes accurately and your joint is ready for final sanding and assembly (bottom).

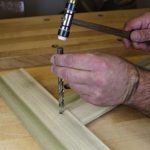
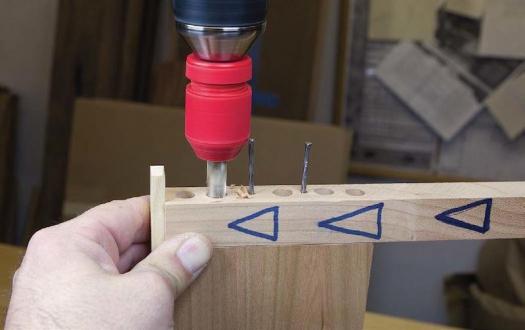
Drill the Holes
With the jig referencing off the back of the workpiece, temporarily nail it in place, set the drilling depth and drill your first set of dowel holes.
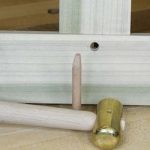
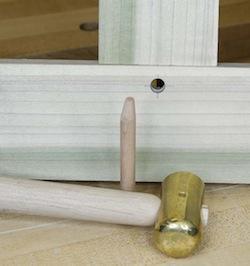
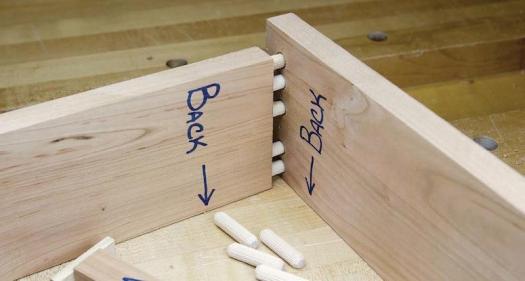
Strong and Simple
Once dowel holes in the mating workpieces are drilled, the joint can be dry-fit.
Small Chamfer
Adding a chamfer to the outer edge of the dowel holes will ease final assembly.
Slightly Smaller
A rasp will compress a dowel that is slightly too large to use.

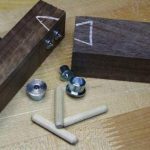
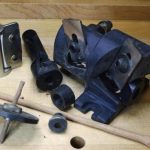
Dowel Making Equipment
Though it may not be necessary, you can make your own dowels with some equipment and the right approach.

A multipurpose joint
There are many situations where dowels can be used – everything from pinning weaker joints like rabbets for a box to pinning stronger joinery, such as mortise and tenons. They can be used to line up edge- glued panels or strengthen an otherwise weak end-grain joint. They work very well on leg- to-apron joints for a smaller table. Dowels came in handy on larger cabinets, like a wall- hung cabinet I built recently. I ended up using dowels to join the carcass, as I needed an over-hang for the top and bottom; dovetails just would not work in that situation.
Expansive dowels have ridges, or spirals, around the body. They come in various diameters – both standard and metric – typically from 1/4″ up to 1/2″ and at various lengths. The ridges on the dowels leave room for glue, and, as the name suggests, they expand when they come in contact with glue, making the fit very tight. If you ever come across an odd-ball situation and need to make your own, you always have that option.
Accurate by nature
While the strength of biscuits and dowels may well be similar, their accuracy is not. Biscuits, by their nature, have a lot of movement both vertically and horizontally before the glue sets. While extra clamps can take care of this, the rush of assembly sometimes causes us to fail to line up our pieces. Dowels allow no movement between the mating pieces, taking one more variable out of always-hectic assemblies. There are many times when adding a few dowels to a joint is a good idea, even if you’re not looking for added strength; location assistance shouldn’t be underrated during a glue-up.
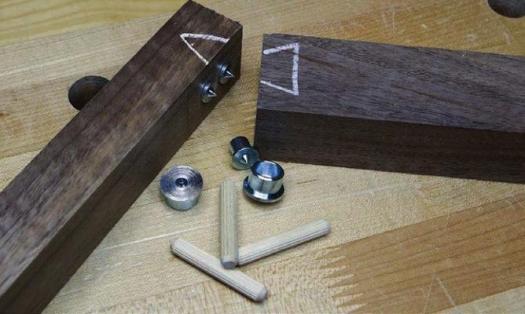
Pinning a joint
When pinning a mortise and tenon, one of the options is to slightly offset the hole in the tenon closer to the shoulder. This not only secures the joinery, but also pulls the joint together even tighter. This is typically known as draw boring. Drill an appropriately sized hole through the mortise and then insert the tenon. Brad-point or forstner bits work well here. Use the same drill bit to lightly mark the location of the hole on the tenon. Pull the joint apart and use an awl to mark a point about 1/16″ closer to the shoulder. Bore the hole and insert it again into the mortise. A draw bore can be used to snug the joint before gluing. Chamfer the end of the dowel and drive it home. It will pull everything nice and tight. When the glue sets, flush the protruding dowel.
Dowel Centers
For those times when a jig won’t work, cheap and easy dowel centers become a great solution. It is optimal to have more than one set of centers, as you will never have enough of the one size you need. Mark and drill the location of your first set of holes, then place the dowel centers in the holes and bring the mating pieces together. Just make sure when you bring the parts together they are aligned with each other exactly how you want them to fit together. The tips on the centers will work like an awl, marking a center point in the undrilled surface, giving your drill bit a starting point. It’s usually best to work on a flat surface, like that of a table-saw, when bringing parts together for marking so mating faces will be aligned. Extra straight pieces of wood can also be used to help with alignment. If your pieces are of different thicknesses, use shims to bring them to the right height.
A customized jig
As I mentioned earlier, the cost of purchasing a dowel jig can push some away from using dowels. There are cheap models out there, but you often get what you pay for … with one exception. Why not make your own jig customized specifically for the task at hand? It can be just as accurate, and will cost you nothing more than a couple of nails and a cutoff from your project.
To make a jig for a specific job cut or plane a piece of wood to the same thickness, and slightly longer, as the two pieces you will join. The piece should also be about 1″ wide. What if you have two different thickness meeting together? No problem. Size your jig to the piece that will receive the dowels in its end grain.
To make the jig work accurately, you are going to need to create a stop on the end of the jig that can be tacked and glued in place. This jig will generally reference off the back of the piece you are working on, as the back edges of cabinets or workpieces are usually set flush with each other. Mark one face of the jig as the reference face. Sometimes words seem to complicate a simple technique, but a picture, along with words, might simplify things.
Take the jig and drill a few pilot holes sized for medium sized nails; the longer the jig is, the more nail holes you will need. Now the dowel location holes can be drilled. I strongly suggest you drill these holes on a drill press so they are 90° to the working face of the jig. I typically place a dowel every inch or so. It’s also good practice to cluster the dowels near the ends and maybe a little farther apart near the middle. The ends typically require more holding power.
Now place the jig on the workpiece, with the small fence against the back of the piece, and drive the nails in until the jig is secure, but removable. If the assembly is small enough to be used on a drill press, I would suggest going that route. Decide on the depth the dowels will protrude into each piece and set your stop appropriately. However, if the assembly is too awkward for the drill press, pull out your hand drill and set a stop on the drill bit with either store-bought collars or masking tape. Be aware that the tape might slide up the bit if you are aggressive while drilling. You could also use a block of wood cut to the right thickness as a shop-made solution.
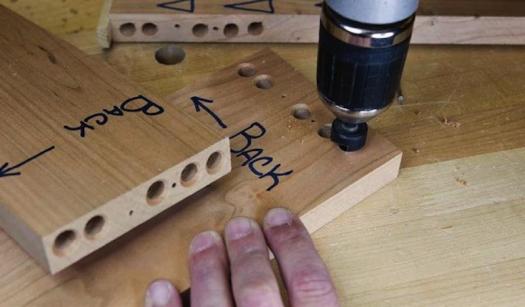
Drill through the jig, into your workpiece, with the appropriate sized bit to create the dowel holes in your workpiece. Pull the nails out and attach the jig to the mating workpiece, but this time with the opposite side of the jig facing in towards the workpiece, to ensure the dowel locations will mate properly. Position and secure the jig to the mating workpiece, adjust the depth if needed and bore the rest of the dowel holes.
Tips and Tricks
In woodworking there are many types of joints. In fact, in years past woodworkers were called joiners. Each method has its benefits and drawbacks. However, you’d be hard-pressed to find a method of joinery that is as simple, cheap, strong and accurate as dowels.
Making Your Own Dowels
Heading to the hardware store to pick up dowels sometimes leaves much to be desired. It’s not uncommon to go through the whole bin and find that the dowels resemble something closer to abstract art rather than straight, round rods. What if you wanted to create some contrast and pin a mortise and tenon with a dowel made of black walnut? One option, rather than scouring the Internet, is to make your own.
There are various jigs on the market, ranging from about $40 to several hundred dollars. If you are going to make a run of them, I suggest spending the money and invest in the more expensive jigs. It’ll make the job easier. If you only need a few or your budget is limited then a dowel plate is probably the right choice.
Each individual tool will come with its own set of instructions, but typically you take defect-free, straight-grained wood and reduce the size to slightly larger that of the final diameter. On some jigs, you would leave them square whereas with dowel plates making hexagon or octagon pieces will produce better results. Shorter stock, say 3-6″ in length, works better than trying to hammer out 12″ sections.
If you will be using these shop-made dowels like expansive dowels, place them on the bench and roll a rasp over them to crease and compress them. You can even make a little jig to hold the dowels and make your own ridges with a bandsaw if you are concerned that excess glue will keep your parts from coming together, but figuring out what the right amount of glue is will always be the best option.

I use a simple approach of using screws to make the initial glue-up. The screws used must have heads that are smaller in diameter than the dowel (say #6 if using 1/4 dowels). After the glue has dried, I take out one screw at a time, drill the correct size hole for the dowel (leaving room at the bottom for excess glue) then put in the dowel and saw it flush.
That’s pretty clever Tony. It does seem a tad more time consuming, but it eliminates the problem that you might encounter trying to align dowel holes – particularly if you don’t have a dowelling jig. Thanks for the tip! Carl
Have you looked at the DowelMax, a great tool, very accurate and invented in Kelowna,B.C.
We have one at the Coquitlam Men’s Shed and everyone that’s used it is impressed.
Thank you for the magazines that you sent to our convention in Squamish. It was a great sucess.
Hi Doug. We’ve been a big fan of Dowelmax for quite some time. It’s arguably the best doweling jig on the market – easy to use, versatile and super accurate. (Jim was one of our first advertisers). All the best to our friends in Squamish.