SITE MAINTENANCE IN PROGRESS
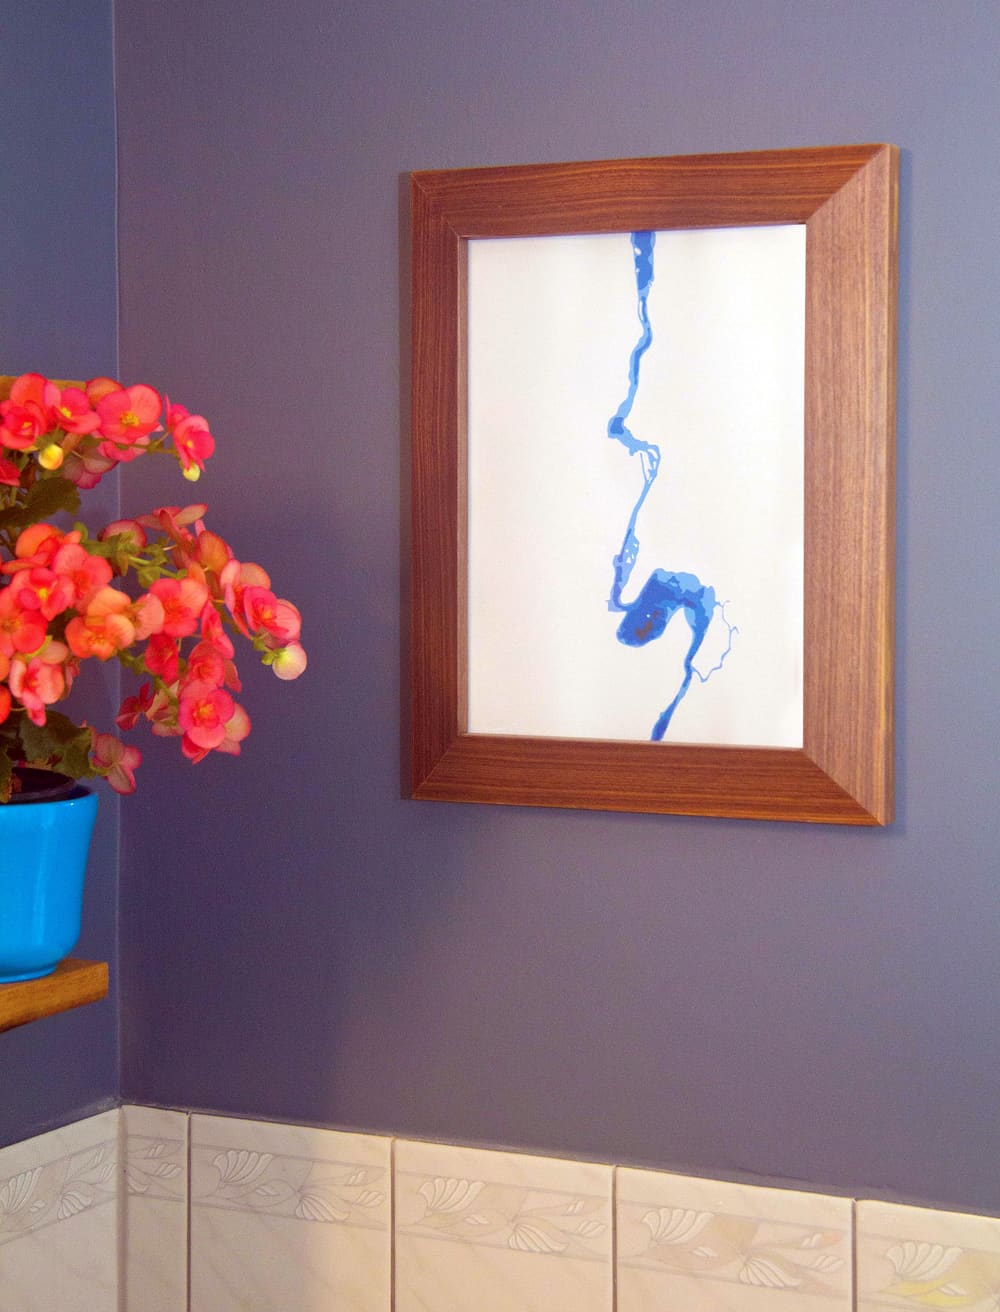
Build a mirror frame
Rob Brown
Rob Brown
February 2025

Simple half-lap joints create a classic, customizable design.
Advertisement
- DIFFICULTY2/5
- LENGTH/TIME2/5
- COST2/5
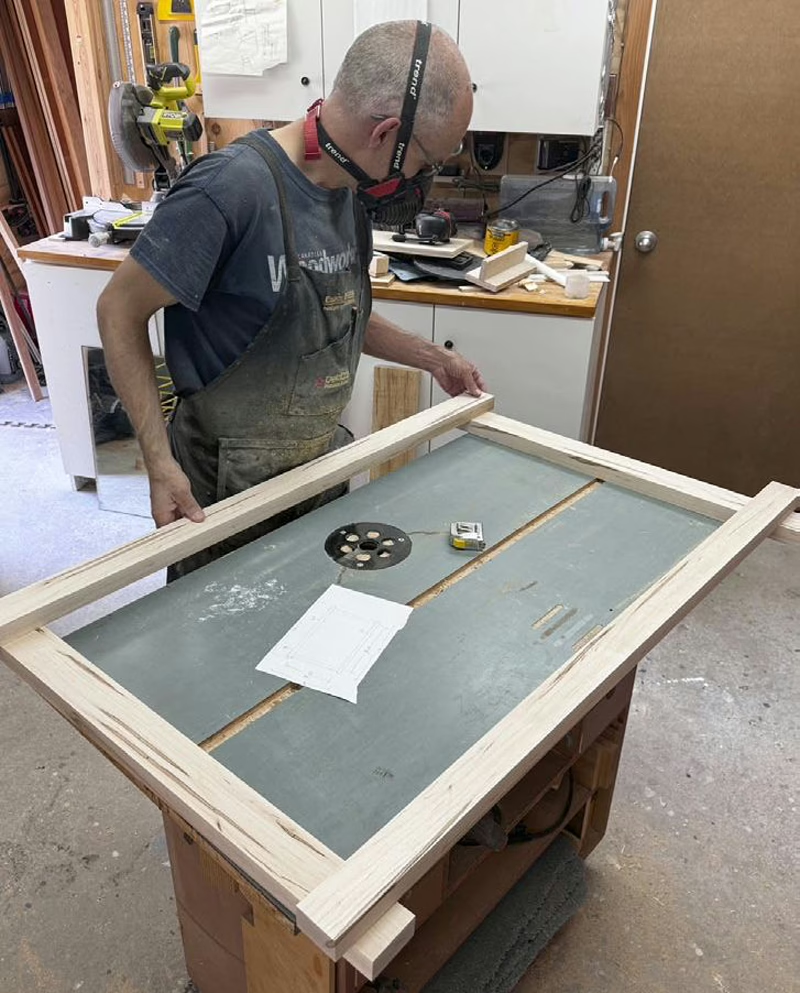
A mirror frame is a quick and easy project that can be customized to the décor in any room. This frame will hang above a six-drawer dresser in a bedroom, so it had to be oriented horizontally, but this design could be adjusted to hang vertically or even be made square.
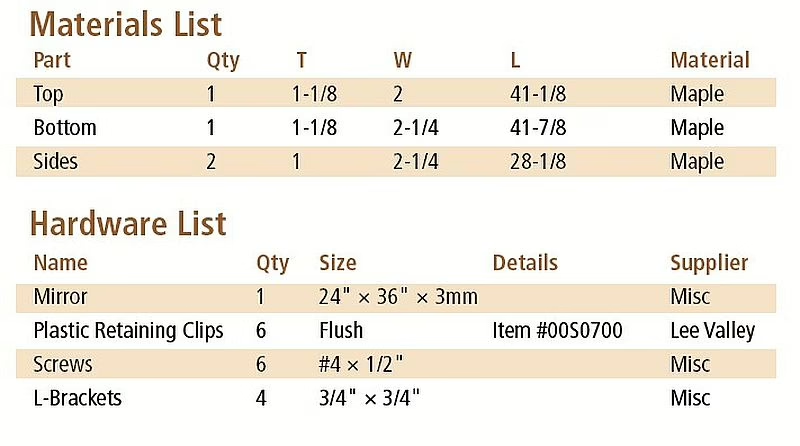
The frame was sized for a 24″ × 36″ piece of mirror I already had. Typically, it would be easier to build the frame first, with the general size of the mirror you wanted in mind, then order the mirror to whatever exact size you needed.
Grain Graphics
The grain and colour of each workpiece is often important, and this situation is no different. At least there are only four pieces to keep track of, which makes things easier. Brown positioned the dark streaks for the best balance overall.
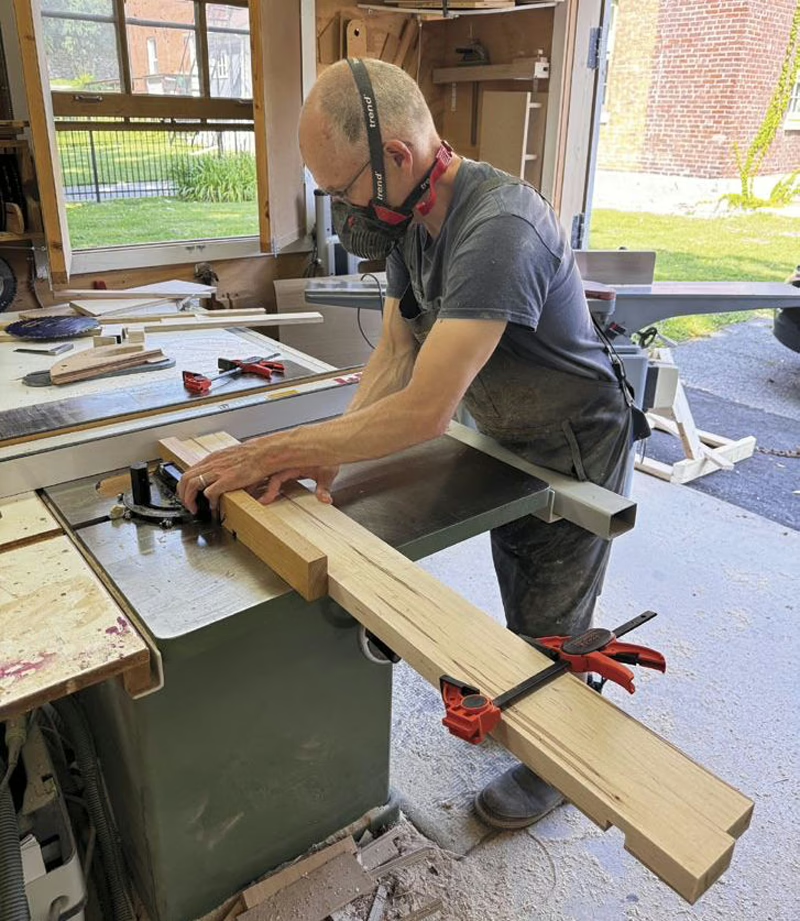
Matching Half-Laps
Here, Brown clamped together the top and bottom rail so the half-lap joints would be the same distance apart, even though the overall lengths of the two rails are different.
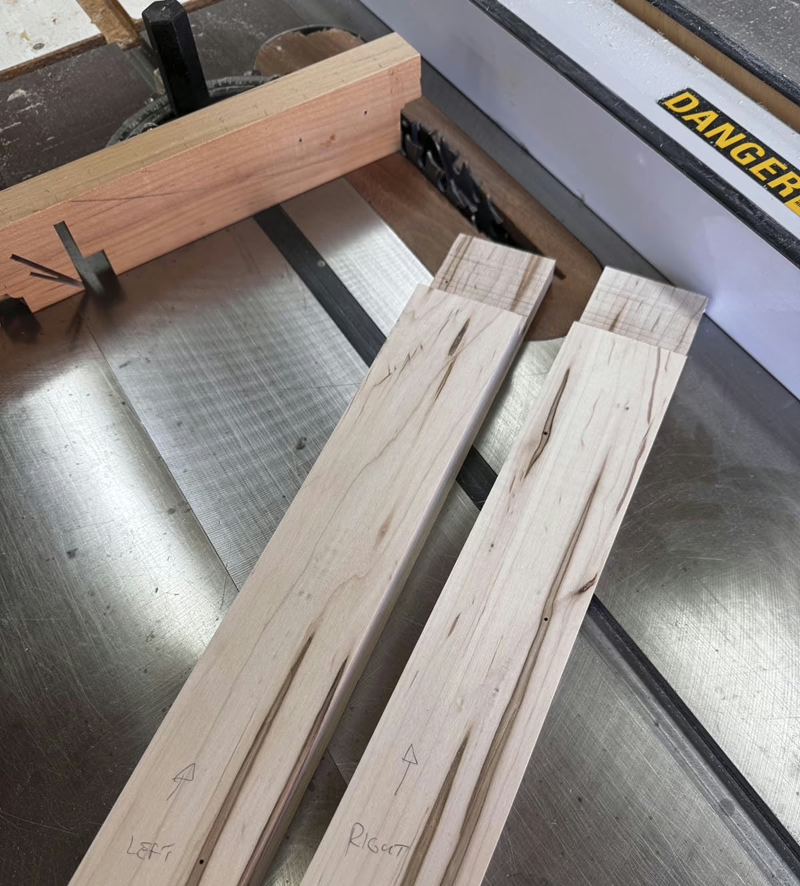
Mating Half-Laps
The mating half-lap joints are now cut into the sides. Notice the names of the parts on the faces of each part, which will help keep track of the different parts.
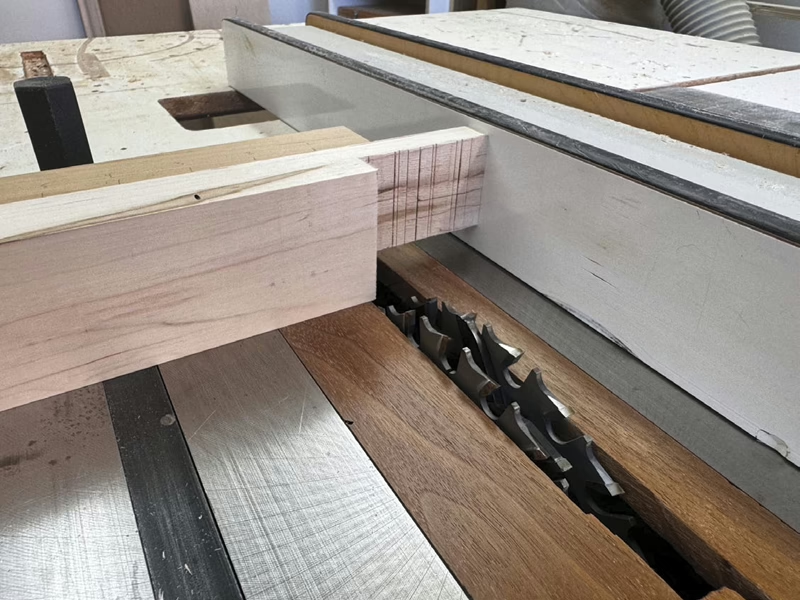
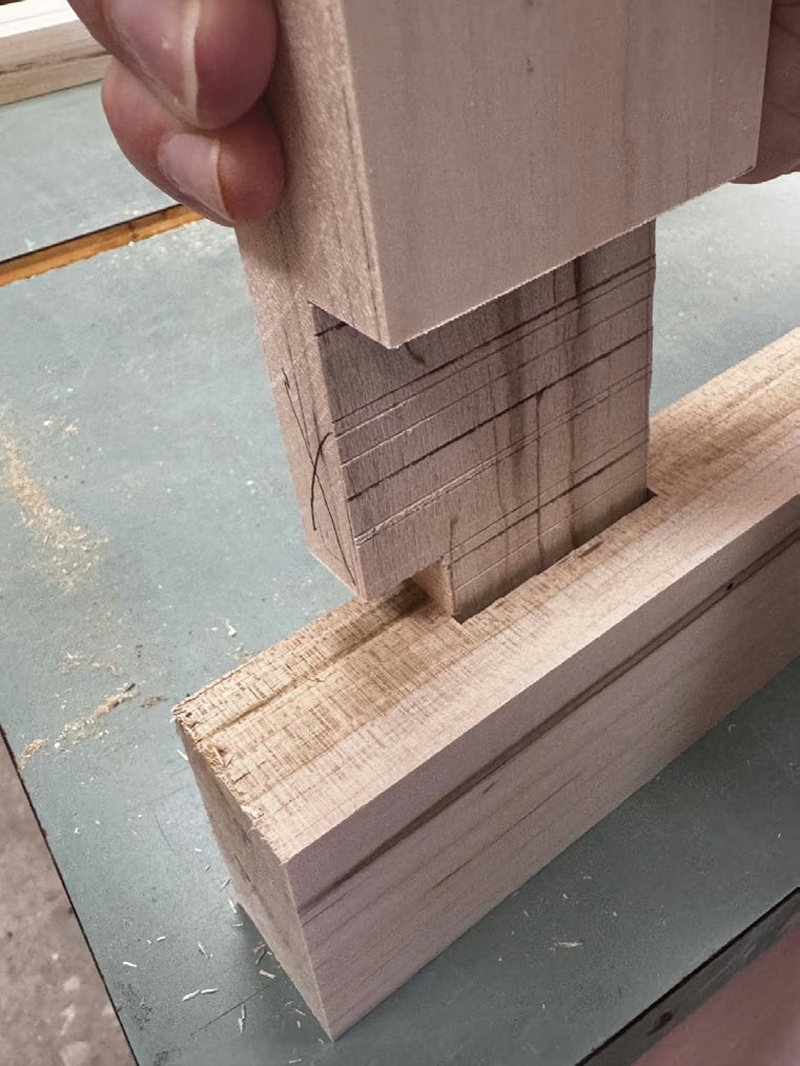
Final Fit
With the height of the dado blade set, machine the four half-lap joints in the sides, with the workpieces on their edge.
Check for Size
Dial in the width of the half-lap portion of the joints that are at the ends of the side pieces, then check the fit against the half-lap joints in the top and bottom rails.
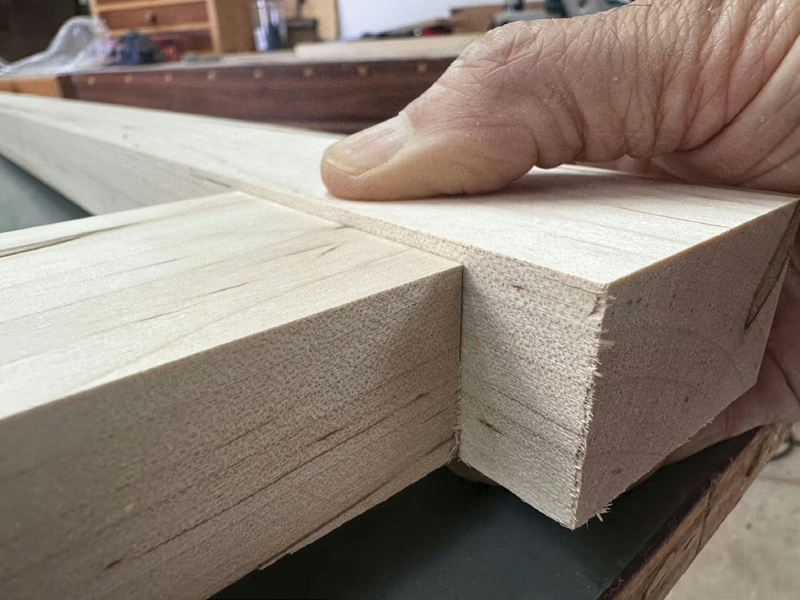
Order of Operations
Although it’s possible to dress the sides thinner than the top and bottom rails before machining the half-lap joints, Brown finds it easier to machine the joints, then dress the sides to final thickness and create a reveal between the sides and top / bottom rails.
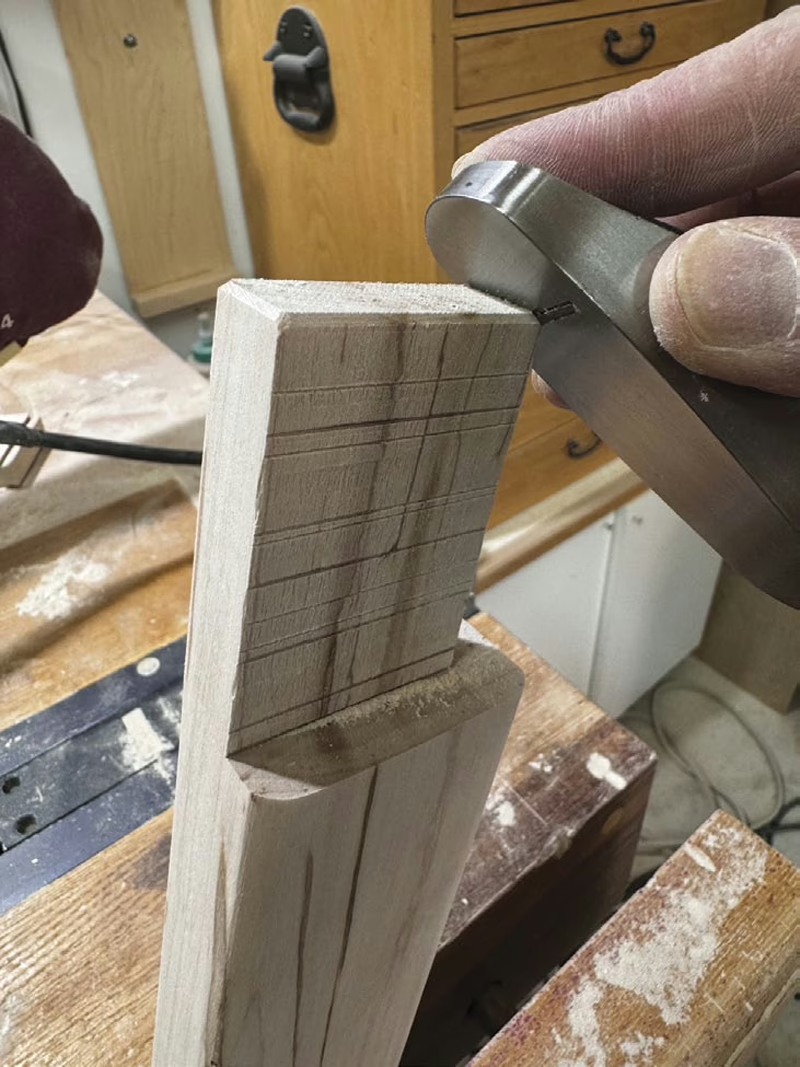
Chamfer the Ends
The ends of the half-lap joints in the sides will be visible after assembly. Chamfer them and lightly sand the visible faces, even though they’re very small.
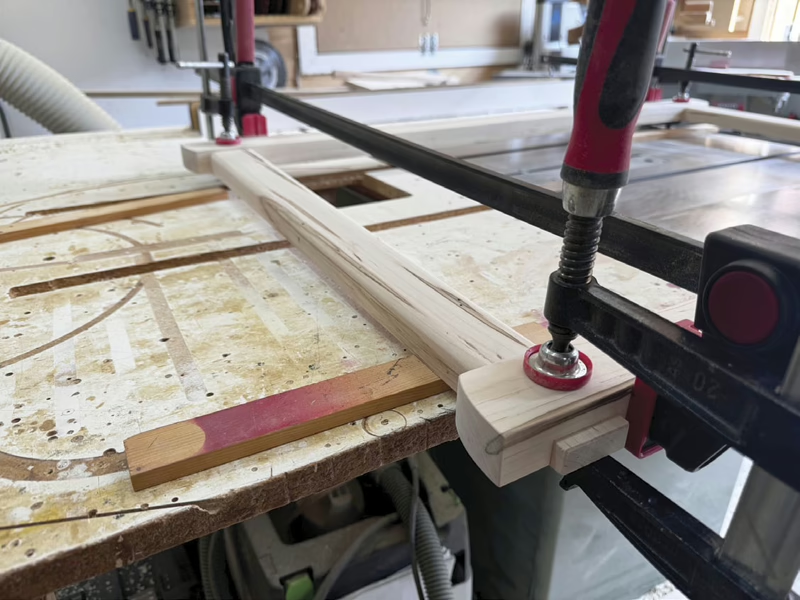
Bring It Together
Apply glue to the face grain of all the half-lap joints and bring them all together. Once longer clamps bring the edges of the joints together, smaller clamps can bring the faces of the joints together.
Rout and Rabbet
Once the frame was glued up, Brown used a rabbet bit in his router table to create the rabbet to accept the mirror. Each pass was shallow to reduce tear-out.
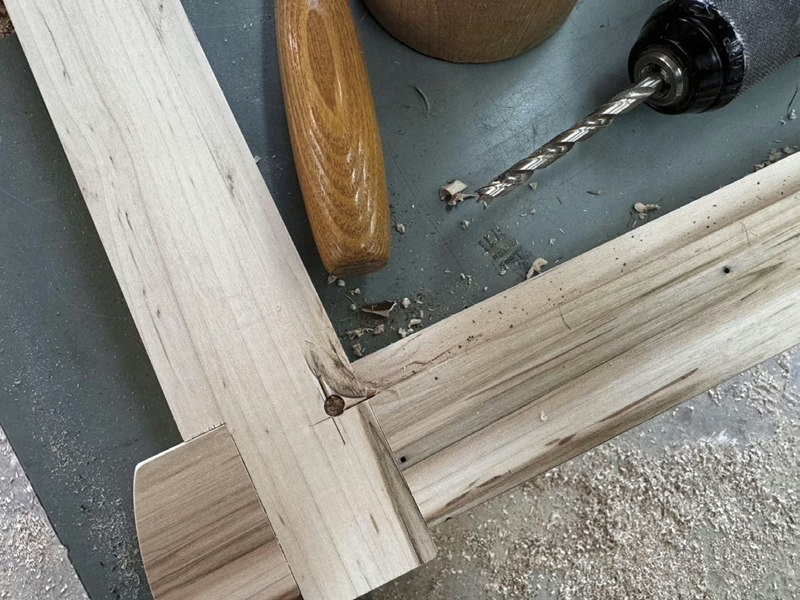
The Easy Route
Rather than chisel out all the waste in the corners, Brown used a drill bit to remove some of the waste from the corner, then a chisel to remove the rest. This approach is much easier.
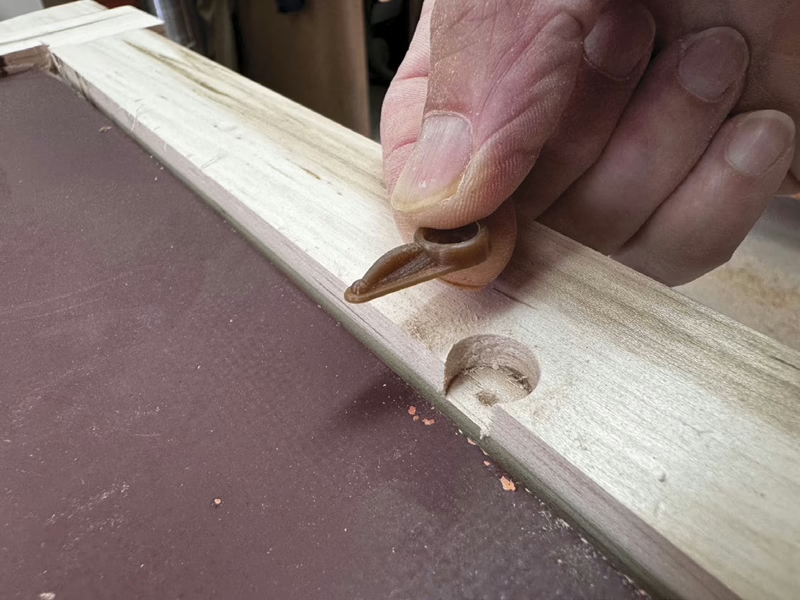
Mirror Clips
A few holes bored in the rear face of the frame will accept the plastic retaining clips. Bore a small pilot hole in the centre of the large hole to accept a #4 screw.
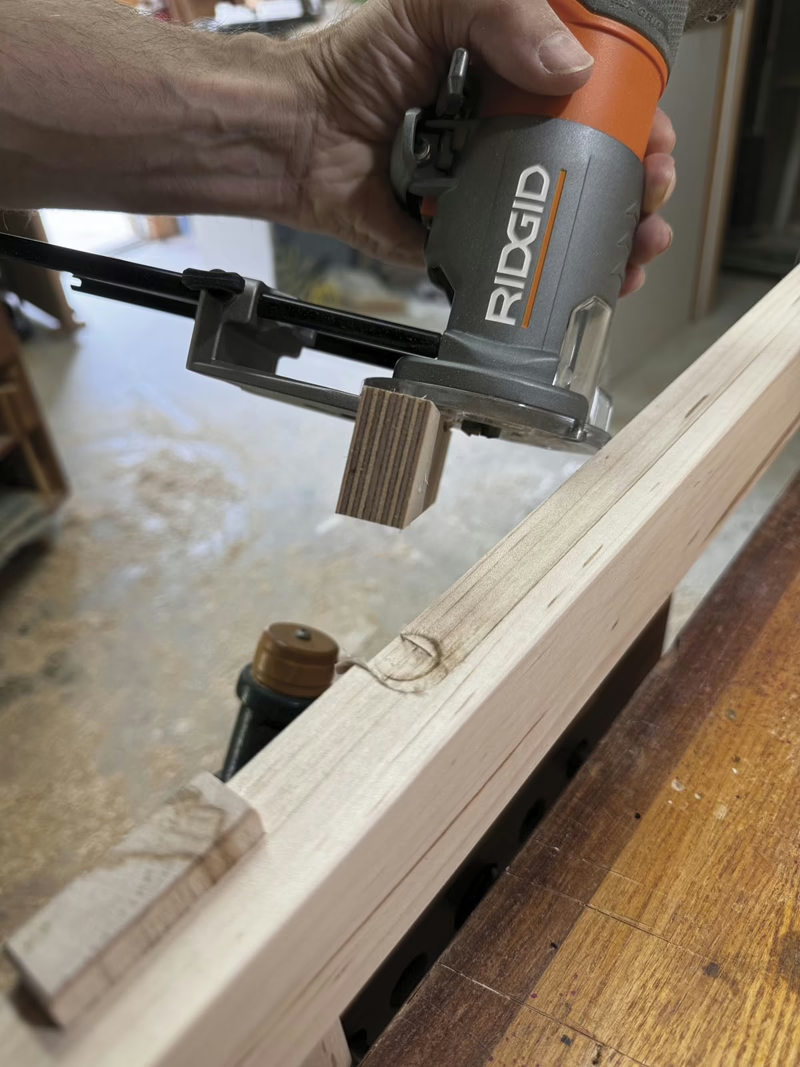
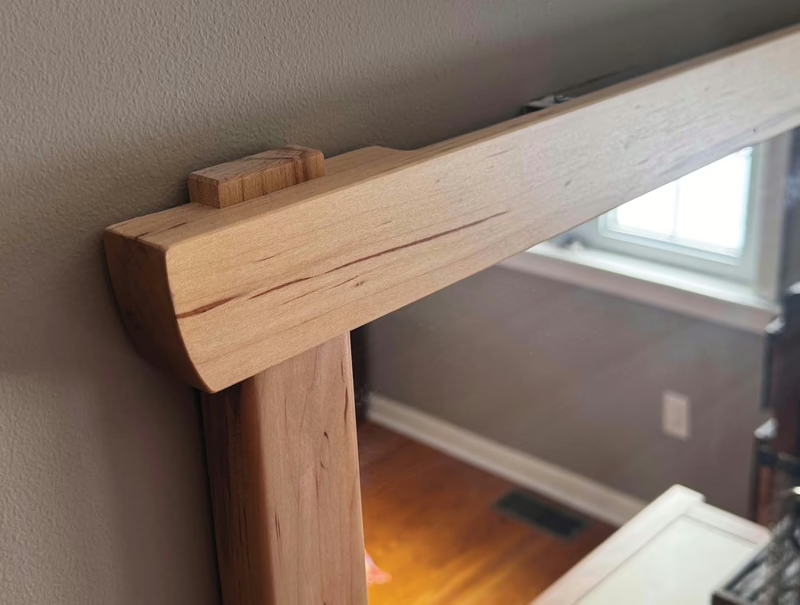
Hide the Hardware
Brown used a trim router, equipped with a 1/2" diameter straight router bit, to machine a shallow rabbet along the upper and lower edges of the frame. This rabbet will allow you to use standard L-brackets to install the frame on the wall, yet have the L-brackets hidden from view.
Invisible Hardware
The L-bracket that secures the lower frame rail gets installed in this orientation, and the mirror frame just sits on top of the protruding portion of the L-bracket. Drill a pilot hole and install a screw up into the frame. The L-bracket won’t be visible.

All Done
With the four main joints constructed, and the finish applied, the rabbets in the upper and lower rails will accept the L-brackets on the wall and you can screw the frame in place.
Grain selection
Grain selection is always important, but when there are only four parts to a project grain orientation is also fairly easy to keep track of. I started off with a 5/4 board of wormy maple about 6″ wide and 8′ long, which gave me about 1″ extra width and about 24″ extra length than I needed. This allowed me to adjust how I cut the four workpieces from the board to give me the best grain orientation and colour. Since I was also dealing with wormy maple, the holes and colour streaks had to be accounted for and spread across the mirror frame somewhat evenly.
I marked out where the cuts needed to be made and used a combination of bandsaw, hand saw, mitre saw and table saw to break out the pieces. At this point, flatten a face, square an edge, plane them all to a thickness of 1-1/8″, rip them to width and cut them to length. The sides will get tapered later, so just leave their width at 2-1/4″ for now.
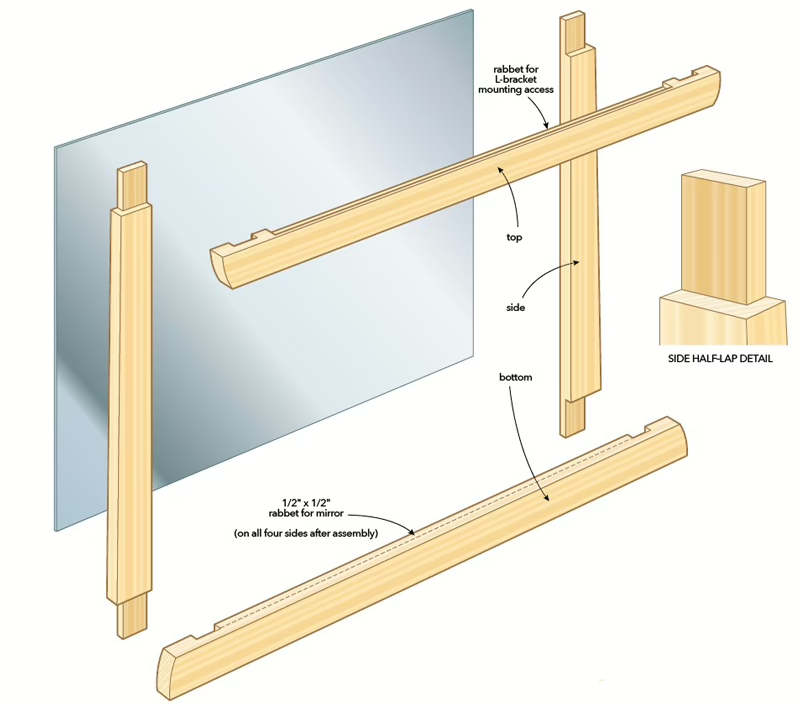
Corner joints
The corners get secured with fairly simple, yet strong, half-lap joints. The mirror I salvaged was surprisingly heavy, so I didn’t want to skimp on strength. Having said that, half-lap joints are easy to machine and can add some flair to an otherwise simple design.
Set a dado set to cut about half the thickness of the material. Even though the top and bottom are different lengths, the joints on both the left and right sides of these two pieces will be the same distance from each other. To keep things simple, I clamped the top and bottom together, laid out the location of the joints and cut the joints with the two parts clamped together. This ensures the joints are an equal distance apart.
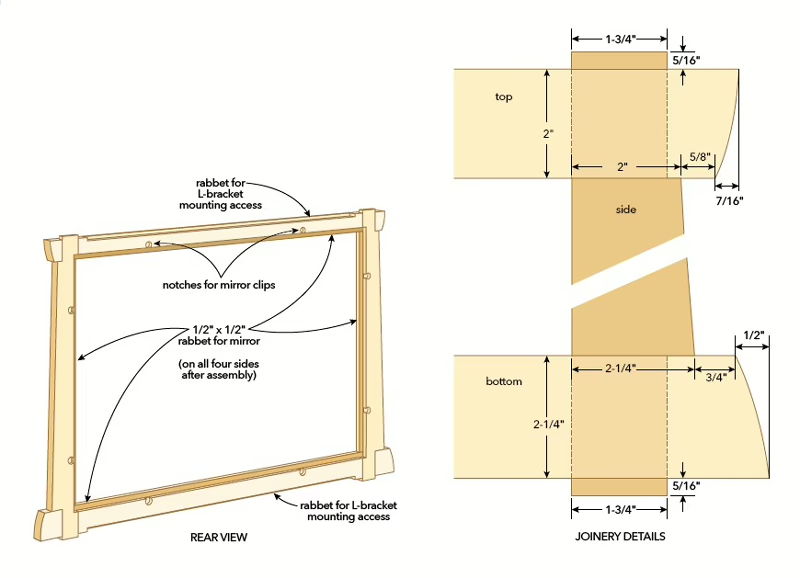
I used the mitre gauge to guide the top and bottom across the blade while the rip fence set the location of the half-lap. Machine the half-lap 1-3/4″ wide, even though the mating side pieces are wider. We will machine the sides to a narrower width so they fit into this half-lap joint later.
Machining the mating half-lap joints in the sides is next. Lay out where the cuts need to be made. Keep in mind, the top joint is 1/4″ closer to the end of each side because the top rail is 1/4″ narrower than the bottom rail.
Again, use the mitre gauge to guide the workpiece and the rip fence to determine location. Be sure to adjust the height of the blade to ensure the faces of the workpieces are flush with each other once the joint is complete.
At this point, the joints will not fit together because the sides are too wide to fit into the 1-3/4″ wide half-lap joint. To take care of this, notch the outer sides of the half-lap joint so the ends of the sides mate nicely with the joints in the top and bottom. Do this by rotating the sides so they’re on their edge. Using the mitre gauge to guide the parts and the rip fence for location, run the parts across the blade. You’ll have to adjust the height of the blade to leave you with a perfect fit. It’s also a good idea to fit each individual joint to its proper mate, as these half-lap joints may vary slightly in their dimensions. Mark the joints of the workpieces so you know how they go back together during assembly.
Dress the sides
You can opt to keep the sides the same thickness as the top and bottom, but I prefer the look of them being thinner by about 1/8″. With the joinery complete, pass the sides through the thickness planer with their outer face up until you like the size of the reveal between the sides and top / bottom.
Taper the sides
The sides taper by 1/4″ in width as they rise upwards. Mark the top and bottom of each side, then use a taper jig on the table saw to bring the sides to their final size. Ensure the taper is on the outer edge of each side. This is the side that has the half-lap joints notched, so the taper won’t affect the final fit of each corner joint.
Round over the sides
This step can also be skipped if you would rather have sides with straight edges. I prefer gently rounded edges on the sides, so I set up a large round over bit in my router table to my liking and made a pass on both edges of the sides. You could also use a hand plane to give you a gentle radius on both of these edges.
Shape the ends
The ends of all four of these parts need at least a bit of work before assembly. The top and bottom need the most attention. Mark a pleasing curve on their ends with a French curve. Use the bandsaw to take off most of the waste, then fair their edges with a sander. For consistency, it might be best to shape a pattern, then use it to mark the rest of the edges. The difference in thickness between the top and the bottom will mean you’ll have to adjust the layout slightly.
The distant 3/8″ of each half-lap joint in each side will be seen. Sand the faces and edges of the lap joints, paying special attention to the end 3/8″. Use a block plane to chamfer the corners. Check how each joint looks once everything is clamped together and make any necessary adjustments.
Sand and assemble
Sand the faces and edges of all the parts and prep for assembly. A dry run will give you the confidence needed to reach for the glue. Apply glue to the faces of each half-lap joint, making sure to stay away from the distant 3/8″ of each half-lap joint on the sides. A pair of clamps bringing the top and bottom towards each other will help keep the gaps tight, while a clamp at each half-lap joint will bring the glue surfaces together nicely. Ensure everything is square, then let the assembly dry.
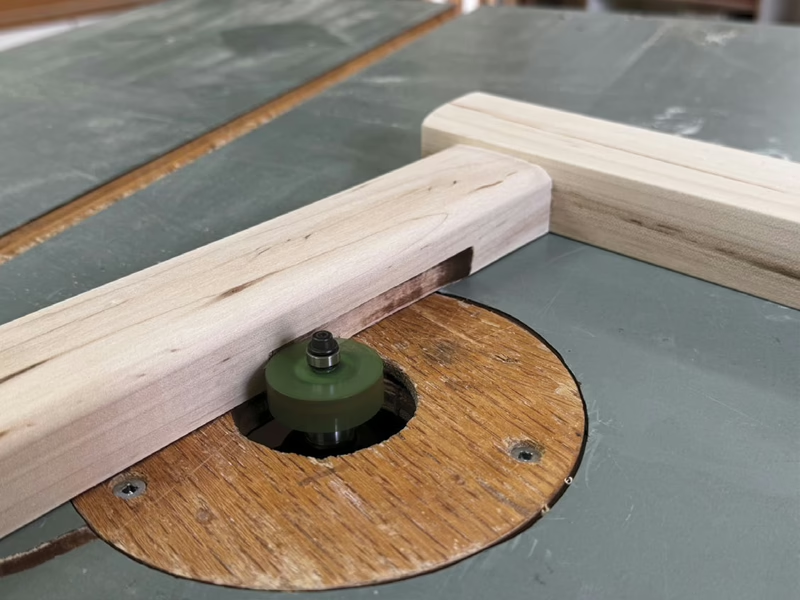
Rout for the mirror
Clean up any dried bits of glue in the corners. Set up a rabbet bit in your router table that will cut a 1/2″ rabbet in the inner edge of the assembly. I machined it 1/2″ high, also. The first pass should be quite light to reduce the risk of chipping. Instead of machining the second pass to full depth, I made additional light passes to slowly reach the full depth after about four passes. Routers work best when removing small amounts of material at a time.
The corners will have to be dealt with in order to allow the mirror to sit into the rabbet. There’s nothing wrong with using a sharp chisel and mallet to square up each corner, but I prefer using a 1/4″ diameter brad point bit to remove the material in the corner, then cleaning up the small amount of waste with a chisel and mallet. Just be sure not to drill too deep or you’ll bore through the face of the frame.
Drill for mirror clips
You can attach the mirror with silicon, but that always seems so final to me. A broken mirror can’t easily be replaced if silicon was used. Plastic retaining clips are just one way of holding a piece of mirror in place. Drill 1/2″ diameter holes in the rear face of the mirror located so they slightly overlap the edge of the rabbet. The depth of these holes will have to be adjusted to work with the thickness of mirror you have and the size of clip you purchased. A pilot hole in the centre of this hole will allow you to drive a small screw home to hold the clip in place without cracking the frame.
Sand and finish
I gave the faces of the frame another once-over and ensured all the edges and corners were eased. I sprayed on three coats of polyurethane, sanding between coats, but just about any finish will do, as this frame won’t get a lot of abuse during its lifetime.
Hang it high
There are many approaches to hanging a mirror frame. I’ll describe the method I used. Since the lower and upper edges of the frame won’t be seen, I decided to machine a shallow rabbet to house and hide L-brackets. The L-brackets can be screwed into studs, then the mirror frame can be screwed to the L-brackets. Just ensure the L-brackets get screwed to the wall so the portion of the L-bracket that’s against the wall is behind the mirror frame. This approach will leave you with no visible fasteners, unless you bend down and look closely at the lower edge of the frame or get on a ladder to look at the upper edge.
I machined the rabbets with a trim router and edge guide, using a few passes to remove the material. The rabbet on the lower edge of the frame is about 3/16″ deep. In order to give me a bit more flexibility during installation, and to ensure the L-brackets would be covered, I machined the top rabbet 5/16″ deep. This means I can leave about 1/16″ more between the upper and lower L-brackets when I install them on the wall, giving me that extra distance to work with, yet the top L-brackets will still not be visible. The installed frame rests on the lower L-brackets, while the upper L-brackets just keep the frame from falling over.
With the L-brackets fixed to the wall, temporarily install the frame and test for fit. Once it’s fitting nicely, remove it, install the mirror with the glass clips, then reinstall the frame on the wall. Finally, stand back, take a look at the person in the mirror and congratulate them on a job well done.

Rob Brown - rbrown@canadianwoodworking.com
Rob is the editor at Canadian Woodworking & Home Improvement and a studio furniture maker.
More Home Decor projects to consider