< 
Something fishy is going on here

I was contacted by someone in Toronto a while ago about making a few sets of shoji screens for their condo.
Two sets would be simple maple screens for their bedroom closet, while a third set, for their front hall, would be a bit showier. The hall screens would be made from black cherry. The idea was to add some sort of Japanese or Chinese motif to the front hall screens. We quickly bounced around a few ideas, all of which would have been good. The silhouette of Mt. Fuji with a full moon above it, some cranes in water, a few chrysanthemums and the wave from the classic Japanese woodblock print by Hokusai titled “The Great Wave Off Kanagawa”.
Over the coming weeks, I considered a bunch of options, but settled on koi fish, pictured from above. I love the movement that can be created by even three or four fish. And the thought of adding textured scales to the design was also fascinating.
Okay, but…
Coming up with a motif was one thing, but incorporating that motif into the screen design was another. Not only did I have the visuals to consider, but these screens had to be constructed so they would be durable. The standard kumiko (the thin horizontal and vertical strips that make up the central pattern of each screen) fit together nicely, but one of the main questions was how the motif I selected would fit into the screens while keeping the structural integrity of the kumiko.
To the shop
My first idea was to carve a few koi from a solid block of wood, then machine grooves into its underside to allow it to mate with the kumiko in a sort of unique half-lap joint. The kumikos would also have their depth reduced by half to allow all the parts to be flush on their back surfaces.
Starting with a piece of pine, I drew an outline and cut it out, while still leaving enough material on the blank to allow me to secure it to a worksurface while power carving it. The piece got fixed to the outfeed surface of my table saw and I started power carving. Having eventually removed all the material I could, I continued with some rasps and carving gouges.
There was no need to get too detailed with this carving, as it was just an experiment. Once I was done, I made some basic kumiko to see how it would look. Sadly, I was underwhelmed by the whole look. It was a bit too bulky for the much more refined look of a traditional shoji screen. It’s also not easy to carve fish in the round.
Try again
I took a step back for a few days in order to readjust my approach. If this project was starting imminently, I’d push on and further the design, but I had another project in the shop at the time that needed to be completed.
Over the coming days I came up with the idea of making the outline of the koi about the same width as the kumiko, about 3/8″. This would further refine the overall look of the motif and ensure it was in keeping with the look and feel of the shoji screens. I got to work to mock up something to see how it looked. It also had to physically mate with the kumiko and create a lasting bond.
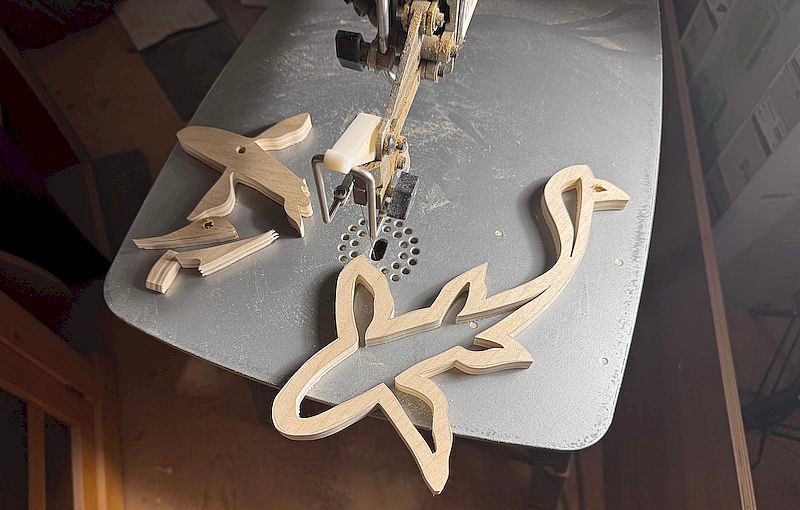
After sketching a fish onto some Baltic birch plywood, I cut one out on the scroll saw. I used plywood so there would be no short grain strength issues, although I wasn’t sure how the contrasting species would look. The cherry kumiko and birch koi needed to look good next to each other. That was still to be determined, at this stage.
Next, I played around with how to join the fish motif to the kumiko. Making a half-lap joint where the kumiko crossed the perimeter of each fish was an approach I thought would work. Rather than spend too much time on it, I marked the location of the half-lap joints and used a hand saw to quickly remove material on both the fish and kumikos to allow them to fit together, even if it was on the loose side for now. Things were looking really good, thankfully.
At this point I was also looking at koi designs on the internet and noticed a few lily pads in one sketch. Adding a lily pad or two to the design might add a bit more depth to the overall look of the piece, so I quickly made one and added it to the mock-up. We will see if I include it in the screen.
Finally, progress
It wasn’t until I sent an image of the mock-up to my wife, who suggested I not run the kumiko through the fish, that the design really came together. I liked the fact that the fish created a natural negative space behind it. It looked like the fish were in front of the kumiko, as even the empty centre area of each fish would look like it was blocking the kumiko, visually.
In terms of the structural aspect of adding these fish to the kumiko gridwork, I thought that as long as I don’t add too many of the fish to each screen, as I try to keep them away from the half-lap joints that occur where each of the kumiko overlap with each other, the latticework of the kumikos would be strong enough for this application.
Almost there
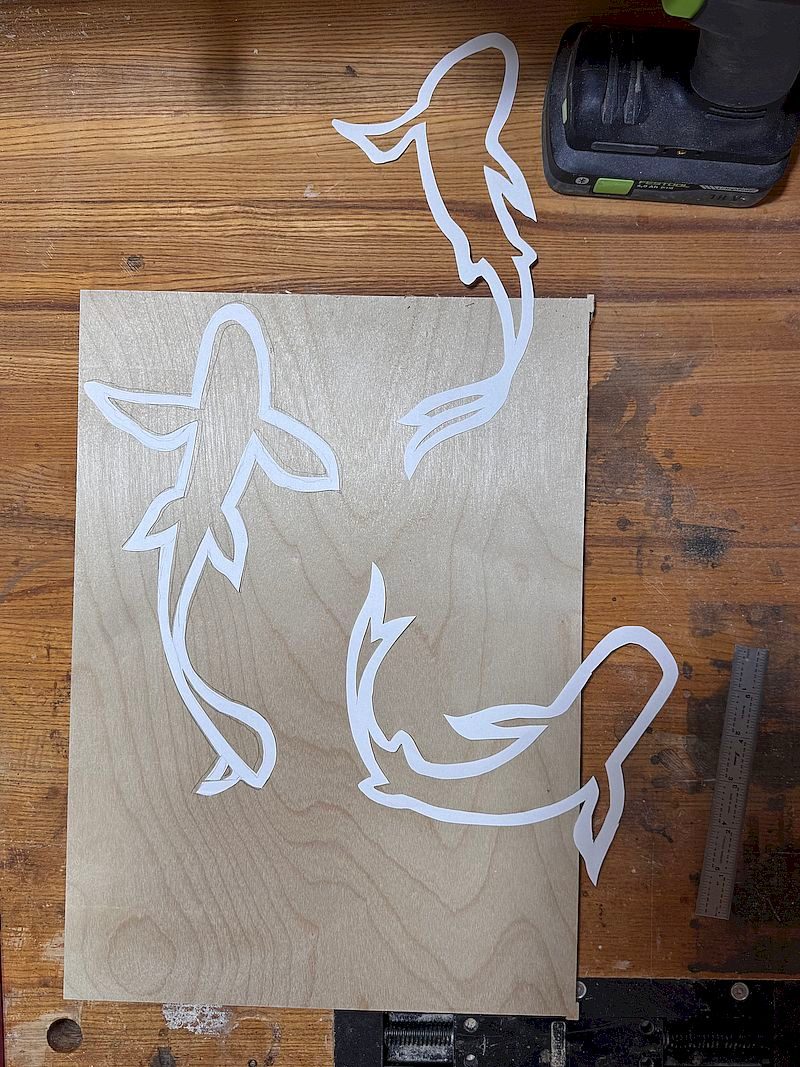
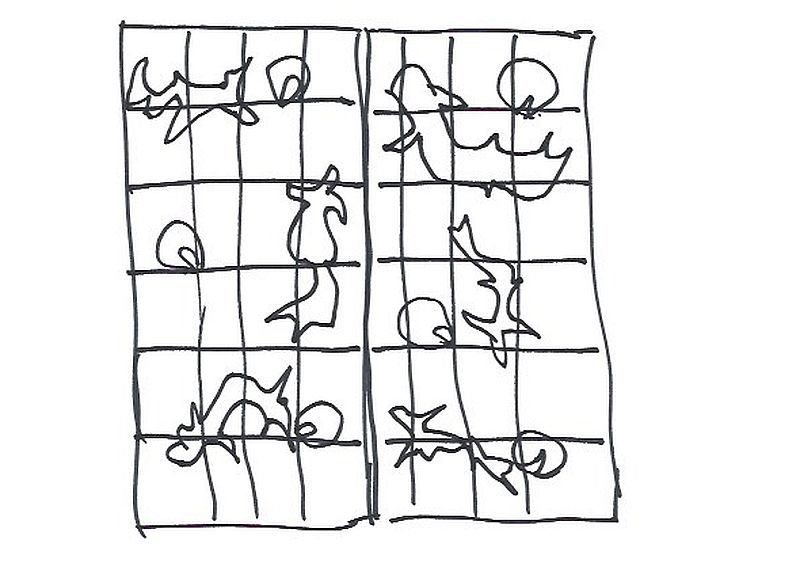
At this stage, all I had to do was get the client onside with the approach. I told him I was trying to bring the koi motif into this design, but he had no idea what I was going to do, specifically. Rather than making more fish to give him a better idea of what the whole project would look like, I cut out some paper fish instead, and positioned them so they looked like they were all swimming upstream together. Thankfully, he loved the idea, and even had a good idea on further refining the design. I had the fish all swimming in one direction, but his suggestion of having the fish swimming in a more circular pattern was a really great idea. I was having trouble envisioning how I could make the fish look like they were swimming together, even though they were on two different screens, separated by a stile of each frame. A group of fish swimming more circularly was a great option. I’ve learned over the years that not all clients have great design sense, though once in a while that’s thankfully not true. Always listen to your clients, but don’t always trust their design sense.
Onward
Now that the design has been worked out, and the deposit has been given, it’s go-time. I’ll be buying lumber in the next few days and getting started on these screens. It should be a fun build. It’s always enjoyable when you don’t really know exactly where you’re going with a project, but you have a bunch of well-defined restrictions.
First Crack
I don't hate the look of the fully carved koi, but I think it's just a bit too heavy for this project. I'll keep this little guy around the shop in hopes he inspires me to consider this approach for another project down the road.
A Quick Mock-Up
Before making any sawdust on the second idea I had, I drew three fish on some paper and cut them out. I liked what I saw, so I reached for the Baltic birch plywood next.
One Wooden Fish, Please
I traced one of the fish onto plywood and brought it to life with my scroll saw.
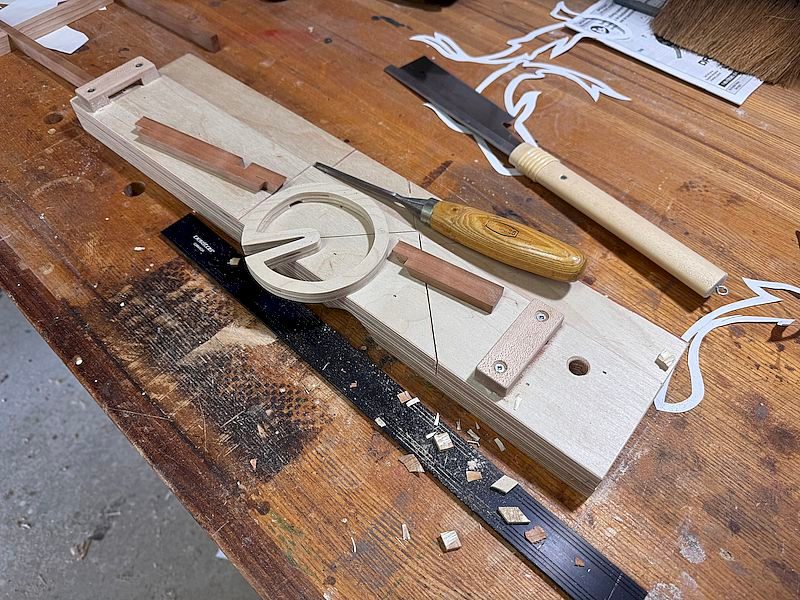
Lily Pads
The idea to add lily pads to this design came to me late in the game. Here, I'm cutting simple half-lap joints in both the lily pad motif and the kumiko parts to allow them to join together.
Bring It All Together
This is one of the photos I sent to my client, to show him the koi and lily pad design. I like the fact that the kumikos don't extend through the fish or lily pad motifs.

Good Idea
This is the sketch my client sent me, after looking over my ideas. The idea of having the fish scattered across the screens, and not all swimming in the same direction, was a good one. I think I'll have the fish swimming in a slightly more circular pattern.

Rob Brown - rbrown@canadianwoodworking.com
Rob is the editor at Canadian Woodworking & Home Improvement and a studio furniture maker.


Hi Guys,
Thanks for your comments. I’ll post a few photos of the finished product once it’s all done.
This is awesome, love the article on you thought this through. Wish we could see the finished product. Thanks Rob.
I really appreciated reading your thinking, planning and overall design process! While I haven’t ever created anything like this, I’ve learned that I don’t take the time to test an idea before jumping headlong into a final construction and then discovering “whoops -missed that” moments!
Now, THAT is really cool, Rob.
Great taste. And a great idea.
Thanks for these pics and drawing.
Howard Rosenberg