< 
Use French cleats to organize your workshop

When you have a small workshop, the key to staying organized and productive is storage that’s not only efficient, but also adaptable to ever-changing needs.
After years of experimenting with a variety of wall storage alternatives, I’ve decided the solution that ticks all the boxes for me is the French cleat system. French cleats have become popular in recent years, but they’re not a new innovation. They’ve been around since the early 1800s when French ship builders would use the technique to hang ropes and tools on the walls, thereby freeing up limited deck space. Today, woodworkers are discovering that French cleats are also an excellent choice for the workshop because the system is capable of carrying heavy loads, are a snap to install with just a few tools, and can be easily reconfigured whenever the need arises.
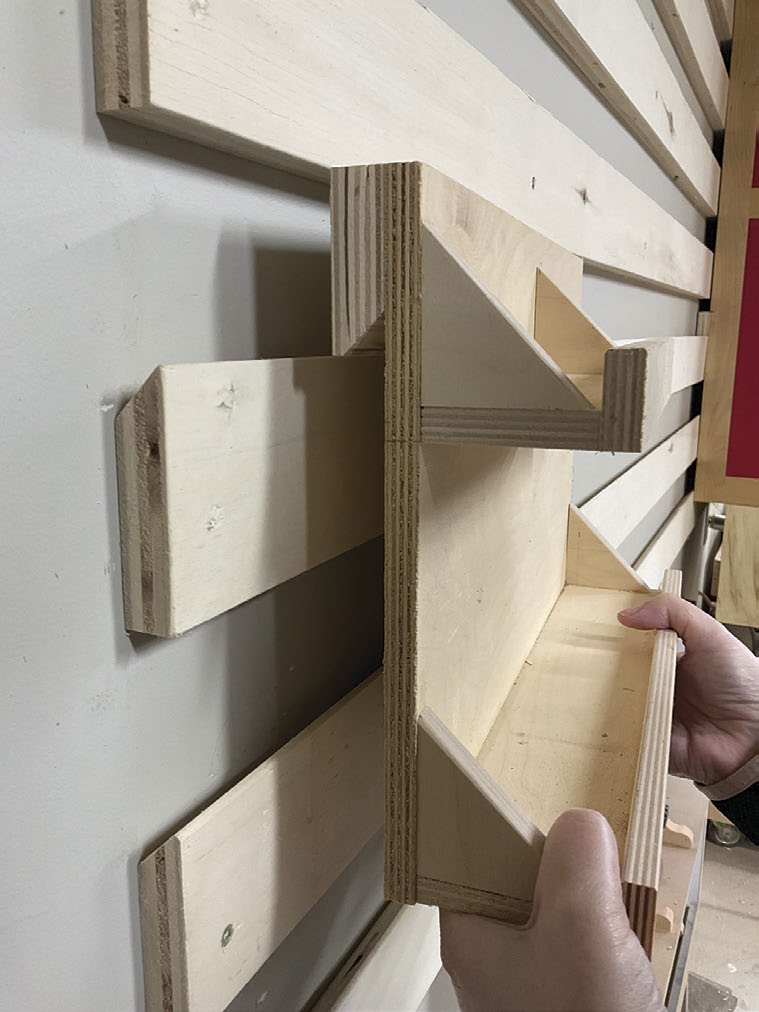
There are basically two main components to every French cleat installation: support rails permanently mounted to the wall and moveable storage fixtures suspended from the rails. The rails have a 45° bevel milled along the top edge and the fixtures have a cleat mounted on the back with an opposing 45° bevel formed on the bottom. When the fixtures are suspended on the rails, the complementary angled edges of the two components interlock to create a secure connection. It’s the weight of the fixture and gravity working together that make the system work. The heavier the object, the more reliable the connection.
Plywood is typically chosen for the rails and cleats because the alternating grain pattern of the thin plies make these sheet goods stronger than other alternatives. Oriented strand board (OSB) or particleboard aren’t good options because the products could break apart under the force of a heavy load.
Sometimes I’ll use hardwood to make my cleats, but solid lumber would be an expensive choice for an entire wall of rails. However, solid lumber would be a great choice for an area that needed high strength.
Regardless of the materials you decide to use, there’s a golden rule to keep in mind for any French cleat installation: the rails and cleats must be exactly the same thickness for the system to work effectively. If the cleat and rail thicknesses don’t match, the parts won’t lock firmly in place, making the fixtures unstable on the wall.
Generally, I recommend using a minimum of 3/4″ material for French cleats but you may get away with something thinner if you only plan on hanging lighter objects, such as a collection of small bench tools.
Plywood Is Strong
Although solid wood is the strongest option for building a French cleat system, it can be expensive. Particleboard, OSB and MDF are too weak for all but a lightweight system. Campbell used quality 3/4" thick plywood for French cleat wall strips and hanging cleats, and a mix of 3/4", 1/2" and 1/4" plywood for the fixtures. He is very happy with it.
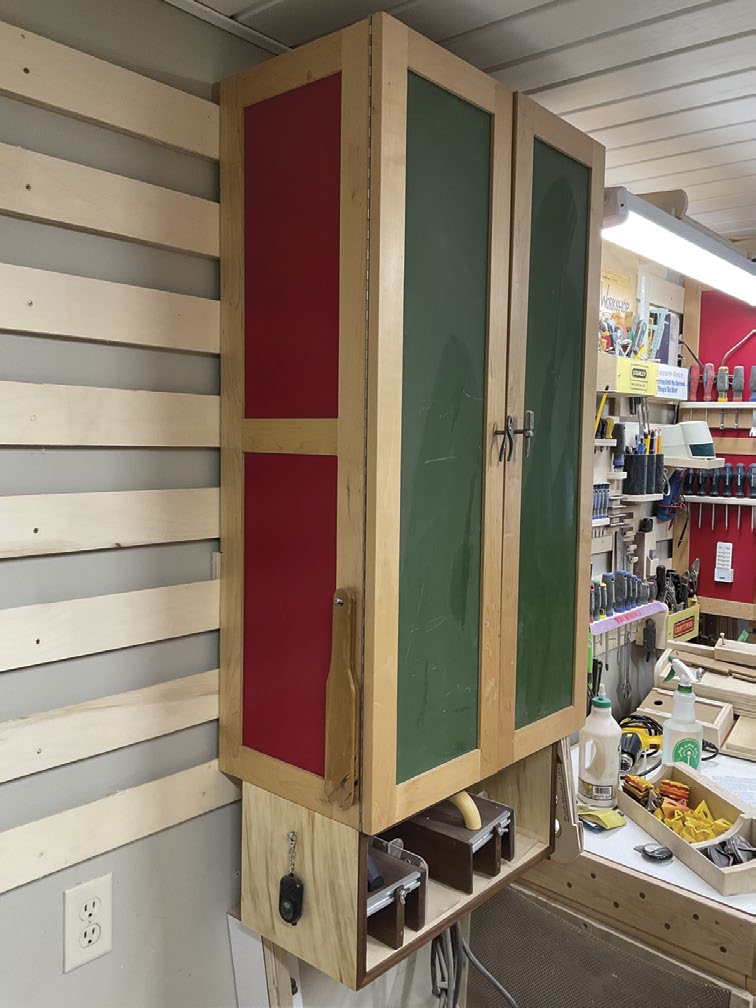
Cabinets on Cleats
Cabinets, with a few cleats on their backs, are great for a French cleat system. The system is strong enough for all but the heaviest cabinets and contents, and they can easily be moved when needed. If a cabinet and its contents are very heavy you can always drive a few long screws or lag bolts through the cabinet and into the studs once you know where you want the cabinet.
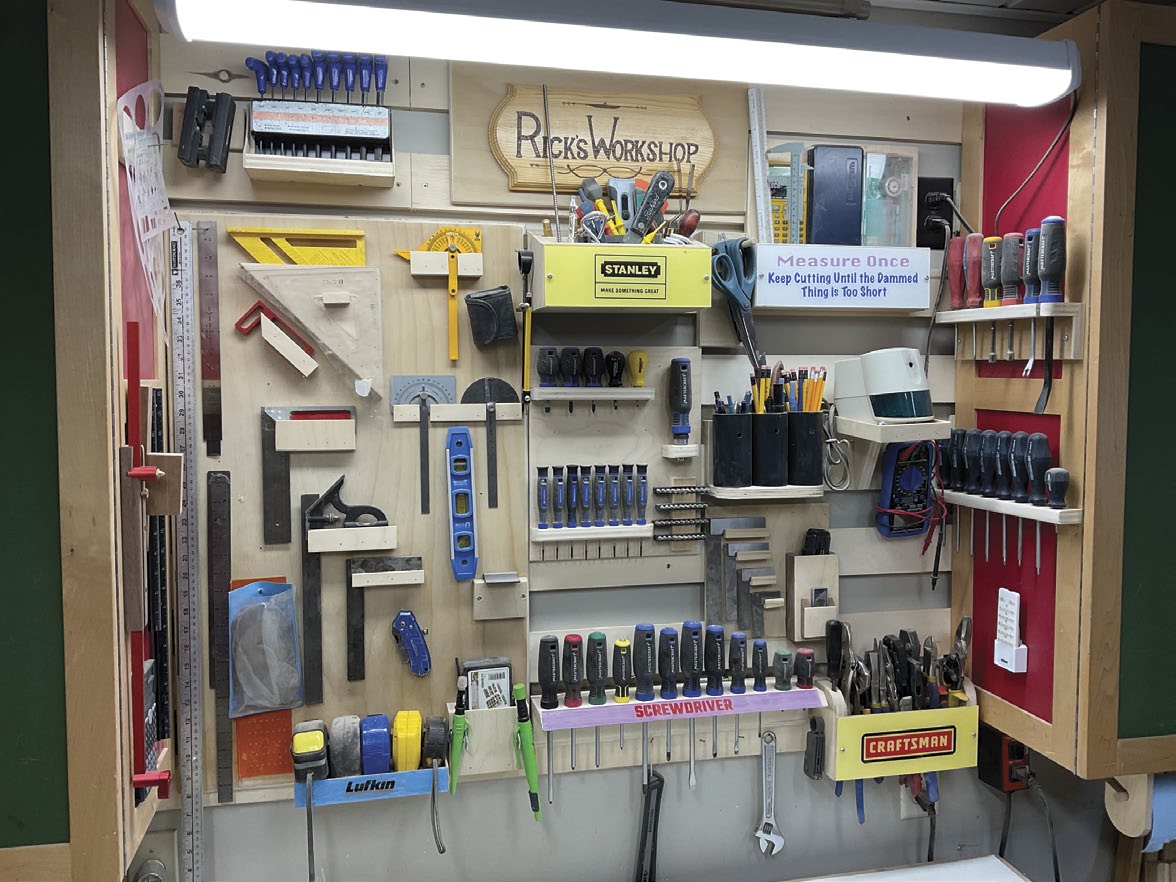
Hand Tools
Some areas of the shop need more refined organization than others. Hand tools are likely the best example of this. Campbell spent time organizing the tools he regularly uses, so they will be right as his fingertips and easy to grasp when he needs them.
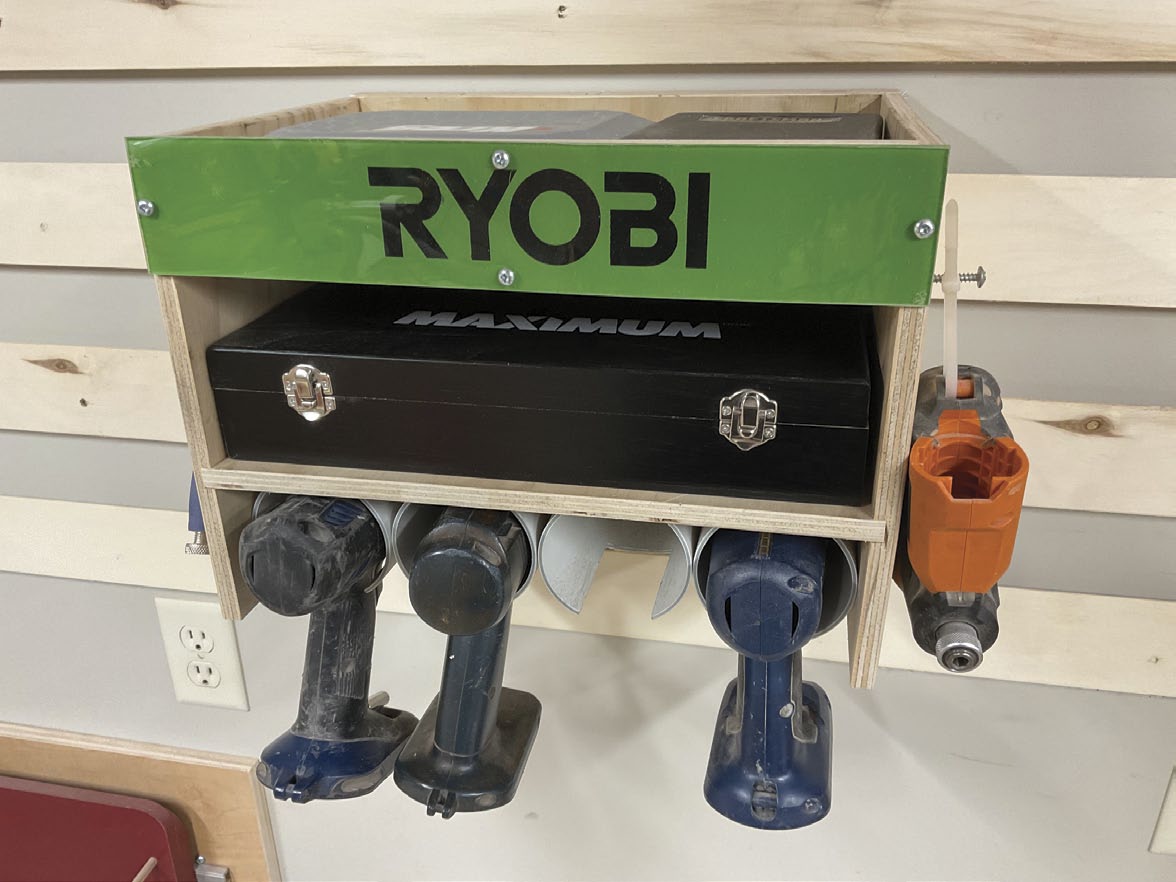
Lots of Drills
Campbell has a few cordless drills that are kept in notched ABS conduit, where they’re easy to grab and go. Some miscellaneous bits and other boring tools are kept directly above the drills.
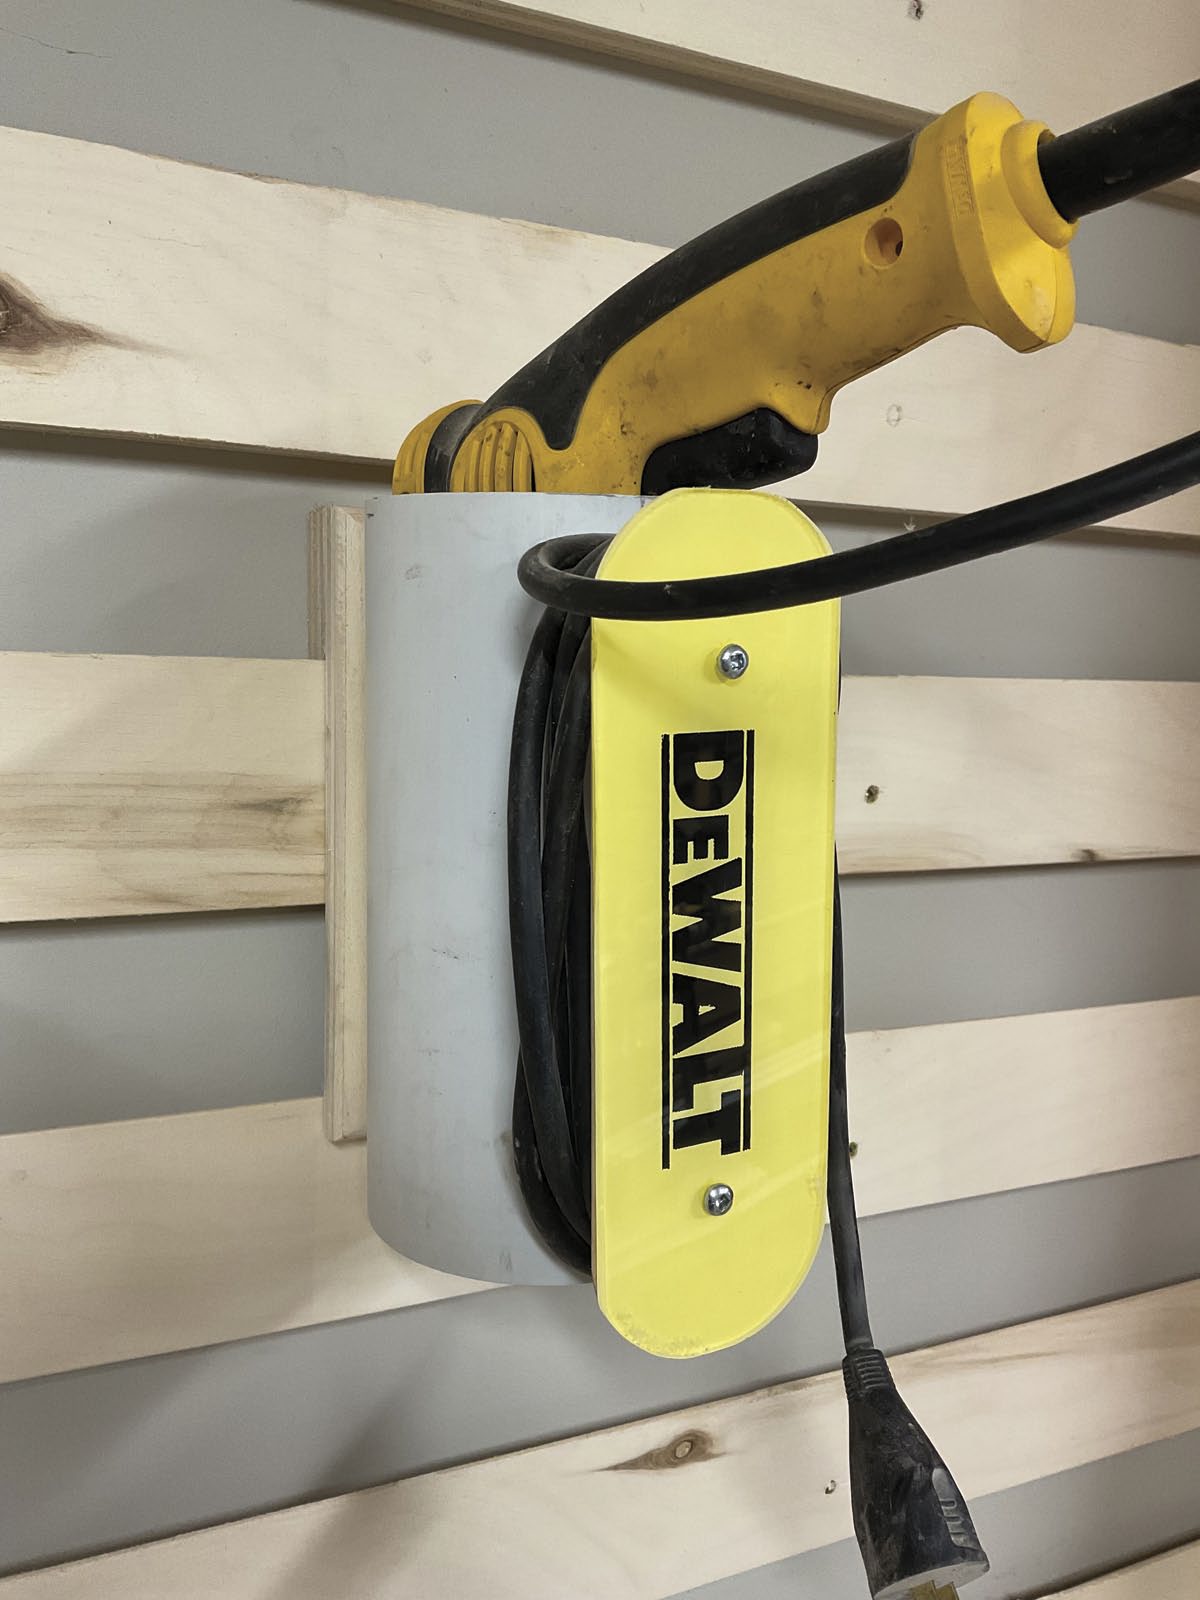
Corded Drills
Campbell’s corded drills are kept in a vertical piece of ABS conduit, with a cleat to wrap the cord around.
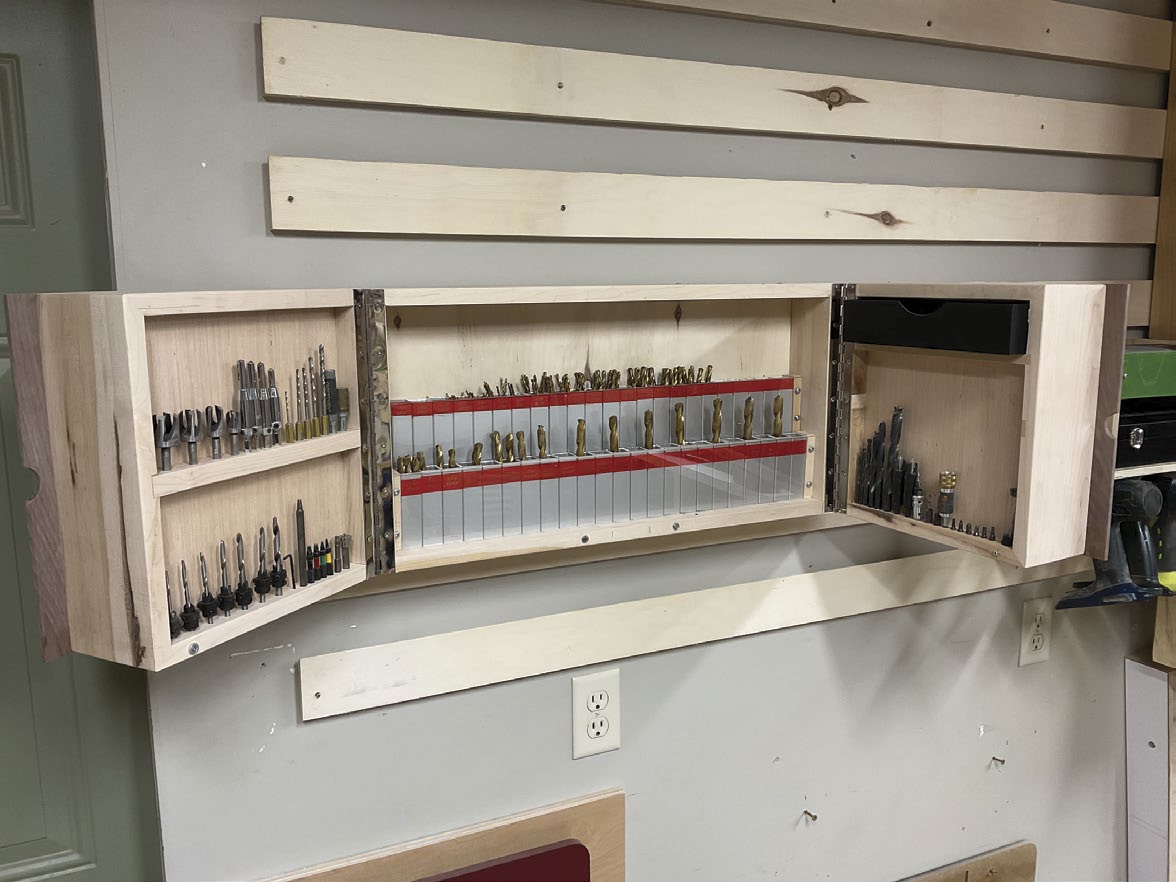
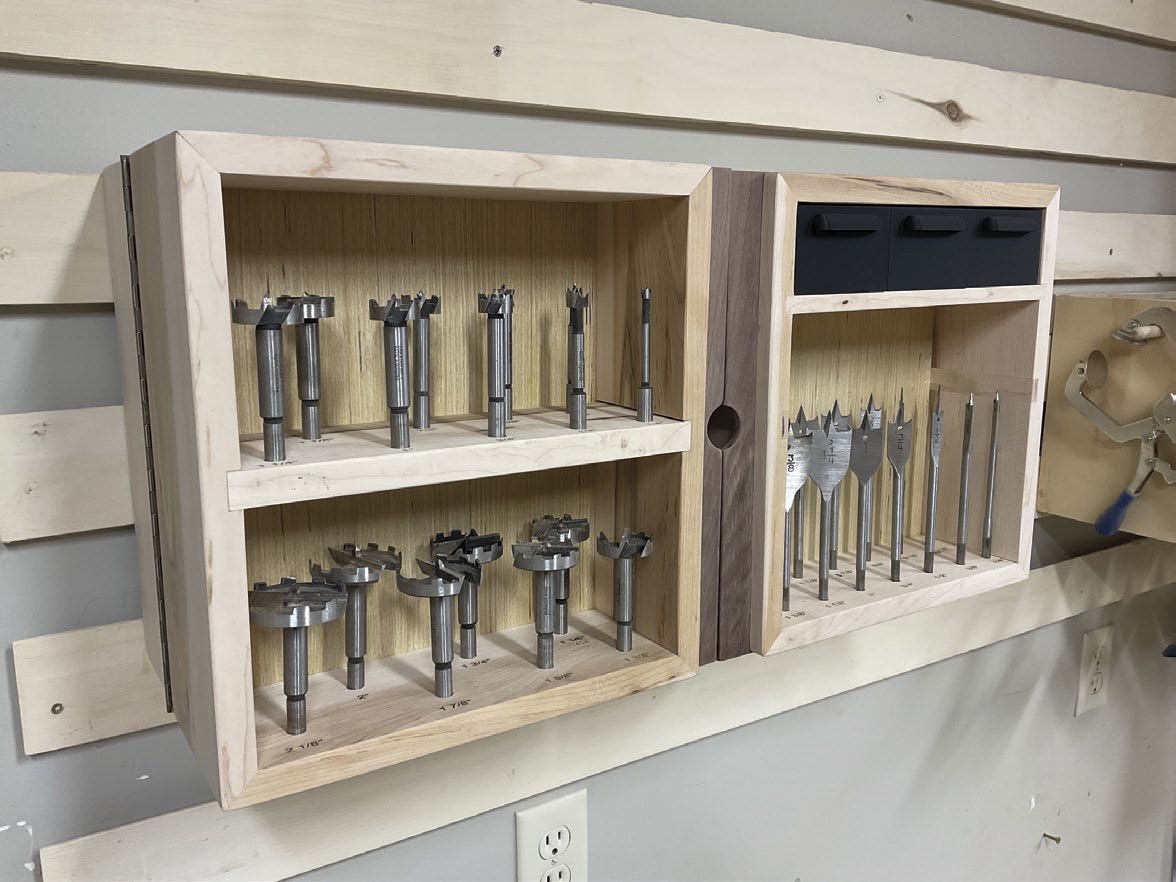
Multi-Layered Storage
A shop isn’t complete without a wide range of sizes and types of drill bits. Campbell has made a dedicated cabinet to clearly store his bits (top). Both outer mini cabinets are hinged and can be moved out of the way to expose not only another layer of drill bit storage, but also more storage on the backs of the two outer mini cabinets (bottom).
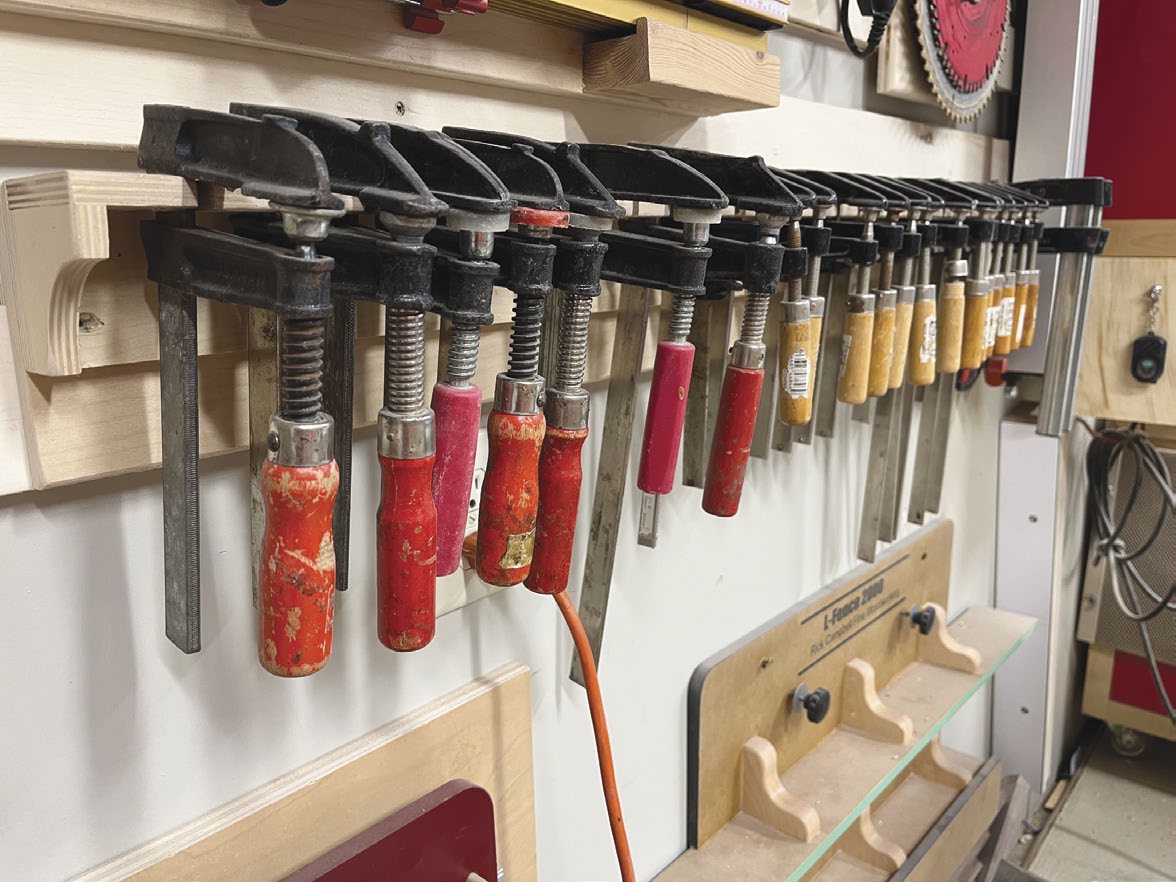
Clamp O’Clock
Everyone has lots of clamps, but the trick is knowing how to store them so they can be grasped easily, not to mention be returned to their home once the glue has dried. Campbell made this simple rack that accepts the bar of each of his F-clamps.
Lots of Options
Bessey K-Body clamps, trigger clamps and C-clamps can all be stored in a variety of ways. A little bit of ingenuity goes a long way when storing them.
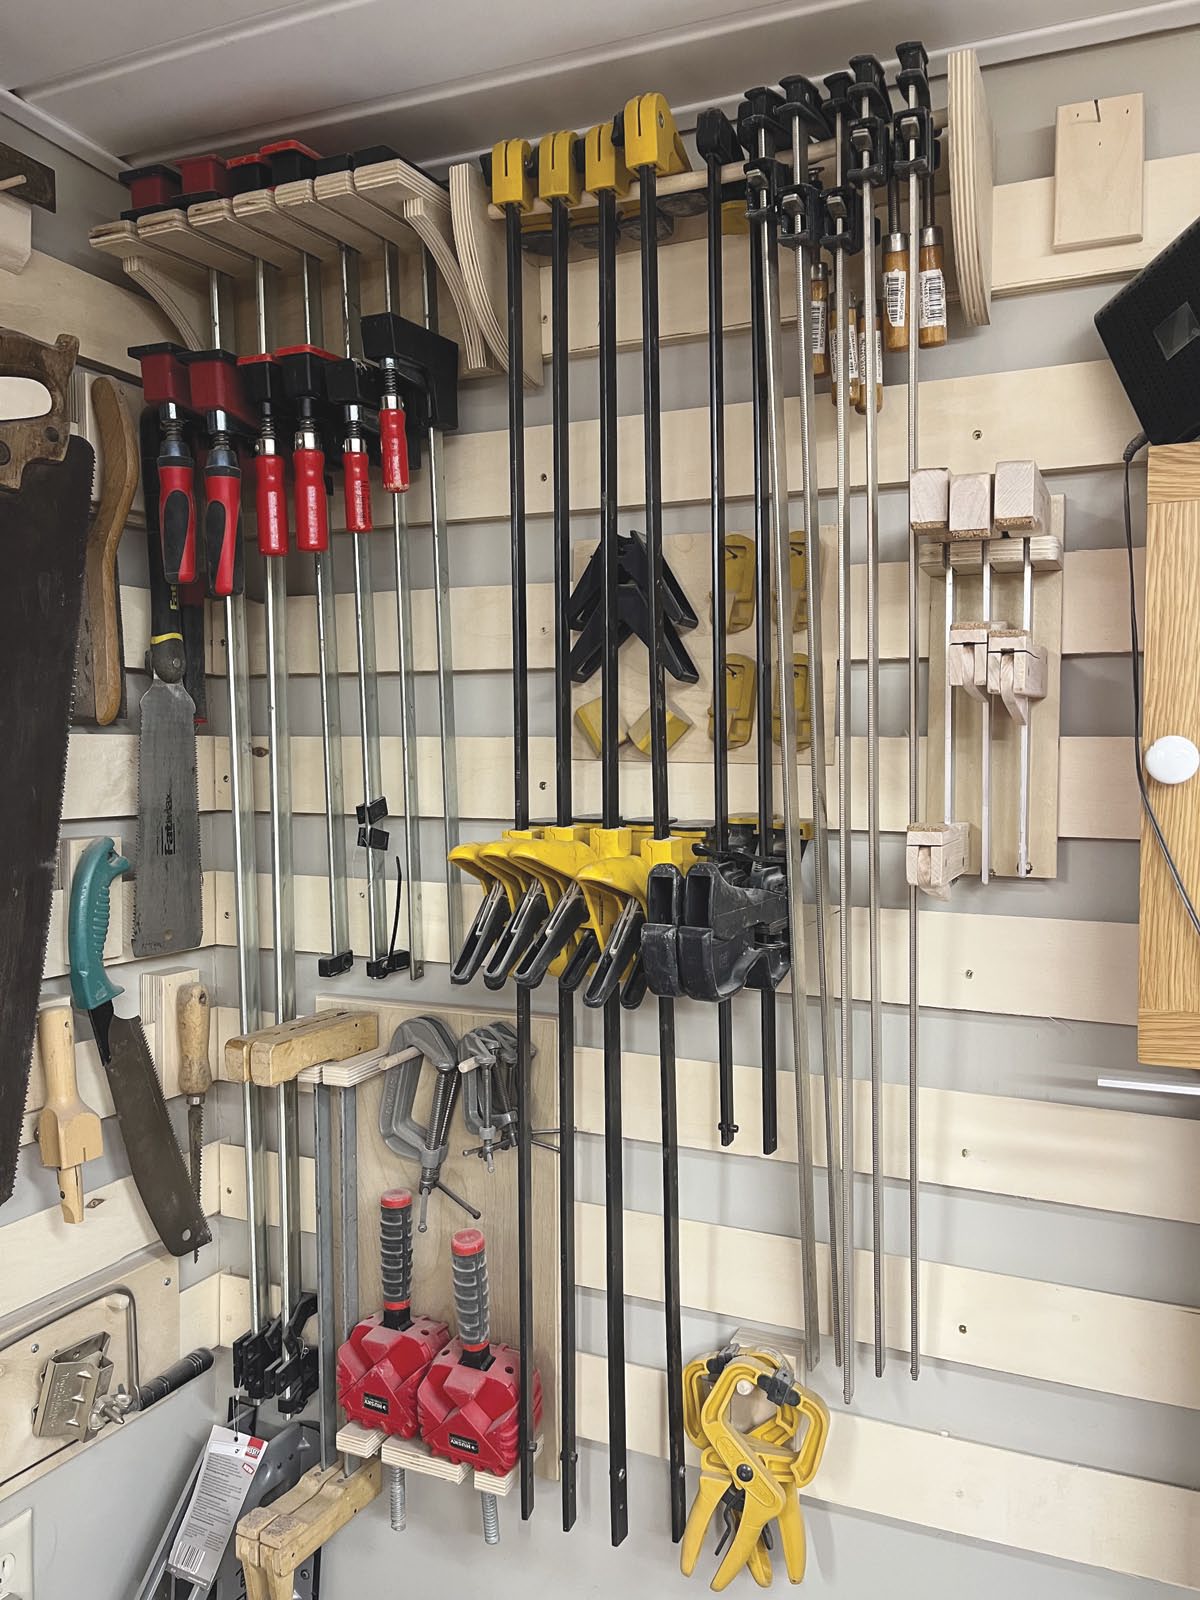
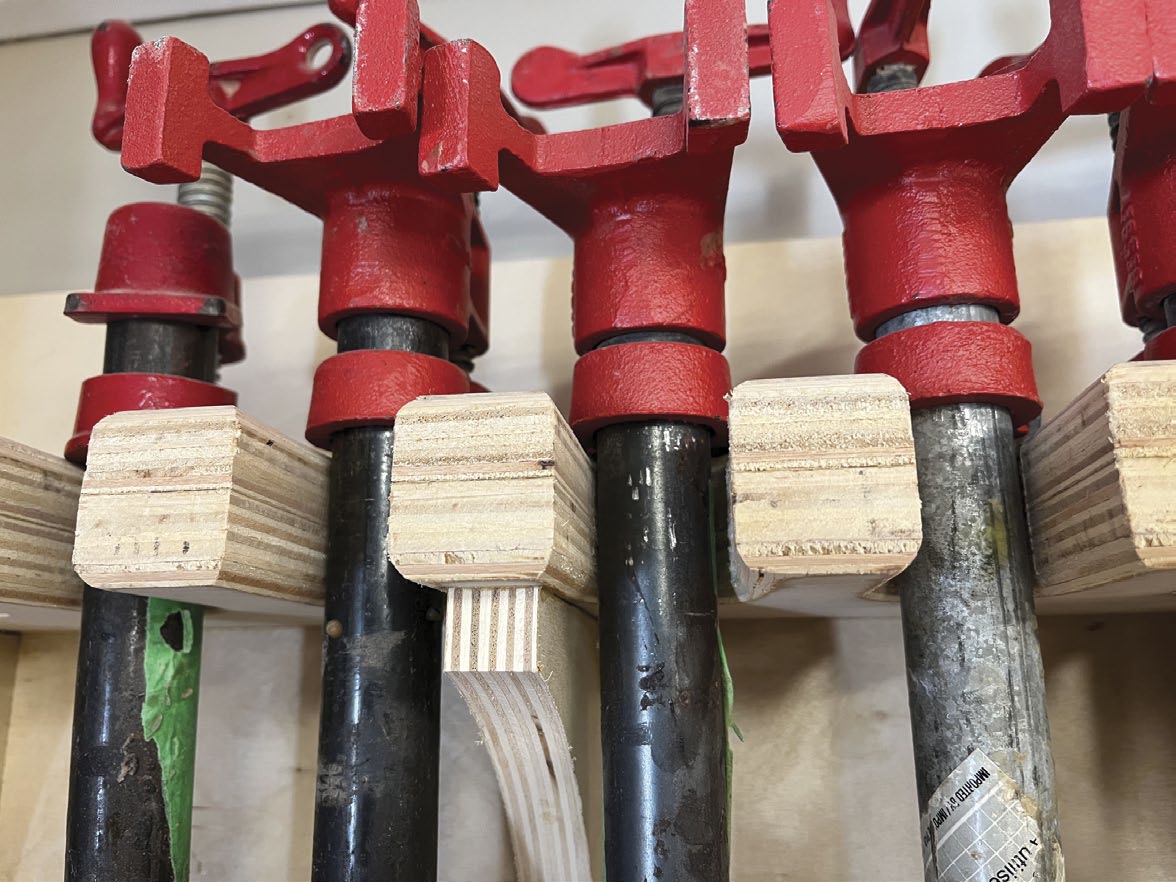
Bar Clamps
The heaviest clamps in a shop are usually bar clamps. Notches in a horizontal piece of plywood, coupled with some plywood bracing, makes for a strong home. Campbell doubled-up the horizontal layer for added strength.
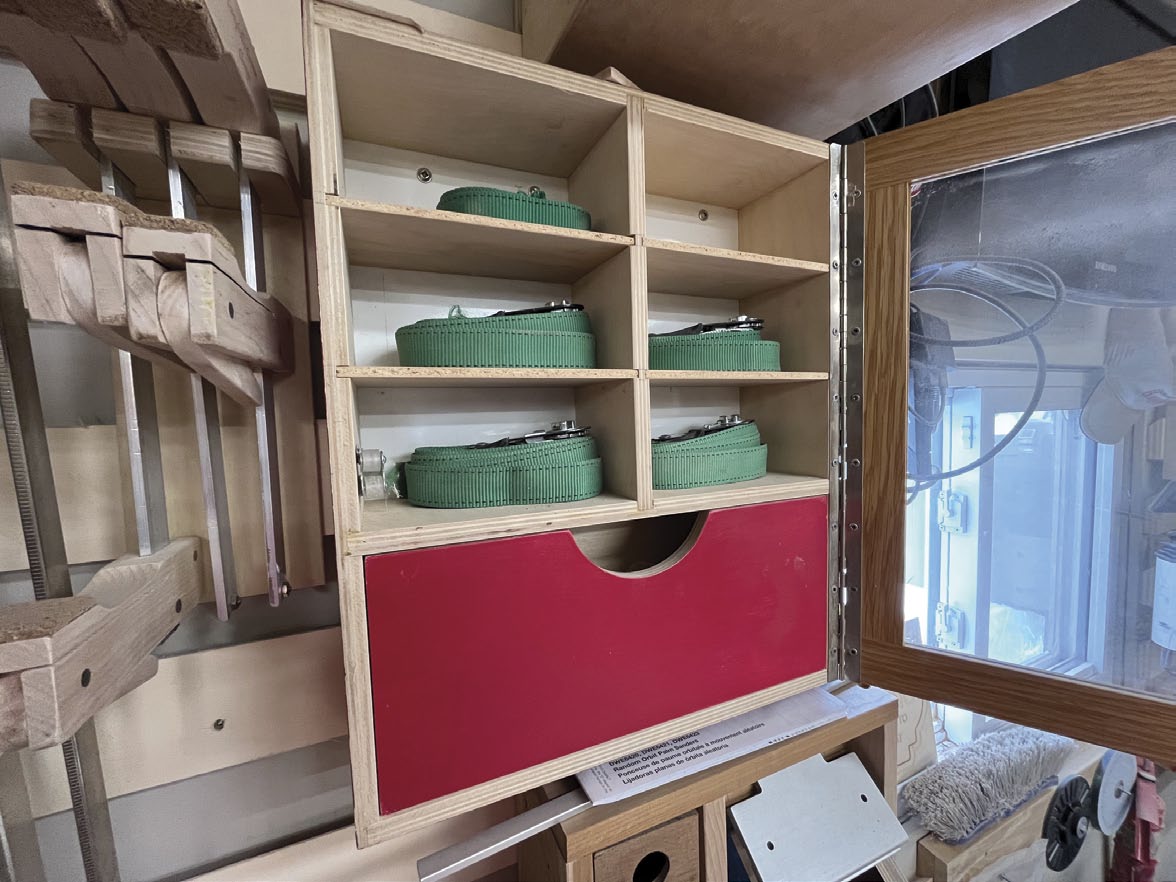
Cubbies for Some Clamps
Web clamps sit patiently in small cubbies until they’re needed.
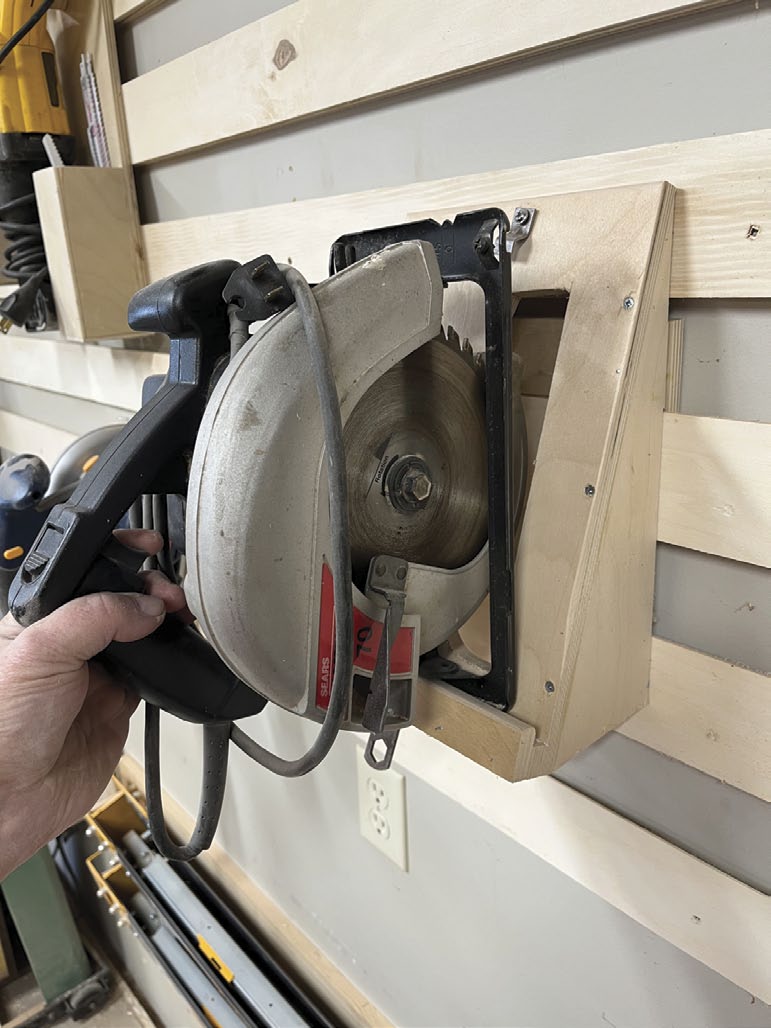
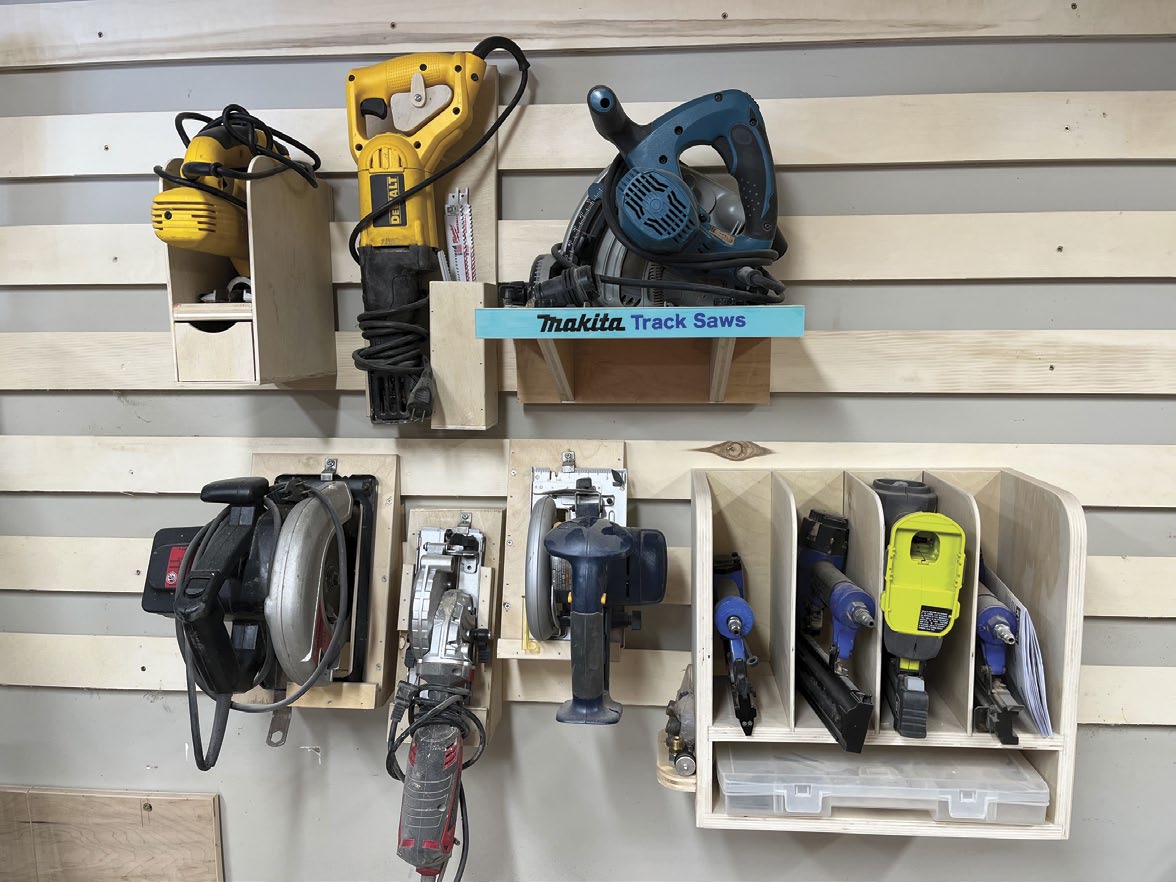
Circular Saw Storage
Campbell created a notch in the base of this fixture to accept the blade on his circular saw. A loosely attached Z-clip holds the far end of the base while the saw is being stored and can be rotated out of the way when he wants to use the saw.
Large Saw Selection
Campbell has stored each of his power saws so they are easy to grasp and return to their homes. His pneumatic nailers also have dedicated homes, with brad nail storage directly underneath.
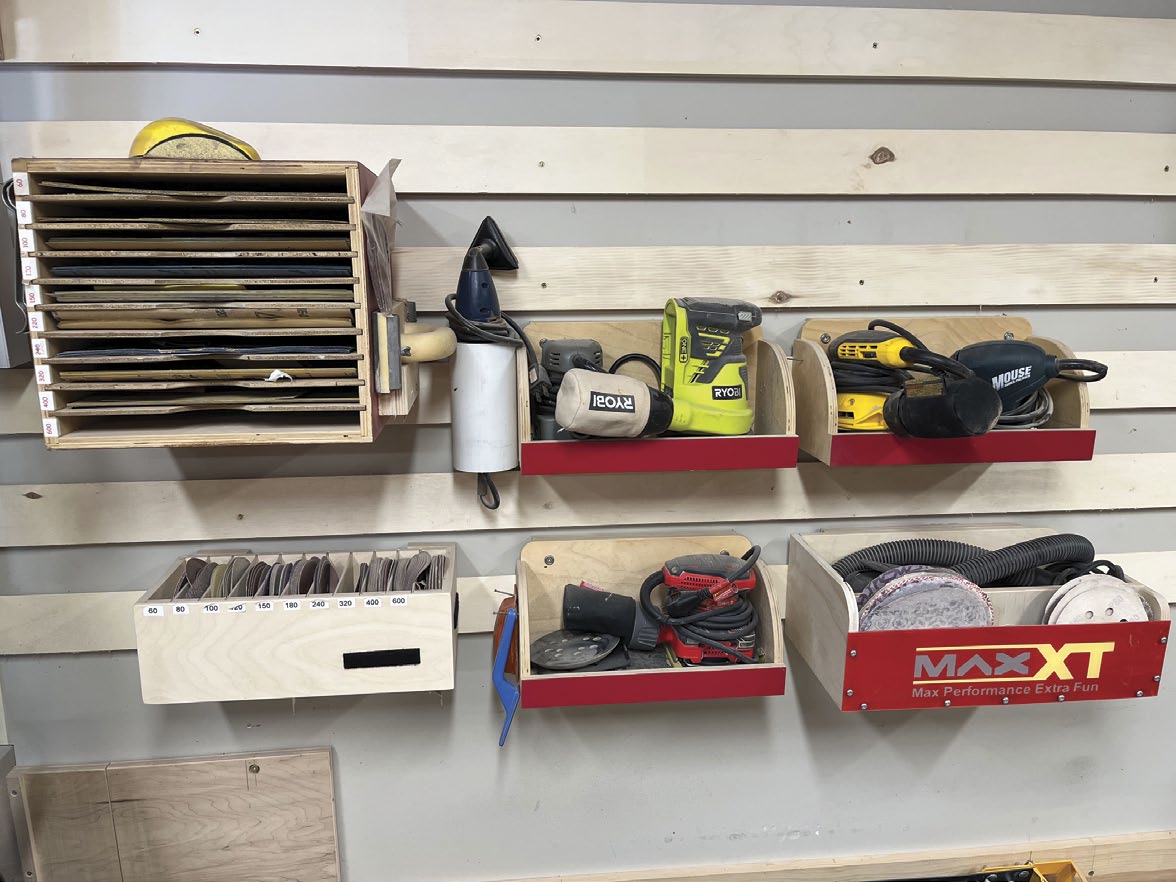
Sanders and Accessories
Trays with sides and fronts allow Campbell’s collection of sanders to sit ready and waiting. Two dedicated boxes store full sandpaper sheets and sanding disks, while labels let him know where to find the grit he needs.
First the rails
You may choose to install just a few French cleats to address a particular storage issue in a specific area of your shop or you could do what I did and cover every wall with rows and rows of rails to achieve a full shop solution.
The width of the rails is up to you, but typically they range between 2-1/2″ to 3″ wide. The most efficient way to cut these parts is to start by ripping lengths of plywood that are a tad more than twice the planned width of the finished rails. For example, if your goal is rails that are 2-1/2″ wide, rip plywood lengths that are 5″ wide plus an 1/8″ to compensate for the kerf of a standard saw blade. Each plywood strip will yield two rails. The next step is to tilt your saw blade to 45° to cut the strips right down the middle. The angle makes finding the exact centre a bit tricky, so use some scrap of the same width to dial in the positioning of your fence before going to town on your stack of rail blanks. It’s not a big deal if the width of the rails doesn’t end up being perfectly uniform because any differences usually won’t create an issue.
To prepare for the installation use a stud finder to clearly mark all the stud locations.
When you mount the rails on the wall, it’s important to use screws that are long enough to anchor the plywood strips into the framing. Typical wall cladding on its own won’t be enough to prevent the screws from pulling out under the weight of a significant burden. Screws that are 3-1/2″ to 4″ long will be sufficient to pass through the rail material, wall cladding and deep into the wall stud.
I prefer to start with the row at the bottom and work my way up. It’s critical that the initial rail be perfectly level because all of the rails that follow will be referenced off this strip. Drive the first screw through the rail and into the stud closest to the mid-point of the strip. In addition to freeing up your hands to work, a screw in the centre will allow you to pivot the rail up or down to make fine adjustments. When you’re satisfied the rail is level, drive more screws into the remaining studs to complete the installation.
Now that you have your initial rail in place, the rest of the job will go more quickly. The spacing between the rails is entirely your choice, as long as the gaps are uniform. If the spacing is not the same between all your rails, you may discover that a cleat fits perfectly in one area but is too wide when you try to move the fixture to another location. The easiest way to achieve consistent spacing is to cut a couple of spacer blocks that are the same width as the gap you’re looking to replicate. With the spacers positioned on the ends of the first rail, rest your next rail on top while you drive screws into the location of each stud. Repeat as you work your way up the wall.
Now for the fixtures
There are a few important factors to keep in mind as you design and build the fixtures for your storage wall. The most obvious consideration is to ensure the cleats are sized to fit comfortably within the rail spacing. I typically leave about 1/4″ of play when I rip my cleats to width.
A few screws are usually all that are required to attach the cleats to the back of the fixtures. Just be certain the cleat is positioned near the top, so most of the weight is suspended below. If the cleat is mounted too low, the fixture could become top heavy, making it unstable on the wall.
To minimize the load on the rails, I always try to make the fixtures as light as possible without compromising structural integrity. For me, this usually means using 1/2″ plywood wherever it makes sense. Even thinner 1/4″ plywood is a good choice for non-structural elements, such as compartment dividers.
I’ve never had an issue with fixtures inadvertently becoming dislodged from the wall, but if this is a concern for you, the assembly can be easily locked in place by driving a screw just below the location of the support rail. If you ever need to relocate the fixture, simply back out the screw and lift the unit off the wall.
When designing fixtures for specific tools, consider building in some extra on-board storage for related accessories and supplies. This way you can bring the entire fixture to the bench while you work, knowing that everything you need to get the job done is close at hand.
Now that you know all the basics, it’s time to unleash your creativity and begin making some sawdust. To get you started, here’s an overview of a few fixtures I’ve constructed for my shop.
Cabinets
French cleats are an excellent choice for hanging tools and accessories on the wall but they’re also a great option for mounting shop cabinets. In fact, all my workshop cabinets hang on rails so that I can easily reconfigure my entire shop layout whenever the need arises. My primary storage cabinets are stuffed full of heavy objects, so for these I took the precaution of using two cleats on the back of each unit to help distribute the load. I also used a frame and panel design to keep the weight to a minimum. The frames are 5/8″ solid stock, surrounding 1/4″ painted plywood inserts. The inserts on the doors are thin chalkboard material to provide a convenient place to make notes or write down critical measurements before they slip my mind. The cabinet backs are also 1/4″ material but I added 3/4″ solid structural supports in behind to beef up the connection with the cleats.
Bench tools
The area of my French cleat wall directly above my workbench is reserved for small hand tools, rulers, squares, and other odds and ends that I reach for on a regular basis. The items I use most often are positioned within arm’s reach at bench height. Those tools I use less frequently are relegated to a location higher up. At the very top I have suspended a LED light fixture from a rail, so it can be easily repositioned if I ever decide to relocate my workbench.
In this busy area of the shop, I strategically arrange as many small items as possible on the same fixture to make the most efficient use of the limited real estate available. For instance, most of my measuring tools are densely packed together on a single long panel and my screwdriver sets are grouped tightly together on just a couple of compact fixtures.
Drill storage
I have come to realize I’m obsessed with power drills; I have way more than I will ever need. Unfortunately, the irregular shape of these tools makes them difficult to hang on the wall.
The solution I settled on was to create holsters from 3″ diameter ABS conduit. Using a jigsaw, I notched out an area at one end of the conduit to receive the drill handle, then I suspended the ABS from the bottom of a horizontal fixture board with a couple of screws. I added some compartments on top to store related accessories and sets of specialty bits.
The long cords on corded drills add an additional challenge when it comes to mounting these tools on the wall. For the corded drills, I screwed a piece of ABS vertically to a backer board and attached a block on the front to wrap the cord around. A thin plywood plate on the face of the block prevents the cord from slipping off. I fancied up the face plates with some painted Plexiglas, but this was an unnecessary frill. I used the same configuration to store my rotary tools and oscillating multi-tool.
If you think I have way too many drills, then I’m even more ashamed to reveal my expansive collection of drill bits. With hundreds of small bits of every size, shape and configuration to deal with, it was a formidable task to come up with an organized storage solution that wouldn’t take up an excessive amount of wall space. After giving the issue some careful thought, I decided the most efficient solution would need to involve a layered approach. This resulted in a cabinet design that has storage on both sides of the doors, in addition to the ample space within. The outside face of the cabinet doors has deep pockets that are used to organize my collection of brad point and spade bits. They’re arranged in a staggered pattern to minimize the area they occupy. I had some room above the spade bits to create a compartment for a few 3D printed drawers that have become the home for my chuck keys and other drill-related odds and ends. These drawers could have just as easily been made from thin plywood. The inside face of the doors has a narrow area reserved for specialty items that don’t take up much room, like counter sink bits and plug cutters.
The interior of the cabinet is filled with tiered rows of marked containers for every possible size of twist bit. The bit containers are made by cutting 1″ hollow aluminum square stock into short lengths. The taller back row has some spacer blocks inserted in the bottom of the containers to elevate the end of the bits above the level of the container lip. I spray painted a narrow band near the top of each row to provide an area to mark the bit sizes with a laser engraver. Alternatively, you could use a label maker or permanent marker to achieve a similar outcome.
Clamps
The old adage that a woodworker can never have too many clamps is certainly true in my workshop. When it comes to storing clamps, the fixture designs were tailored slightly to fit each specific style, but the basic concept is generally the same for all. The fixtures all have some form of horizontal support that’s used to suspend the head of the clamps. For my F-clamps, the support is notched along the edge to receive the neck of the bar. When it comes to my K-Body and quick-release clamps, I simply hook the heads over a long horizontal dowel. To accommodate my pipe clamps, I drilled out curved notches in the support rail that exactly fit the diameter of the round pipe shafts. Clamps tend to be very heavy, so all of the racks have corner bracing on the ends for added support.
My ratcheting web clamps required a completely different solution. For these I constructed a small cabinet with divided cubbies to store the individual clamps and a drawer at the bottom for the related accessories.
Saws
Like my collection of drills, the circular saw, track saw, reciprocating saw and jigsaw have irregular shapes that make them a challenge to hang on the wall.
The fixtures for my circular saws are all designed with an angled platform that includes a narrow opening to accommodate the protruding blade and blade guard. A slotted cleat captures the edge of the tool base at the bottom and a metal bracket pivots into position to hook over the baseplate at the top. To remove the tool, I simply swivel the bracket out of the way and lift the saw off the fixture.
My track saw sits flat because the blade fully retracts, so all that was required here was a supported horizontal platform with a lip around the perimeter to prevent the tool from sliding off.
The storage for my reciprocating saw consists of a flat vertical panel with a thick block attached near the top that’s used to suspend the saw by the handle. The block is shaped to match the profile of the handle opening and a plywood catch rotates into position to hold the handle securely in place. A small plywood bin was added to one side to store extra blades.
To house my jigsaw, I created a narrow-walled corral with a gap on the inside of the base to receive the protruding end of the blade. The sides are thin 1/4″ material to keep the weight down but the back and horizontal base are both beefy 3/4″ plywood to provide the necessary structure for the assembly. Underneath I added a small drawer to store extra blades. Although they’re not in the category of saws, I used a similar concept to create a series of storage bays for my collection of brad nailers. Rather than a drawer underneath, this unit has an open slot to receive a storage container full of supplies.
Sanding
The construction of the fixtures for most of my power sanders is similar to the design for the track saw – a horizontal platform with a lip on the edge to retain the tool. The only exception is the fixture for one of my random orbital sanders that has a particularly long handle and a cumbersome vacuum hose to deal with. For this tool I constructed a cleat-mounted box, large enough to accommodate both the sander and coiled hose. On the front of the box I added a slot for extra sanding pads and disks. A basic box attached to a cleat is an effective solution that can work for a number of applications around the shop.
Most of my sandpaper supplies are stored in a pair of boxes with rows of slots to separate the various grits. I marked the grit size on the edge of each slot, so I can quickly identify the particular sheet or disk that’s required. The boxes are constructed from 1/2″ plywood, with 1/4″ dividers filling the interior.
Final thoughts
French cleats are just one option when it comes to hanging tools and supplies on shop walls, so you should consider all the possibilities before choosing the storage configuration that works best for you. If you do decide to give French cleats a try, just be forewarned that organizing your shop with these fixtures can become addictive, but that may not be so terrible if the end result is an adaptable and efficient shop layout that will serve you well for years to come.

Rick Campbell - finrtc@gmail.com
Besides being an obvious dead ringer for Brad Pitt, Rick has written well over a hundred project articles for various North American woodworking publications and enjoys taking every opportunity to make sawdust in his London, Ontario, workshop.